AWS Contact Center
Best practices for using Amazon Connect audio optimization for Citrix
Real-time media services running within virtual desktop infrastructure (VDI) environment, such as Citrix, can experience audio quality issues due to the resource intensive nature of processing the media on the server(s). Implementing Amazon Connect audio optimization for Citrix enables you to improve audio quality, reduce host server resources and lower cost per agent.
VDI sessions are not optimized for processing audio and video as agents typically would use non-resource intensive client applications or browser-based services through their VDI session. If an agent is loading an inventory systems, CRM or order management webpage and it takes 1 or 2 seconds to load, that could be adequate for the customer journey, but with real-time communications milliseconds matter.
Processing real-time communication on VDI solutions require a lower session density per server, resulting in increased costs through the requirement of more physical server resources and therefore a higher cost per agent, increasing the overall cost of contact.
Solution overview
In this blog post, you will learn how to build and deploy an Amazon Connect audio optimized Embedded and Custom CCP for use on Citrix Virtual Desktops, to deliver an optimal audio quality.
With Amazon Connect audio optimization for Citrix, that utilize the Amazon Connect Connect RTC JS and Amazon Connect Streams JS libraries, the media processing is offloaded to the local host machine, improving audio quality though reducing the server processing overhead of encoding and decoding audio streams and allowing for a higher session density, lowering costs.
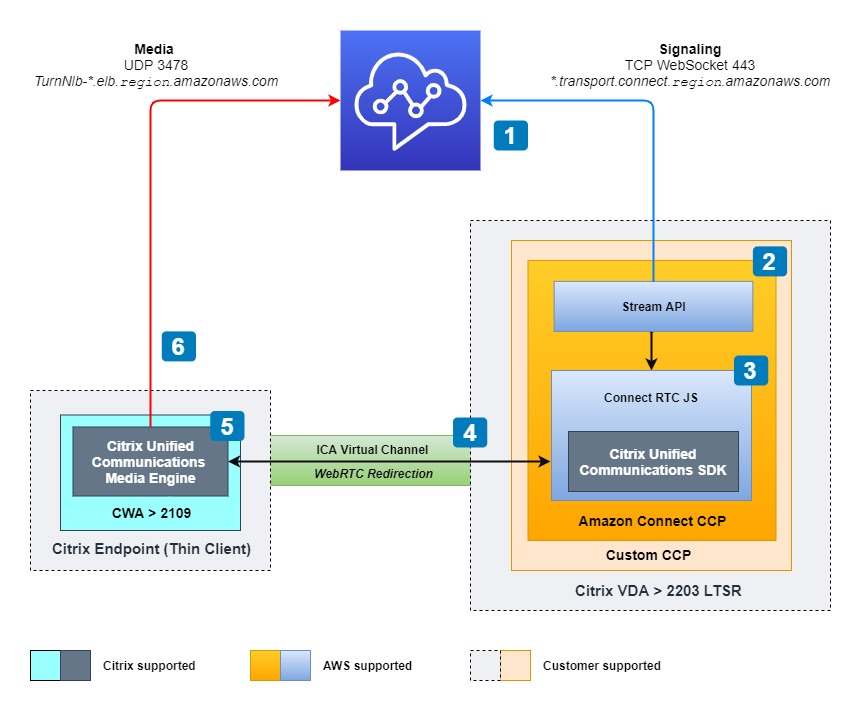
Figure 1. Component Architecture
- Call enters Amazon Connect
- Amazon Connect notifies the CCP of the call
- CCP uses Amazon Connect Steams.js and Amazon Connect Connect-RTC.js which contains the Citrix Unified Communications (UC) SDK
- Citrix UC SDK communicates with Citrix UC Media Engine
- Citrix UC Media Engine establishes audio connection with Amazon Connect
- Audio traverses from local host machine to Amazon Connect
The Amazon Connect Connect RTC JS manages the loading of the Citrix Unified Communications SDK that is required to redirect the communication from the browser to the Citrix Unified Communications Media Engine for WebRTC actions and provide functionality to interact with the Citrix session too.
The Amazon Connect Contact Control Panel (CCP) enables agents to interact with customer contacts. It’s how agents receive calls, chat with contacts, transfer them to other agents, put them on hold, and perform other key tasks. The Embedded CCP sample embeds the Amazon Connect CCP into the web application, where as the Custom CCP hides the Amazon Connet CCP and replaces it with your own buttons to control the agents experiance.
Security Disclaimer
Please note that this solution is meant to serve as an example for how you can get started building an Amazon Connect Audio Optimized Embedded or Custom CCP. We recommend performing additional code reviews, functional testing, and IT validation before releasing this solution in a production environment. Always make sure to thoroughly test your solution and follow AWS Security Best Practices.
Deployment walkthrough
Here’s a quick overview of all the steps to be followed in this solution:
- Set up your VDA
- Set up your network
- Download sample Embedded or Custom CCP
- Configure sample Embedded or Custom CCP
- Deploy sample Embedded or Custom CCP
- Approve CloudFront URL
- Update Agent Security Profile
- Test solution
- Validate media redirection
- Clean up
Prerequisites
For this walkthrough, it is assumed that you understand and have access to the following resources:
- An AWS account
- An Amazon Connect instance
- A phone number claimed in your Amazon Connect instance
- A development machine with NodeJS installed
- Installed and configured AWS CLI
Citrix Prerequisites
In order to use Amazon Connect audio optimization for Citrix, your Citrix environment must meet the following system requirements.
Server
Citrix Virtual Desktops and Apps (VDA) service that needs to be version 2109 LTSR or above.
Client
Citrix Workspace Application (CWA) installed on your local machine that is version 2109 or above for Windows, Linux & Mac.
Step 1: Set up your VDA
Citrix WebRTC redirection is not enabled by default on the VDA sessions and you need to add the following registry key in order to allowlist the Amazon Connect Supported Browsers:
- Open Windows Registry Editor inside your VDA session
- Add the Citrix WebSocket Service allow list registry key as follows:
- Restart the CtxHdxWebSocketService using Task Manager to finish the setup

Restart the CtxHdxWebSocketService
Step 2: Set up your network
You need to ensure that your Citrix environment is configured accordingly to the Amazon Connect Admin Guide section to Set up your network.
Citrix VDA
You need to ensure the browser running inside the session on the VDA can access the following Amazon Connect domains, as mentioned in the Figure 3 diagram below all with TCP on port 443.
| URL allow list | *.transport.connect.region.amazonaws.com
*.telemetry.connect. region.amazonaws.com
myInstanceName.my.connect.aws
*.static.connect.aws *.cloudfront.net |
| AWS Region | Replace region with the location of your Amazon Connect instance. |
| Ports | 443 (TCP) |
| Direction | OUTBOUND |
| Traffic | SEND/RECEIVE |
Agent Machine
You need to ensure that the agent machine can establish connectivity to the Amazon Connect Softphone Media service, as mentioned in the Figure 3 diagram below with UDP on port 3478.
| URL allow list | TurnNlb-*.elb.region.amazonaws.com |
| AWS Region | Replace region with the location of your Amazon Connect instance. |
| Ports | 3478 (UDP) |
| Direction | OUTBOUND |
| Traffic | SEND/RECEIVE |
To add specific endpoints to your allow list based on Region, see NLB endpoints.
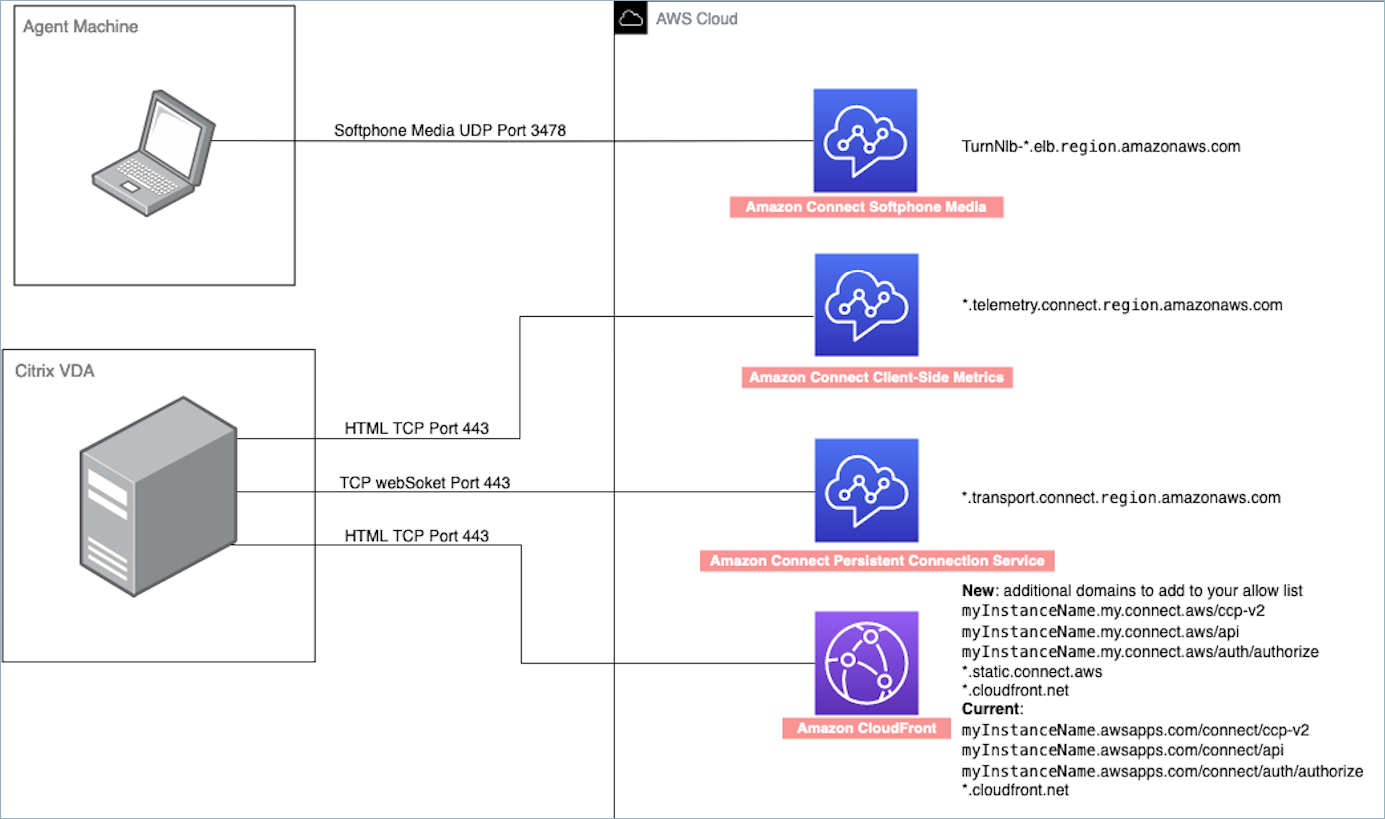
Figure 3. Network paths
You can also reference the Amazon Connect network setup guide for further details on your network setup for Amazon Connect.
Step 3: Download the sample code
In this step we will download a copy of the sample embedded and custom ccp from the Git repository.
Using Git, clone the repository from GitHub:
git clone https://github.com/aws-samples/amazon-connect-audio-optimization.git
Step 4: Configure the Sample CCP
Next you will need to configure the sample solution.
- Navigate to the
Citrixfolder - Navigate to either the
Embedded CCPorCustom CCP - Navigate to
src/js/initCCP.js - Find ccpURL and replace
<YOURCONNECTCCPURL>with your own CCP URL. Your CCP URL will be like https://instance_alias.my.connect.aws/ccp-v2/ - Find connectRegion and replace
<YOURCONNECTREGION>with the region where your Amazon Connect instance is deployed.This is the region your connect instance is deployed to e.g. us-east-1, eu-west-2. See full list of available Amazon Connect Regions
Example

Figure 4. Amazon Connect instance parameters.
Step 5: Deploy the Sample CCP
Next, you will deploy the solution using AWS CDK. AWS CDK will create an Amazon S3 bucket to store the code, configure Amazon CloudFront to serve the content from Amazon S3 and then provide a URL where you can access the CCP.
In your terminal window perform the following actions:
- Bootstrap CDK
cdk bootstrap aws://<<ACCOUNT-NUMBER>>/<<REGION>> - Change to the solution folder for CDK
cd cdk - Deploy the solution
cdk deploy - CDK will ask you “Do you wish to deploy these changes? (y/N)”Confirm you wish to deploy the changes:
y - Copy the CDK Output for the CloudFront CCP URL.Embedded CCP.

Figure 6. Example CDK Output for Embedded CCP URL
Custom CCP.

Figure 7. Example CDK Output for Custom CCP URL
Step 6: Approve CloudFront URL
Now that the solution has been deployed to your AWS account, you need to approve the URL in Amazon Connect.
- Navigate to the Amazon Connect service page in your AWS Console.
- Select your Instance by clicking the Instance alias
- In the menu on the left side of the page, select Approved origins.
- Click on the Add domain button.

Figure 8. Approved domains
- Enter the CloudFront CCP URL from the CDK Output and click Add domain.

Figure 9. Adding your CloudFront URL domain
Step 7: Update security profile for Embedded CCP
As we have to use our own controls for selecting the agent’s microphone and speaker, we need to remove the option to change the audio devices within the embedded CPP.
- Navigate to the Amazon Connect Console for your instance.Your Amazon Connect Console URL will be similar to:https://instance-name.my.connect.aws
- Navigate to the Users menu on the left-hand side of the screen, then Security Profiles.

Figure 10. Amazon Connect console menu for Users / Security profiles.
- Select your Agent security profile.

Figure 11. Agent Security profile
- Ensure that Audio device settings is unchecked.

Figure 12. CCP Audio device settings
NOTE: This step is only mandatory when you use the Embedded CCP, when you use the custom CCP this step is not mandatory.
Step 8: Test the solution
Now it’s time to test your Amazon Connect Audio Optimized CCP for Citrix.
- Navigate to the CloudFront CCP URL in your chosen browser.Embedded CCP.

Figure 13. Embedded CCP loading.
Custom CCP
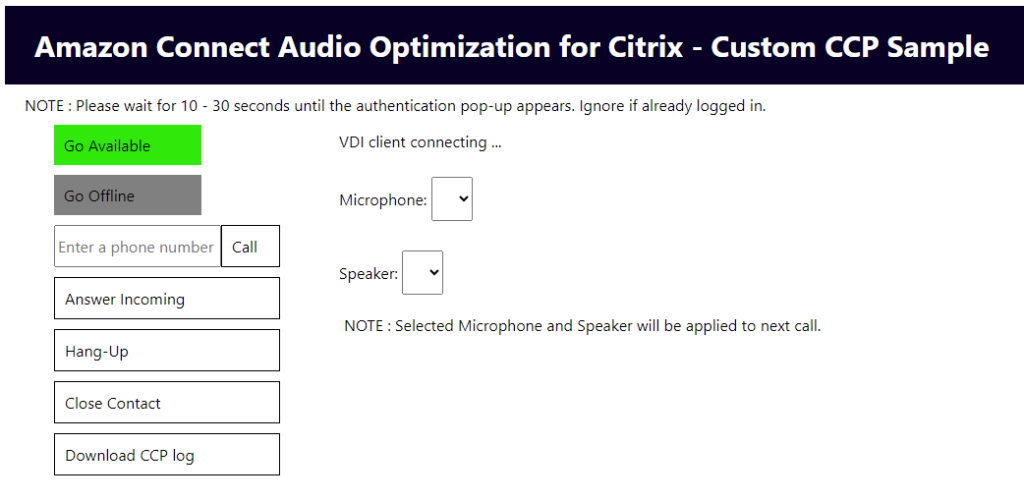
Figure 14. Custom CCP loading.
- Your Citrix session may ask you to permit the use of your microphone and webcam, if you are asked Permit use of these devices.

Figure 15. Permit use of microphone
- The media devices will populate into the drop-down lists for Microphone & Speaker.Embedded CCP.

Figure 16. Embedded CCP connected.
Custom CCP.

Figure 17. Custom CCP connected.
- Enable pop-ups for the site to allow the Amazon Connect login page to load.

Figure 18. Allow pop-ups.
- Login to your Amazon Connect instance.
- Now the CCP has loaded with your agents details and status.Embedded CCP.

Figure 19. Embedded CCP has loaded.
Custom CCP.

Figure 20. Custom CCP has loaded.
Step 9: Validate media redirection
Now we can validate the media traffic is now flowing from the local device and not from the Citrix session.
You will need to have an installation of Wireshark, which you can download from Wireshark.
- Open Wireshark and select the local interface that you wish to capture.
- Add the Filter
udp.port == 3478
Figure 21. Wireshark protocol and port filter.
- Place a call and see the Media traffic flowing in Wireshark through the local interface.

Figure 22. Wireshark results
Sample code highlights
The Citrix Unified Communications SDK (UCSDK) exposes some important functions that can be used within your extended or custom CCP to enhance the useability.
Checking session status
Within your active Citrix virtual environment session, redirection results can be communicated to the browser via an event callback method. The callback mechanism exposes an ‘event’ containing the event name and specific data for the event. Your code can use this method to set up an event callback so that it can be notified of the active session connection status so your code can be up to date with the connection status.
vdiClientConnected Event
Dispatched when Citrix WebRTC redirection is initiated successfully. The event contains various version information, note that ‘vda’ and ‘endpoint’ versions are currently only placeholders.
window.CitrixWebRTC.setVMEventCallback((event)
Example vdiClientConnected Event
type_script indicates CitrixWebrtc.js SDK version
webrpc indicates redirection engine version on client endpoint
webrtc_codecs indicates WebRTC native base version, for example, M76
receiver indicates Citrix CWA version
osinfo indicates client endpoint OS information
vdiClientDisconnected Event
Dispatched when Citrix WebRTC redirection terminates or is unable to establish. As part of the event, you are provided a reason and message that can be used to understand why redirection disconnected.
Example vdiClientDisconnected Event
- Redirection attempt has failed due to web socket connection error.
- Client endpoint has requested to disconnect due to potential problem with HdxRtcEngine.exe or due to the Citrix session disconnect.
- Citrix Workspace Application on client endpoint does not support WebRTC redirection.
- Redirection attempt has failed due to the absence of the Citrix WebRTC redirection status registry key.
Note: WebRTC Redirection Registry Key is set to true within the Amazon Connect Connect RTC library, you do not need to set this in your code.
Audio device selection
To allow an agent to select an alternative audio device from what is set within the Citrix active session you need to know what client endpoint devices are available to select an alternative microphone or speaker device by the agent.
window.CitrixWebRTC.enumerateDevices()
If you do not require your agents to change their audio devices from the default devices, then you do not need to utilise this method. If an agent does need to change their device without implementing this method, they can do so by changing their microphone or headset/speaker devices in their active Citrix session.
You will need to update the sample code in src/js/initCCP.js to change allowFramedSoftphone: true and then pass the VDIPlatform: "CITRIX" parameter within the initCCP and remove the call to connect.core.initSoftphoneManager.
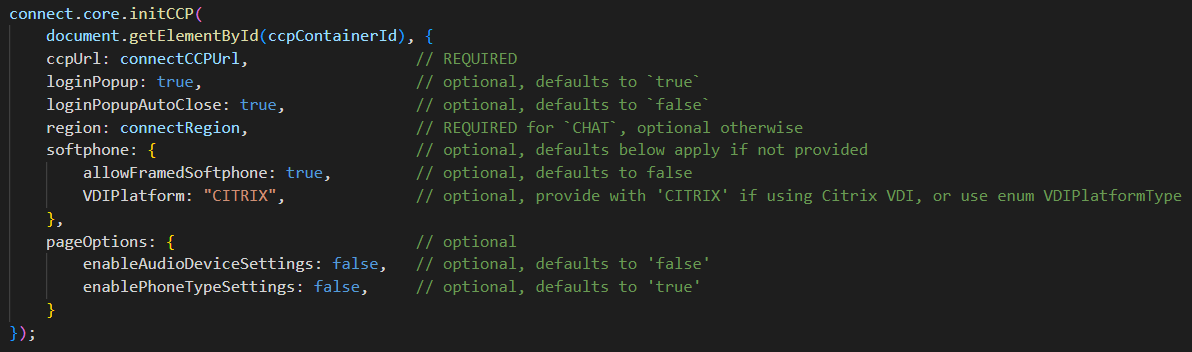
Figure 23. No audio device selection
Triaging your solution
CCP Logs
The Citrix Unified Communications SDK (UCSDK) output logs into the browser console and also logs into the Streams Logger which enables you to access the Citrix UC SDK logs via the CCP Logs either via the embedded CCP using the Download logs link or within a custom CCP using connect.getLog().download().
Citrix Client Endpoint WebRPC and WebRTC Logs
The Citrix WebRTC redirection engine that runs on the client endpoint produces WebRPC and WebRTC logs in a text format. Whenever redirection engine process is launched, if configured properly, a new webrpc.log and webrtc_# log files are created.
The default log level is set to 2 (error), however more verbose debug/trace level logs can be captured by setting the value to 1 (debug) or 0 (trace).
Windows endpoint logs
Log levels can be adjusted via a registry key on the local client endpoint (Not within the Citrix session).
Logs can be found in the directory: %Temp%\HdxRtcEngine.
Linux endpoint logs
Log levels can be adjusted via a config file. Create /var/.config/citrix/hdx_rtc_engine/config.json file and add configuration keys in JSON format e.g.
Logs can be found in the directory: /tmp
Mac endpoint logs
On Mac endpoint, log levels can be adjusted via a command. Execute defaults write command with configuration keys.
If in the event that you need to create a support case you will need to also capture a HAR file and Console logs from your browser session.
Cleaning up
To avoid incurring future charges, you can delete the resources that were deployed in this blog.
cdk destroy
Recommendations
It is recommended that you run the latest version of Citrix VDA and CWA to ensure that you are running the latest bug fixes and features from your Citrix environment.
Known limitations
This optimization has the following known limitations:
- Voice only
- Embedded & Custom CCP only
Conclusion
In this blog post we demonstrated how to optimize Amazon Connect with Citrix Virtual Desktops to deliver an optimal agent and caller experience. We showed how to setup you network to ensure connectivity, how to build an Amazon Connect audio optimized Custom & Embedded CCP for Citrix and how to select Citrix audio devices for the agent.
Additional Information
This optimization is part of the Citrix Ready Unified Communications Program and employs the Citrix Ready Unified Communications Premium integration via the Citrix WebRTC SDK.
Author bio
 |
Dan Manning is a Scaling Specialist Solutions Architect at Amazon Web Services, specialized in Customer Experience, based in the United Kingdom. He guides AWS customers in designing and implementing customer experience solutions that enhance enterprise customer engagement and improve operational efficiencies. Dan enjoys property renovation and riding mountain bikes downhill as fast as possible (while trying not to fall off). |
Ready to transform your customer service experience with Amazon Connect? Contact us.