AWS Contact Center
Improve your customers experience by adjusting your agents’ availability status
Michael Goligorsky, Sr. Solutions Architect, Amazon Connect
As organizations increasingly compete on the basis of great customer experience, contact center performance has become a critical business focus. Contact centers rely on agents to provide great customer service with every interaction. Without productive agents, you risk losing your customers, reputation, and revenue.
Given this, it is crucial for supervisors to monitor agents’ productivity. Amazon Connect now provides an API to update or override the agent status programmatically based on your specific business need. For example, when monitoring calls, you can take a group of agents ‘offline’ to give them inputs on how to handle calls. Or supervisors can send a group of agents to ‘lunch’ based on forecasted schedule feed from your WFM (workforce management system).
In this blog, you will deploy a serverless web application that provides supervisors with ability to programmatically mass update agents’ status. Using a CloudFormation template, you will deploy all of the necessary architecture to support the functionality of this new feature.
Overview of solution
In the following architecture (figure 1), an AWS Lambda function is used to programmatically display the list of agents and provide supervisors with the ability to mass update agents status using Amazon Connect API operations. An Amazon S3 origin bucket and Amazon CloudFront are used to host supervisor dashboard. Amazon API Gateway backed by AWS Lambda function facilitates viewing, searching, and updating agents state information.
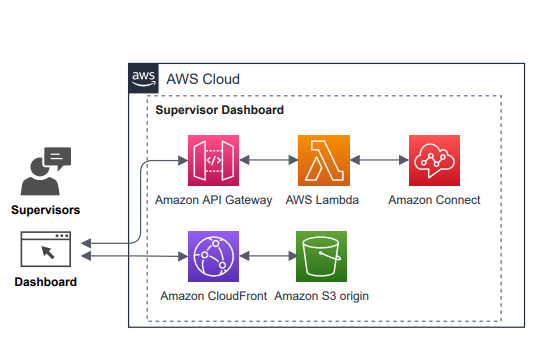
Figure 1: Solution architecture
Note: This is a sample project designed to be easily deployable for experimentation. The AWS Identity and Access Management (IAM) policy permissions use least privilege, however Amazon CloudFront, and Amazon API Gateway resources deployed will be publicly accessible.
We recommend that you take the appropriate measures to secure your Amazon CloudFront distribution and Amazon API Gateway as required.
Prerequisites
For this walkthrough, it is assumed that you understand and have access to the following resources:
- An AWS account
- Access to the following services:
- An existing Amazon Connect instance
- Amazon CloudFront
- Amazon Simple Storage Service (Amazon S3)
- AWS Lambda
- Amazon API Gateway
Walkthrough
To get started, launch the CloudFormation template in the same Region where Amazon Connect instance is deployed.
![]()
Deployment steps
For deploying the solution, you will need the following information:
Once you have the Amazon Connect instance ID, you are all set to deploy the solution.
Overview of the steps:
- Deploy the AWS CloudFormation stack
- Sign in to Amazon Connect as an agent and launch CCP
- Test the solution by updating agent status
1. Deploy the AWS CloudFormation Stack

- Log in to the AWS Management Console.
- Click on the Launch Stack button.
- In the parameters section, enter the stack name, instance ID, and click on Next.
- Click Next again
- Check the box for “I acknowledge that AWS CloudFormation might create IAM resources.”
- Choose Create Stack.
- The AWS CloudFormation template may take 15–20 minutes to create all the resources. Once done, it will show the status as “CREATE_COMPLETE”
2. Launch the custom contact center supervisor dashboard
- Log in to your AWS Management Console and navigate to AWS CloudFormation by typing the service name in the search bar.
- Select the name of the stack that you created.
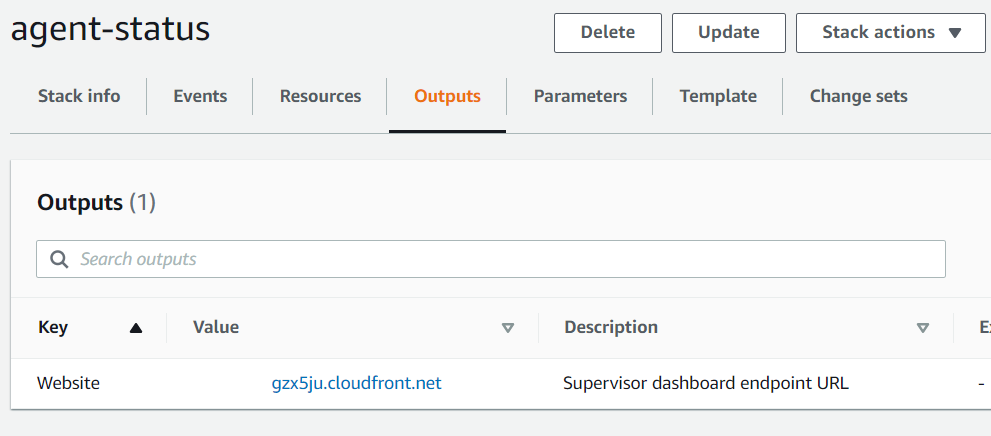
- Go to the Outputs section of the newly created stack. Copy the website URL from the Value column.
- Paste the URL in a new web browser tab and navigate to the supervisor dashboard.
- Log in to the Amazon Connect CCP as a configured agent who can receive calls from the basic queue.
3. Test the solution
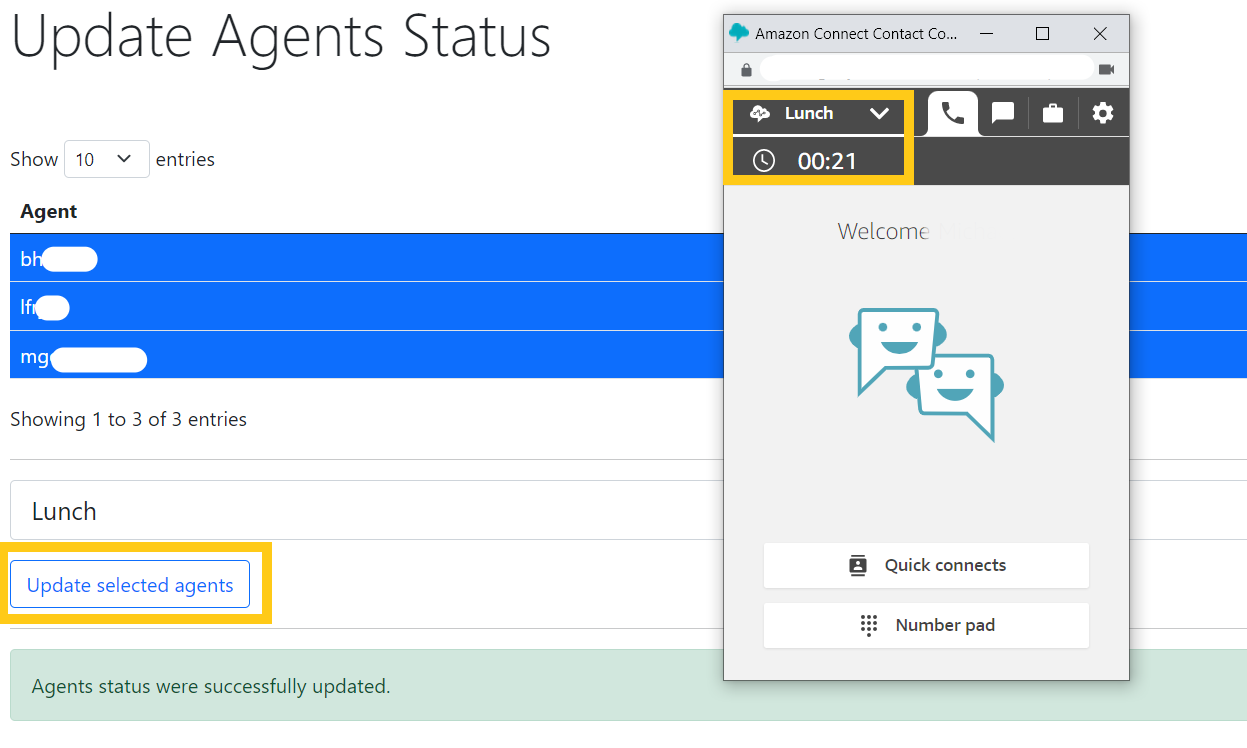
- Verify that you can see agents.
- Select multiple agents by clicking on agent’s name.
- Update agents’ status in the supervisor dashboard (from “Available” to “Offline”).
- Verify that agent’s CCP is in the “Offline” status.
Cleaning up
To avoid incurring future charges, remove all created resources by deleting the AWS CloudFormation stack. Optionally, you can also delete S3 bucket containing source files.
If you created an Amazon Connect instance for this blog, you can delete the Amazon Connect instance in the Amazon Connect service console.
Conclusion
In this blog post, we demonstrated an example how contact center supervisors can monitor agents’ statuses in near-real-time. We provided UI example of how you update agents’ status programmatically using Amazon Connect “PutUserStatus” API. To learn more, visit the Amazon Connect website.
Author bio
 Michael Goligorsky is a Senior Solutions Architect with Amazon Web Services. With 25+ years of enterprise IT experience in Fortune 100 companies, Michael is passionate about diving deep with customers to architect creative solutions to some of the most complex challenges in cloud computing. In his spare time, he can be found traveling the world with his family. Michael Goligorsky is a Senior Solutions Architect with Amazon Web Services. With 25+ years of enterprise IT experience in Fortune 100 companies, Michael is passionate about diving deep with customers to architect creative solutions to some of the most complex challenges in cloud computing. In his spare time, he can be found traveling the world with his family. |