Containers
Implementing a pub/sub architecture with AWS Copilot
Introduction
The AWS Copilot CLI is a tool that since its launch in 2020, developers have been using to build, manage, and operate Linux and Windows containers on Amazon Elastic Container Service (Amazon ECS), AWS Fargate, and AWS App Runner.
In this post, I’ll walk you through how you can use AWS Copilot CLI to easily implement a publisher service and subscriber worker services on Amazon ECS and AWS Fargate, which respectively publish and consume events in a pub/sub architecture.
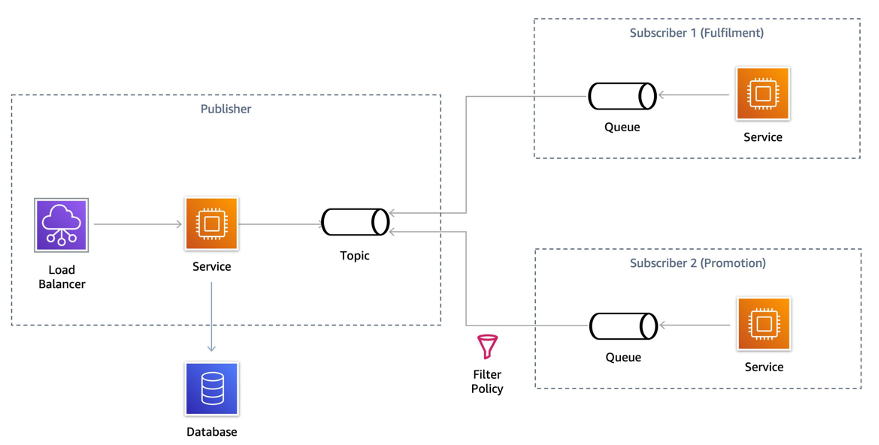
To illustrate this functionality, you’ll create a publish/subscribe (pub/sub) architecture that is based on an architecture very similar to the one covered in this post, but rather than resorting to AWS Lambda functions, you’ll use Amazon ECS services running on AWS Fargate and the resources will be created and managed using the AWS Copilot CLI.
In this post, you’ll pretend you are the owner of an e-commerce platform, and each time there is an order submitted to your platform, a micro-service publishes a message to a topic (signaling a new order) to which several micro-services interested on this message starts processing in the order received in an asynchronous way. You can think of different types of micro-services that could process an order. For instance, an order fulfilment micro-service, an invoicing micro-service, a promotion micro-service that generates coupon codes for orders above a certain threshold, etc. For the scope of this post you’ll just implement a fulfilment micro-service and a promotion micro-service.
The solution architecture is shown in the following diagram.
Solution overview
Publish/subscribe messaging, or pub/sub messaging, is an asynchronous messaging pattern that decouples applications by enabling loosely coupled service-to-service communication on which messages are exchanged without the need of knowing the identity of the sender or recipient. Senders (also called publishers) broadcast messages to message topics, whereas recipients (called subscribers) subscribe to different topics and receive only the messages published to the topics they are subscribed to and match their filtering policy.
Although it’s possible for subscribers to be indefinitely listening to messages from a publisher, it’s good practice to apply a pattern known as topic-queue chaining, which as its name indicates, chains an SNS Topic to SQS queues. If a service runs into an exception or needs to undergo maintenance, then the messages are persisted into a queue. This also has the advantage that the queue can act as a buffer which ultimately behaves as a load-balancer.
The AWS Copilot CLI easily implements a pub/sub architecture with the topic-queue chaining pattern by allowing you to:
- create a publisher service that sends messages to an Amazon SNS topic by simply modifying a service manifest.
- create worker services composed of one or more Amazon SQS queues to process notifications published to the topics, dead-letter queues (DLQs) to handle failures, and an Amazon ECS service running on AWS Fargate that’s able to poll messages from the queue and asynchronously process the messages.
In this post, you’ll implement the following architecture using the Load Balanced Web Service and Worker Service abstractions that AWS Copilot CLI provides us.

Walkthrough
In the remainder of this post, we’ll run through the following steps:
- Clone the sample repository and explore the code.
- Create the environment where our micro-services will live using the AWS Copilot CLI.
- Create the publisher and an SNS topic.
- Create the subscribers, their respective SQS queues, and subscriber policies.
- Verify how the pub-sub architecture you implemented works.
Prerequisites
For this walkthrough, you should have the following prerequisites:
- An AWS account.
- Have the AWS Copilot CLI installed (version v1.22 or higher).
- Properly configured AWS Credentials using the AWS CLI or with environment variables.
- Docker is installed and up and running.
Clone the sample repository
As a first step, position yourself on the directory where you want to clone the Github repository, and perform a git clone.
git clone https://github.com/aws-samples/aws-copilot-pubsubPosition yourself on the directory you just cloned and observe the different subdirectories. You have a folder for each service, one for the publisher and one for the two subscribers named fulfilment and promotion. The folder structure should look like this:
Create an application and environment
As a first thing, you are going to create a logical group of related services, environments, and pipelines you might create. In the AWS Copilot terminology this is called an application.
copilot app init pubsubOnce you execute that command, AWS Copilot uses a folder named ./copilot to hold infrastructure-as-code YAML configuration files, called manifests, which enable you to easily deploy containerized applications on AWS using the AWS Copilot CLI. It also creates some infrastructure roles used for the creation of resources.
Our next step is to create an environment for the application where we deploy our services. With AWS Copilot, it’s possible to create different environments that logically isolate the deployments of our applications in a very easy way. A common use case is to have a test environment and a separate production environment where applications are deployed only when they have been validated on the test environment. For the scope of this walkthrough, you only deploy the services to a testing environment named test that you create with the following command:
copilot env init \
    --app pubsub \
    --name test \
    --region 'eu-west-1' \
    --default-config \
    --profile default
Once you press enter on the command, AWS Copilot uses the specified profile credentials (default profile) to create the necessary infrastructure to host our services. Alternatively, you can omit the profile and you’ll be prompted to select one of the existing profiles under the ~/.aws/credentials file. AWS Copilot uses the selected credentials start to create the resources on your behalf. Once the initial configuration has been made, you could update the defaults by modifying the ./copilot/environments/test/manifest.yaml file, in this case we will leave it as it is, and deploy the environment running the command:
copilot env deploy --name testFor every environment you create, AWS Copilot creates a separate networking stack and Amazon ECS cluster using the AWS Fargate compute engine. This process may take about 2 minutes, so stretch a bit while this process is completed. If you want to know more of what’s being created behind the scenes, then head to the AWS CloudFormation console and follow the progress of the stack that has been created on your behalf, it should be named <appName>-<envName> so in this case pubsub-test.
Create the publisher
Now that your environment has been deployed and you already have an Amazon ECS cluster, you can deploy your first micro-service named publisher which will send messages to an SNS topic.
As a first thing, explore the directory ./publisher. You’ll see that inside there is a Python file that implements the logic and a Dockerfile that’s used to build a container image with the code and dependencies.
The code is very simple, because it leverages Flask and Jinja templates to create a small front-end shown in the image below:
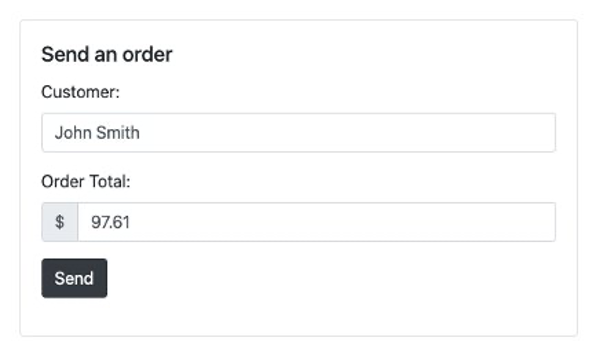
The frontend provides a form with two fields: one for the customer name and another for the order amount. This is just a simple way to trigger the processing of a request. Every time the Send button is selected, the micro-service processes the form, saves the data of the order to a DynamoDB table, and then send a message to an SNS topic so that processing can start asynchronously on the subscriber micro-services.
To implement such a micro-service, you need to create multiple infrastructure components and the process of doing so might be time consuming. To efficiently use our time on developing micro-services, rather than losing time understanding how to create the underlying infrastructure, AWS Copilot helps us on creating an Elastic Load Balancer (either an Application Load Balancer or a Network Load Balancer), an Amazon ECR Repository, a Task Definition, an Amazon ECS task, as well as resources such as SNS Topics and DynamoDB tables with some CLI commands and additional configuration through the AWS Copilot YAML manifest files.
First, we use an AWS Copilot pattern called Load Balanced Web Service and create an Amazon ECS service with an Application Load Balancer (ALB) that allows it to be publicly accessible. You can do so with the following command:
copilot svc init \
    --app pubsub  \
    --svc-type "Load Balanced Web Service" \
    --name "publisher" \
    --port 5000 \
    --dockerfile "publisher/Dockerfile"
When executed, this command creates a private Amazon ECR repository where the container image will be safely stored, and a manifest file under copilot/publisher/manifest.yml, which includes configuration options for the service.
Before you deploy the service, review the manifest.yml file that has been generated. Observe how the manifest file holds the configuration for your service, and you can modify the assigned CPU, memory, and number of tasks among other configuration options.
For this walkthrough, you need to add two extra resources: an SNS topic where the publisher will send messages to, and a database where the requests will be saved.
To easily create an SNS Topic with the AWS Copilot CLI, you can add the following section to the manifest file created for the service.
publish:
  topics:
    - name: ordersTopic
For each topic you declare, AWS Copilot creates a Standard SNS topic, injects the Amazon Resource Name (ARN) of the resource through an environment variable called COPILOT_SNS_TOPIC_ARNS, and gives the Amazon ECS task the appropriate permissions to publish messages to that topic. The environment variable has a JSON structure where the keys are topic names and each key has as a value their respective Topic ARN. Therefore, in Python, you access these dictionary-like structures by writing:
dest_topic_name = 'ordersTopic'
sns_topics_arn = json.loads(os.getenv("COPILOT_SNS_TOPIC_ARNS"))
topic_arn = sns_topics_arn[dest_topic_name]
Note that we are creating a standard SNS Topic, in case you need FIFO (first-in, first-out) ordering, you can also enable this behavior by adding the fifo property in the topic configuration of manifest file. Keep in mind that if FIFO is enabled, then all subscribers must have FIFO SQS queues as well. To keep things simple, we will leave the topics as standard.
To add the database table, you can execute the following command on the terminal:
copilot storage init \
    --name ordersTable \
    --storage-type DynamoDB \
    --workload publisher \
    --partition-key id:S \
    --no-sort --no-lsi
This creates a file named addons/ordersTable.yml under the copilot/publisher directory, which contains configuration of the DynamoDB table that will be deployed using the AWS Copilot CLI.
Now that you have defined the required resources on the manifest and add-on files, you can go ahead and actually create them. The Docker Daemon running locally will be used to build a container image that will then be uploaded to Amazon Elastic Container Registry (Amazon ECR) and used as an image for the Amazon ECS task.
Note: ensure the Docker daemon is running at this point or the command will fail.
copilot svc deploy --name publisher --env testYou’ll see the resource progress creation on the terminal. After the service and its add-ons have been created, you’ll receive an Application Load Balancer DNS name, which makes it possible to access the service across the internet.
Create the first subscriber (fulfilment)
In the previous step, you created the publisher infrastructure and service to send an order; however, we haven’t created the subscriber infrastructure and services to process the orders. Let’s go ahead and create the first subscriber service. As a first thing you create the service definition by running the command:
copilot svc init \
    --app pubsub \
    --svc-type "Worker Service" \
    --name fulfilment \
    --port 5000 \
    --dockerfile "subscribers/fulfilment/Dockerfile" \
    --subscribe-topics "publisher:ordersTopic"
Note that here we’re using the Worker service abstraction provided by the AWS CLI, which provisions an Amazon ECS service running on AWS Fargate, and an SQS queue that acts as a buffer and holds the messages.
Moreover, notice that we have selected the topic we want to subscribe with <svcName>:<topicName>. Alternatively, rather than using the flag argument, you can omit it and when you run the command you’ll be prompted to subscribe to your already existing SNS topic. You can then use the space bar to select the topic and then press Enter:
After the command has been issued, notice a new manifest file has been created for the service under the copilot/fulfilment directory. Observe that there is now a section where the topics subscriptions have been added.
subscribe:
  topics:
    - name: ordersTopic
      service: publisher
With this configuration, the AWS Copilot CLI injects an environment variable named COPILOT_QUEUE_URI that you can use to access the events received on the SQS queue. There are occasions when certain messages that are repeatedly read from the queue which the application isn’t able to process successfully, these messages should be rerouted to another queue usually called a Dead-Letter Queue (DLQ) for manual examination. With AWS Copilot, its very easy to specify to create a DLQ and a redrive configuration. All you need to do is add the following section to the manifest file:
subscribe:
  topics:
    - name: ordersTopic
      service: publisher
  queue:
    dead_letter:
      tries: 3
Once you have modified the manifest, you can deploy the subscriber service into Amazon ECS and AWS Fargate with the command:
copilot svc deploy --name fulfilment --env testCreate the second subscriber (promotion)
In the previous step, you created a subscriber service that processes every message sent to the ordersTopic topic. However, it’s common that some micro-services might not need to process every message they receive, but only some messages with particular characteristics. To do so, many customers create new topics or do some pre-processing on the consumer deciding whether the message should be processed or not. However this isn’t good practice. What best practices dictate is to use a native functionality within SNS that allows you to publish message attributes along the message content so that subscribers can then specify a subscription filtering policy to define which messages they want to receive. SNS only forwards the messages that meet the constraints. With this solution, you don’t need to create extra topics or do unnecessary pre-processing.
The service you deploy in this step is named promotion and is only interested on orders that have an amount greater than $80. In such scenarios, a 20% coupon code will be generated for the next purchase of the customer.
Similarly to the service you deployed before, you create the service by running:
copilot svc init \
    --app pubsub \
    --svc-type "Worker Service" \
    --name promotion \
    --port 5000 \
    --dockerfile "subscribers/promotion/Dockerfile" \
    --subscribe-topics "publisher:ordersTopic"
However, in the copilot/promotion/manifest.yml manifest file you’ll add a new section specifying the filter policy for the SNS topic subscription.
subscribe:
  topics:
    - name: ordersTopic
      service: publisher
      filter_policy:
        amount:
          - numeric:
              - ">="
              - 80
  queue:
    dead_letter:
      tries: 3
Once you have modified the manifest, you can deploy the subscriber service into Amazon ECS and AWS Fargate with the command:
copilot svc deploy --name promotion --env testVerify it works
Now that you’ve created all the micro-services, it’s time to test it works as expected. Open your browser and enter the Domain Name System (DNS) name of the load balancer that was given to you after creating the publisher service. In case you have lost this DNS name you can run:
copilot svc show --name publisher --json | jq '.routes[0].url'or simply run:
copilot svc show --name publisherand copy the value of the variable named COPILOT_LB_DNS.
Every time you refresh the page, a new name and order total will be generated, but you are able to modify the fields if you want.
To see what’s happening behind the scenes, open a terminal window and run the following command:
copilot svc logs \
    --name publisher \
    --env test \
    --follow  \
    --since 1s
This command allows you to stream the logs out of your publisher service so arrange your windows so that you can see the frontend and the terminal at the same time. You might not see anything at the beginning, but as soon as you press the send button you should see a similar output:


To see what’s happening on the two subscriber services, run a similar command to see the logs:
copilot svc logs \
    --name fulfilment\
    --env test \
    --follow  \
    --since 1s

copilot svc logs \
    --name promotion \
    --env test \
    --follow  \
    --since 1s

It’s recommended that you have three terminal windows open at the same time so you get to see how the processing occurs on every micro-service.
Experiment with different amounts and see how those orders which don’t meet the threshold aren’t processed by the promotion micro-service. You can also explore the table items of the DynamoDB table that holds all orders sent to verify they have been persisted.
Cleaning up
To avoid incurring future charges, delete the resources. If you created everything correctly, you should be able to run the command below and all the services and related infrastructure created for this demo will be deleted.
copilot app delete pubsubConclusion
You have easily built a sample pub/sub architecture by leveraging the AWS Copilot CLI. Rather than losing time creating all of the infrastructure and policies needed for your services, you used some service templates and commands that help you deploy all the needed resources, allowing you to focus on what really matters. Creating publisher and subscribers has never been easier, as the AWS Copilot CLI can take care of creating SNS Topics, SQS Queues, Subscriptions, Filtering policies, DLQ, re-drive configuration, and the Uniform Resource Identifier (URI) injection into the service themselves.
AWS Copilot is an open-source tool, and you can check out our incremental features on the public roadmap. We encourage you to get involved by creating GitHub issues or joining the conversation on Gitter!
See you there!