Containers
Using CRaC to reduce Java startup times on Amazon EKS
Application modernization is a focus area for organizations of different sizes and across industries to achieve business objectives such as reduced time to market, improved cost efficiency, and better customer experience. Containers and container orchestration platforms have been one of the key enablers for these modernization initiatives. Many customers standardize on Kubernetes as a containers orchestration platform, and they use Amazon Elastic Kubernetes Service (Amazon EKS) to easily provision and manage Kubernetes clusters in the AWS cloud and on-premises data-centers.
Many of the legacy applications being modernized are written in Java. Furthermore, Java is one of the most popular programming languages used for building new microservices leveraging frameworks such as Spring Boot. Spinning up a new Java-based container sometimes suffers from extended startup time – the time needed for starting the underlying application server and various initialization activities are usually the major contributors to this. Extended startup time means less responsiveness to scale out events. It also negatively impacts operational activities such as worker nodes recycling where several containers are terminated and rescheduled on new worker nodes at the same time and contend on resources.
Coordinated Restore at Checkpoint (CRaC) is an OpenJDK project that provides a fast start and immediate performance for Java applications. It allows for starting a Java application and JVM from an image in a warmed-up form. The image is created from a running Java process at an arbitrary point of time (“checkpoint”). The start from the image (“restore”) continues from the point when the checkpoint was made. Azul initially started the OpenJDK CRaC project and released a JDK with CRaC-support. An alternative OpenJDK distribution with CRaC support is offered by Bellsoft.
In this post, we demonstrate how CRaC can be leveraged in a Continuous Integration (CI) pipeline build using AWS CodePipeline and AWS CodeBuild to create a warmed-up container image of the application. Then, we deploy it into Amazon EKS. We run some comparisons to show the improvement in startup time achieved with CRaC.
You can find the code of the implementation on GitHub.
Solution overview
The following diagram depicts the architecture of a sample implementation for CRaC. It is comprised of the following components:
- A Git repository that contains the sample application source code. AWS CodeCommit, a secure, highly scalable, and fully managed source control service, is used for hosting the repository.
- A CI pipeline that orchestrates the various activities involved in the build process. CodePipeline, a fully managed continuous delivery service that automates release pipelines, is used for building the CI pipeline. CodeBuild, a fully managed CI service that compiles source code, runs tests, and produces ready-to-deploy software packages, is executing the build tasks and producing the final container image that is deployed into the EKS cluster.
- A container images registry where the container image is stored, and retrieved from by the runtime. Amazon Elastic Container Registry (Amazon ECR) – a fully managed container registry offering high-performance hosting is used for container image storing.
- A Kubernetes cluster where the container image is deployed. Amazon EKS, a managed Kubernetes service to run Kubernetes in the AWS cloud and on-premises data centers, is used to provide the needed cluster.

Figure 1: Architecture of the sample implementation
The CI pipeline is extended to run the new version of the code, warm it up, capture a checkpoint using CRaC, and publish a container image with CRaC checkpoint files to the containers registry (Amazon ECR). The application is started on the target environment by restoring it from the checkpoint files rather than starting it from scratch. This leads to significant reduction in startup time, and eliminates the spike in compute resources consumption that is usually observed during Java application startup time.
The high-level flow for the snapshotting approach that applies to Java applications in general is outlined in this post. In the course of the post, we document an approach specific to Spring Boot 3.2 and discuss its advantages and disadvantages:
- After the commit of a new version of the code, the CI pipeline on CodePipeline checks out the source code
- A build run on CodeBuild is initiated and performs the following:
a. Compiles the new version of the code producing a JAR file, and creates an image that contains the JAR file
b. Runs a container from the image with the application running inside
c. Warms up the application by sending traffic that simulates the traffic expected in the target environment, then captures a checkpoint
d. Creates an image that contains the JAR file and CRaC checkpoint files
e. Pushes the images to Amazon ECR
3. K8s manifests that deploy the application are applied to EKS clusters that comprise the target environment. For comparison purposes, two deployments are created: one that points to the image without CRaC checkpoint files where the application is started from scratch, and one that points to the image with CRaC checkpoint files where the application is started by restoring it from the captured checkpoint.
Our example application is a simple REST-based Create Read Update Delete (CRUD) service that implements basic customer management functionalities. All data is persisted in an Amazon DynamoDB table accessed using the AWS SDK for Java V2.
The REST-functionality is located in the class CustomerController, which uses the Spring Boot RestController-annotation. This class invokes the CustomerService, which uses the Spring data repository implementation, CustomerRepository. This repository implements the functionalities to access a DynamoDB table with the SDK for Java V2. All user-related information is stored in a Plain Old Java Object (POJO) called Customer.
Implementation details
As already mentioned, we use CRaC to create checkpoint files in order to save the status of a “warm” JVM in the form of files. This state can be restored by reading the checkpoint files, which leads to a significant improvement in startup performance. The checkpoint files can be saved as an additional layer in a container image. We have also tested other options, such as saving in an Amazon Elastic Filesystem (Amazon EFS) or in an Amazon Simple Storage Service (Amazon S3) bucket.
Persisting the current state of the JVM in a file naturally has certain implications: for example, it may contain secrets or other sensitive data. If the application creates and maintains file handlers or network connections, then they must be closed before checkpointing, and re-established after restoration. Spring Boot fully supports this for the dependencies contained in Spring Boot. However, if external libraries are used, then it must be checked whether CRaC support is implemented, and if not, then additional logic must be written. In our example, we use the SDK for Java V2, which did not have CRaC support when the post was published, so the connection to DynamoDB must be rebuilt after loading the snapshot. Java agents, which are specified in the form of JVM parameters when the application is started, are a special case. Agents are often used for APM tools that automatically instrument the application and generate metrics. These must also support the CRaC lifecycle and implement the corresponding runtime hooks.
The high-level flow outlined previously is detailed in the following sub-sections.
Step 1 – Checking out source
The CI environment (CodePipeline in this case) is trigged by commits on the configured Git repository (CodeCommit repo in this sample implementation). Upon triggering, the source code is checked out, and it proceeds to the next step, which is executing a CodeBuild project.
Step 2 – Build
The CodeBuild project executes the following steps:
Step 2.a – Compiling source code and creating container image
A multi-stage container image build process is used for creating a container image with application JAR. Let’s look closer at the Dockerfile that is used for building the container image:
We use the OpenJDK 17 with CRaC from Azul as the parent image for the build. In the first step, we copy the Maven pom-file and the source code into the image, install Maven using SDKMAN, and start the build. We start the second stage of the build with the same parent image, install a few missing packages, and copy the necessary scripts and the JAR-file we’ve created in the first stage of our build.
Step 2.b – Running the application within the CI environment
docker run is used for running the application within the CI environment. The configuration parameters are passed to the container as OS environment variables through –env / -e options.
A file system available in the CI environment is mounted in the container through –volume / -v options and made available to the Java process running inside the container for storing the checkpoint files, and keeping them beyond the lifetime of the container.
This sample implementation is based on OpenJDK 17 with CRaC from Azul, which is using CRIU for checkpointing/restoring Java processes. CRIU needs control on PID for checkpointing and restoring. Previously, this required CAP_SYS_ADMIN capability, but it is not a best practice to run Java applications with the elevated permissions. The CAP_CHECKPOINT_RESTORE capability was introduced in Linux 5.9 to address this issue.
The Linux capabilities CHECKPOINT_RESTORE (and SYS_PTRACE capability, which is also needed for checkpointing/restoring) are granted through the --cap-add option. A sample docker run command is provided as follows:
Note
As mentioned previously, CAP_CHECKPOINT_RESTORE system capability was introduced in Linux kernel 5.9, while CodeBuild underlying instances are running Linux kernel 4.14. Therefore, we had to run docker in privileged mode inside CodeBuild to capture the checkpoint.
Step 2.c – Warming up the application and capturing the checkpoint
How do we write the snapshot file in our example? After building the container image, it is first started and (ideally) the application is warmed up with a workload that is as close as possible to the productive usage. Only then is the JVM “warm”. After this, the checkpoint file is written with the help of CRaC and CRIU. The relevant section of the bash script that implements this functionality can be seen as follows. This is a general approach that works for all JVM-based workloads independent of the framework used.
This bash-script starts the application, uses siege to warm it up, and jcmd to create the snapshot file.
Step 2.d – Creating a container image that contains the JAR file and CRaC checkpoint files
Now the checkpoint files are in a file system in the CI environment. A new container image is created from the container image that contains the application JAR file in which the checkpoint file has been added as an additional layer.
This Dockerfile for creating the new container image that contains the checkpoint files is shown as follows. The produced container image is used for starting the application in the target environment by restoring the checkpoint files.
Step 2.e – Pushing the container images to Amazon ECR
AWS CLI is used for pushing the built container images to Amazon ECR.
Step 3 – Applying K8s manifests for deploying the application into Amazon EKS
A key point about deployment into Amazon EKS is the Linux capabilities that need to be granted to the Pod where the Java application is restored. As mentioned previously, the CAP_CHECKPOINT_RESTORE and SYS_PTRACE capabilities are necessary. The following YAML snippet shows how to grant these capabilities to the Pod (refer to the GitHub repo to see the complete YAML manifests for deployment into K8s):
Application changes to support CRaC
In this section, we discuss the changes that need to be done in the application to support CRaC.
Implementing the CRaC Resource
CRaC requires that the application closes all open files and network connections before the checkpoint is captured. Additionally, you may need to refresh configurations upon restoration to cater for differences between the environment where the checkpoint is captured and the environment where it is restored (such as database connection URL). To facilitate that, CRaC provides an API that allows for classes to be notified when a checkpoint is about to be made and when a restore has happened. The API provides an interface, org.crac.Resource, which must be implemented for those classes that need to be notified. There are only two methods, beforeCheckpoint() and afterRestore(), which are used as callbacks by the JVM. All Resources in the application must be registered with the JVM, which can be achieved by obtaining a CRaC Context and using the register() method. More details about this can be found in the Azul documentation.
The sample application used in this implementation interacts with DynamoDB through the AWS SDK. First, a client is created, then this client is used for performing operations on a DynamoDB table. Each client maintains its own HTTP connection pool. To capture the checkpoint, the connections in the pool (network connections) needs to be closed. This is achieved by closing the client in beforeCheckpoint() method and recreating it in afterRestore().
The following code snippet shows how the CustomerRepository class – which implements Spring data repository and is responsible for creating, reading, updating, and deleting customer data in a DynamoDB table – is altered to handle CRaC requirements for network connections through the org.crac.Resource interface:
We can see here how we implement the two methods beforeCheckpoint() and afterRestore() of the Resource-interface. Developers with existing experience with AWS Lambda SnapStart should notice that these runtime hooks are also used to save and reload the state. In our case, we close the connection to DynamoDB and re-establish it.
Configuration management
If the checkpoint is captured on an environment (such as a CI environment) that is different from the one on which it is restored (such as a prod environment), and the configurations are loaded before the checkpoint has been captured, then the configurations need to be refreshed as part of the checkpoint restoration to match the target environment.
There are several mechanisms that can be used for configuration management in Java, including OS environment variables, command line parameters, Java system properties, and configuration files (such as application.properties files for Spring applications). The values of the OS environment variables in an application restored from a checkpoint are those of the environment where the checkpoint is captured. Therefore, Java system properties were used for configuration management in this implementation rather than environment variables.
Spring Framework provides Environment Abstraction for facilitating configuration management; and it supports various configuration management mechanisms. This includes OS environment variables, Java system properties, and other mechanisms.
As depicted in the previous code snippet, the afterRestore() method calls the loadConfig() method, which load the configurations from Java system properties through the Environment Abstraction:
Note
If you are using OS environment variables for configuration management, and accessing them through Environment Abstraction, then you do not have to change the code to switch to Java system properties. The Environment Abstraction supports both mechanisms, and it gives precedence to Java system properties over OS environment variables. Check Spring documentation for more details.
The Java system property is set in the command that runs the application with the value that exists in an OS environment variable:
The OS environment is set through the K8s Deployment, and the value is retrieved from a ConfigMap:
AWS credentials management
For the application to interact with DynamoDB, it needs AWS credentials. In the CI environment (where the checkpoint is captured), an AWS Identity and Access Management (IAM) role is assumed, and temp credentials are provided to the application as Java system properties. Therefore, SystemPropertyCredentialsProvider is used as the credentials provider. The target environment is based on Amazon EKS. Therefore, IAM roles for service accounts (IRSA) is used for interacting with AWS API. This requires using WebIdentityTokenFileCredentialsProvider as the credentials provider.
The configuration parameter mode is used to instruct the code on whether to use SystemPropertyCredentialsProvider or WebIdentityTokenFileCredentialsProvider.
Note
Another option for solving this problem is using DefaultCredentialsProvider. In the CI environment (where the checkpoint is captured), the credentials are passed as Java system parameters, in this case the default credentials provider chain uses SystemPropertyCredentialsProvider. In the target environment (Amazon EKS), the web identity token is injected by Amazon EKS, so the default credentials provider chain uses WebIdentityTokenFileCredentialsProvider. DefaultCredentialsProvider checks the configurations and decides which provider to use at class load time. Therefore, the checkpoint has to be captured before then for this option to work.
Some customers prefer to capture the checkpoint on the same environment on which it is restored to avoid the complexity involved in changing configurations and handling AWS credentials.
Spring built-in support for CRaC
Spring has built-in CRaC support since version 6.1 (and Spring Boot since version 3.2), which means, among other things, that CRaC is integrated into the Spring Lifecycle (more information on this can be found in this Spring Framework post). In the documentation you can find the following section: “When the -Dspring.context.checkpoint=onRefresh JVM system property is set, a checkpoint is created automatically at startup during the LifecycleProcessor.onRefresh phase. After this phase has completed, all non-lazy initialized singletons have been instantiated, and InitializingBean#afterPropertiesSet callbacks have been invoked; but the lifecycle has not started, and the ContextRefreshedEvent has not yet been published.”
With this approach, it’s possible to snapshot the framework code but not the application code. Also, we don’t have a fully warmed up JVM that is going to be snapshotted. This means that the startup time is higher compared to the general approach.
The automatic snapshotting process is simpler than the manual one. The Java process is started with the corresponding parameters and after it has finished, a check is made to see whether the files storing the current state are in the file system.
To restore the state and run our app, we can simply use the following:
Externalizing checkpoint files
Some organizations may want to refrain from keeping checkpoint files in the container image, and reasons for that include:
- Reducing the container image size
- Not changing the nature of data stored in Amazon ECR to contain microservices in-memory data, and avoiding revisiting the configured security controls for it
To address these concerns, the following mitigations can be considered:
- Storing the checkpoint files in Amazon EFS, and mounting it in the pod. We observed that restoring the sample Java process takes two seconds when the checkpoint files are stored in Amazon EFS versus 0.3 seconds when the checkpoint files are part of the container image.
- Storing the checkpoint files in Amazon S3, and syncing to the pod filesystem at start-up time. We observed that the sync operations takes six seconds for checkpoint files sized 170 MB on worker nodes of m5.large (a public S3 endpoint was used for this testing).
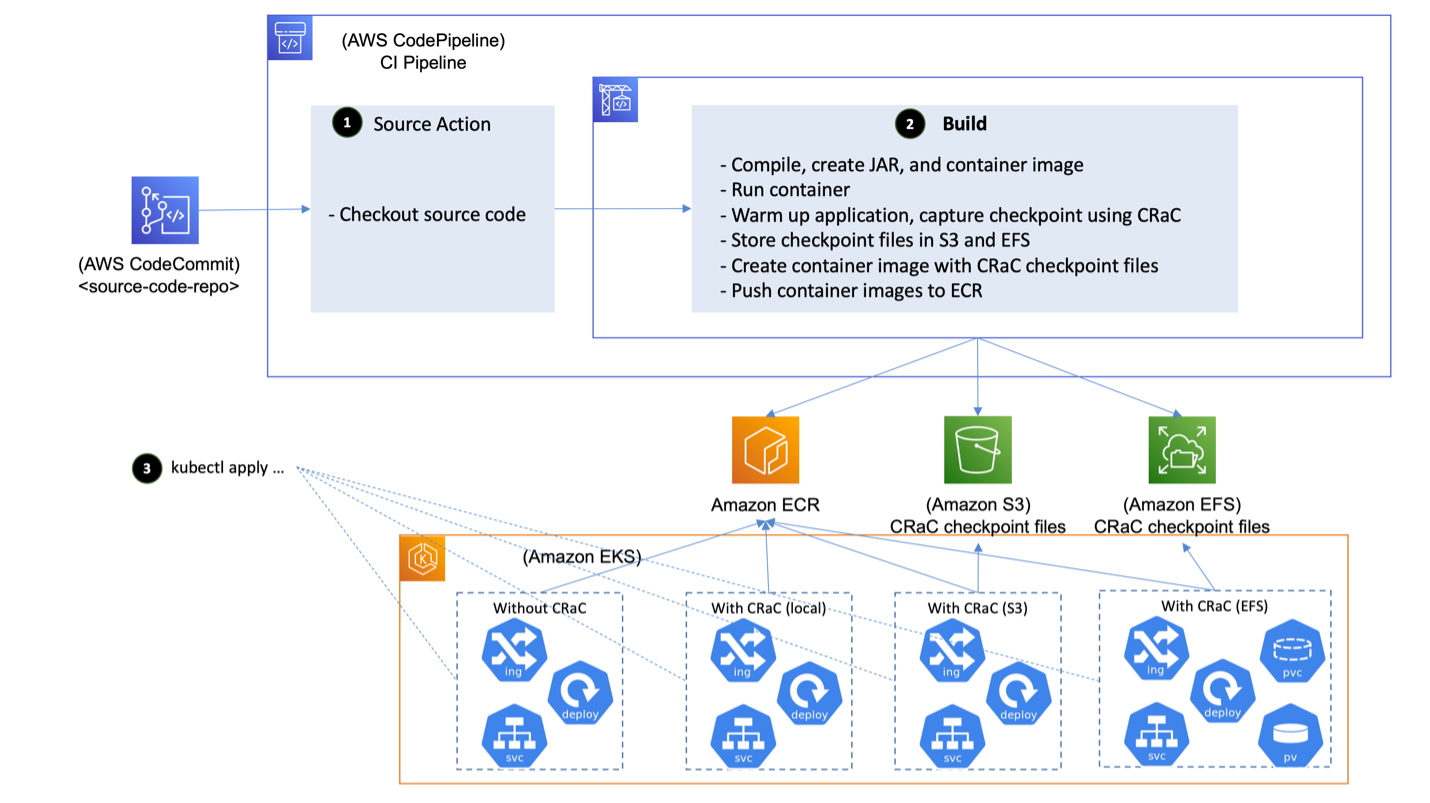
Figure 2: Sample implementation with different storage backends.
Prerequisites
You will need the following to complete the steps in this post:
An AWS Cloud 9 instance with the following components installed:
- AWS Command Line Interface (AWS CLI) version 2
- The AWS Cloud Development Kit (AWS CDK) version 2.122.0 or higher
- npm version 10.3.0 or higher
- kubectl version 1.28
- git-remote-codecommit
Walkthrough
The first step is to create the infrastructure using an AWS CDK application. All necessary steps to create the infrastructure and build the application can be found in the GitHub-repository.
Performance considerations
Let’s investigate the impact of using the Azul JDK with CRaC support as compared to a standard OpenJDK.
Measurement and results
We tested different configurations for our performance tests. First, we tested the following scenarios for the general approach (checkpoint is captured after warming up the application by executing the jcmd command):
- Container image without CRaC
- Container image with CRaC, checkpoint file stored as an additional layer in the container image
- Container image with CRaC, checkpoint file stored in Amazon EFS
- Container image with CRaC, checkpoint file stored in Amazon S3
The results are as follows:
| Deployment | Checkpoint files size (MB, uncompressed) | Image size in Amazon ECR (MB) | Time to download Checkpoint files (Seconds) | Startup time (Seconds) | Total startup time (Seconds) |
| No CRaC | – | 349.97 | – | 12 | 12 |
| CRaC – Container image | 232 |
397.39 (contains CRaC files) |
– | 0.3 | 0.3 |
| CRaC – EFS | 232 | 349.97 | – | 2 | 2 |
| CRaC – S3 CLI | 232 |
463.38 (contains AWS CLI) |
6 | 0.3 | 6.3 |
Second, we tested the same scenarios but with the checkpoint captured automatically through Spring built-in CRaC integration (the checkpoint is captured for the framework only, not the application). The results are as follows:
| Deployment | Checkpoint files size (MB, uncompressed) | Image size in Amazon ECR (MB) | Time to download Checkpoint files (Seconds) | Startup time (Seconds) | Total startup time (Seconds) |
| No CRaC | – | 354.3 | – | 19 | 19 |
| CRaC – Container image | 184 |
389.91 (contains CRaC files) |
– | 2.5 | 2.5 |
| CRaC – EFS | 184 | 354.3 | – | 4.2 | 4.2 |
| CRaC – S3 CLI | 184 |
467.71 (contains AWS CLI) |
7.5 | 2.5 | 10 |
As can be seen, the configuration without CRaC is the slowest. The fastest variant is the one with CRaC (checkpointing after warming up using jcmd command) and the storage of the checkpoint in the image as an additional layer with 0.3 seconds. This is an impressive improvement of 97.5 percent. Using automatic checkpointing through Spring built-in integration with CRaC is slightly slower.
Tradeoffs
As already indicated, CRaC adds considerable complexity to the build process for capturing checkpoints. In addition, when pre-warming the JVM, care should be taken to make sure that a large proportion of the paths in the code are covered in order to achieve the best possible result. CRaC is still a fairly new technology: at the time of writing this post, only the OpenJDK distribution from Azul and Bellsoft supported CRaC. In addition, there are many third-party libraries that do not yet support CRaC. The same applies to Java agents.
An additional challenge is configuration management and AWS credentials management. As explained previously, if the checkpoint is captured in an environment that is different from the environment where it is restored, then some adaption may be needed.
Another challenge is that a checkpoint is only guaranteed to run on a CPU that has the features of the CPU used for capturing the checkpoint. This is because CRaC cannot reconfigure an already running JVM to stop using some of the CPU features when being restored on a CPU that is missing those features. It’s possible to specify a generic CPU target using -XX:CPUFeatures=generic for checkpointing. This means the JVM only uses CPU features that are available on every x86-64 CPU. However, this may have negative performance impacts. You can find more information about this in the Azul documentation.
Cleaning up
After you are finished, the following resources need to be deleted:
- the sample application K8s resources deployed into the Amazon EKS cluster, then the Amazon EKS cluster itself
- the CI pipeline that create the container images and captures/stores the checkpoint (this includes the Amazon ECR repository that stores the container images)
- the AWS Cloud9 instance if it is no longer needed
The exact clean-up instructions can be found in the GitHub repository.
Conclusion
In this post, we demonstrated the impact of CRaC on the startup time of a Spring Boot application running on Amazon EKS. Exactly the same pattern can also be used for Amazon ECS. We started with a typical implementation of a Spring Boot-application without CRaC, added several configurations for the checkpoint location, and measured the impact. In our performance tests, we found out that the configuration with checkpoint file stored as an additional layer in the container image has the biggest impact on the application startup performance.
We hope we’ve given you some ideas on how you can optimize your existing Java application to reduce startup time. Feel free to submit enhancements to the sample application in the source repository.