AWS Database Blog
Amazon Aurora for MySQL compatibility now supports global transaction identifiers (GTIDs) replication
Amazon Aurora with MySQL compatibility is a relational database engine that combines the speed and reliability of high-end commercial databases with the simplicity and cost-effectiveness of open-source databases. It also delivers up to five times the throughput of the standard MySQL community edition.
In this blog post, I provide some guidance to help you migrate from MySQL DBs hosted on-premises or on Amazon EC2 to Aurora MySQL using newly released GTID-based replication feature.
What is GTID-based replication?
A global transaction identifier (GTID) is a unique identifier created and associated with each transaction committed on a database server running MySQL, or a MySQL-compatible engine. It uniquely identifies both the origin server, as well as the transaction.
One of the biggest challenges for database administrators after a failover or downtime is restoring replication in a way that ensures no changes are skipped and no conflicts are generated. As workloads become more dynamic, scalable, and complex, these reconfiguration tasks are increasingly frequent. In turn, they increase the administrative overhead needed to identify positions in the binary log file, thus extending recovery time.
With GTID-based replication, this is no longer an issue. Using the absolute coordinates of GTID, you can automatically track the position in the replication stream, thus reducing the administration overhead and permitting replication with minimal overhead.
GTID-based replication also guarantees complete consistency, because once a transaction is committed on a server, the server automatically skips transactions with the same GTID that have been already processed. This means that a committed transaction on a master is applied only once on the replicas, minimizing network and disk usage.
Until recently, you could use GTIDs used only with Amazon RDS for MySQL. Now, Amazon Aurora MySQL 2.04 (and newer) also supports GTID replication.
When should you use GTID-based replication in Aurora MySQL?
Following are two main scenarios for Aurora MySQL, where we can use GTID-based replication:
- Migrations from MySQL databases hosted on-premises or on Amazon EC2 that use GTIDs.
- Outbound replication to external MySQL-based systems that need to use GTIDs.
In this blog post, I show you how to migrate your on-premises MySQL database with GTID enabled to Aurora MySQL.
The following illustration shows an overview of the architecture.

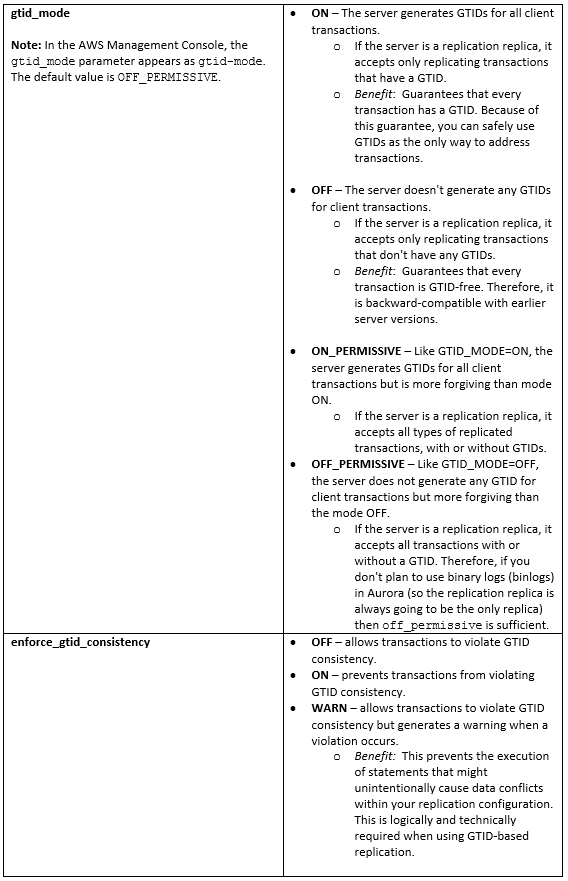
Parameters that enable GTID parameters in Aurora MySQL
For GTID-based replication, use the following parameters in the DB cluster parameter group. A DB cluster parameter group acts as a container for engine configuration values that are applied to every DB instance in an Aurora DB cluster.
Migrating a database with GTID support to Aurora MySQL
The following walkthrough shows you how to migrate a database from an external MySQL server to Aurora MySQL using GTID replication.
Before you begin, extend your internal network into the AWS cloud by using AWS Direct Connect or VPN connection. By using this type of network extension, you can seamlessly connect to AWS-hosted resources in a secure environment. For more information, see Network-to-Amazon VPC Connectivity Options in the AWS whitepaper Amazon Virtual Private Cloud Connectivity Options.
Part 1: Enable GTID and binary logging on your external MySQL server
If your external MySQL server doesn’t already have binary logging (binlogs) and GTID enabled, use the following steps to enable these:
- Enable gtid-mode and enforce-gtid-consistency in the external MySQL server’s configuration file (usually at /etc/my.cnf) within the [mysqld] section.
- Enable binary logs to start capturing changes on the master.For more information, see Replication with Global Transaction Identifiers and Setting the Replication Master Configuration in the MySQL documentation. Let’s walk through how to enable GTID-based replication and binary logging on an external MySQL server.From a terminal/command shell, stop the mysql service.
Edit the my.cnf file (this file usually under /etc/my.cnf).
The following relevant entries in the /etc/my.cnf file.
Note: If the server ID is set to 0, binary logging takes place, but a master with a server ID of 0 refuses any connections from replica. So, it’s important to configure a unique server-id in your replication topology, as described in the MySQL documentation.
Then, start the mysql service.
- While connected to the external MySQL server, verify the binary log and GTID are enabled. When GTIDs are in use, Executed_Gtid_Set shows the set of GTIDs for transactions that have run on the master.
- Create a backup of an external MySQL database: There are many techniques you can use to export and import your MySQL database. In this blog post, I use a tool that is bundled with the MySQL distribution (the native tools). However, you can use third-party utilities such as mydumper and myloader for better performance. For more details, see the mydumper project, and the AWS whitepapers Amazon Aurora Migration Handbook and Best Practices for Migrating MySQL Databases to Amazon Aurora.Before backing up the database, you must first stop any write operations to the instance. The following commands flush all tables and lock the DB in read-only mode.
Then create the dump of external MySQL databases.
After taking the backup of the databases, unlock the tables.
- Now, create a replication account. For security reasons, use this account only for replication.
For more information, see Creating a User for Replication in the MySQL documentation.
- Grant REPLICATION SLAVE privileges to your replication user.
Part 2: Perform the initial data load into Aurora MySQL
In this part, you create the Aurora MySQL DB cluster, and perform a simple initial data load containing the existing data set from your master:
- Create an Aurora MySQL 2.04 cluster or upgrade an existing Aurora DB cluster by modifying the Aurora DB cluster. You can create an Aurora DB cluster using the AWS Management Console, the AWS CLI, or the RDS API.
- Create a custom cluster parameter group and configure gtid-mode and enforce_gtid_consistency:
• gtid-mode – ON or ON_PERMISSIVE or OFF_PERMISSIVE
• enforce_gtid_consistency – ON
Note: It’s preferable to set the GTID mode to OFF_PERMISSIVE unless you plan to enable binlogs in your Aurora MySQL cluster for more complex replication topologies. This setting allows incoming replication from external databases regardless of the GTID settings at the replication source.
Next, associate the DB cluster parameter group with the Aurora MySQL cluster.For details about parameter groups, see Working with DB Parameter Groups in the Aurora documentation. If you change the default parameter group of a DB instance, reboot the DB instance. For more information, see Rebooting a DB Instance.
Verify the version of newly created or modified Aurora MySQL cluster by running the following command.
Before loading the backup into the Aurora MySQL cluster, you might want to create an EC2 instance to copy the dump files to. You then load the data into the Aurora MySQL DB cluster from that EC2 instance. That way, you aren’t limited by the network latency between your local computer and Aurora. Using this approach, you can compress the dump file or files. You then copy them to the EC2 instance to reduce the network costs associated with copying data to Amazon RDS. You can also encrypt the dump file or files to secure the data as it is being transferred across the network.
For better performance considerations, see the AWS Whitepaper Best Practices for Migrating MySQL Databases to Amazon Aurora.Connect to Aurora MySQL Cluster endpoint using MySQL command.
At the mysql prompt, run the source command and pass it the name of the database dump file to load the data into Aurora MySQL.
Part 3: Catch up with changes using GTID-based replication on Aurora MySQL
Because the initial data load can take a while, replication helps catch up your Aurora MySQL DB cluster with changes occurring on the external MySQL server. This later helps you minimize downtime when you decide to cut over your application to use the Aurora MySQL DB cluster.
To catch up with changes using GTID-based replication, take these steps:
- Before enabling replication on Aurora MySQL replica, I recommend that you take a manual snapshot of the replica target for the Aurora MySQL cluster. This way, if a problem arises and you need to re-establish replication, you can restore the snapshot instead of having to import the data into Aurora MySQL replica target again.
- To set up the Aurora MySQL DB cluster as a replica, connect to it using the master user and configure replication to external MySQL server by using rds_set_master_with_auto_position. This stored procedure performs the necessary changes so the DB cluster can connect to the external master and requests binlogs. It also configures replication based on global transaction identifiers.
Note: The stored procedure accepts an additional parameter when used in Amazon RDS MySQL due to support for delayed replication, compared to Aurora MySQL, which does not.
- Then start the replication on the target Aurora MySQL cluster.
Part 4: Verify the replication status on the Aurora MySQL replica
Next, verify that the Aurora MySQL replica can connect to external MySQL master and GTID-based replication is working as expected.
To do so, run SHOW SLAVE STATUS\G; and verify the following four columns, which must be showing these values:
For more information, see Checking Replication Status, Slave_IO_State, and Slave_SQL_Running_State.
The Slave_IO_Running: Yes, and Slave_SQL_Running: Yes, values mean that replication is working as expected. However, replication by definition is an asynchronous process. This means that data can take some time to replicate. The replication lag can thus vary. This variance is predominantly based on the volume of writes on the master to be applied on the replica, and on network conditions between the master and the Aurora replica.
When your Aurora cluster is in sync with the external MySQL server, Seconds_Behind_Master is naturally 0. That means the replica is up-to-date with the external MySQL master server and all the binary logs have been applied on the Aurora MySQL replica.
Part 5: Switch the application to use an Aurora endpoint
Now it’s time to switch your application to use an Aurora cluster endpoint. There are a couple of ways to do this:
- Option 1: If you are not using CNAME record in your application architecture (as described in the Amazon Route 53 documentation), simply stop your external MySQL server. Then point your application to the Aurora cluster endpoint.
- Option 2: After verifying the replication status and ensured that all binary logs have been applied, put the external MySQL server into a read-only state. Then change the CNAME record that your applications reference to an Aurora cluster endpoint (not a reader endpoint).If you use this pattern, be sure to pay close attention to the time-to-live (TTL) setting for your CNAME record (as described in the Route 53 documentation). If this value is set too high, then the hostname pointed to by this CNAME might be cached longer than desired. If this value is set too low, the additional overhead might be placed on your client applications by having to resolve this CNAME repeatedly. Though use cases differ, a TTL of 5 seconds is usually a good place to start.
Summary
In this blog post, we discussed the advantages of GTID-based replication and support of Amazon Aurora for MySQL. There are many use cases for replication to and from Amazon Aurora MySQL databases. In this blog post, we focused on how to migrate an external MySQL database to Aurora MySQL using GTID-based replication.
About the Author
 Vijay Karumajji is a Database Solutions Architect with Amazon Web Services. He works with our customers to provide guidance and technical assistance on database projects, helping them improving the value of their solutions when using AWS.