AWS Database Blog
Auditing for highly regulated industries using Amazon Aurora PostgreSQL
Financial services industry (FSI) customers and other highly regulated industries often need to audit every action made by each database user and administrator as well as identify each person logged in to their databases, usually using their identity provider (IdP). In such cases, the IdP is considered the source of truth for mapping users against people.
Security is our top priority. That’s why we listen closely to our customers to offer both a secure cloud computing environment and innovative security services that are designed to satisfy the needs of the most risk-sensitive organizations.
In this post, we show a proactive solution to a common security challenge for highly regulated industries and describe how to incorporate security best practices for auditing and monitoring users’ actions on data stored in Amazon Aurora PostgreSQL-Compatible Edition.
Solution overview
The solution uses the following AWS services and features:
- Amazon Aurora Database Activity Streams – Used for monitoring and auditing users’ actions
- AWS Identity and Access Management (IAM) – Integrated to the customer’s IdP for authenticating users against Aurora
- AWS Security Token Service – AWS STS enables you to request temporary, limited-privilege credentials for AWS Identity and Access Management (IAM) users or for users that you authenticate (federated users)
- Security Assertion Markup Language – We use SAML assertion tags for linking each authenticated against the database user with a related IdP user
- AWS Single Sign-On – With AWS SSO, you can create and manage user identities in the AWS SSO identity store
- AWS Key Management Service (AWS KMS) – AWS KMS makes it easy for you to create and manage cryptographic keys and control their use across a wide range of AWS services and in your applications.
Aurora provides three authentication methodologies:
The solution presented in this post uses IAM authentication. With this method, you don’t need to store user credentials in the database, and you can connect to the database using a temporary authentication token. An authentication token is a unique string of characters generated on request from an Amazon Relational Database Service (Amazon RDS) API call. Authentication tokens are generated using AWS Signature Version 4. Each token has a lifetime of 15 minutes.
The solution offers the following benefits:
- Network traffic to and from the database is encrypted using Secure Socket Layer (SSL) or Transport Layer Security (TLS). For more information about using SSL and TLS with Aurora, see Using SSL/TLS to encrypt a connection to a DB cluster.
- You can use IAM to centrally manage access to your database resources, instead of managing access individually on each database cluster.
- For applications running on Amazon Elastic Compute Cloud (Amazon EC2), you can use profile credentials specific to your EC2 instance to access your database instead of a password, for greater security.
- IAM database authentication is available for both Amazon Aurora MySQL-Compatible Edition and Aurora PostgreSQL databases.
Furthermore, within the proposed solution, IAM is integrated to the customer’s IdP. This allows customer’s users, authenticated already against the IdP, to log in successfully to the database. This is a key point of the solution because it allows for the linking of actions uniquely logged by the Aurora database activity streams to IdP users that are ultimately uniquely related to persons.
The following user-related entities, are, by default, unrelated to each other from a technical point of view:
- IdP users – The IdP is usually adopted by companies as the source of truth for IT users and their relationships with physical people.
- IAM roles – These are the IAM roles assumed by users once they land onto AWS. Their associated permissions allow them to get the temporary token for logging in to the Aurora database.
- Database users – These are the database users defined within the Aurora database.
This logical separation between these users, defined at the different architectural levels (IdP, IAM, database), represents broken points in the chain of actions that need to be correlated to determine, staring from the audit log, who has performed actions on the database.
The key point of the solution is to link the three entities by taking advantage of the native integration of the services involved, to make sure the IdP user beginning the chain is linked uniquely to the database user.
This allows the actions performed against the database and logged onto the database activity streams audit logs to be uniquely related to the user that is identified against the IdP.
Workflow overview
The following diagram depicts the high-level workflow of the solution. The workflow consists of two main steps: authentication and auditing.

The workflow consists of two main stages: authentication (Steps 1–7) and auditing (Steps 8–9). Each user that needs to authenticate on Aurora performs the following steps:
- The user logs in against the corporate IdP (in this post we use AWS SSO). Because the IdP is the source of truth, it allows you to bind a user to a person.
- The IdP authenticates the user and redirects them to AWS Security Token Service (AWS STS).
- The user is redirected to the AWS STS endpoint, passing their authentication information within the SAML assertion.
- SAML provides the user with the temporary (limited, according to their requirements) privilege credentials for IdP authenticated users to log in against AWS services.
- The user can use the security token for making AWS APIs calls. In this case, they use the
generate-db-auth-tokenAmazon RDS API to get a temporary token for logging in against the Aurora database. After you generate an authentication token, it’s valid for 15 minutes before it expires. If you try to connect using an expired token, the connection request is denied (see Connecting to your DB instance using IAM authentication for more details). With a token, you can avoid managing passwords for your database users. - The Amazon RDS API provides a temporary token.
- The user logs in to the Aurora database using the temporary token.
- When a user logs in to the database, their activities are logged by Aurora against a stream in Amazon Kinesis Data Streams. See Monitoring database activity streams for details about the types of activities that Aurora database activity streams log.
- You can monitor the data stream. You might use multiple solutions for that, this post leverages a custom script that uses the AWS SDK for Python (Boto3) to get messages from the stream or by forwarding the stream messages to other AWS or third-party services (such as AWS Lambda or IBM Guardium).
Configure IdP integration with IAM
To simulate a real-life scenario, we use AWS SSO as our IdP. The integration process consists of the following high-level steps:
- Create a permission set.
- Create the AWS SSO user.
- Set attributes for access control.
- Bind the user with permission sets.
- Connect using AWS SSO.
Let’s review these steps in more detail.
Create a permission set
A permission set is a collection of administrator-defined policies that AWS SSO uses to determine a user’s permissions to access a given AWS account. Permission sets can contain either AWS managed policies or custom policies that are stored in AWS SSO. Policies are documents that act as containers for one or more permission statements. These statements represent individual access controls (allow or deny) for various tasks that determine what tasks users can or can’t perform within the AWS account.
Permission sets are stored in AWS SSO and are only used for AWS accounts. Permission sets ultimately get created as IAM roles in a given AWS account, with trust policies that allow users to assume the role through AWS SSO.
To create a permission set, complete the following steps:
- On the AWS SSO console, choose AWS accounts in the navigation pane.

- Choose Create permission set.

- Select Create a custom permission set.

- For Name, enter
dba. - Enter the following custom policy:
The policy defines that the related users can log in onto the <DATABASECLUSTER> database, using a database user whose name corresponds to the AWS SSO userName field.
- Choose Next: Tags and complete the steps to create your permission set.
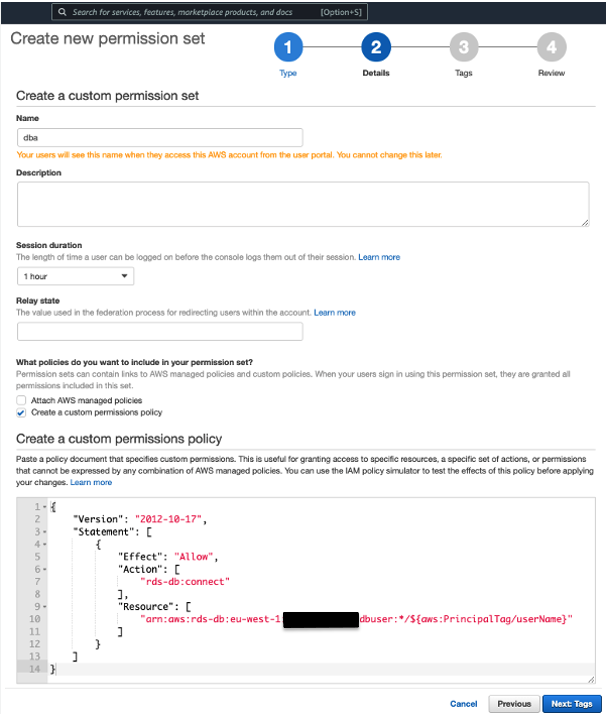
The following screenshot shows our new permission set on the AWS SSO console.

Create the AWS SSO user
To create your AWS SSO user, complete the following steps:
- On the AWS SSO console, choose Users in the navigation pane.
- Choose Add user.

- In the User details section, enter your user information.

- Under Add user to groups, you can optionally add the user to an AWS SSO group. For this post, we skip this step.
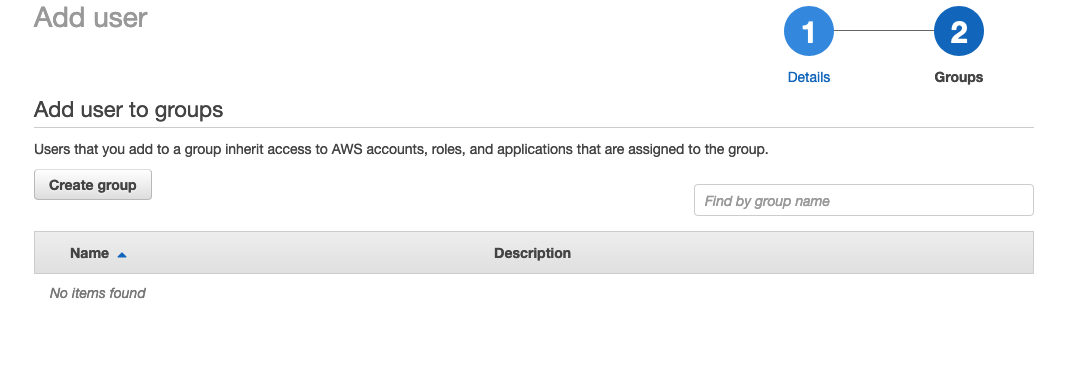
The following screenshot shows the new user listed on the AWS SSO console.

Set attributes for access control
You need to configure the mapping of the AWS SSO user’s tags to pass through the SAML assertion. In this case, we need to configure the userName attribute of the AWS SSO user because we need it to be checked against the database user.
- On the AWS SSO console, choose Settings in the navigation pane.
- Choose Enable next to Attributes for access control.

- Choose View details.
- Add an attribute with key
userNameand value${path:userName}.
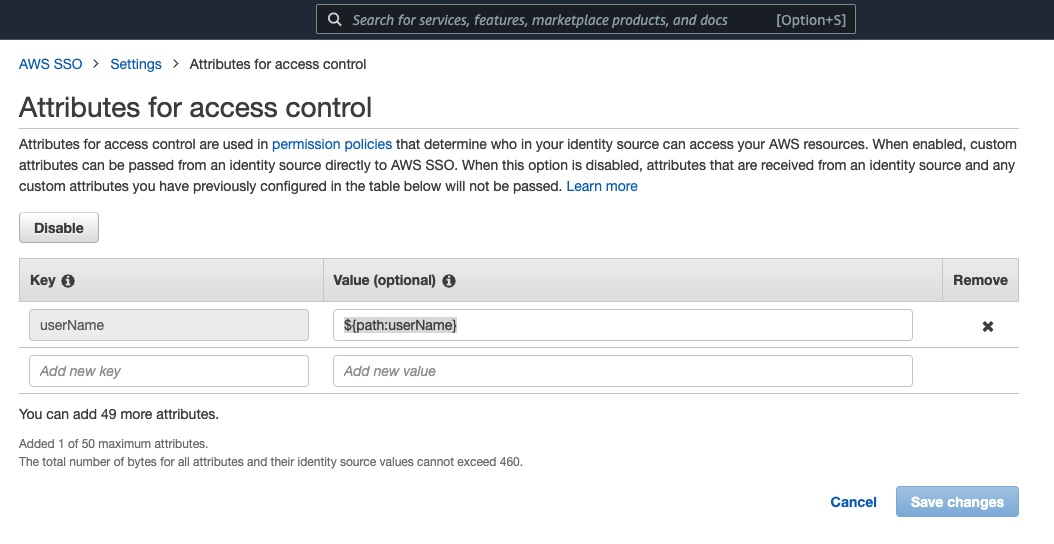
- Choose Save changes.
A message appears on the Settings page that the attributes are now enabled.

Such configuration ensures that the “userName” attribute is mapped against the SAML assertion’s attribute “userName”.
Bind the user with permission sets
You need to bind the user or user group with a permission set.
- On the AWS SSO console, choose AWS accounts in the navigation pane.
- On the AWS organization tab, choose Assign users.

- On the Users tab, select the users to bind to a specific permission set.

- Select the permission set to use.

- Choose Finish.
You can now connect using AWS SSO.

Connect using AWS SSO
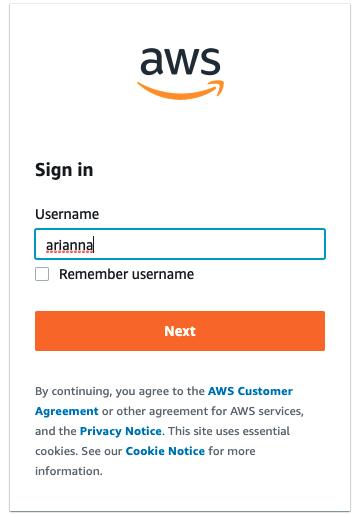
You can now navigate to the Dashboard page on the AWS SSO console and access the user portal. Users can also access the AWS SSO login page without signing in to the console. To connect using AWS SSO, complete the following steps:
- Sign in using the credentials of the user you created.
For your first login, you should use the link you received in your mailbox.

After you sign in, you’re prompted with the list of AWS accounts and related permission sets that are associated to your AWS SSO user.

- Choose the correct account.

- Choose the arrow to expand the account details.
- Choose Command line or programmatic access to get the temporary, limited privilege credentials for AWS services.
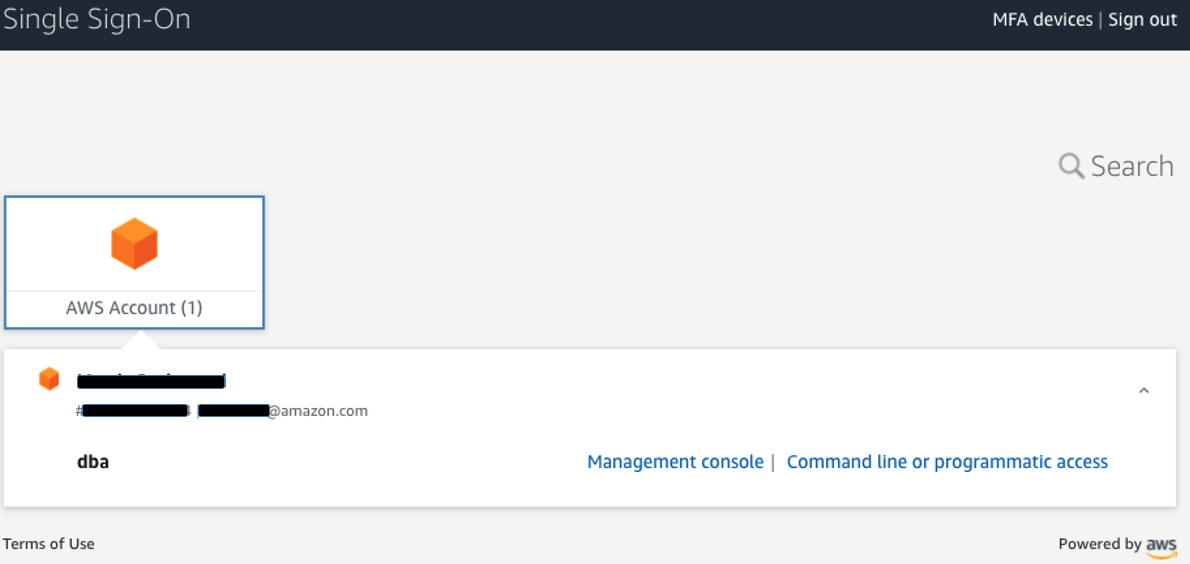
You can copy the credentials into a shell, and you’re now ready to make AWS services API calls, according to the permissions configured in your associated permission set.
It’s now time to log in into the Aurora database. When you have an Aurora cluster available, click on the black box to get the temporary credentials that allows you to get the Aurora token to log in into the database.

Configure Aurora integration with IAM
For every user that needs to log in against the Aurora database via IAM, you have to create a user within the database in advance without storing password.
To use IAM authentication with Aurora PostgreSQL, complete the following steps:
- Enable IAM database authentication in the DB cluster using the AWS Command Line Interface (AWS CLI) as follows:
The placeholder <cluster-identifier> is the name of your DB cluster. For example, we use the following code:
You can also use the AWS Management Console or the Amazon RDS API. For more information, see Enabling and disabling IAM database authentication.
- Connect to the database cluster (with user name and password), create a user with login privileges, and grant IAM role access to the user:
For example, we use the following code:
We can then use the IAM policy created in the previous step to access the database using IAM database authentication. For more information, see Creating and using an IAM policy for IAM database access.
Prevent database users from setting or modifying their password
The solution presented in this post assumes that all database users access the database transiting through their corporate IdP and IAM. This section shows how to prevent users from modifying their password on the database and accessing the database directly with SQL authentication.
You can restrict who can manage database user passwords to a special role. This provides more control over password management on the client side.
You enable restricted password management with the static parameter rds.restrict_password_commands and use a role called rds_password. When the parameter rds.restrict_password_commands is set to 1, only users that are members of the rds_password role can run certain SQL commands. The restricted SQL commands are commands that modify database user passwords and password expiration time. IAM authentication is the only viable option to access the database, except for the primary user, who can always access the database via SQL authentication.

To use restricted password management, your database cluster must be running Aurora PostgreSQL 10.6 or higher. Because the rds.restrict_password_commands parameter is static, changing this parameter requires a database restart.
When a database has restricted password management enabled, you get the following error if you try to run restricted SQL commands: ERROR: must be a member of s to alter passwords.
The following commands demonstrate the user “arianna” logging in to the database and trying to change the password.
Note: The below code requires you to authenticate against AWS as described in “Test the solution” section.
Now that we have created the database user and configured it to log in only through an IAM temporary token, we can assign the necessary privileges to the user and enable the auditing to capture the activities run on the database in near-real time. We remind you to assign the least amount of privileges that are effectively necessary.
We also recommend that you review the post Working with RDS and Aurora PostgreSQL logs (Part 1 and Part 2) for more details about how to work with PostgreSQL logs and tune various parameters to capture more database activity details.
Audit database activity on the database
Database activity streams is a database security technology for monitoring and analyzing database activity. Database activity streams can help businesses address regulatory and industry requirements.
Database activity streams provide a near-real-time stream of the activity in your database cluster. Aurora pushes activities to a Kinesis data stream. The stream is created automatically. You can also configure AWS services such as Amazon Kinesis Data Firehose and AWS Lambda to consume the stream and store the data (see How database activity streams work for more information).
After you capture this information in near-real time, you can monitor and block these activities through rules and alarms.
The solution in this post shows how database activity data is captured. You can then use the integration between this Aurora feature with IBM Security Guardium, McAfee Data Center Security Suite, and Imperva SecureSphere Database Audit and Protection applications.
You can also expand this solution by implementing your own consumer applications for integrating your processing workflows and define a custom end-to-end solution.
Configure a database activity stream
You start an activity stream at the database cluster level to monitor database activity for all database instances of the cluster. Any database instances added to the cluster are automatically monitored. Make sure you meet any prerequisites before getting started.
Database activity streaming requires a customer managed key (CMK) using AWS KMS. This key encrypts the key that in turn encrypts the logged database activity. For more information, see Setup KMS for Database Activity Streaming.
Start the database activity stream
You can choose to have the database session handle database activity events either synchronously or asynchronously.

Choose a CMK other than the default key.
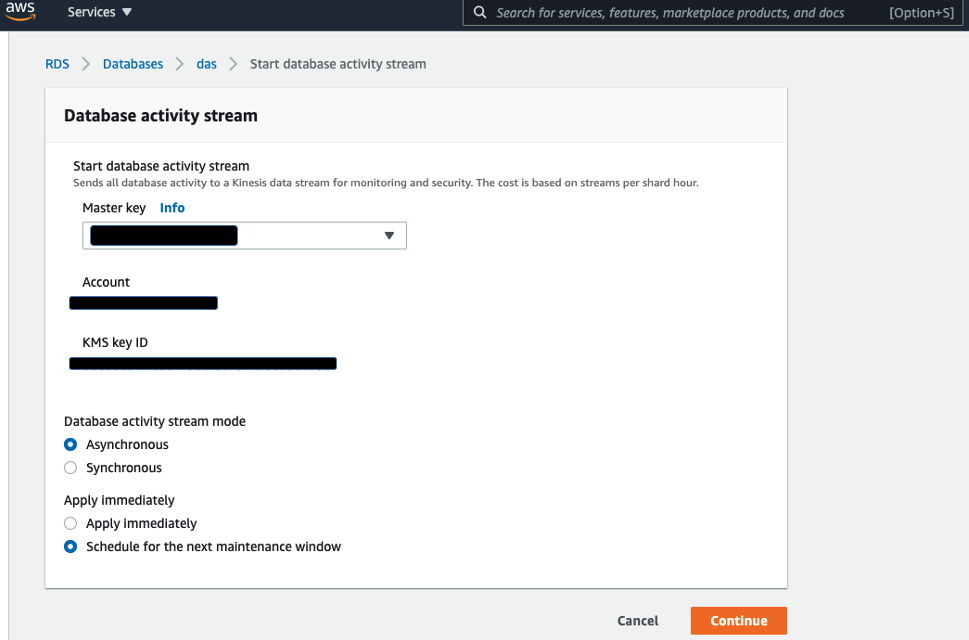
When it’s enabled, you can see under the configuration page the details of the database activity stream, along with the status Started.
Test the solution
You can test the authentication mechanism with the solution described in this post and verify that you can only connect to the database with the username associated with your IdP user. In this case, we use an AWS Cloud9 environment where we set the main variables for the temporary connection:
- Perform the authentication via AWS SSO as described earlier when you configured your IdP integration with IAM.
- Copy the temporary credentials into AWS Cloud9 command line.
- Perform the connection into the database.
- Run the PostgreSQL interactive terminal program, called psql, which allows you to interactively enter, edit, and run SQL commands such as the table create of a dummy:
Next, you can read the activity from the database activity stream.
- Navigate to the Configuration tab of the Aurora cluster and choose the link for the stream.

- To get data out of the Kinesis data stream, you can use a script like https://awsauroralabsmy.com/scripts/das_reader.py.
The following screenshot shows the output of the script, with contains the auditing of the operations we ran against the Aurora cluster.

To format the database activity streaming output and interpret the results, you can use an editor with a JSON plugin or a command line tool such as jq.
Conclusion
In this post, we showed how to configure a solution for fulfilling database auditing requirements with Aurora. The proposed solution allows highly regulated customers to configure Aurora auditing while linking reported database users to their trusted IdP users. The solution uses Aurora database activity streams for auditing database users’ actions. It combines the Aurora IAM authentication feature with AWS identity federation methodologies for linking your IdP’s trusted user entities to the Aurora database users that are reported into the database activity streams.
We encourage you to try the solution and reach out with your feedback.
About the Authors
 Mattia Berlusconi is a Specialist Database Solutions Architect based in Milan, Italy. In his role, he helps customers of any size, pursuing their business objectives, along their cloud journey. He works with customers’ architects for identifying the best solution for them, with specific focus on the most innovative options for storing data. Mattia brings years of experience from the field, in migrating and innovating databases and data platforms to speed-up the customer in adopting cloud.
 Paola Lorusso is the Manager of EMEA Open Source Databases Specialist Team, based in Milan, Italy. She works with companies of all sizes to support their innovation in the database domain. The team helps customers to adopt the best migration strategy and design database architectures on AWS with open-source managed solutions.
A special thanks to Ettore Trevisiol, AWS Professional Services Cloud Infrastructure Architect, who worked with us at the definition of the initial solution for the customer.