The AWS Cloud Development Kit (AWS CDK) allows you to create AWS resources with a single line of code. For example, you can create a VPC in TypeScript with the following line:
new EC2.Vpc(this, 'cache_vpc');
However, several AWS resources require several lines of code because you often need to create supporting resources. For example, you need to create a CfnSubnetGroup and a SecurityGroup before creating an Amazon ElastiCache for Redis CfnReplicationGroup.
In this post, we show you all the prerequisites and steps to deploy an Amazon ElastiCache cluster using AWS CDK and TypeScript. We also show you how to deploy resources using Amazon ElastiCache for Redis Serverless.
Solution overview
ElastiCache is a fully managed, Redis- and Memcached-compatible service that delivers real-time, cost- optimized performance, and up to 99.99% Service Level Agreement (SLA) for modern applications. ElastiCache speeds up database and application performance, scaling to hundreds of millions of operations per second with microsecond response times. ElastiCache offers enhanced security, reliability, scalability, and performance when compared to open-source alternatives.
ElastiCache Serverless is a new serverless option that allows you to create a cache in under a minute and instantly scale capacity based on application traffic patterns.
In the following sections, we demonstrate the steps to deploy the prerequisite resources, then to deploy ElastiCache and ElastiCache Serverless resources.
Prerequisites
You need to have the following on your laptop:
This post assumes you are familiar with AWS networking and security mechanisms. For more information, refer to Networking Essentials and AWS Cloud Security.
Create the prerequisite resources
Before creating the ElastiCache cluster, you need to install the AWS CDK on your local machine, then create the AWS CDK directory structure, install the NPM packages, and create the VPC and the subnet group.
Complete the following steps to create the prerequisite resources.
Install the AWS CDK on your local machine
First, install the AWS CDK on your local machine:
- Enter the following command in a terminal:
- Validate the installation with the following command:
You should get an output like the following:
% cdk --version
2.126.0 (build fb74c41)
Create the AWS CDK directory structure
Enter the following commands to create the AWS CDK directory structure:
mkdir work && cd work
cdk init --language typescript
You should get an output like the following:
% cdk init —language typescript
Applying project template app for typescript
# Welcome to your CDK TypeScript project

This is a blank project for CDK development with TypeScript.

The `cdk.json` file tells the CDK Toolkit how to execute your app.

## Useful commands

* `npm run build`  compile typescript to js
* `npm run watch`  watch for changes and compile
* `npm run test` perform the jest unit tests
* `cdk deploy` deploy this stack to your default AWS account/region
* `cdk diff` compare deployed stack with current state
* `cdk synth`  emits the synthesized CloudFormation template

Executing npm install...
 All done!
Install the NPM packages
Enter the following command to install the NPM packages:
You should get an output like the following:
% npm install

added 321 packages, and audited 356 packages in 15s

34 packages are looking for funding
run `npm fund` for details

found 0 vulnerabilities
Create the VPC
Now you’re ready to create your first AWS resource using AWS CDK, which is the VPC. Complete the following steps:
- Using your preferred editor, open the
lib/work-stack.ts file, erase its contents, and enter the following code:
import * as cdk from 'aws-cdk-lib';
import { Construct } from 'constructs';
import * as EC2 from 'aws-cdk-lib/aws-ec2';

export class WorkStack extends cdk.Stack {
private vpc: EC2.Vpc;

constructor(scope: Construct, id: string, props?: cdk.StackProps) {
        super(scope, id, props);

        this.vpc = new EC2.Vpc (this, 'cache_vpc');
    }
}
It’s this straightforward to create a VPC using the AWS CDK.
- Prepare the AWS environment by entering the following command:
You should get an output like the following:
% cdk bootstrap
 Bootstrapping environment aws://XXXXXXXXXXXX/us-west-2...
Trusted accounts for deployment: (none)
Trusted accounts for lookup: (none)
Using default execution policy of 'arn:aws:iam::aws:policy/AdministratorAccess'.
Pass '—cloudformation-execution-policies' to customize.
CDKToolkit: creating CloudFormation changeset...
 Environment aws://XXXXXXXXXXXX/us-west-2 bootstrapped.
- Create the AWS CloudFormation template by running the following command:
You should see a long output describing the generated CloudFormation template.
- Create the VPC by entering the following command. The
—-require-approval option bypasses the prompt for approval.
cdk deploy --require-approval never
You should get an output like the following:
% cdk deploy --require-approval never

 Synthesis time: 2.08s

WorkStack: start: Building dd5711540f04e06aa955d7f4862fc04e8cdea464cb590dae91ed2976bb78098e:current_account-current_region
WorkStack: success: Built dd5711540f04e06aa955d7f4862fc04e8cdea464cb590dae91ed2976bb78098e:current_account-current_region
WorkStack: start: Building 4cb6f2e5367a7f873db5ddafcd7cc27e983a5c512c5b650a8ce855bb44240e95:current_account-current_region
WorkStack: success: Built 4cb6f2e5367a7f873db5ddafcd7cc27e983a5c512c5b650a8ce855bb44240e95:current_account-current_region
WorkStack: start: Publishing dd5711540f04e06aa955d7f4862fc04e8cdea464cb590dae91ed2976bb78098e:current_account-current_region
WorkStack: start: Publishing 4cb6f2e5367a7f873db5ddafcd7cc27e983a5c512c5b650a8ce855bb44240e95:current_account-current_region
WorkStack: success: Published 4cb6f2e5367a7f873db5ddafcd7cc27e983a5c512c5b650a8ce855bb44240e95:current_account-current_region
WorkStack: success: Published dd5711540f04e06aa955d7f4862fc04e8cdea464cb590dae91ed2976bb78098e:current_account-current_region
WorkStack: deploying... [1/1]
WorkStack: creating CloudFormation changeset...

 WorkStack

 Deployment time: 150.57s

Stack ARN:
arn:aws:cloudformation:us-east-1:XXXXXXXXXXXX:stack/WorkStack/144b3f00-c754-11ee-852f-1218bbad4295

 Total time: 152.65s
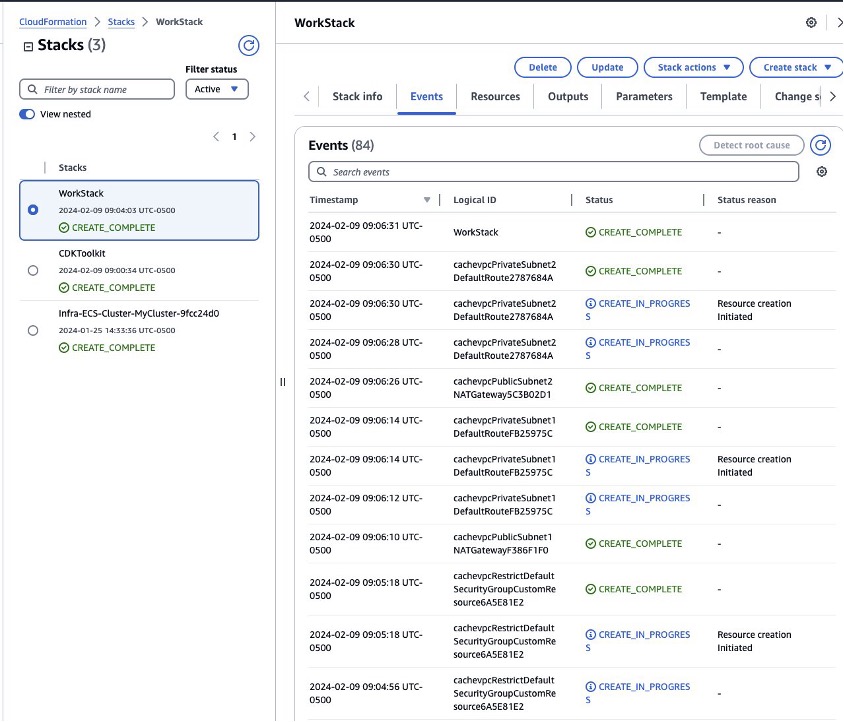
The preceding command deployed a CloudFormation stack. If you navigate to the AWS CloudFormation console (replace the URL to point to the AWS Region you deployed your stack to), you should see the Events tab and other information related to the deployment.
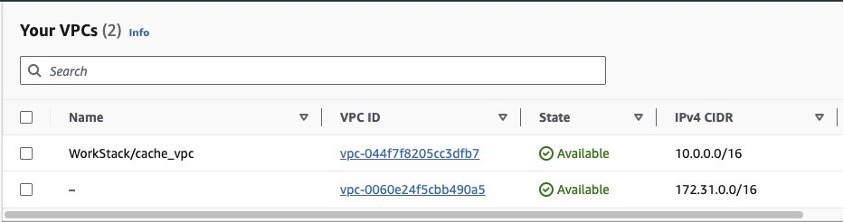
If you navigate to the Amazon Virtual Private Cloud (Amazon VPC) console, you should see the cache VPC deployed.
Create the subnet group
Now that you have created the VPC, you can create the subnet group for ElastiCache, which determines the Availability Zones that the nodes can be deployed to. Complete the following steps:
- Update the
lib/work-stack.ts file to add the subnetGroup creation code, containing the private subnets:
import * as cdk from 'aws-cdk-lib';
import { Construct } from 'constructs';
import * as EC2 from 'aws-cdk-lib/aws-ec2';
import { aws_elasticache as ElastiCache } from 'aws-cdk-lib';

export class WorkStack extends cdk.Stack {
    private vpc: EC2.Vpc;

    constructor(scope: Construct, id: string, props?: cdk.StackProps) {
        const groupName = "ElastiCacheSubnetGroup";

    super(scope, id, props);

    this.vpc = new EC2.Vpc (this, 'cache_vpc');

    const subnetIds = [];
    for (const subnet of this.vpc.privateSubnets) {
        console.log ("createElastiCache subnet ID: ", subnet.subnetId);
        subnetIds.push(subnet.subnetId);
    }

    const subnetGroup = new ElastiCache.CfnSubnetGroup(this, "ElastiCacheSubnetGroup", {
        cacheSubnetGroupName: groupName,
        subnetIds: subnetIds,
        description: "ElastiCache Subnet Group"
    })
  }
}
- Enter the following command to synthesize and deploy the stack:
cdk synth; cdk deploy --require-approval never
Create an ElastiCache for Redis replication group
The following steps create an ElastiCache for Redis replication group with cluster mode disabled and a single primary node using AWS CDK.
Create the security group
First, create the security group to be used with ElastiCache. This security group allows any IP address to connect to Redis port (6379).
- Update the
lib/work-stack.ts file to add the security group:
import * as cdk from 'aws-cdk-lib';
import { Construct } from 'constructs';
import * as EC2 from 'aws-cdk-lib/aws-ec2';
import { aws_elasticache as ElastiCache } from 'aws-cdk-lib';
import { SecurityGroup, Peer, Port } from 'aws-cdk-lib/aws-ec2';

export class WorkStack extends cdk.Stack {
    private vpc: EC2.Vpc;

    constructor(scope: Construct, id: string, props?: cdk.StackProps) {
        const groupName = "ElastiCacheSubnetGroup";

        super(scope, id, props);

        this.vpc = new EC2.Vpc (this, 'cache_vpc');

        const subnetIds = [];
        for (const subnet of this.vpc.privateSubnets) {
            console.log ("createElastiCache subnet ID: ", subnet.subnetId);
            subnetIds.push(subnet.subnetId);
        }

        const subnetGroup = new ElastiCache.CfnSubnetGroup(this, "ElastiCacheSubnetGroup", {
            cacheSubnetGroupName: groupName,
            subnetIds: subnetIds,
            description: "ElastiCache Subnet Group"
        })

        const securityGroup = new SecurityGroup(this, "ElastiCacheSecurityGroup", {
            vpc: this.vpc,
            allowAllOutbound: true,
            description: "ElastiCache Security Group",
            securityGroupName: "ElastiCacheSecurityGroup"
        });

        securityGroup.addIngressRule(Peer.anyIpv4(), Port.tcp(6379), "Redis port");

    }
}
- Enter the following command to synthesize and deploy the stack:
cdk synth; cdk deploy --require-approval never
Create the replication group
Finally, deploy a replication group to create the ElastiCache instance:
- Update the
lib/work-stack.ts file to add a ReplicationGroup configuration. The following code creates a single-node cluster, which is useful for testing purposes.
import * as cdk from 'aws-cdk-lib';
import { Construct } from 'constructs';
import * as EC2 from 'aws-cdk-lib/aws-ec2';
import { aws_elasticache as ElastiCache } from 'aws-cdk-lib';
import { SecurityGroup, Peer, Port } from 'aws-cdk-lib/aws-ec2';

export class WorkStack extends cdk.Stack {
    private vpc: EC2.Vpc;

    constructor(scope: Construct, id: string, props?: cdk.StackProps) {
    const groupName = "ElastiCacheSubnetGroup";

    super(scope, id, props);

    this.vpc = new EC2.Vpc (this, 'cache_vpc');

    const subnetIds = [];
    for (const subnet of this.vpc.privateSubnets) {
        console.log ("createElastiCache subnet ID: ", subnet.subnetId);
        subnetIds.push(subnet.subnetId);
    }

    const subnetGroup = new ElastiCache.CfnSubnetGroup(this, "ElastiCacheSubnetGroup", {
        cacheSubnetGroupName: groupName,
        subnetIds: subnetIds,
        description: "ElastiCache Subnet Group"
    })

    const securityGroup = new SecurityGroup(this, "ElastiCacheSecurityGroup", {
        vpc: this.vpc,
        allowAllOutbound: true,
        description: "ElastiCache Security Group",
        securityGroupName: "ElastiCacheSecurityGroup"
    });

    securityGroup.addIngressRule(Peer.anyIpv4(), Port.tcp(6379), "Redis port");

    const cache = new ElastiCache.CfnReplicationGroup(this, "ReplicationGroup", {
        replicationGroupDescription: "Elastic Cache Replication Group",
        numCacheClusters: 1,
        automaticFailoverEnabled: false,
        engine: 'redis',
        cacheNodeType: 'cache.m7g.large',
        cacheSubnetGroupName: subnetGroup.ref,
        securityGroupIds:[securityGroup.securityGroupId],
    });
    // Establishes the dependency between cache and subnetGroup,
    // so that they can be deleted in the right order
    cache.addDependency(subnetGroup);

  }
}
- Enter the following command to synthetize and deploy the stack:
cdk synth; cdk deploy --require-approval never
Wait 5–7 minutes for the ReplicationGroup deployment. You should get an output like the following:
[...]
WorkStack:  start: Building [...]
WorkStack:  success: Built [...]
WorkStack:  start: [...]
WorkStack:  success: [...]
WorkStack: deploying... [1/1]
WorkStack: creating CloudFormation changeset...

  WorkStack

  Deployment time: 391.31s

Stack ARN:
arn:aws:cloudformation:us-east-1:XXXXXXXXXXXX:stack/WorkStack/363cc3b0-991c-11ee-b081-0ee27d5eb659

  Total time: 393.28s
Verify the resources
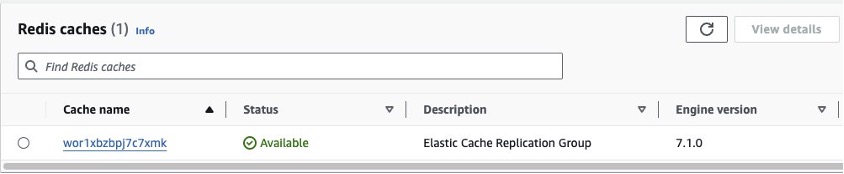
Log in to the ElastiCache console in the Region where you deployed your resources. You should see a Redis cluster.
Deploy ElastiCache for Redis Serverless resources
So far, you have deployed the node-based version of ElastiCache for Redis, where you created the subnet group and security group, and defined the node type and number of nodes.
To deploy the ElastiCache for Redis Serverless version, complete the steps in this section after you create the VPC and the subnet group in the previous sections.
Create the security group
Complete the following steps to create the security group to use with ElastiCache. This security group allows any IP address to connect to the Redis port (6379) and replica port (6380).
- Update the lib/work-stack.ts file to create the security group:
import * as cdk from 'aws-cdk-lib';
import { Construct } from 'constructs';
import * as EC2 from 'aws-cdk-lib/aws-ec2';
import { aws_elasticache as ElastiCache } from 'aws-cdk-lib';
import { SecurityGroup, Peer, Port } from 'aws-cdk-lib/aws-ec2';

export class WorkStack extends cdk.Stack {
    private vpc: EC2.Vpc;

    constructor(scope: Construct, id: string, props?: cdk.StackProps) {
        const groupName = "ElastiCacheSubnetGroup";

        super(scope, id, props);

        this.vpc = new EC2.Vpc (this, 'cache_vpc');

        const subnetIds = [];
        for (const subnet of this.vpc.privateSubnets) {
            console.log ("createElastiCache subnet ID: ", subnet.subnetId);
            subnetIds.push(subnet.subnetId);
        }

        const subnetGroup = new ElastiCache.CfnSubnetGroup(this, "ElastiCacheSubnetGroup", {
            cacheSubnetGroupName: groupName,
            subnetIds: subnetIds,
            description: "ElastiCache Subnet Group"
        })

        const securityGroup = new SecurityGroup(this, "ElastiCacheSecurityGroup", {
            vpc: this.vpc,
            allowAllOutbound: true,
            description: "ElastiCache Security Group",
            securityGroupName: "ElastiCacheSecurityGroup"
        });

        securityGroup.addIngressRule(Peer.anyIpv4(), Port.tcp(6379), "Redis port");
        securityGroup.addIngressRule(Peer.anyIpv4(), Port.tcp(6380), "Redis port");

    }
}
- Enter the following command to synthesize and deploy the stack:
cdk synth; cdk deploy --require-approval never
Create a serverless cache
To add the serverless cache, complete the following steps:
- Update the AWS CDK code in the lib/work-stack.ts file:
import * as cdk from 'aws-cdk-lib';
import { Construct } from 'constructs';
import * as EC2 from 'aws-cdk-lib/aws-ec2';
import { aws_elasticache as ElastiCache } from 'aws-cdk-lib';
import { SecurityGroup, Peer, Port } from 'aws-cdk-lib/aws-ec2';

export class WorkStack extends cdk.Stack {
    private vpc: EC2.Vpc;

    constructor(scope: Construct, id: string, props?: cdk.StackProps) {
        const groupName = "ElastiCacheSubnetGroup";

        super(scope, id, props);

        this.vpc = new EC2.Vpc (this, 'cache_vpc');

        const subnetIds = [];
        for (const subnet of this.vpc.privateSubnets) {
            console.log ("createElastiCache subnet ID: ", subnet.subnetId);
            subnetIds.push(subnet.subnetId);
        }

        const subnetGroup = new ElastiCache.CfnSubnetGroup(this, "ElastiCacheSubnetGroup", {
            cacheSubnetGroupName: groupName,
            subnetIds: subnetIds,
            description: "ElastiCache Subnet Group"
        })

        const securityGroup = new SecurityGroup(this, "ElastiCacheSecurityGroup", {
            vpc: this.vpc,
            allowAllOutbound: true,
            description: "ElastiCache Security Group",
            securityGroupName: "ElastiCacheSecurityGroup"
        });

        securityGroup.addIngressRule(Peer.anyIpv4(), Port.tcp(6379), "Redis port");
        securityGroup.addIngressRule(Peer.anyIpv4(), Port.tcp(6380), "Redis port");

        new ElastiCache.CfnServerlessCache(this, "ServerlessCache", {
            engine: 'redis',
            serverlessCacheName: 'MyServerlessCache',
            securityGroupIds:[securityGroup.securityGroupId],
            subnetIds: subnetIds
        });
    }
}
- Enter the following command to synthesize and deploy the stack:
cdk synth; cdk deploy --require-approval never
Verify the resources
On the ElastiCache console, you should see a Redis cluster like the one in the following screenshot.

Clean up
It’s straightforward to clean up the deployed resources, because you deployed them as a single AWS CDK application. Enter the following command:
You should get an output like the following:
% cdk destroy -f
createElastiCache subnet ID: ${Token[TOKEN.69]}
createElastiCache subnet ID: ${Token[TOKEN.87]}
WorkStack: destroying... [1/1]

 WorkStack: destroyed
Conclusion
In this post, we showed you how to create all the prerequisites and the two versions of ElastiCache for Redis: the provisioned version required multiple steps, such as creating the subnet group and security group; the serverless version was much more straightforward and could be created with a single AWS CDK command.
Let us know in the comments section if you have any suggestions or concerns.
About the Author
 Eduardo Patrocinio is a distinguished Principal Solutions Architect on the AWS Strategic Accounts team, bringing unparalleled expertise to the forefront of cloud technology. With an impressive career spanning over 25 years, Eduardo has been a driving force in designing and delivering innovative customer solutions within the dynamic realms of cloud and service management.