AWS Database Blog
Migrating relational databases to Amazon DocumentDB (with MongoDB compatibility)
Relational databases have been the foundation of enterprise data management for over 30 years. But the way we build and run applications today, coupled with unrelenting growth in new data sources and growing user loads, is pushing relational databases beyond their limits. This can inhibit business agility, limit scalability, and strain budgets, compelling more and more organizations to migrate to alternatives like NoSQL databases.
Amazon DocumentDB (with MongoDB compatibility) is a fast, scalable, highly available, and fully managed document database service that supports MongoDB workloads. As a document database, Amazon DocumentDB makes it easy to store, query, and index JSON data. To get started with Amazon DocumentDB, see Getting Started with Amazon DocumentDB (with MongoDB compatibility).
If your data is stored in existing relational databases, converting relational data structures to documents can be complex and involve constructing and managing custom extract, transform, and load (ETL) pipelines. Amazon Database Migration Service (AWS DMS) can manage the migration process efficiently and repeatably. With AWS DMS, you can perform minimal downtime migrations, and can replicate ongoing changes to keep sources and targets in sync. This post provides an overview on how you can migrate your relational databases like MySQL, PostgreSQL, Oracle, Microsoft SQL Server, and others to Amazon DocumentDB using AWS DMS.
Data modeling
Before addressing the mechanics of using AWS DMS to copy data from a relational database to Amazon DocumentDB, it’s important to understand the basic differences between relational databases and document databases.
Relational databases
Traditional relational database management system (RDBMS) platforms store data in a normalized relational structure and use structured query language (SQL) for database access. This reduces hierarchical data structures to a set of common elements that are stored across multiple tables. The following diagram provides an overview of the structure of the Employees sample database.

This image was taken from MySQL’s employees sample database under the Creative Commons Attribution-ShareAlike license. No changes have been made.
When developers need to access data in an application, you merge data from multiple tables together in a process called as join. You predefine your database schema and set up rules to govern the relationships between fields or columns in your tables. RDBMS platforms use an ad hoc query language (generally a type of SQL) to generate or materialize views of the normalized data to support application-layer access patterns. For example, to generate a list of departments with architects (sorted by hire date), you could issue the following query against the preceding schema:
The preceding query initiates complex queries across a number of tables and then sorts and integrates the resulting data. One-time queries of this kind provide a flexible API for accessing data, but they require a significant amount of processing. If you’re running multiple complex queries, there can be considerable performance impact, leading to poor end-user experience.
In addition, RDBMSs require up-front schema definition, and changing the schema later is very expensive. You may have use cases in which it’s very difficult to anticipate the schema of all the data that your business will eventually need. Therefore, RDBMS backends may not be appropriate for applications that work with a variety of data. However, NoSQL databases (like document databases) have dynamic schemas for unstructured data, and you can store data in many ways. They can be column-oriented, document-oriented, graph-based, or organized as a key-value store. This flexibility means that:
- You can create documents without having to first define their structure
- Each document can have its own unique structure
- The syntax can vary from database to database
- You can add fields as you go
For more information, see What is NoSQL?
Document databases
Amazon DocumentDB is a fully managed document database service that makes it easy to store, query, and index JSON data. For more information, see What is a Document Database? and Understanding Documents.
The following table compares terminology used by document databases with terminology used by SQL databases.
| SQL | Amazon DocumentDB |
| Table | Collection |
| Row | Document |
| Column | Field |
| Primary key | ObjectId |
| Index | Index |
| View | View |
| Nested table or object | Embedded document |
| Array | Array |
Using Amazon DocumentDB, you can store semi-structured data as a document rather than normalizing data across multiple tables, each with a unique and fixed structure, as in a relational database. Fields can vary from document to document—you don’t need to declare the structure of documents to the system, because documents are self-describing. Development is simplified because documents map naturally to modern, object-oriented programming languages.
The following is an example of a simple document. In the following document, the fields SSN, LName, FName, DOB, Street, City, State-Province, PostalCode, and Country are all siblings within the document:
For more information about adding, querying, updating, and deleting documents, see Working with Documents.
Amazon DocumentDB is designed to work with your existing MongoDB applications and tools. Be sure to use drivers intended for MongoDB 3.4 or newer. Internally, Amazon DocumentDB implements the MongoDB API by emulating the responses that a MongoDB client expects from a MongoDB server. Therefore, you can use MongoDB APIs to query your Amazon DocumentDB database. For example, the following query returns all documents where the Item field is equal to Pen:
For more information about writing queries for Amazon DocumentDB, see Querying.
Let’s say that you have a table in your relational database called Posts and another table called Comments, and the two are related because each post has multiple comments.
The following is an example of the Posts table.
| post_id | title |
| 1 | Post 1 |
| 2 | Post 2 |
The following is an example of the Comments table.
| comment_id | post_id | author | comment |
| 1 | 1 | Alejandro Rosalez | Nice Post |
| 2 | 1 | Carlos Salazar | Good Content |
| 3 | 2 | John Doe | Improvement Needed in the post |
In order to get the comments of a post with title “Post 1”, you will need to execute an expensive JOIN query similar to below:
While modelling data for documents, you can create one collection of documents that represents a post with an array of comments. See the following output:
The following query will provide the comments for the post with title as “Post 1”:
For more information about data modeling, see Data Modeling Introduction.
Solution overview
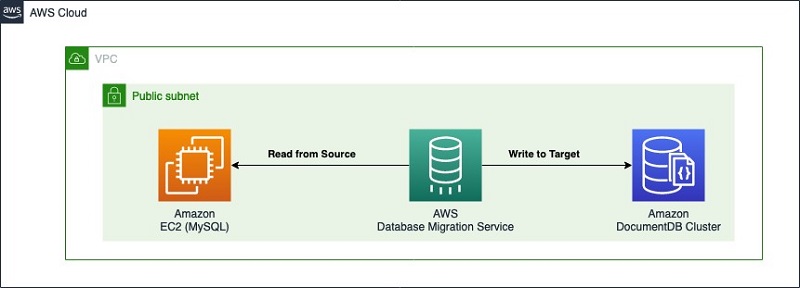
You can use AWS DMS to migrate (or replicate) data from relational engines like Oracle, Microsoft SQL Server, Azure SQL Database, SAP ASE, PostgreSQL, MySQL and others to an Amazon DocumentDB database. You can also migrate the data from non-relational sources, but those are beyond the scope of this post. As depicted in the following architecture, you deploy AWS DMS via a replication instance within your Amazon Virtual Private Cloud (Amazon VPC). You then create endpoints that the replication instance uses to connect to your source and target databases. The source database can be on premises or hosted in the cloud. In this post, we create the source database in the same VPC as the target Amazon DocumentDB cluster. AWS DMS migrates data, tables, and primary keys to the target database. All other database elements are not migrated. This is because AWS DMS takes a minimalist approach and creates only those objects required to efficiently migrate the data. The following diagram shows the architecture of this solution.
The walkthrough includes the following steps:
- Set up the source MySQL database.
- Set up the target Amazon DocumentDB database.
- Create the AWS DMS replication instance.
- Create the target AWS DMS endpoint (Amazon DocumentDB).
- Create the source AWS DMS endpoint (MySQL).
- Create the replication task.
- Start the replication task.
- Clean up your resources.
As a pre-requisite, we just need an AWS Account and an IAM user which has appropriate access permissions.
This walkthrough incurs standard service charges. For more information, see the following pricing pages:
- AWS Database Migration Service pricing
- Amazon DocumentDB (with MongoDB compatibility) pricing
- Amazon EC2 pricing
Setting up the source MySQL database
We first launch an Amazon Linux 2 EC2 instance and install MySQL server. For instructions, see Installing MySQL on Linux Using the MySQL Yum Repository. Then, we load the sample Employee database with the structure as shown in the beginning of the post. We used the following commands to load the sample database:
Setting up the target Amazon DocumentDB database
For instructions on creating a new Amazon DocumentDB cluster and trying out some sample queries, see Setting up an Document Database. For this walkthrough, we create the cluster my-docdb-cluster with one instance my-docdb-instance. The following screenshot shows the cluster details.

Creating an AWS DMS replication instance
AWS DMS uses an Amazon Elastic Compute Cloud (Amazon EC2) instance to perform the data conversions as part of a given migration workflow. This EC2 instance is referred to as the replication instance. A replication instance is deployed within a VPC, and it must have access to the source and target databases. It’s a best practice to deploy the replication instance into the same VPC where your Amazon DocumentDB cluster is deployed.
You also need to make other considerations in terms of sizing your replication instance. For more information, see Choosing the optimum size for a replication instance.
To deploy a replication instance, complete the following steps:
- Sign in to the AWS DMS console within the AWS account and Region where your Amazon DocumentDB cluster is located.
- In the navigation pane, under Resource management, choose Replication instances.
- Choose Create replication instance. This brings you to the Create replication instance page.
- For Name, enter a name for your instance. For this walkthrough, we enter mysql-to-docdb-dms-instance.
- For Description, enter a short description.
- For Instance class, choose your preferred instance. For this walkthrough, we use a c4.xlarge instance. Charges may vary depending on your instance size, storage requirements, and certain data transfer usage. For more information, see AWS Database Migration Service Pricing.
- For Engine version, choose your AWS DMS version (prefer the latest stable version – not the beta versions).
- Select Publicly accessible option, if you want your instance to be publicly accessible. If you’re migrating from a source that exists outside of your VPC, you need to select this option. If the source database is within your VPC, accessible over an AWS Direct Connect connection, or via a VPN tunnel to the VPC, then you can leave this option unselected.
- In the Advanced security and network configuration section, select your suitable Security Group (that allows network traffic access to the source and target database).
You can also define other options, such as specific subnets, Availability Zones, custom security groups, and if you want to use AWS Key Management Service (AWS KMS) encryption keys. For more information, see Working with an AWS DMS replication instance.
- For this post, we leave the remaining options at their defaults.
- Choose Create.
For more details and screenshots, see Create a replication instance using the AWS DMS console. Provisioning your replication instance may take a few minutes. Wait until provisioning is complete before proceeding to the next steps.
Creating a target AWS DMS endpoint
After you provision a replication instance, you define the source and targets for migrating data. First, we define the connection to our target Amazon DocumentDB cluster. We do this by providing AWS DMS with a target endpoint configuration.
- On the AWS DMS console, under Resource management, choose Endpoints.
- Choose Create endpoint. This brings you to the Create endpoint page.
- For Endpoint type, select Target endpoint.
- For Endpoint Identifier, enter a name for your endpoint. For this walkthrough, we enter target-docdb-cluster
- For Target Engine, select docdb
- For Server name, enter the cluster endpoint for your target Amazon DocumentDB cluster (available in the Amazon DocumentDB cluster details on the Amazon DocumentDB console). To find the cluster endpoint of your Amazon DocumentDB cluster, refer to Finding a Cluster’s Endpoint.
- For Port, enter the port you use to connect to Amazon DocumentDB (the default is 27017).
- For SSL mode, choose verify-full.
- For CA certificate, do one of the following to attach the SSL certificate to your endpoint:
- If available, choose the existing rds-combined-ca-bundle certificate from the Choose a certificate drop-down menu.
- Download the new CA certificate bundle. This operation downloads a file named
rds-combined-ca-bundle.pem. Then complete the following:- In the AWS DMS endpoint page, choose Add new CA certificate.
- For Certificate identifier, enter
rds-combined-ca-bundle. - For Import certificate file, choose Choose file and navigate to the
rds-combined-ca-bundle.pemfile that you previously downloaded. - Open the file and choose Import certificate.
- Choose rds-combined-ca-bundle from the Choose a certificate drop-down menu.
- For User name, enter the master user name of your Amazon DocumentDB cluster. For this walkthrough, we enter masteruser
- For Password, enter the master password of your Amazon DocumentDB cluster.
- For Database name, enter suitable value. For this walkthrough, we enter employees-docdb as the database name.
- In the Test endpoint connection section, ensure that your endpoint is successfully connected. This can be confirmed when status shows as successful as seen in the following screenshot.

For more information on this step, see Creating source and target endpoints.
Creating the source AWS DMS endpoint
We now define the source endpoint for your source RDBMS.
- On the AWS DMS console, under Resource management, choose Endpoints.
- Choose Create endpoint.
- For Endpoint type¸ select Source endpoint.
- For Endpoint Identifier, enter a name. For this walkthrough, we enter source-ec2-mysql
- For Source engine, choose your source database engine. For this walkthrough, we used mysql.
- For Server name, enter your source endpoint. This can be the IP or DNS address of your source machine
- For Port, enter the DB port on the source machine (here 3306).
- For Secure Socket Layer, choose the value depending on user configurations set in your source mysql database. For this walkthrough, we used none.
- For User name, enter the user name of your source DB. For this walkthrough, we enter mysqluser.
- For Password, enter the master password of your source DB.
- For Database name, enter suitable value. For this walkthrough, we enter employees.
- In the Test endpoint connection section, ensure that your endpoint is successfully connected. This can be confirmed when status shows as successful as seen in the following screenshot.

For more information on this step, see Creating source and target endpoints.
Creating a replication task
After you create the replication instance and source and target endpoints, you can define the replication task. For more information, see Creating a task.
- On the AWS DMS console, under Conversion & Migration, choose Database migration tasks.
- Choose Create database migration task.
- For Task identifier, enter your identifier. For this walkthrough, we enter dms-mysql-to-docDB
- Choose your replication instance and source and target database endpoints. For this walkthrough, we enter mysql-to-docdb-dms-instance, source-ec2-mysql and target-docdb-cluster
- Choose the Migration Type as per your requirements:
- Migrate existing data – This will migrate the existing data from source to target. This will not replicate the ongoing changes on the source.
- Migrate existing data and replicate ongoing changes – This will migrate the existing data from source to target and will also replicate changes on the source database that occur while the data is being migrated from the source to the target.
- Replicate data changes only – This will only replicate the changes on the source database and will not migrate the existing data from source to target.
You may refer to Creating a task for more details on this option. For this walkthrough, we enter Migrate existing data.
- On the Task settings page, select Wizard as the Editing Mode.
- On the Task settings page, you can select Target table preparation mode. You can choose one of the following, depending on your requirements:
- Do nothing – This creates the table if a table isn’t on the target. If a table exists, this leaves the data and metadata unchanged. AWS DMS can create the target schema based on the default AWS DMS mapping of the data types. However, if you wish to pre-create the schema (or have a different data type) on the target database (Amazon DocumentDB), you can choose to create the schema and use this mode to perform the migration of data to your desired schema. You can also use mapping rules and transformation rules to support such use cases.
- Drop tables on target – This drops the table at the target and recreates the table.
- Truncate – This truncates the data and leaves the table and metadata intact.
For this walkthrough, we enter Drop tables on target.
- On the Task settings page, you will have the option to select Include LOB columns in replication. For this walkthrough, we used Limited LOB mode with Max LOB size (KB) as 32. You can choose one of the following depending on your requirements:
- Don’t include LOB columns – LOB columns are excluded from the migration.
- Full LOB mode – Migrate complete LOBs regardless of size. AWS DMS migrates LOBs piecewise in chunks controlled by the Max LOB size parameter. This mode is slower than using Limited LOB mode.
- Limited LOB mode – Truncate LOBs to the value of the Max LOB size parameter. This mode is faster than using Full LOB mode.
- For this walkthrough, we unchecked Enable validations. AWS DMS provides support for data validation to ensure that your data was migrated accurately from the source to the target. This may slow down the migration. Refer to AWS DMS data validation for more details.
- On the Task settings page, select Enable CloudWatch logs. Amazon CloudWatch logs are useful if you encounter any issues when the replication task runs. You also need to provide IAM permissions for CloudWatch to write AWS DMS logs. Choose your values for Source Unload, Task Manager¸ Target Apply, Target Load, and Source Capture. For this walkthrough, we used Default. Initially, you may wish to keep the default values for logging levels. if you encounter problems, you can modify the task to select more detailed logging information that can help you to troubleshoot. To read more, refer to Logging task settings and How do I enable, access, and delete CloudWatch logs for AWS DMS?
- The Table Mapping configuration section of the replication task definition specifies the tables and columns that AWS DMS migrates from source MySQL database to Amazon DocumentDB. You can specify the required information two different ways: using a Guided UI or a JSON editor. For more information about sophisticated selection, filtering and transformation possibilities, including table and view selection and using wildcards to select schemas, tables, and columns, see Using table mapping to specify task settings. For this walkthrough, we used the following values:
- Editing mode – Wizard
- Schema – Enter a schema
- Schema name – employees
- Table name – %
- Action – Include
Refer to Specifying table selection and transformations rules from the console for screenshots of this step.
- Choose Create task.
Starting the replication task
The definition of the replication task is now complete and you can start the task. The task status updates automatically as the process continues. For this post, we configured migration type as Migrate existing data, so the status of the task shows as Load Complete, which may differ depending on the migration type.
If an error occurs, the error appears on the Overview details tab (see the following screenshot) under Last failure message. For more information about troubleshooting, see Troubleshooting migration tasks in AWS Database Migration Service.

For our sample database, the AWS DMS process takes only a few minutes from start to finish.

For more information about connecting to your cluster, see Developing with Amazon DocumentDB. For this post, we use the mongo shell to connect to the cluster. If you connect to the target cluster, you can observe the migrated data.
The following query lists all the databases in the cluster:
The following query switches to use the employees-docdb database:
The following query lists all the collections in the employees-docdb database:
The following query selects one document from the departments collection:
The following query selects one document from the employees collection:
The following query counts the number of documents in the employees collection:
Cleaning up
When database migration is complete, you may wish to delete your AWS DMS resources.
- On the AWS DMS dashboard, choose Tasks in the navigation pane.
- Locate the migration task that you created earlier and click on drop-down Actions button and choose Delete.
- In the navigation pane, choose Endpoints.
- Choose the source and target endpoints that you created earlier and click on drop-down Actions button and choose Delete.
- In the navigation pane, choose Replication instances.
- Choose the replication instance that you created earlier and click on drop-down Actions button and choose Delete.
Summary
AWS DMS can quickly get you started with Amazon DocumentDB and your own data. This post discussed how to migrate a relational database to Amazon DocumentDB. We used an example MySQL database and migrated a sample database to Amazon DocumentDB. You can use similar steps for migration from a different supported RDBMS engine to Amazon DocumentDB.
To learn more about Amazon DocumentDB, see What Is Amazon DocumentDB (with MongoDB Compatibility).
To learn more about AWS DMS, see Sources for AWS Database Migration Service and Using Amazon DocumentDB as a target for AWS Database Migration Service.
About the Author
 Ganesh Sawhney is a Partner Solutions Architect with the Emerging Partners team at Amazon Web Services. He works with the India & SAARC partners to provide guidance on enterprise cloud adoption and migration, along with building AWS practice through the implementation of well architected, repeatable patterns and solutions that drive customer innovation. Being an AWS Database Subject Matter Expert, he has also worked with multiple customers for their database and data warehouse migrations.