AWS Database Blog
New AWS DMS and AWS Snowball Integration Enables Mass Database Migrations and Migrations of Large Databases
This post contains some outdated information. For a newer version, visit the updated post: Enable large-scale database migrations with AWS DMS and AWS Snowball.
More than 40,000 databases have been migrated to AWS using AWS Database Migration Service (AWS DMS), either as a one-time migration or with ongoing replication. AWS Database Migration Service (AWS DMS) and AWS Schema Conversion Tool (AWS SCT) significantly simplify and expedite the database migration process in a low-cost, highly available manner.
At some point in any migration, however, the bandwidth of your network becomes a limiting factor. It’s simple physics. If you want to move 5 terabytes from your on-premises network to the AWS Cloud over your 10-Gbps network… no problem. Increase that by an order of magnitude or two, or work with a slow, busy network. Suddenly you can spend days, weeks, or months waiting for your data. Maybe you are only trying to move a 500-GB database. But your network is painfully slow, because you are in a remote location or because there are geospecific network challenges at the time of the migration. Or perhaps you have many smaller databases to migrate that together add up to a significant size.
Another common scenario that can hinder or delay a database migration project is the lack of outside access to the database itself. You might find yourself all set to start AWS DMS on your source database, only to find that your corporate network policy doesn’t allow access to the database from outside your corporate network.
These scenarios and others like them are where AWS Snowball Edge and its brand-new integration with AWS DMS come in.
AWS Snowball Edge is a service and also a physical storage appliance from AWS that enables you to move petabytes of data to AWS. It helps eliminate challenges that you can encounter with large-scale data transfers, including high network costs, long transfer times, and security concerns. You know that you can order a book or a Crock-Pot on Amazon Prime, knowing it will show up at your door two days later. Similarly, you can order several AWS Snowball Edge appliances from your AWS Management Console. They show up at your data center a few days later, each with a secure capacity of 100 TB.
Combining these powerful services, AWS announced today the AWS DMS integration with AWS Snowball Edge, so that you can more easily move large database workloads to AWS.
Following is an architecture diagram showing various components involved in this integration. It shows how to fully migrate the source database to the target database on AWS, including replication of ongoing changes on the source database.
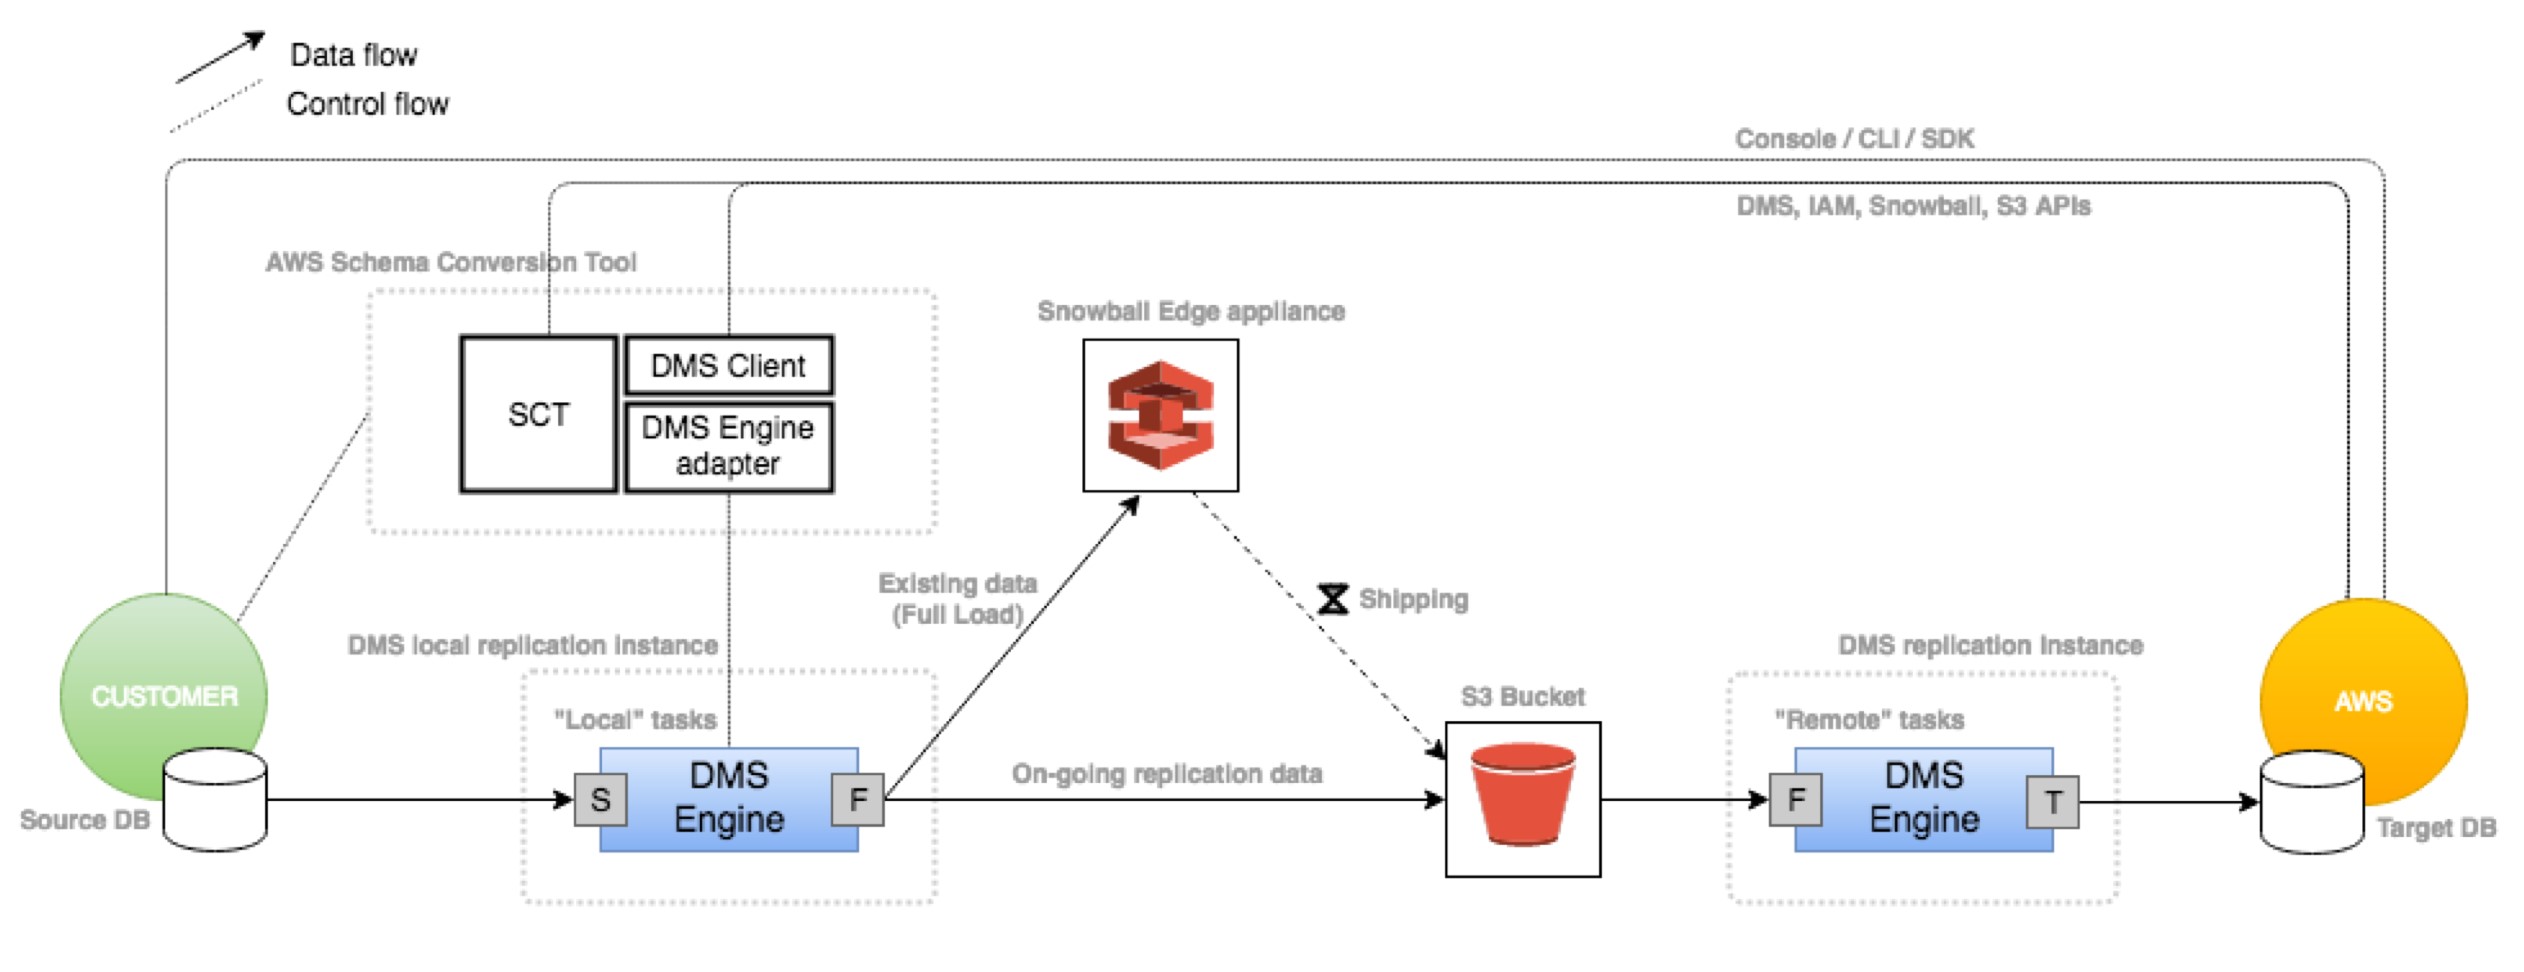
Some of the salient features of this integration architecture are the following:
- You get the ability to physically attach a secure, hardened device directly inside your data center rather than opening ports from the outside.
- You can now move very large databases from on-premises to AWS Cloud.
- This integration provides a “push” model to migrate databases instead of a “pull” model.
- You can migrate one or more databases using the same AWS Snowball Edge device without a need to upgrade your network infrastructure and consume dedicated bandwidth.
- While migrating these multiterabyte and multipetabyte databases to AWS, your on-premises databases remain online. They can be decommissioned when the AWS Snowball Edge appliance is shipped back to AWS and is automatically loaded onto your target Amazon RDS– or Amazon EC2–based database.
- You can migrate existing data (one time) or optionally perform ongoing data replication to the target database.
A few notes about working with AWS Snowball Edge and AWS DMS:
- The version of AWS Snowball required for integration with AWS DMS is AWS Snowball Edge.
- Currently, you need a Linux host to run the DMS Snowball agent.
- The AWS Snowball Edge must be on the same network as your source database.
You can use the steps following to migrate a database or multiple databases using the new integration of AWS DMS and AWS Snowball Edge.
Preparation
Preparation involves setting up prerequisites, creating an Amazon S3 bucket, and getting and configuring your AWS Snowball Edge.
Prerequisites
As prerequisites, you must set up the source and target databases. To do so, look at the documentation for the AWS DMS source configuration and target configuration.
Step 1: Create an Amazon S3 bucket (staging S3)
When you’ve set up the source and target databases as described in the documentation, you create a bucket in Amazon S3. This bucket is also called the “staging S3.”
This bucket acts as a temporary staging area for existing data and ongoing transactions during a database migration process.
When database migration is complete and cutover to the target database is done, you can delete this staging S3 bucket.
This bucket should be in the same AWS Region as the target database. Also, AWS DMS and AWS SCT need AWS Identity and Access Management (IAM) roles to access this bucket.
For more information, see Prerequisites When Using S3 as a Source for AWS DMS in the AWS DMS documentation.
Step 2: Order and configure the AWS Snowball Edge
Next, you create an AWS Snowball job through the AWS Management Console and order your AWS Snowball Edge appliance. As part of this step, you specify the Amazon S3 bucket (staging S3) you created in the previous step.
When your AWS Snowball Edge appliance arrives, configure it on your local network following the steps mentioned in the Getting Started section of the AWS Snowball Edge documentation.
When AWS Snowball Edge device is connected to your network, you install the Snowball client. You then unlock the Snowball by downloading the manifest file and an unlock code from the AWS Management Console, as shown in the following command.
Run the following command on the Snowball client to get the local access key and local secret key to use following.
In the commands preceding, replace the IP address and unlock code with your AWS Snowball Edge configuration information.
Configuration
Next, configure your migration by taking the following steps.
Step 1: Configure AWS SCT
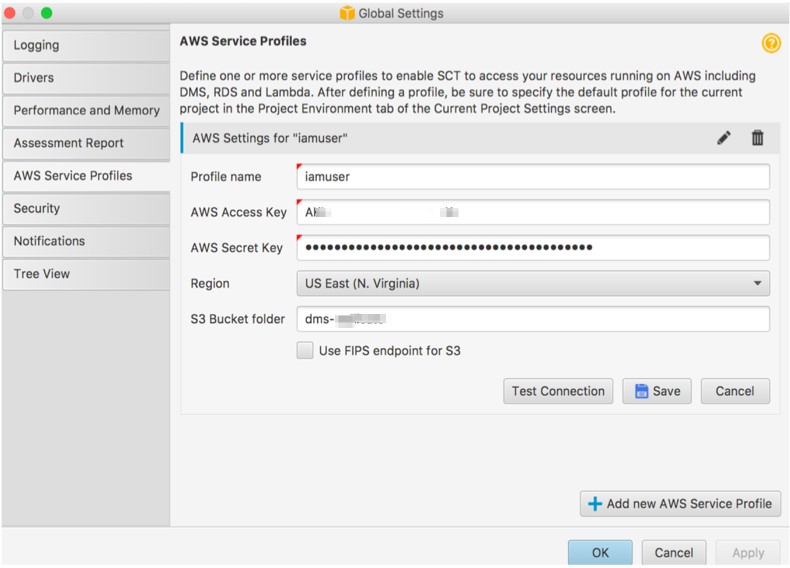
In the first step of configuration, configure the global settings for AWS SCT. These settings include the AWS service profile and the database drivers for the source and target databases.
To do so, start AWS SCT and for Settings choose Global Settings, AWS Service Profiles. The Global Settings page opens.
Along with the AWS access key and secret key, you also need to specify the Amazon S3 bucket (the staging S3) that was created in the earlier step.
When the AWS service profile is configured in AWS SCT, you can use the source and target database details to create a new project in SCT. Then you can connect to both the source and target databases in this AWS SCT project.

Step 2: Configure the AWS DMS Replication Agent instance and install the AWS DMS Replication Agent
The local Linux machine where an agent runs and connects to the source database or databases to migrate data is called an AWS DMS Replication Agent instance. The agent process running on this instance is called an AWS DMS Replication Agent.
You size the Linux machine that you use depending on a couple of considerations. These considerations are the number of tasks to run on this machine and the throughput requirements for data migration from the source database to the AWS Snowball Edge device.
The AWS DMS replication agent is delivered as a downloadable .rpm file in the SCT package. The installation steps are as follows.
During the installation, you need to provide the port number and password. This port number and password are used in the AWS SCT UI in the next step.
Step 3: Install the source and target database drivers on the AWS DMS Replication Agent instance
The agent running on the replication instance connects to the source database to load the database transactions in AWS Snowball Edge for the target database. Thus, we need to install source and target database drivers on this instance.
You install the ODBC drivers required for the source databases on the replication instance. For information on how to configure these drivers for specific source and target databases, see the database documentation.
For example, to configure MySQL drivers, run the commands following.
After executing the preceding commands, make sure that the /etc/odbcinst.ini file has following contents.
Step 4: Configure an AWS DMS Replication instance using the console
For AWS DMS and AWS Snowball Edge integration, the AWS DMS replication instance is called an AWS DMS remote replication instance. It’s named this way because in this case, the instance is running on the AWS Cloud. This placement contrasts with that for the AWS DMS Replication Agent instance, which runs on your local Linux machine. For clarification of the two replication instances, see the architecture diagram.
For information on how to create an AWS DMS remote replication instance using the AWS Management Console, see the AWS DMS blog mentioned earlier or the AWS DMS documentation.
Execution
Now that you’ve set up configuration, you can run the migration by using the following steps.
Step 1: Connect AWS SCT to the replication agent
In this step, you connect to the replication agent using the host name, port number, and password you provided in configuration step 3.
In the AWS SCT user interface, navigate to View, Database Migration View (Local & DMS), and choose Register.
Specify the IP address of the host, the port number, and the password used for AWS DMS replication agent configuration, as shown following.

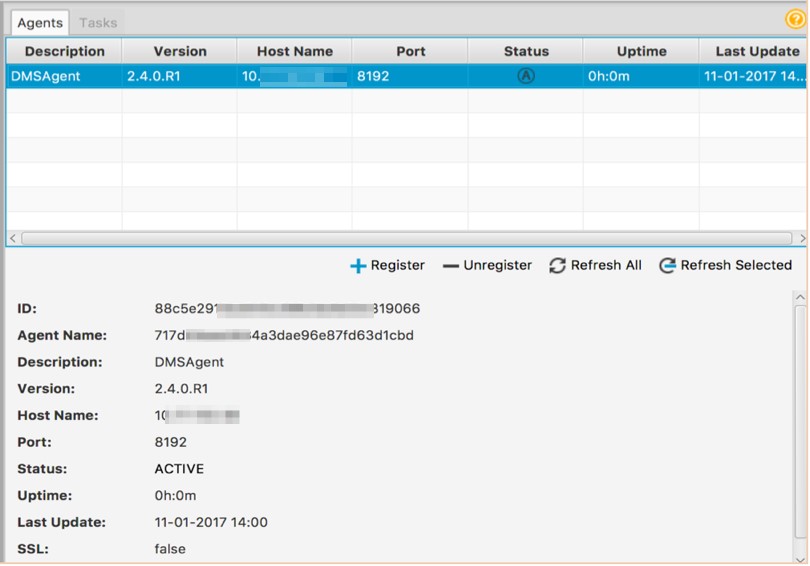
The replication agent creates and tests the connections to the source database, the AWS Snowball Edge device, and the staging S3 bucket. It also reports the status of the Snowball Edge and the Snowball import or export job in the AWS SCT UI.
The AWS DMS replication agent is an independent process running on Linux and doesn’t depend on the AWS SCT.
Step 2: Create Local and DMS Tasks in AWS SCT
You can now create tasks on the local and remote AWS DMS replication instances. AWS DMS tasks are the actual workhorses that do the data migration.
You create local and remote tasks in a single step from the AWS SCT UI as described following.
First, open the context (right-click) menu for the source schema in SCT, and choose Create Local & DMS Task.
Details such as agents, replication instances, IAM roles, AWS import job names, and so on, are prepopulated from AWS SCT profile configurations and your AWS DMS resources in the AWS Region.
Choose the appropriate agent, replication instance, migration type, and IAM role. Choose the job name, and type the Snowball IP address. Also, type the local Amazon S3 access key and local S3 secret key details obtained when you performed step 2 in the Preparation section, preceding.

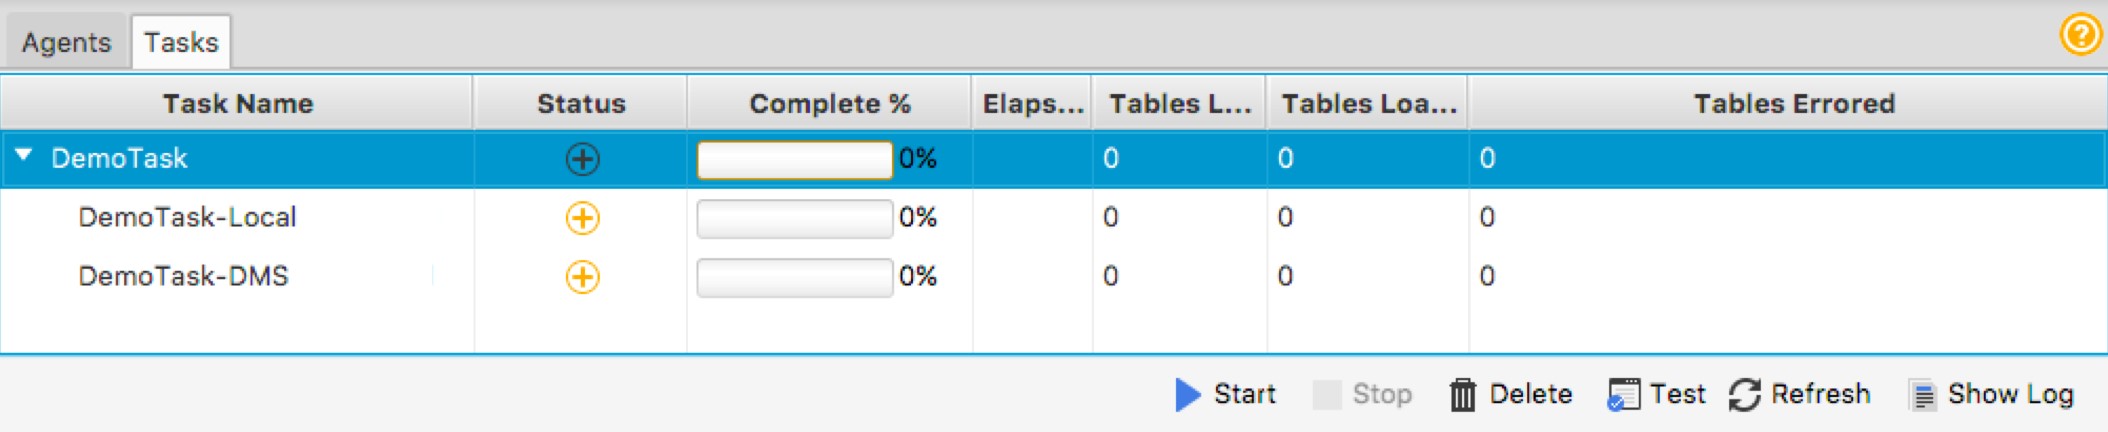
As a result, two tasks are created, which you can see in the AWS SCT UI and DMS console:
- Local task – This task migrates existing data from the source database to the AWS Snowball Edge and also any ongoing transactions to the staging S3.
- DMS task – This task is the one that you are used to seeing in AWS DMS console. This task migrates existing data from the staging S3 to the target database. It then applies any ongoing transactions to the target database. For clarification of the two tasks, see the architecture diagram preceding.


Step 3: Test the connections, start the tasks, and monitor progress
You are now ready to test the connection to the source database, AWS Snowball Edge device, and staging S3 from AWS DMS Replication Agent instance. To do so, choose Test on the AWS SCT Tasks tab.
Doing this also tests the connectivity to the staging S3 and the target database from the AWS DMS remote replication instance.
Unless the test for all these tasks is successful, you can’t start the tasks.
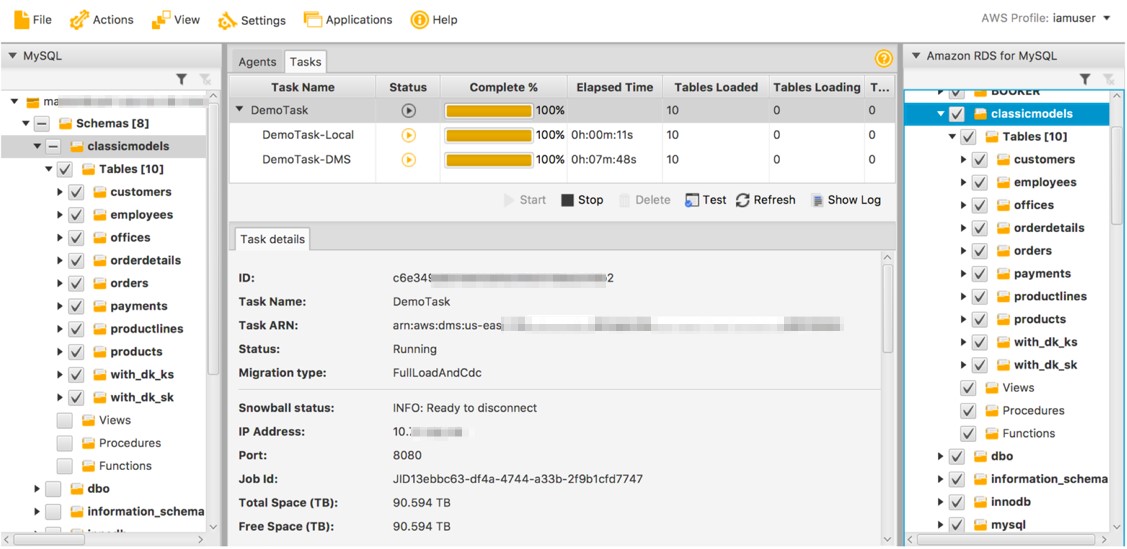
The AWS DMS task remains in the running state in the console until the AWS Snowball Edge device is shipped to AWS and the data is loaded into your staging S3 area.
The following diagram shows the loaded data streams.

As mentioned, when the AWS Snowball Edge is attached at AWS, the AWS DMS task automatically starts loading existing data into the target database (full load). The task then applies the change data capture (CDC) logs for ongoing replication.
When all existing data is migrated and the ongoing replication process brings both the source and target databases up to the same transaction level, you can cut over to the target database. Your applications can now point to the new database on AWS.
Congratulations! You have migrated your multiterabyte database or databases to AWS using AWS DMS and AWS Snowball Edge integration.
We also want to highlight the fact that you can migrate your database in this “push” model without using the AWS Snowball Edge device too! In this case, the local task or tasks copy the existing data from the source database to the staging S3, including the ongoing database transactions.
The DMS tasks on the AWS DMS remote replication instance then load existing data immediately on the target database. The tasks start loading the ongoing transactions once existing data is migrated. You can also use this staging S3 flow to verify that the entire process works well by testing on a small table or two before you order your Snowball Edge.
Summary
Many AWS features and services arise from AWS teams carefully listening to real-life customer experiences and needs. This new integration between AWS DMS and AWS Snowball Edge is an excellent example of implementing the ideas that emerge from that process. In turn, the implementation opens up new possibilities and opportunities for AWS customers.
There are many more use cases for this feature besides migrating very large databases. During a migration, if you need compression or must deal with corporate network access policies, this integrated solution might be the tool for you. If you have limited, remote, or geographically challenged bandwidth issues, this solution might be the tool for you. Or maybe you have many databases to migrate all at once, then this solution might be the best way to accomplish your goal. Don’t hesitate to explore this solution when migrating your databases to AWS.
For more information about this feature, read the AWS documentation. Let us know your feedback.
About the Authors
 Ejaz Sayyed is a partner solutions architect with the Global System Integrator (GSI) Team at Amazon Web Services. He works with the GSIs on AWS cloud adoption and helps them with solution architectures on AWS. When not at work, he likes to spend the time with his family which also includes two kids, Saad and Ayesha.
 Mitchell Gurspan is a senior solutions architect at Amazon Web Services. He is an AWS Certified Solutions Architect – Associate and is the author of a book on database systems. Mitchell resides in South Florida with his wife and two children. He enjoys tennis, teaches martial arts, and enjoys skiing when time allows.
Special thanks to Alex Gershun, an AWS DMS Software Development Engineer for his inputs.