AWS HPC Blog
How to manage HPC jobs using a serverless API
High performance computing (HPC) helps researchers, engineers and academic institutions to process simulations that are too complex to resolve within an acceptable timeframe or are just too large, which warrants a distribution of the workload across many servers.
HPC systems are traditionally accessed through a command line interface (CLI) where the users submit and manage their computational jobs. Depending on their experience and sophistication, the CLI can be a daunting experience for users not accustomed in using it. Fortunately, the cloud offers many other options for users to submit and manage their computational jobs.
An example is event-driven workflows that can automatically submit jobs as new data is stored in an Amazon S3 bucket. In addition to providing automation and minimizing direct user interactions, event-driven workflows provide creative ways to interact with the resources of your cluster. As a result, researchers and engineers can dedicate more time to science and less time managing their jobs.
In this blog post we will cover how to create a serverless API to interact with a HPC system in the the cloud built using AWS ParallelCluster. This API is a building block that will enable you to build event-driven workflows. We will also demonstrate how to interact with the cluster using the standard curl command. This detailed information will help you to extend the described solution and design your own customized environment. To this end, we use the following AWS services:
- Amazon API Gateway is a fully managed service that makes it easy for developers to create, publish, maintain, monitor, and secure APIs at any scale. APIs act as the “entry point” for applications to access data, business logic, or functionality from your backend services. We use Amazon API Gateway as central point of access to the AWS ParallelCluster cluster.
- AWS Systems Manager provides a unified user interface so you can track and resolve operational issues across your AWS applications and resources from a central place. With Systems Manager, you can automate operational tasks for Amazon EC2 instances. The solution uses AWS Systems Manager to run the scheduler commands on the AWS ParallelCluster Head node.
- AWS Lambda is a serverless compute service that lets you run code without provisioning or managing servers, creating workload-aware cluster scaling logic, maintaining event integrations, or managing runtimes. Amazon API Gateway uses AWS Lambda to run the SSM command on the Scheduler head node and return the results.
Figure 1 shows the components of the solution. The architecture illustrates how a user interacts with the API to start a HPC job in the cluster created by AWS ParallelCluster.
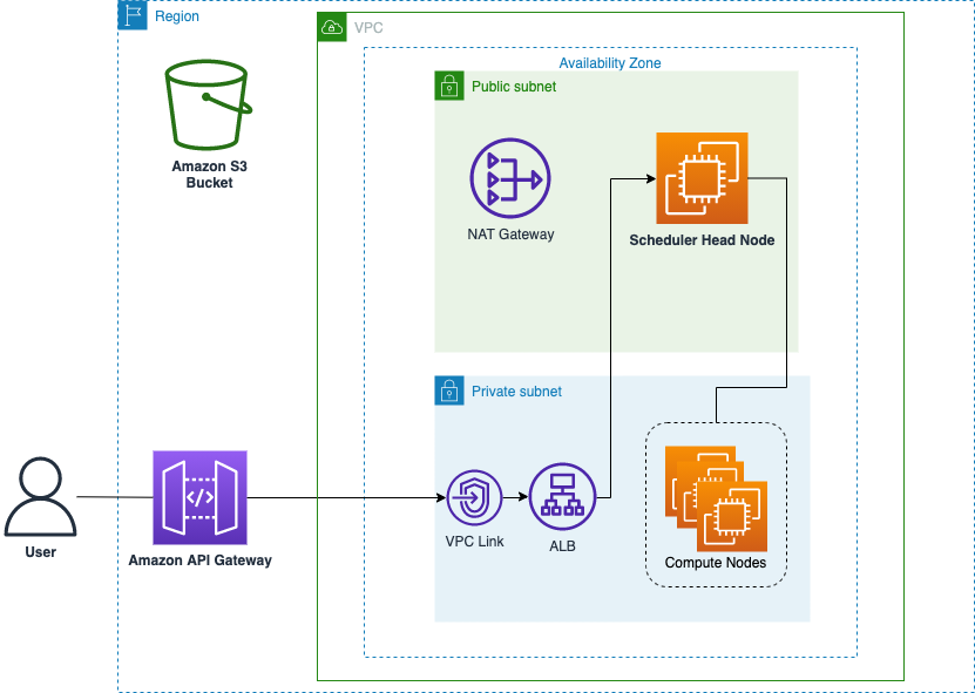
Figure 1. A high-level architecture of the solution
In this workflow, a user interacts with an Amazon API Gateway endpoint. The API Gateway interacts with the Slurm native rest API on the head node via VPC Link and an internal Application Load Balancer. The output from the command is displayed on-screen after the execution. AWS ParallelCluster performs the action of managing the compute nodes for processing the jobs submitted to the scheduler’s queue. Amazon S3 is also used to store the job script(s) submitted to the Slurm scheduler.
Cost of the solution
You can deploy the majority of the solution in this blog post within the AWS Free Tier. Make sure that your AWS ParallelCluster configuration uses the t3.micro instance type for the cluster’s head and compute instances. This is the default instance type specified in the AWS ParallelCluster configuration provided in this post. Some components that are deployed by AWS ParallelCluster will incur costs. The NAT gateway component does not offer a free tier, you are charged for each hour that your NAT gateway is available and each Gigabyte of data that it processes.
For real-world HPC use cases, you most likely want to use a different instance type, such as C5 or C5n. C5n in particular can work well for HPC workloads because it includes the option to use the Elastic Fabric Adapter (EFA) network interface. This makes it possible to scale tightly coupled workloads to more compute instances and reduce communication latency when using protocols such as MPI.
To stay within the AWS Free Tier allowance, be sure to destroy the created resources as described in the teardown section of this post.
Deploy the solution requirements
As a prerequisite to operating a cluster, you’ll need to ensure that you have a VPC that is compliant with AWS ParallelCluster’s network requirements to host the compute resources. Click on “Launch Stack” to create a compatible VPC and the required security group and bucket in your account:
![]()
After the stack has been deployed, upload the provided post-install.sh script in the created bucket.

Launch a cluster with AWS ParallelCluster
To further streamline deployment, you can use AWS CloudShell which already has the AWS SAM command line interface and other requirements installed and ready for you to use. AWS CloudShell is a browser-based shell that makes it easy to securely manage, explore, and interact with your AWS resources.
To install AWS ParallelCluster into a Python virtual environment, define a configuration file, and launch a small cluster:
- Open the AWS CloudShell Console, and ensure you’re operating in the Virginia (us-east-1) Region
- Clone the repository containing the AWS SAM template (and other assets) that defines the API:
- Install the cluster management tool; at the CloudShell prompt enter the following:
- Create the configuration file from the example that is provided in the repository:
- Open the file in your editor of choice (vim is already installed, you can install nanowith the yum package manager if you prefer):
- Search for and replace the “
CHANGE_ME” string in the file using the following guidance:
 There are four parameters that you’ll need to configure, each of them is unique to your account:
SubnetId: CHANGE_ME: The first change is the subnet ID for the head node. This parameter value can be found on the Outputs tab of the “hpc-serverless-job-mgmt-requirements” CloudFormation stack, see the “HeadNodeSubnetId” key. Refer to the following example:
- Here you must provide the name of the Security Group. You can get this value from the Outputs tab of the “hpc-serverless-job-mgmt-requirements” CloudFormation stack, see the following example:

KeyName: CHANGE_ME: Here you must provide the name of a valid EC2 key pair in your account. If you haven’t created one, learn how with Create or import a key pair, then come back here to resume.BucketName: CHANGE_ME: Here you must provide the name of the created bucket. You can get this value from the Outputs tab of the “hpc-serverless-job-mgmt-requirements” CloudFormation stack, see the following example:
Script: CHANGE_ME: Here you must provide the s3 path of the uploaded post-install.sh script.SubnetIds: CHANGE_ME: Here you must provide the subnet ID for the compute nodes. This parameter value can be found on the Outputs tab of the “hpc-serverless-job-mgmt-requirements” CloudFormation stack, see the “ComputeResourcesSubnetId1” or “ComputeResourcesSubnetId2”
BucketName: CHANGE_ME: Here you must provide the name of the created bucket. You can get this value from the Outputs tab of the “hpc-serverless-job-mgmt-requirements”
- Save the configuration file; in vim’s normal mode, input :wq and press the enter key.
- Create a new cluster named “my-cluster” using the saved configuration file. The following command creates a cluster named “my-cluster“.
Creating the cluster will take a few minutes. You can monitor the status in the CloudFormation console. Alternatively, you can read another blog post that explains how to create and manage cluster lifecycle with an API while you wait, Using AWS ParallelCluster with a serverless API.
When the deployment is completed, You need to take a note of the HeadNode instance ID.
The ID can be retrieved using the following ParallelCluster Command:
Deploy the API with AWS SAM
The AWS Serverless Application Model (AWS SAM) is an open-source framework that you can use to build serverless applications on AWS. You’ll use AWS SAM to simplify the setup of the serverless architecture explained later in this post.
In this case, the framework automates the configuration of the API Gateway. This is achieved by defining the resources in an AWS SAM template and deploying it with the AWS CloudFormation service. This simplifies infrastructure deployment so you can focus on how the API works with the Slurm scheduler.
To deploy the SAM application with AWS CloudShell:
- Inside the AWS CloudShell Console, use the AWS SAM command line interface (CLI) and build the serverless application
- Again, using the AWS SAM CLI; deploy the application
- The guided deployment will ask you to provide inputs that will inform how the AWS resources are deployed, accept the default answers except for the following two prompts (highlighted in the following screenshot of AWS CloudShell):
- For “Stack Name [sam-app]:” enter
hpc-serverless-job-mgmt-api - For “Parameter VpcId []:” enter the VPCID from the Outputs tab of the “hpc-serverless-job-mgmt-requirements” CloudFormation stack.
- For “Parameter PrivateSubnetIds []:” enter the comma separated list of the ComputeResourcesSubnetId1 and ComputeResourcesSubnetId2 values from the Outputs tab of the “hpc-serverless-job-mgmt-requirements” CloudFormation stack.
- For “Parameter HeadNodeInstanceID []:” enter the HeadNode instance id retrieved in the previous section.
- For “Parameter LoadBalancerSG []:” enter the APISecurityGroup from the Outputs tab of the “hpc-serverless-job-mgmt-requirements” CloudFormation stack.
- For “Stack Name [sam-app]:” enter

AWS SAM will now initiate the deployment and create the resources defined in the template, once complete, it will display useful information about an Amazon S3 bucket, IAM policy, and an API endpoint URL. This is information needed for configuration later in this process (you don’t have to note it now, but you can to save steps later on).

Interact with the HPC cluster via API
To interact with the created API, You need to generate a Slurm token used for the authentication.
The token can be generated, connecting to the Slurm Head Node as ec2-user:

The lifespan parameter is used to specify the token’s lifespan in seconds
The following examples will demonstrate interaction with curl. The SLURM_JWT variable must be exported in your local terminal before executing the commands. The Schedmd Slurm rest API page contains the API implementation details.
Here is an example for listing cluster partitions:
The result should look like the following:
Next, let’s look an example for submitting a job.
To submit a job via the API:
The first step is to create a file named job.json with the following content:
The syntax of the script is available in the Slurm rest API documentation.
Now you may submit the job (which will remain in the queue for 5 minutes so that you can explore the other examples):
Result:
{
   "meta": {
     "plugin": {
       "type": "openapi\/v0.0.36",
       "name": "REST v0.0.36"
     },
     "Slurm": {
       "version": {
         "major": 20,
         "micro": 8,
         "minor": 11
       },
       "release": "20.11.8"
     }
   },
   "errors": [
   ],
   "job_id": 2,
   "step_id": "BATCH",
   "job_submit_user_msg": ""
Job Detail:
curl -H "X-SLURM-USER-NAME:ec2-user" -H "X-SLURM-USER-TOKEN:${SLURM_JWT}" https://abc123def456.execute-api.us-east-1.amazonaws.com/slurm/v0.0.36/job/2Result:
And so on with other API methods such as listing jobs.
Cleanup
When you have finished your computation, the cluster can be destroyed using the following command in your CloudShell:
Empty and remove the Amazon S3 bucket created as part of the requirements stack:
Next, delete the following two CloudFormation stacks in the CloudFormation Management Console:
- hpc-serverless-job-mgmt-requirements
- hpc-serverless-job-mgmt-api
Conclusion
In this post, we show you how to deploy a complete serverless API to interact with an HPC system built using AWS ParallelCluster.
A traditional HPC system requires access through a command line interface (CLI) to interact with the underlying environment for the submission and management of the jobs. This kind of interaction can be a barrier for some users.
The architecture in the post brings the simplicity of a cloud native approach to a complex environment like an HPC scheduler through an API. This API enables you to build an event-driven workflow to automate the job submissions based on new data in an Amazon S3 bucket.
The solution shown here interconnects several services with Amazon API Gateway acting as a gateway to your HPC environment and interacts with the AWS ParallelCluster cluster. This solution uses a serverless architecture pattern to manage the Slurm scheduler on the head node and return results.
In addition, this approach can help you improve the security of your HPC system by preventing users from directly accessing the Slurm scheduler head node through the CLI. This can be a requirement driven by organizational security policies. In addition, the solution can be used in an event-driven workflow and automatically invoked when new data is ingested into your environment.
The solution can be extended to orchestrate the entire life of a job; from copying the required data into the cluster, submitting the job, and managing the collection and storage of the generated data.
We consider this architecture an entry point to building your event-driven cluster more reliably and securely.