AWS HPC Blog
Leveraging Seqera Platform on AWS Batch for machine learning workflows – Part 2 of 2
 This post was contributed by Dr Ben Sherman (Seqera) and Dr Olivia Choudhury (AWS), Paolo Di Tomasso, and Gord Sissons from Seqera, and Aniket Deshpande and Abhijit Roy from AWS.
In part one of this two-part series, we explained how Nextflow and Seqera Platform work with AWS, and we provided a sample Nextflow pipeline that performs ML model training and inference for image analysis to illustrate how Nextflow can support custom ML-based workflows. We also discussed how AWS customers are using this today.
In this second post, we will provide a step-by-step guide explaining how users new to Seqera Platform can rapidly get started on AWS, maximizing the use of AWS Batch, Amazon Simple Storage Service (Amazon S3), and other AWS services.
Depending on your familiarity with AWS, these steps should take around an hour to complete.
Prerequisites
Before following the step-by-step guide here, readers should:
- Have an AWS account and be familiar with using the AWS Management Console or AWS Command Line Interface (CLI).
- Have a high-level understanding of AWS Identity and Access Management (IAM) users and roles.
- Obtain a free Seqera Cloud account for testing.
Step-by-step guide
This section explains how to set up an AWS environment to support pipeline execution, obtain a free Seqera Cloud account, and configure Seqera to launch and manage the ML pipeline introduced in part 1 of this series.
Create an Amazon S3 bucket
The first step is to create an S3 bucket in your preferred AWS region (we used us-east).
- Once logged into the AWS console, navigate to the Amazon S3
- Click on the Create bucket
- Give the bucket a globally unique name (for example, we used
seqera-work-bucket, but you will need to choose something else) and select the AWS region where the bucket will reside. - You can leave ACLs disabled and block all public access to the bucket since Seqera Platform will use this bucket internally. Others do not need to see the contents.
- Accept the default for the remaining settings and select Create bucket.
Once the bucket is created, select it and record its Amazon Resource Name (ARN) by clicking Copy ARN. In our example, the ARN is arn:aws:s3:::seqera-work-bucket.
You will need the name of the ARN to set up an AWS policy in the following steps.
Setup your IAM credentials
To create an AWS Batch environment and marshal other AWS cloud resources, Seqera will need AWS credentials. We’ll use the AWS Identity and Access Management (IAM) service to create appropriate IAM policies and attach these policies to an AWS IAM user or role.
First, create a policy with sufficient privileges to manage the AWS Batch environment and support pipeline execution. Follow the steps below to create a custom “seqera_forge_policy.”
- Navigate to the IAM console by searching for the IAM service
- Under Access Management, select Policies
- Click on Create policy to create a new IAM policy
- Under Specify permissions, select the JSON policy editor
- Copy the contents of the default
forge-policy.jsonfile located on GitHub into the policy editor - Click Next
- Give the policy a name (like
Seqera_Forge_Policy) - Select Create policy
Note that this is a sample policy and you should review the policy based on your security requirements, particularly if you want to use it for production.
With these steps, you have created a policy to give Seqera sufficient permissions to deploy an AWS Batch environment on your behalf.
Next, you’ll need to create a similar policy that gives your IAM user or role permission to access the Amazon S3 bucket you created earlier.
- Repeat the steps in IAM as before to create a new policy for accessing the S3 bucket by clicking Create policy from the Policies screen
- Under Specify permissions, select the JSON policy editor
- Copy the contents of the default
s3-bucket-write.jsonfile located on GitHub into the policy editor - Update the ARN in the
S3-bucket-writepolicy to reflect the ARN for the S3 bucket you created - Click Next
- Give the policy a name (like
Seqera_S3_Bucket_Write) - Select Create policy
You should now have two new customer-managed policies, as shown in Figure 1.
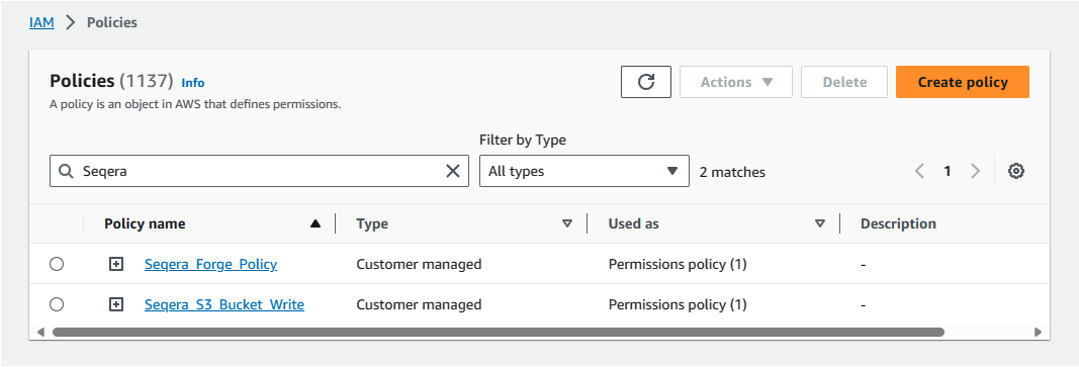
Figure 1: Create IAM policies to manage AWS Batch environment and execute pipelines.
Next, attach these policies to an IAM user or IAM role. You may already have your own IAM users or roles defined, in which case you can bind the policies to existing users or roles.
If you are doing this for the first time, follow these steps to create a new IAM user called seqera-user, and bind the policies created above to that user like this:
- From the AWS console, navigate to the IAM console
- Under Users, select Create user
- Give the user a name like
seqera-user - There is no need to provide this IAM user with access to the AWS Management Console
- Select Attach policies directly
- Search for the two customer-managed policies you created earlier by searching on the string Seqera and then select these two policies to apply them to the new IAM user
- After attaching the policies, select Create user
The final step is to create an access key based on the new IAM user that will be used by Seqera:
- Under Access management / Users, select seqera-user
- Record the user’s ARN for future reference
- Click on Create Access key
- Record the Access key and Secret access key and store them in a safe place. You’ll need these credentials to create a compute environment in the Seqera Platform.
Create a free Seqera Cloud account
The next step is to create a free Seqera Cloud account. Navigate to https://seqera.io and click on Login / Sign up. You can create a free account and sign into the Seqera cloud environment hosted on AWS infrastructure using GitHub or Google credentials – or by providing an email address.
After logging in, you’ll be directed to the Seqera Platform console.
Setup an AWS Batch Compute Environment in Seqera
On initial login to the Seqera Platform, you’ll be taken to a community showcase workspace with ready-to-run pipelines and preconfigured AWS compute environments. New users can experiment with community showcase pipelines and Datasets and enjoy up to 100 hours of free AWS cloud credits.
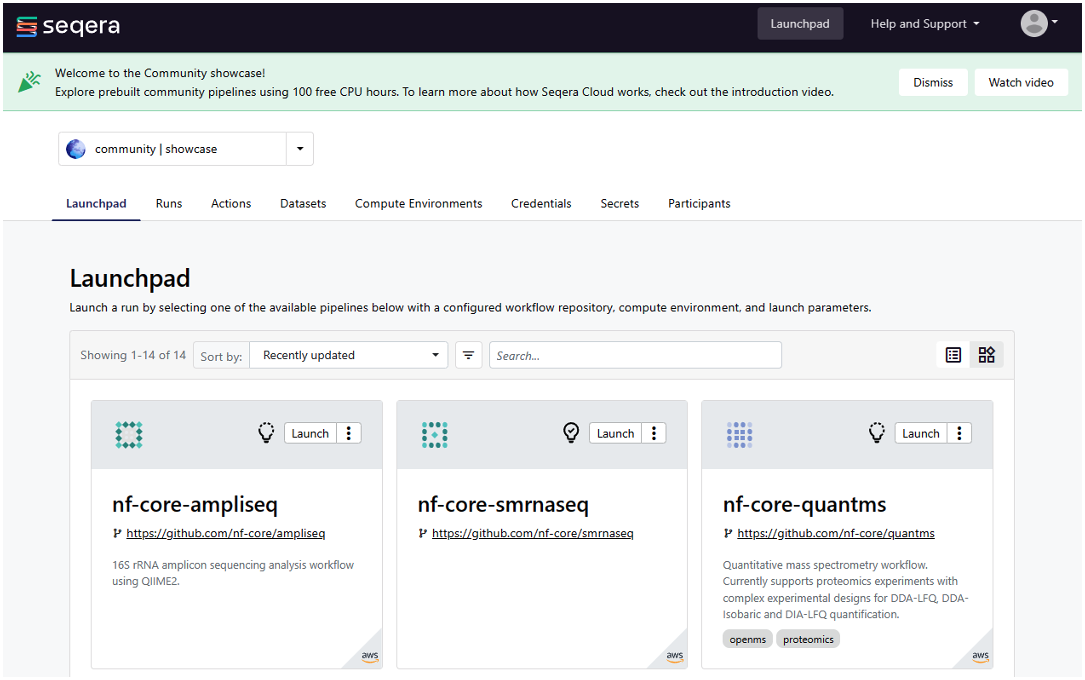
Figure 2: Log in to Seqera Platform to use community showcase pipelines or add your own pipelines.
You can also watch a short introductory video that explains how to get started with the Seqera interface.
To add your own compute environments and pipelines, you’ll need to navigate to your personal workspace, as shown in Figure 2. Click on the selector next to community | showcase and select your personal workspace by selecting your name where it appears under user. You can optionally create a new workspace and store your compute environments and pipelines there.
The first time you login, your personal workspace will have no compute environments, datasets, or pipelines. You can create a new AWS Batch Compute Environment (CE) by following these steps:
- Select the Compute Environments tab from within your personal workspace
- Click on Add Compute Environment
Define a new AWS Batch compute environment, by completing the form, as shown in Figure 3:
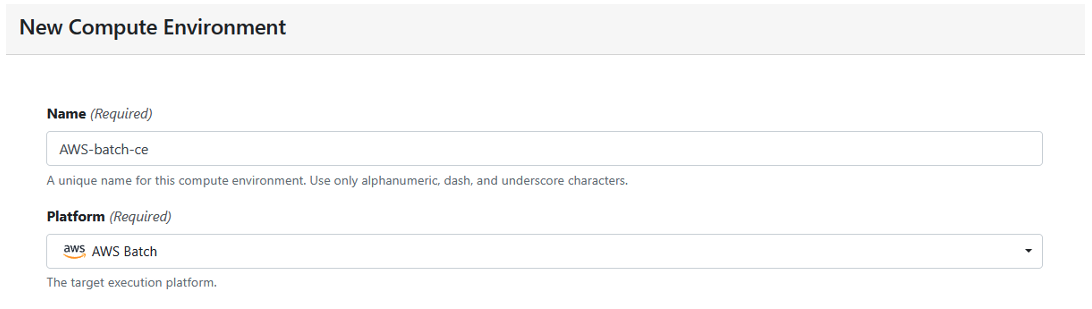
Figure 3: Create a new compute environment.
The first time you add user credentials, you’ll be asked to supply the IAM Access key and Secret access key you generated earlier.
Seqera Platform will store these credentials securely and ask you to assign a name to the credentials for future reference. Your AWS credentials will not be visible to you, or other users.
Continue filling in the form, as illustrated in Figure 4:
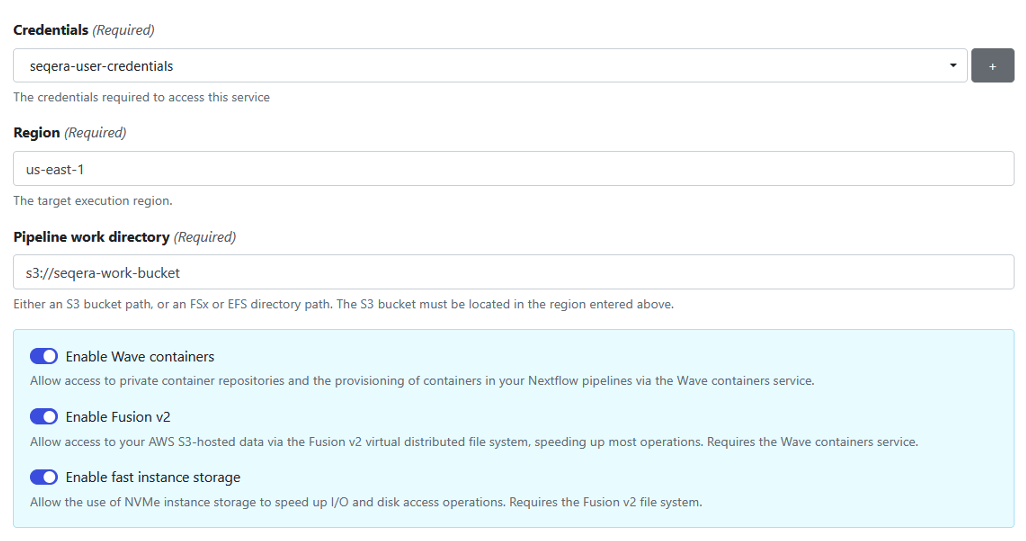
Figure 4: Add credentials to store access keys and tokens for your compute environment.
Nextflow pipelines running on AWS Batch typically use Amazon S3 storage. Nextflow supports S3 natively, automatically copying data in and out of S3 and making it accessible to containerized bioinformatics tools.
To provide more efficient data handling, we use Seqera’s Fusion file system (Fusion v2) when setting up the pipeline. Fusion is a virtual, lightweight, distributed filesystem that allows any existing application to access object storage using the standard POSIX interface. Using the Fusion file system is optional but it’s recommended because it reduces the pipeline execution time and your cost by avoiding overhead related to data movement. If you use the Fusion file system, you must also enable Wave containers in the compute environment since the Fusion client is deployed in a Wave container.
You can learn more about Fusion file system in the whitepaper Breakthrough performance and cost-efficiency with the new Fusion file system.
Under Config mode, select Batch Forge to have Seqera automatically configure the AWS Batch account on your behalf.
For the provisioning model, select Spot, as shown in Figure 5. Since Nextflow pipeline tasks can tolerate Amazon Elastic Compute Cloud (Amazon EC2) Spot Instances being interrupted, we recommend you use Spot Instances in most cases.
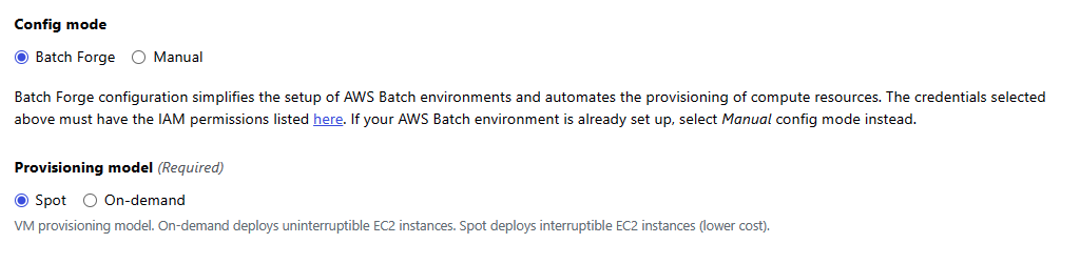
Figure 5: Select Batch Forge for Config mode and Spot for Provisioning model.
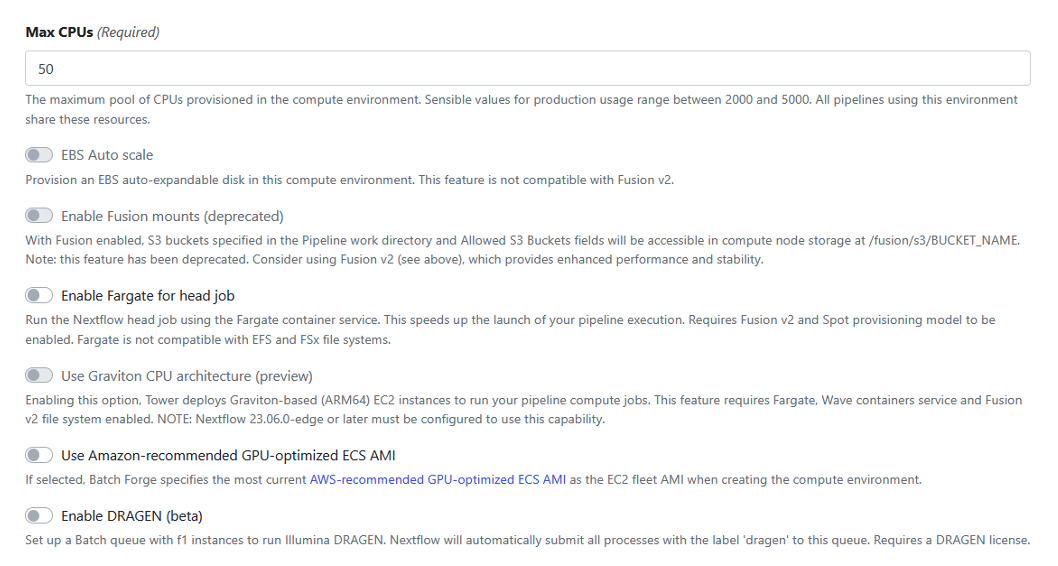
Figure 6: Select default values for the rest of the configuration options.
Accept the defaults for the remainder of the configuration options, as shown in Figure 6.
Once you’ve provided details of your Batch Compute Environment, click Add to add the CE.
Assuming you have valid AWS credentials and have filled in the form correctly, you should see a new Compute Environment appear in your Seqera workspace.
After creating the Compute Environment in Seqera, you can login into the AWS Console and navigate to AWS Batch. Assuming you selected Spot provisioning, two new AWS Batch CEs – and queues – will have been created on your behalf.
Seqera Forge configures a Head queue that dispatches Nextflow head jobs to a compute environment configured to use EC2 On-Demand instances. This prevents the Nextflow head job from being interrupted during execution.
A separate Work queue and Spot-based CE are also automatically configured to support Nextflow compute tasks during pipeline execution.
The names of the queues and compute environments are assigned by Seqera Forge, like in Figure 7:
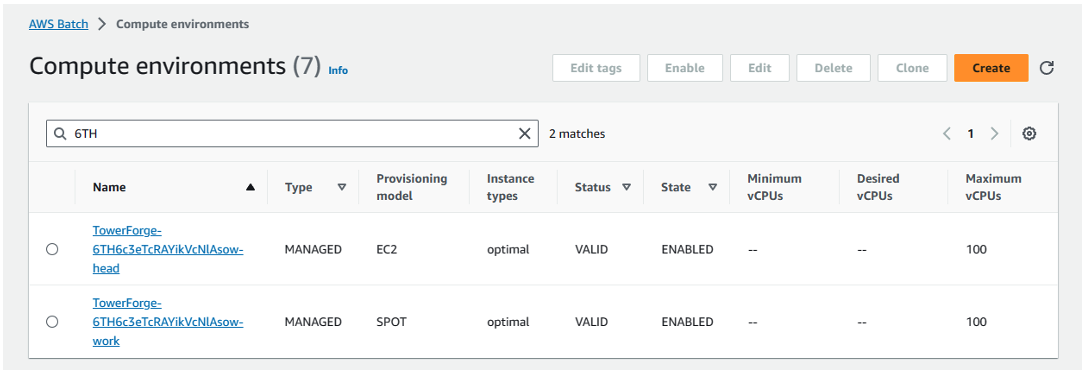
Figure 7: Assign queues and compute environments with Seqera Forge.
Add the ML pipeline to the Launchpad
Now that we have an AWS Batch CE set up in our Seqera workspace, we can add the ML pipeline to the Seqera Launchpad.
- From your workspace in the Seqera UI, select the Launchpad tab
- Click Add pipeline
- Give the pipeline a name like
ML-hyperopt-pipeline - Select the Compute environment created above
- Supply the pipeline’s repository URI – for our machine learning example, use
https://github.com/nextflow-io/hyperopt - Click on the Revision number field, and select the tag or branch name retrieved from the source code manager to select a particular pipeline branch or version. Use master in this example.
- Specify the S3 bucket you created earlier as the work directory (e.g.
s3://seqera-work-bucket) - Under Config profiles, select wave
- Under Advanced Options in the Nextflow config file field, optionally set
dag.enabled=trueif you would like Nextflow to generate a DAG (directed acyclic graph) file - Accept the defaults for the rest of the pipeline configuration options
- Click Add to add the pipeline to the Launchpad
- You should see the new
ML-hyperopt-pipelineappear in the Seqera Launchpad in your workspace
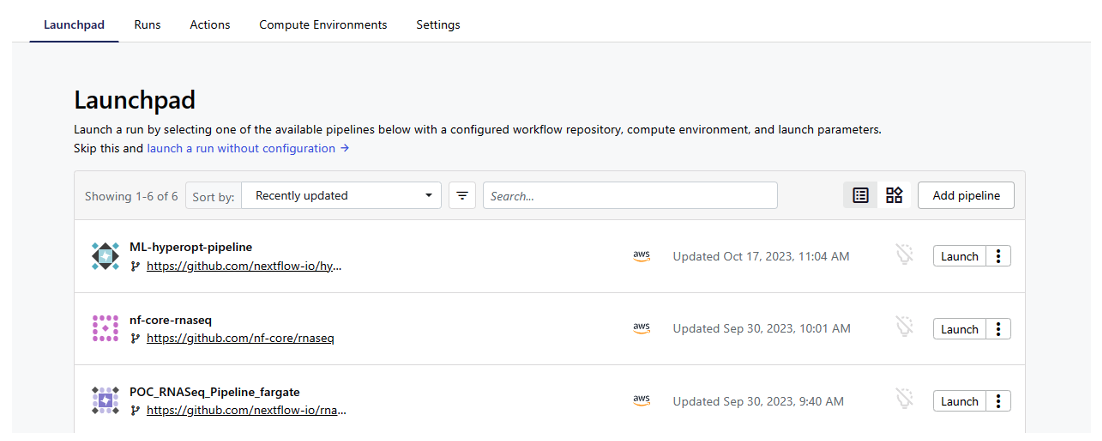
Figure 8: Add ML pipeline to Seqera Launchpad.
Run the pipeline
To run the ML-hyperopt-pipeline, click on Launch beside the ML-hyperopt-pipeline on the Launchpad.
After launching the pipeline, you can monitor execution under the Runs tab. The pipeline will take a few minutes to start the Amazon EC2 instances supporting the AWS Batch CEs and begin dispatching tasks to Batch.
Assuming the pipeline runs successfully, you should see the following output in the Execution log accessible through the Seqera interface.
N E X T F L O W  ~  version 23.10.0
Pulling nextflow-io/hyperopt ...
 downloaded from https://github.com/nextflow-io/hyperopt.git
Launching `https://github.com/nextflow-io/hyperopt` [mighty_koch] DSL2 - revision: eb2b84a91a [master]

    M L - H Y P E R O P T   P I P E L I N E
    =======================================
    fetch_dataset   : true
    dataset_name    : wdbc

    visualize       : true

    train           : true
    train_data      : data/*.train.txt
    train_meta      : data/*.meta.json
    train_models    : [dummy, gb, lr, mlp, rf]

    predict         : true
    predict_models  : data/*.pkl
    predict_data    : data/*.predict.txt
    predict_meta    : data/*.meta.json

    outdir          : results

Monitor the execution with Nextflow Tower using this URL: https://tower.nf/user/gordon-sissons/watch/5MUVbQjbhEFjRu
[da/4b6a7f] Submitted process > fetch_dataset (wdbc)
[c5/78cd5e] Submitted process > split_train_test (wdbc)
[68/29cb37] Submitted process > train (wdbc/dummy)
[01/0b89d1] Submitted process > train (wdbc/mlp)
[37/7e1cc8] Submitted process > train (wdbc/lr)
[22/8452c6] Submitted process > train (wdbc/rf)
[6e/763ce3] Submitted process > visualize (1)
[2a/3f3d84] Submitted process > train (wdbc/gb)
[5a/1c71a0] Submitted process > visualize (2)
[cc/7dd9ad] Submitted process > predict (wdbc/dummy)
[b5/f30153] Submitted process > predict (wdbc/mlp)
[de/340f09] Submitted process > predict (wdbc/lr)
[e5/d205ef] Submitted process > predict (wdbc/rf)
[38/6a6eaf] Submitted process > predict (wdbc/gb)
The best model for ‘wdbc’ was ‘mlp’, with accuracy = 0.991

Done!
Note that the pipeline trains each model, runs each model against the dataset, and determines the model with the best predictive accuracy.
If you’ve gotten this far: Congratulations! You’ve successfully set up your first compute environment in Seqera and used AWS Batch to execute a machine learning pipeline.
Conclusion
For organizations collaborating on large-scale data analysis and ML workloads, Seqera Platform running on AWS can be an excellent solution. You can more easily deploy powerful AWS compute and storage resources at scale, while also reducing your costs through optimized resource usage, and managing spend across projects and teams. You can also leverage best-in-class curated bioinformatics pipelines and modules from nf-core and other sources.
This can help improve research productivity with a unified view of data, pipelines, and results, while collaborating more effectively with local and remote teams.
We’re excited to know how this works out for you, or if you have other challenges that AWS or Seqera can help you meet. Contact us at ask-hpc@amazon.com if you want to discuss these with us.
The content and opinions in this blog are those of the third-party author and AWS is not responsible for the content or accuracy of this blog.