AWS for Industries
Developing healthcare applications using Epic Electronic Health Record APIs
The healthcare industry is increasingly turning to technology to improve the user experience throughout the continuum of care. Healthcare organizations are developing new, innovative applications for patients, members, administrators, and clinicians by leveraging real-time Epic Electronic Health Record (EHR) data using APIs. These applications range from clinical communication, to patient triage, to care coordination, and beyond.
This post demonstrates how Epic customers can use Amazon Lambda to query RESTful APIs in real-time. Amazon Lambda easily integrates with many of our other services in order to build robust voice, mobile, web, reporting, and AI/ML applications. By leveraging Amazon Lambda to make API calls, customers can use the example in this post to modify and create their own solutions for their organizations.
Overview of solution
Before we begin, it’s important to mention that the method outlined here is for creating an application with system-level access using OAuth 2.0 (commonly referred to as a backend system integration). While there are other types of integrations you can consider, such as a SMART on FHIR EHR launch or standalone launches, those other methods require different workflows that are not in scope for this post. For demonstration purposes, we are building a simple chatbot that you can call into, ask about your medications, and have it speak the real-time results to you. While chatbots are one use case for this, the possibilities of what you can build using this method can range from doing real-time AI/ML predictions to querying data for patient and clinician portals, or even optimizing workflows and building real-time dashboards. The possibilities are up to you.
The following high-level architecture diagram illustrates what we are building for this example.
 Figure – Overall architecture of solution
Walkthrough
For this walkthrough, the following prerequisites are needed.
Prerequisites
- An AWS account
- An App Orchard Account
- Permissions to create for Amazon Connect, Amazon Lex, Amazon Lambda, Amazon KMS, and Amazon Certificate Manager
- Java JDK, OpenJDK, Coretto, or compatible compiler
- Maven
- General knowledge of APIs, FHIR, and creating JWT’s (JSON Web Tokens)
With these prerequisites in mind, we can now begin creating the certificate needed to authenticate to clinical data.
Compile the sample Java program to create a PEM and Certificate in AWS
The first step in creating a secure application through SMART Backend services following the OAuth 2.0 framework, which requires JSON Web Token (JWT) code-signing, is a certificate generated by AWS Key Management Service (KMS) and AWS Certificate Manager (ACM) Private Certificate Authority (PCA).
To do this, we took the sample code from the blog post Code signing using AWS Certificate Manager Private CA and AWS Key Management Service asymmetric keys and modified it. Grab the code from our sample Java application, which will allow you to customize the certificate common name and AWS region to deploy in. You can either download the JAR package or build the Java application based on Java source code using Maven. The application depends on the AWS SDK for Java and Bouncy Castle Crypto APIs, and it has been tested with Amazon Corretto 11 and Maven 3.6. To run the Java application, you will need to install and configure the default profile of AWS Command Line Interface (CLI) using an AWS Identity & Access Management (IAM) user with the programmatic access and appropriate permissions to invoke both ACM and ACM private CA APIs.
After downloading the JAR package, run this command:
java -cp ./diy-code-signing-kms-private-ca-1.0-SNAPSHOT-jar-with-dependencies.jar com.amazonaws.acmpcakms.examples.Runner
To build the package and run the program, try the following command in KMS-PCAACM-OAUTH folder: mvn verify
You should see the below output. Respond to the following customization questions:
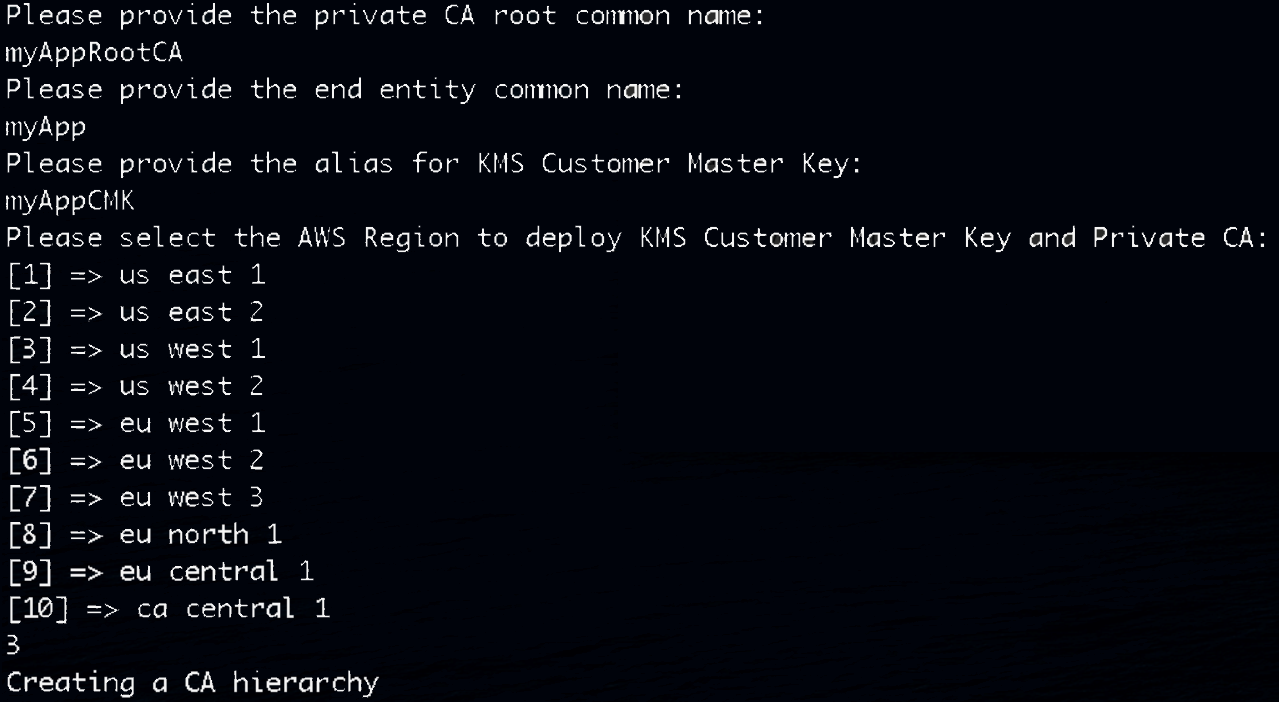 Figure – Provide a private CA name, entity common name, KMS key alias, and a Region for deployment
Once the program exits successfully, you will see the public X509 certificate myappcodesigningcertificate.pem file. Copy this PEM file somewhere so you can use it later in this guide. You will also see a root Private CA created in US-WEST-1 region as selected above.
 Figure – View of your new private CA
You will also see a Custom Master Key in KMS in the same AWS region.
 Figure – View of your new customer managed key
Take note of the CMK Key ID, as this will be used later to sign our JWT token.
Application Setup
Applications that connect to Epic can make use of FHIR or other API calls. Epic customers can use Epic’s Galaxy website for the latest instructions on how to configure your setup. You can also review the latest guidelines and requirements for publishing apps using the App Orchard or Epic on FHIR.
Set up your application using the following steps:
- Create a new application. Take note of the non-production and production client IDs that are generated for your application. You will use the non-production ID later in this post.
- Configure your app record for use with backend systems.
- Select the desired incoming APIs that your app will need access to. For the code example in this blog, we are using MedicationStatement.Read(STU3), MedicationStatement.Search(STU3), Patient.Read(STU3), and Patient.Search(STU3).
- Enable OAuth 2.0.
- Upload the Public.pem file (created above) as a public key.
- Choose a FHIR version.
- Activate your app.
Building in Lambda
We can now move back to our AWS account and continue the build. If there’s one thing to take away from this post, it is this section, where we show how to query data using Lambda. For this example, we are building against the App Orchard’s sandbox environment.
Deploy the needed Lambda code through the one-click CloudFormation deployment:
![]()
Or as an alternative to the one-click deployment, follow these steps in your AWS console:
- Create an empty Lambda function with Python 3.8 as the language. This function will be used to query data and fulfill our bot requests.
- Add the following environment variables to the function and add the App Orchard and KMS keys from earlier:
 Figure – For demonstration purposes, use your unique client_id and kms_key_id as environment variables. In production, store these in AWS Secrets Manager.
- We created a Python class you can easily download and add to your Lambda function. You can choose how to implement this in your environment, but this class contains a function called “get_access_token”, containing the most important logic for connecting and generating your JWT. This function takes any client ID and generates a token using KMS.
Python Lambda function Sample Code:

def get_access_token(self, clientid, audience, expires_in_minutes=4):
        segments = []

        header_dict = {
          "alg": "RS384",
          "typ": "JWT"
        }
        header = json.dumps(header_dict, separators=(",", ":")).encode("utf-8")
        segments.append( base64.urlsafe_b64encode(header).replace(b"=", b"") )

        tmpexp = datetime.now(timezone.utc) + timedelta(minutes=expires_in_minutes)
        tmpintexp = int((tmpexp - datetime(1970, 1, 1, tzinfo=timezone.utc)).total_seconds())
        payload_dict = {
            'iss': clientid,
            'sub': clientid,
            'aud': audience,
            'jti': ''.join(random.choice(string.ascii_letters) for i in range(150)),
            'exp': tmpintexp
        }
        payload = json.dumps(payload_dict, separators=(",", ":")).encode("utf-8")
        segments.append( base64.urlsafe_b64encode(payload).replace(b"=", b"") )
        signing_input = b".".join(segments)
        logger.debug('signing input: {}'.format(signing_input.decode("utf-8")))

        response = self.kms_client.sign(
            KeyId=self.kms_key_id,
            Message=signing_input,
            MessageType='RAW',
            SigningAlgorithm='RSASSA_PKCS1_V1_5_SHA_384'
        )
        signature = base64.urlsafe_b64encode(response['Signature']).replace(b"=", b"")
        segments.append( signature )
        encoded = b".".join(segments)
        postData = {
            'grant_type' : 'client_credentials',
            'client_assertion_type': 'urn:ietf:params:oauth:client-assertion-type:jwt-bearer',
            'client_assertion': encoded
        };
        r = self.http.request('POST', audience, fields=postData)

        return {
            'status': r.status,
            'data': json.loads(r.data.decode())
}- Visit our sample repo to download the entire Lambda function to use. The function contains all bot fulfillment methods, as well as the class generating your auth token.
- Deploy the Lambda function into your account. We can now begin building a voice-enabled chatbot that will query real-time clinical data.
Building an IVR using Amazon Connect and Amazon Lex
It’s now time to test our code and bring it all together in a sample application with real-time clinical data. We will be using Amazon Connect, a self-service IVR, with an Amazon Lex chatbot calling our Lambda function (created in the previous step) through an Amazon Connect contact flow. (This blog assumes you already have an Amazon Connect instance ready. To learn more, see Create an Amazon Connect instance.) For this post, a sample Lambda function and contact flow are provided and can be downloaded via the following links:
- Starter Contact Flow: https://connect-epic-us-east-1.s3.amazonaws.com/Epic+Starter+Flow.json
- Authentication Bot: https://connect-epic-us-east-1.s3.amazonaws.com/DemoPatientAuth_Bot_LEX_V1.zip
- Healthcare IVR Bot: https://connect-epic-us-east-1.s3.amazonaws.com/demoHealthcareIVR_Bot_LEX_V1.zip
After downloading these samples, perform the following steps:
- Import both the Lex bots into your AWS console.
- Update each of the bots’ intents to use our Lambda function as the fulfillment.

- Build and publish the Lex bots.
- Add both of the Lex bots to your Amazon Connect instance Build and publish the Lex bots.
 Resulting configuration of adding Lex bots to Amazon Connect instance
 - Import the contact flow into your Amazon Connect instance and associate it with a phone number.
- Edit the contact flow. Select each of the two “Get customer input” blocks and select the appropriate Lex bot. The first block in the flow will use DemoPatientAuth and the second will use demo HealthcareIVR.
 Figure – Example of Amazon Connect contact flow with Amazon Lex
By separating our authentication from our main bot, we’re able to ensure that patients interacting with clinical data will not inadvertently trigger the need to authenticate again.
- Save and publish the contact flow.
Testing the Solution
Now that the solution is deployed, you can dial into the IVR and test the data integration. Perform the following steps in order to test:
- Find a patient within the system that has medications prescribed. Make sure that the phone number for the patient is the same as the phone number you will be dialing from (as the contact flow currently uses the calling number as one of the identifiers). Also take note of the following information for the patient:
- Birth date
- Gender
- Call the phone number that was configured to point to the IVR contact flow. On answer, the contact flow will attempt to authenticate you by using your phone number and prompting you to say your birthday and gender.
- If successfully authenticated, you can ask what your medications are by using one of the following utterances:
- What are my medications?
- Help with medications
- Medications
Deploying in the Real World
You now have a functional bot that you can call into. In the real world, you will want to clean up the bot and contact flow so they are more robust and can handle more complex interactions. You also need to change your environment variables to use the sandbox of your choice for development and production. We used a very simple flow to demonstrate validating a patient over phone, but check with your organization’s security and legal teams to ensure you validate patients according to your organization’s requirements for patient authentication.
Another important aspect to consider is who should be creating the application in the App Orchard. In short, the answer is that it boils down to ownership. If this solution is being created for multiple organizations (i.e., an AWS ISV Partner SaaS offering), that partner should have their own App Orchard account since they will be owning the client IDs and defining the App Orchard listing. If the solution is being built for a customer (perhaps by an AWS SI Partner) and will be owned by the customer, then the partner should have their customer create the application in the customer’s App Orchard account.
Cleaning Up
To avoid incurring future charges, delete the Private CA previously generated as well as the Amazon Connect phone number. The rest of the resources created throughout this post are pay-as-you-go.
Conclusion
This post provides the steps needed to integrate real-time Epic APIs with AWS resources in a secure manner. While the example outlined above is a simple workflow with a handful of services, the ability to integrate with other AWS HIPAA eligible services is quite extensive and ultimately up to your imagination.
We encourage you to contact us or reach out to your AWS account manager if you have further questions or interest in building solutions with real-time clinical data. Happy healthcare building! To find the latest development to this solution, check out this repository on GitHub.
To learn more about how Epic customers can leverage AWS services, visit Epic on AWS for Healthcare & Life Sciences.
—
Epic and App Orchard are trademarks or registered trademarks of Epic Systems Corporation.