Integration & Automation
Customize an AWS Quick Start for your use case
While AWS Partners and customers often use AWS Quick Starts without changing the default architecture, you can customize a Quick Start for your use case. Customizing makes sense when you find an architecture in the Quick Start catalog that comes close to what you want to build, and you need a unique variation of it.
Quick Starts are automated reference architectures that streamline the deployment of key workloads on the AWS Cloud. They use infrastructure as code to provision production environments on AWS that may require hundreds of discreet procedures to deploy manually. In addition to the efficiency they offer, Quick Starts have an often overlooked but critical aspect: they’re open-source and modular. That’s what makes them customizable.
In this post, I describe the three steps for customizing a Quick Start:
- Fork and clone the Quick Start repository.
- Customize the Quick Start by modifying templates.
- Deploy the customized Quick Start from your AWS account.
| About this blog post | |
| Time to read | 6 min. |
| Learning level | Intermediate (200) |
| AWS services | AWS CloudFormation |
Prerequisites
This blog post assumes that you’re familiar with AWS CloudFormation templates, GitHub, and Git commands.
For this post, you need the following:
- An AWS account
- Access to AWS Management Console
An example Quick Start
Let’s pick an example architecture. The Amazon Elastic Kubernetes Service (Amazon EKS) Quick Start, shown in Figure 1, deploys an Amazon EKS cluster, Kubernetes nodes spanning two or three Availability Zones, and a Linux bastion host in a public subnet. It also includes a number of additional options to choose during deployment. For example, you can deploy AWS Partner products into the cluster or include an AWS Load Balancer Controller.

Figure 1. Example architecture—Amazon EKS Quick Start
The default deployment may suit your needs. However, what if you want more than three Availability Zones or Linux bastion hosts? How about automating a post-deployment process that is not supported by the default Quick Start? Or what if you want to deploy only certain components? This is where you benefit from the modular design of Quick Start reference deployments.
The following three steps demonstrate how to customize a Quick Start based on the Amazon EKS example.
Step 1. Fork and clone the Quick Start repository
The first step to customizing a Quick Start is to fork and clone its GitHub repository. You need a GitHub account to do this.
Sign in to your GitHub account, and search for a Quick Start repository in the public AWS Quick Start GitHub organization. When you find the Quick Start you’d like to customize—in this case, quickstart-amazon-eks—choose Fork, as shown in Figure 2. Then choose your GitHub account. (For more information about forking, see Fork a repo.)
Figure 2. Forking a repository
After forking, you have in your account an exact copy of the repo at the time you forked it.
Next, clone the forked repository (download a local copy to your workstation). To do this, use the git clone command at a Bash or PowerShell prompt. For more information, see git-clone.
About submodules
A Quick Start repo may contain submodules. Submodules are records in a GitHub repository that invoke commits in another repository. For example, as of this writing, the Amazon EKS Quick Start includes eight other Quick Start repositories as submodules.
To include a repository’s submodules when you clone it, add the --recurse-submodules flag to the git clone command:
Important: A Quick Start repository remains dependent on its submodules even after you fork and clone it. Changes to upstream submodule repositories, if merged into your fork, can break code that you have customized in your Quick Start. To avoid code breaks, I recommend either forking and cloning all submodule repositories in addition to the repository that you want to customize or ensuring that your submodules remain pinned to a particular commit.
For more information about submodules, see Git Tools – Submodules.
Step 2. Customize the Quick Start by modifying templates
After forking and cloning a Quick Start repository, you can begin customizing it by modifying its AWS CloudFormation templates. Templates are stored in the /templates directory in a Quick Start repository. Most Quick Starts include a main (parent) template and one or more workload templates. The main template is typically a .yaml file that deploys a virtual private cloud (VPC), bastion host, and other AWS resources on top of which an AWS Partner product is deployed. With 19 templates at the time of this writing, the Amazon EKS reference deployment is a good example of Quick Start modularity.
For example, to add support for a fourth Availability Zone, you would edit all templates that contain parameters and conditions that are configured for three Availability Zones. Such changes include adding a fourth PublicSubnetID parameter in the template amazon-eks.template.yaml, as shown in lines 57–59 of Figure 3.
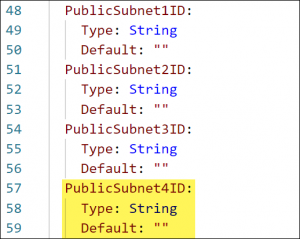
Figure 3. Adding a parameter
When editing templates, you can change default parameter names as long as you keep parameter names consistent across all the templates in that Quick Start. If you change a default parameter name in one template, search the other templates and edit it wherever it appears. For more information, refer to Working with AWS CloudFormation Templates.
In addition to modifying Quick Start templates, you can copy templates and use them in your own projects. You can also copy other Quick Start components for this purpose, such as AWS Lambda functions and scripts. These are stored in the /scripts directory of the Quick Start repository.
Step 3. Deploy the customized Quick Start from your AWS account
To deploy a customized Quick Start, you create an Amazon Simple Storage Service (Amazon S3) bucket to store the Quick Start contents, test your code with TaskCat, and upload your Quick Start.
1. Create an S3 bucket
In your AWS account, create an S3 bucket. Then change the QSS3BucketName parameter name in all the Quick Start templates from aws-quickstart to the name of your S3 bucket. See the Default parameter, shown in Figure 4.

Figure 4. QSS3BucketName parameter name
2. Test your code with TaskCat
After editing your forked copy of the Quick Start code, use TaskCat to test it. TaskCat is an open-source tool that the AWS Quick Start team developed for testing AWS CloudFormation templates. When you test with TaskCat, a file at the root of the repository—taskcat.yml—passes parameter values to the CloudFormation templates.
For more information about TaskCat, see Introducing TaskCat v0.9 and the AWS Quick Start workshop.
3. Upload your Quick Start
Finally, upload the content of your customized Quick Start to your S3 bucket. You can do this from the AWS Management Console by following the instructions found in Uploading objects. Or you can upload your Quick Start from the command line with the aws s3 cp command.
After you upload your customized Quick Start, it can be launched in an AWS Partner or customer AWS account without referencing the original Quick Start.
Cleanup
If you’re experimenting with customizing Quick Starts and don’t intend to use the resources you create, avoid incurring future charges by deleting the resources when you’re finished. For information on how to remove a customized Quick Start that you have uploaded to your AWS account, see Deleting a stack on the AWS CloudFormation console. To remove an instance that a Quick Start has deployed after you’ve provisioned an environment through the console, see Terminate your instance.
Conclusion
Using the steps outlined in this post, you can customize any reference architecture in the Quick Start catalog and then deploy your customized architecture from your own AWS account. To start experimenting, I recommend the following:
- Check out the AWS Quick Start workshop.
- Fork, modify, and deploy your own custom Quick Start. I recommend the Linux Bastion, Remote Desktop Gateway, and VPC Quick Starts as good examples to experiment with.
For more information about working with the Quick Start program, see 10 Best Practices to Help Partners Build AWS Quick Starts for Customer.
Contact our team at quickstart@amazon.com, or let me know your thoughts in the comments.