In the past five years, deep neural networks have solved many computationally difficult problems, particularly in the field of computer vision. Because deep networks require a lot of computational power to train, often using tens of GPUs, many people assume that you can run them only on powerful cloud servers. In fact, after a deep network model has been trained, it needs relatively few computational resources to run predictions. This means that you can deploy a model on lower-powered edge (non-cloud) devices and run it without relying on an internet connection.
Enter Apache MXNet, Amazon’s open source deep learning engine of choice. In addition to effectively handling multi-GPU training and deployment of complex models, MXNet produces very lightweight neural network model representations. You can deploy these representations on devices with limited memory and compute power. This makes MXNet perfect for running deep learning models on devices like the popular $35 Raspberry Pi computer.
In this post, we walk through creating a computer vision system using MXNet for the Raspberry Pi. We also show how to use AWS IoT to connect to the AWS Cloud. This allows you to use the Cloud to manage a lightweight convolutional neural network running real-time object recognition on the Pi.
Prerequisites
To follow this post, you need a Raspberry Pi 3 Model B device running Jessie or a later version of the Raspbian operating system, the Raspberry Pi Camera Module v2, and an AWS account.
Setting up the Raspberry Pi
First, you set up the Pi with the camera module to turn it into a video camera, and then install MXNet. This allows you to start running deep network-based analysis on everything that the Pi “sees.”
Set up your Pi with the Camera Module and connect the device to the Internet, either through the Ethernet port or with WiFi. Then, open the terminal and type the following commands to install the Python dependencies for this post:
sudo apt-get update
sudo apt-get install python-pip python-opencv python-scipy \
python-picamera
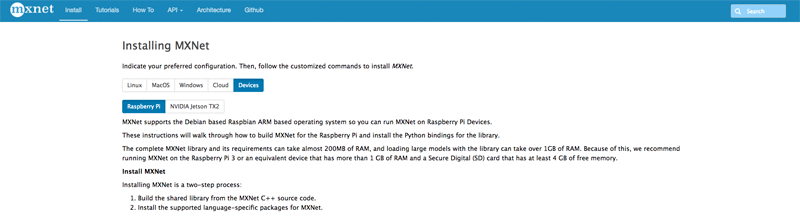
Build MXNet for the Pi with the corresponding Python bindings by following the instructions for Devices. For this tutorial, you won’t need to build MXNet with OpenCV.
Verify that the build succeeded by opening a Python 2.7 Read-Eval-Print-Loop (REPL) environment on your Pi’s terminal and typing the following:
python
>>> import mxnet as mx
>>> mx.__version__
Running predictions locally
To run predictions on images captured by the Pi camera, you need to fetch a pretrained deep network model from the MXNet Model Zoo. Create a Python file in the Pi’s home directory, name load_model.py, and write a class that downloads ImageNet-trained models from the Model Zoo and loads them into MXNet on the Pi:
# load_model.py
import mxnet as mx
import numpy as np
import picamera
import cv2, os, urllib2, argparse, time
from collections import namedtuple
Batch = namedtuple('Batch', ['data'])


class ImagenetModel(object):

    """
    Loads a pre-trained model locally or from an external URL and returns an MXNet graph that is ready for prediction
    """
    def __init__(self, synset_path, network_prefix, params_url=None, symbol_url=None, synset_url=None, context=mx.cpu(), label_names=['prob_label'], input_shapes=[('data', (1,3,224,224))]):

        # Download the symbol set and network if URLs are provided
        if params_url is not None:
            print "fetching params from "+params_url
            fetched_file = urllib2.urlopen(params_url)
            with open(network_prefix+"-0000.params",'wb') as output:
                output.write(fetched_file.read())

        if symbol_url is not None:
            print "fetching symbols from "+symbol_url
            fetched_file = urllib2.urlopen(symbol_url)
            with open(network_prefix+"-symbol.json",'wb') as output:
                output.write(fetched_file.read())

        if synset_url is not None:
            print "fetching synset from "+synset_url
            fetched_file = urllib2.urlopen(synset_url)
            with open(synset_path,'wb') as output:
                output.write(fetched_file.read())

        # Load the symbols for the networks
        with open(synset_path, 'r') as f:
            self.synsets = [l.rstrip() for l in f]

        # Load the network parameters from default epoch 0
        sym, arg_params, aux_params = mx.model.load_checkpoint(network_prefix, 0)

        # Load the network into an MXNet module and bind the corresponding parameters
        self.mod = mx.mod.Module(symbol=sym, label_names=label_names, context=context)
        self.mod.bind(for_training=False, data_shapes= input_shapes)
        self.mod.set_params(arg_params, aux_params)
        self.camera = None

    """
    Takes in an image, reshapes it, and runs it through the loaded MXNet graph for inference returning the N top labels from the softmax
    """
    def predict_from_file(self, filename, reshape=(224, 224), N=5):

        topN = []

        # Switch RGB to BGR format (which ImageNet networks take)
        img = cv2.cvtColor(cv2.imread(filename), cv2.COLOR_BGR2RGB)
        if img is None:
            return topN

        # Resize image to fit network input
        img = cv2.resize(img, reshape)
        img = np.swapaxes(img, 0, 2)
        img = np.swapaxes(img, 1, 2)
        img = img[np.newaxis, :]

        # Run forward on the image
        self.mod.forward(Batch([mx.nd.array(img)]))
        prob = self.mod.get_outputs()[0].asnumpy()
        prob = np.squeeze(prob)

        # Extract the top N predictions from the softmax output
        a = np.argsort(prob)[::-1]
        for i in a[0:N]:
            print('probability=%f, class=%s' %(prob[i], self.synsets[i]))
            topN.append((prob[i], self.synsets[i]))
        return topN

    """
    Captures an image from the PiCamera, then sends it for prediction
    """
    def predict_from_cam(self, capfile='cap.jpg', reshape=(224, 224), N=5):
        if self.camera is None:
            self.camera = picamera.PiCamera()

        # Show quick preview of what's being captured
        self.camera.start_preview()
        time.sleep(3)
        self.camera.capture(capfile)
        self.camera.stop_preview()

        return self.predict_from_file(capfile)


if __name__ == "__main__":
    parser = argparse.ArgumentParser(description="pull and load pre-trained resnet model to classify one image")
    parser.add_argument('--img', type=str, default='cam', help='input image for classification, if this is cam it captures from the PiCamera')
    parser.add_argument('--prefix', type=str, default='squeezenet_v1.1', help='the prefix of the pre-trained model')
    parser.add_argument('--label-name', type=str, default='prob_label', help='the name of the last layer in the loaded network (usually softmax_label)')
    parser.add_argument('--synset', type=str, default='synset.txt', help='the path of the synset for the model')
    parser.add_argument('--params-url', type=str, default=None, help='the (optional) url to pull the network parameter file from')
    parser.add_argument('--symbol-url', type=str, default=None, help='the (optional) url to pull the network symbol JSON from')
    parser.add_argument('--synset-url', type=str, default=None, help='the (optional) url to pull the synset file from')
    args = parser.parse_args()
    mod = ImagenetModel(args.synset, args.prefix, label_names=[args.label_name], params_url=args.params_url, symbol_url=args.symbol_url, synset_url=args.synset_url)
    print "predicting on "+args.img
    if args.img == "cam":
        print mod.predict_from_cam()
    else:
        print mod.predict_from_file(args.img)
To download the lightweight, but highly accurate, ImageNet-trained SqueezeNet V1.1 model and run it on an image of a cat, run the following command in the Pi’s home directory:
wget https://upload.wikimedia.org/wikipedia/commons/b/b9/CyprusShorthair.jpg -O cat.jpg
python load_model.py --img 'cat.jpg' --prefix 'squeezenet_v1.1' --synset 'synset.txt' --params-url 'http://data.mxnet.io/models/imagenet/squeezenet/squeezenet_v1.1-0000.params' --symbol-url 'http://data.mxnet.io/models/imagenet/squeezenet/squeezenet_v1.1-symbol.json' --synset-url 'http://data.mxnet.io/models/imagenet/synset.txt'
The output should include cat as one of the top labels, and look similar to this:
[(0.57816696, 'n02123045 tabby, tabby cat'), (0.19830757, 'n02124075 Egyptian cat'), (0.16912524, 'n02325366 wood rabbit, cottontail, cottontail rabbit'), (0.020817872, 'n02123159 tiger cat'), (0.020065691, 'n02326432 hare')]
To run the pretrained model on an image captured with the Raspberry Pi camera, point the camera at an object that you want to classify and run the following command in the Pi’s home directory:
python load_model.py –img ‘cam’ –prefix ‘squeezenet_v1.1’ –synset ‘synset.txt’
You will see a quick preview of the image captured by the camera. Then the model runs and returns suggested labels for the object.
Connecting to AWS IoT
Running a model locally on the Pi is a great first step. But to reliably centralize and store predictions and remotely update the model, you need to connect the Pi to the AWS Cloud. To do this, set up AWS IoT on the Pi.
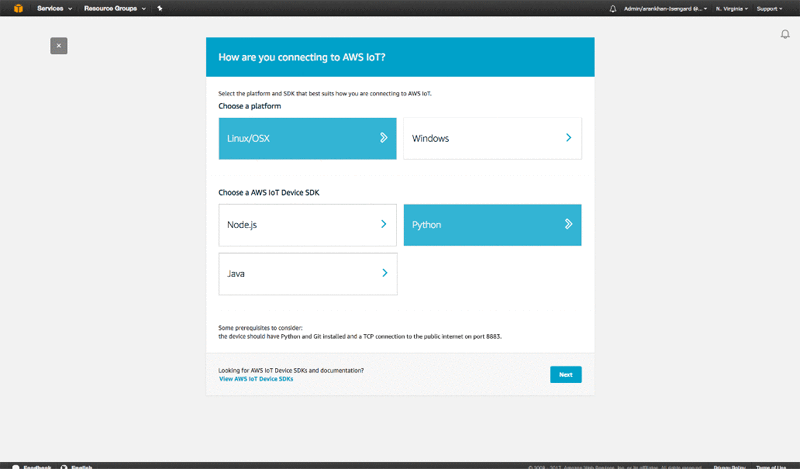
In the AWS IoT console, use the AWS IoT Connect wizard. For platform, choose Linux/OSX. For SDK type, choose Python, and then choose Next.
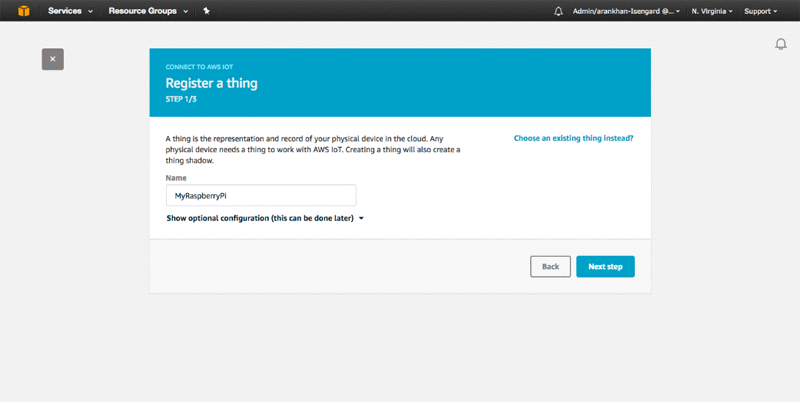
Register your device with the name “MyRaspberryPi.”
Choose Next Step and download the connection kit in connect_device_package.zip to your Pi. When you unzip connect_device_package.zip and extract its contents into your Pi’s home directory, you see the files that you need to securely connect your device to AWS:
- myraspberrypi.cert.pem
- myraspberrypi.private.key
- myraspberrypi.public.key
- start.sh
To set up a secure connection between your device and the AWS Cloud, follow the steps on the next screen to run the start.sh script on the Pi. This script downloads the Symantec Root-CA certificate onto your Pi and installs the AWS IoT SDK, which lets you easily interact with AWS IoT from Python. The script also confirms that the Pi is talking to AWS IoT.
Now you can use AWS IoT to create a service on the Pi that runs near-real-time object recognition and constantly pushes results to the AWS Cloud. It also provides a mechanism to seamlessly update the model running on the Pi.
In your home directory, create a new file called iot_service.py, and add the following code to it:
# iot_service.py
import AWSIoTPythonSDK
from AWSIoTPythonSDK.MQTTLib import AWSIoTMQTTClient
import sys
import logging
import time
import getopt
import json
import load_model

# Custom MQTT message callback
def customCallback(client, userdata, message):
    print("Received a new message: ")
    print(message.payload)
    print("from topic: ")
    print(message.topic)
    print("--------------\n\n")

    if message.topic == "sdk/test/load":
        args = json.loads(message.payload)
        new_model = load_model.ImagenetModel(args['synset'], args['prefix'], label_names=[args['label_name']], params_url=args['params_url'], symbol_url=args['symbol_url'])
        global_model = new_model
    elif message.topic == "sdk/test/switch":
        args = json.loads(message.payload)
        new_model = load_model.ImagenetModel(args['synset'], args['prefix'], label_names=[args['label_name']])
        global_model = new_model

# Usage
usageInfo = """Usage:

Use certificate based mutual authentication:
python iot_server.py -e  -r  -c  -k

Use MQTT over WebSocket:
python iot_server.py -e  -r  -w

Type "python iot_server.py -h" for available options.
"""

# Help info
helpInfo = """-e, --endpoint
    Your AWS IoT custom endpoint
-r, --rootCA
    Root CA file path
-c, --cert
    Certificate file path
-k, --key
    Private key file path
-w, --websocket
    Use MQTT over WebSocket
-h, --help
    Help information
"""

# Read in command-line parameters
useWebsocket = False
host = ""
rootCAPath = ""
certificatePath = ""
privateKeyPath = ""
try:
    opts, args = getopt.getopt(sys.argv[1:], "hwe:k:c:r:", ["help", "endpoint=", "key=","cert=","rootCA=", "websocket"])
    if len(opts) == 0:
        raise getopt.GetoptError("No input parameters!")
    for opt, arg in opts:
        if opt in ("-h", "--help"):
            print(helpInfo)
            exit(0)
        if opt in ("-e", "--endpoint"):
            host = arg
        if opt in ("-r", "--rootCA"):
            rootCAPath = arg
        if opt in ("-c", "--cert"):
            certificatePath = arg
        if opt in ("-k", "--key"):
            privateKeyPath = arg
        if opt in ("-w", "--websocket"):
            useWebsocket = True
except getopt.GetoptError:
    print(usageInfo)
    exit(1)

# Missing configuration notification
missingConfiguration = False
if not host:
    print("Missing '-e' or '--endpoint'")
    missingConfiguration = True
if not rootCAPath:
    print("Missing '-r' or '--rootCA'")
    missingConfiguration = True
if not useWebsocket:
    if not certificatePath:
        print("Missing '-c' or '--cert'")
        missingConfiguration = True
    if not privateKeyPath:
        print("Missing '-k' or '--key'")
        missingConfiguration = True
if missingConfiguration:
    exit(2)


# Configure logging
logger = logging.getLogger("AWSIoTPythonSDK.core")
logger.setLevel(logging.DEBUG)
streamHandler = logging.StreamHandler()
formatter = logging.Formatter('%(asctime)s - %(name)s - %(levelname)s - %(message)s')
streamHandler.setFormatter(formatter)
logger.addHandler(streamHandler)


# Init AWSIoTMQTTClient for publish/subscribe communication with the server
myAWSIoTMQTTClient = None
if useWebsocket:
    myAWSIoTMQTTClient = AWSIoTMQTTClient("basicPubSub", useWebsocket=True)
    myAWSIoTMQTTClient.configureEndpoint(host, 443)
    myAWSIoTMQTTClient.configureCredentials(rootCAPath)
else:
    myAWSIoTMQTTClient = AWSIoTMQTTClient("basicPubSub")
    myAWSIoTMQTTClient.configureEndpoint(host, 8883)
    myAWSIoTMQTTClient.configureCredentials(rootCAPath, privateKeyPath, certificatePath)


# AWSIoTMQTTClient connection configuration
myAWSIoTMQTTClient.configureAutoReconnectBackoffTime(1, 32, 20)
myAWSIoTMQTTClient.configureOfflinePublishQueueing(-1)  # Infinite offline Publish queueing
myAWSIoTMQTTClient.configureDrainingFrequency(2)  # Draining: 2 Hz
myAWSIoTMQTTClient.configureConnectDisconnectTimeout(10)  # 10 sec
myAWSIoTMQTTClient.configureMQTTOperationTimeout(5)  # 5 sec


# Connect and subscribe to AWS IoT
myAWSIoTMQTTClient.connect()
myAWSIoTMQTTClient.subscribe("sdk/test/load", 1, customCallback)
time.sleep(2)


# Tell the server we are alive
myAWSIoTMQTTClient.publish("sdk/test/monitor", "New Message: Starting IoT Server", 0)

global_model = load_model.ImagenetModel('synset.txt', 'squeezenet_v1.1')

while True:
    if global_model is not None:
        predictions = global_model.predict_from_cam()
        print predictions
        myAWSIoTMQTTClient.publish("sdk/test/monitor", "New Prediction: "+str(predictions), 0)
Now run this file by entering the following command in the Pi’s home directory:
python iot_service.py -e my-device-endpoint.amazonaws.com -r root-CA.crt -c myraspberrypi.cert.pem -k myraspberrypi.private.key
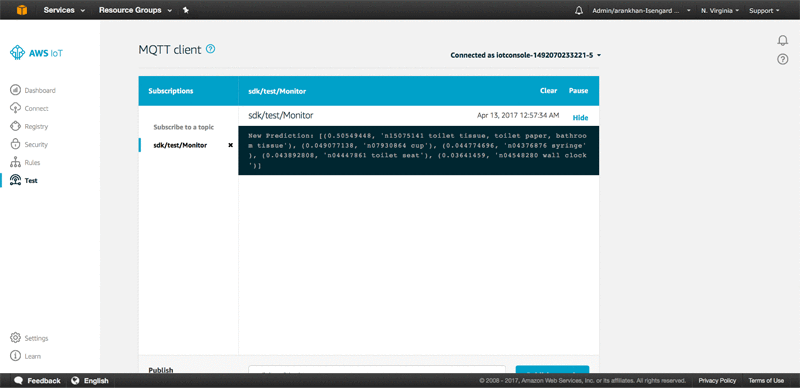
In the AWS IoT Console choose Test, and subscribe to the sdk/test/monitor topic:

To see the predictions streaming into AWS in real time, on the Test page, choose the name of the new topic. Even if the network connection slows or is dropped, AWS IoT ensures that packets aren’t lost and the prediction log remains up to date.
To send commands to the Pi to update the MXNet model it’s running, you can publish to MQTT topics. For example, to update the SqueezeNet model running on the Pi to a larger, but more accurate, ResNet model, in the MQTT client in the Publish section, send the following JSON to the sdk/test/load topic:
{
"synset": "synset.txt",
"prefix": "resnet-18",
"label_name": "softmax_label",
"params_url": "http://data.mxnet.io/models/imagenet/resnet/18-layers/resnet-18-0000.params",
"symbol_url": "http://data.mxnet.io/models/imagenet/resnet/18-layers/resnet-18-symbol.json"
}
This is what it looks like in the MQTT client:
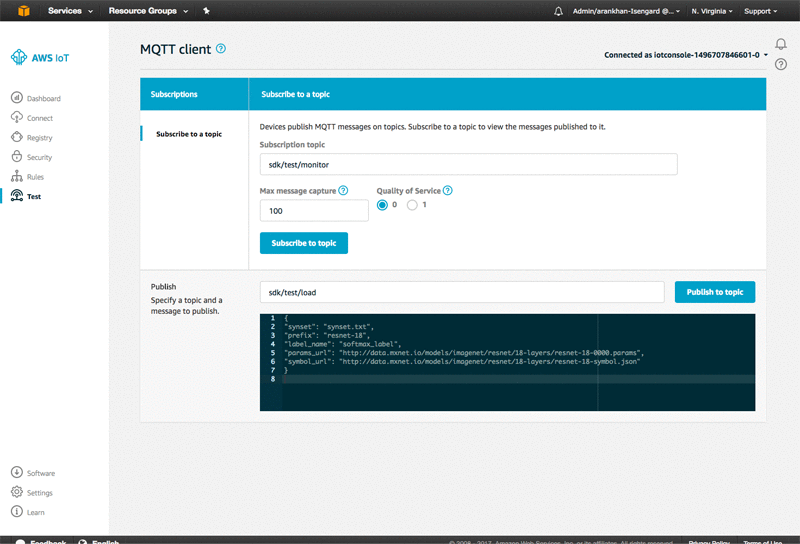
The Pi downloads the new network symbol and parameter files from the Model Zoo, loads them for prediction, and continues running with the new model. You don’t need to download a new synset. The two models that you’re using have been trained for the ImageNet task, so the set of objects that you’re classifying remains the same.
Next steps
By running MXNet for predictions on the Raspberry Pi and connecting it to the AWS Cloud with AWS IoT, you have created a near state-of-the-art computer vision system. Your system doesn’t rely on a constant high-bandwidth connection to stream video or expensive GPU servers in the cloud to process that video. In fact, by using AWS and MXNet on the Pi, you can easily create a much more reliable and cost-effective smart camera system. With this approach, you enjoy most of the benefits of cloud-based model monitoring and management. But, you reduce the price from a monthly cost of hundreds of dollars (for server and data transfer costs) to a one-time hardware cost of around $60 (the cost of the Pi and the camera module).
This smart camera system is just the tip of the iceberg. You can start to iterate on it, connecting it to production services in the AWS Cloud, building out multi-device coordination though AWS IoT, and using methods like transfer learning to adapt the pretrained models to specific computer vision tasks.
Additional Reading
Learn how to use Amazon Rekognition to build an end-to-end serverless photo recognition system.
About the Author
 Aran Khanna is a Software Development Engineer with AWS Deep Learning. He works as the technical lead for MXNet on IoT, edge and mobile devices, allowing customers to put intelligence everywhere, by enabling them to deploy and manage efficient deep networks across a broad set of low powered devices. In his spare time, you can find him writing about digital privacy, building new features for his smart home or skiing in Lake Tahoe.