AWS for M&E Blog
AWS Artist Series: Optimizing the environment with foliage
Find the other posts in the AWS Artist series below:
AWS Artist Series: Compositing Spanner
AWS Artist Series: Creating characters with dynamic wrinkles
AWS Artist Series: Animating Noa
AWS Artist Series: Rigging the bridge for “Spanner”
AWS Artist Series: Laying out the opening shots of Spanner
AWS Artist Series: Creating an ocean of clouds
Project
Spanner is the story of two bridge builders, Noa and Ulysse. Noa is an expert in her field who trained hard to get where she is—she’s a no-nonsense type. By contrast, Ulysse spends more time on his reputation than he does on his skills. Their personalities collide while Noa works on a repair job, and Ulysse tries to steal her techniques. As expected, Noa gives him no quarter.
The goal of this project was to create an industry-caliber film with heavy data sets to simulate how our customers work when creating feature films. And on top of that, we created the film entirely in the cloud. Heavy files, big renders, and beautiful scenes prove that excellent quality can be produced on virtual workstations— a brick and mortar office is not required to make amazing artistry.
For this project, our team animated using Maya, rendered with Arnold, and created the high-resolution foliage assets with SpeedTree. To view the final film, see Animated Short Film: Spanner.
Problem
When creating heavy data sets, we succeeded a little too well: The environment was so detailed and heavy, it was impossible to navigate around the scene, meaning an artist could not look around the scene without very long pauses as the computer caught up. For example, one viewport rotation took minutes to calculate. Imagine turning your head to look at something, then waiting 30 seconds for your eyes to catch up. Some optimization was in order, so we decided that for set-dressed pillars in the distance, a little could go a long way — literally.
Solution
Amaru Zeas, Associate Art Director on Spanner, decreased the density of the pillar geometry. However, we were still set dressing the low-resolution pillars with high resolution SpeedTree assets. This slowed down scenes to a crawl, creating very long scene loading times and extreme difficulty navigating the scene, if it didn’t crash.
To reduce the amount of geometry and memory usage for the foliage, we looked at how video games use flat cards to produce the effect of foliage, while keeping the compute level low. We came up with the idea of rendering images of our existing foliage, and applying those images to flat cards, or planes. After that, our team applied those planes to the pillars. This produced the silhouettes viewable at a distance from the camera view.
Our first attempt to generate these flat cards was with Maya Paint Effects. We did a test of Paint Effects with sample tree options (provided by the tool) that converted a drawn line into a series of cards. The only requirement for Paint Effects to work is for the geometry to have unwrapped UVs.
As you may know, Paint Effects cards allow artists to paint strokes in a scene for paint effects in 3D space. They’re also designed to face the camera every time it moves. Imagine the enormous compute time this creates on our opening shot, which is a moving camera sequence. It didn’t take long for us to realize the amount of lines we needed to draw to create foliage slowed down the compute (and our productivity).
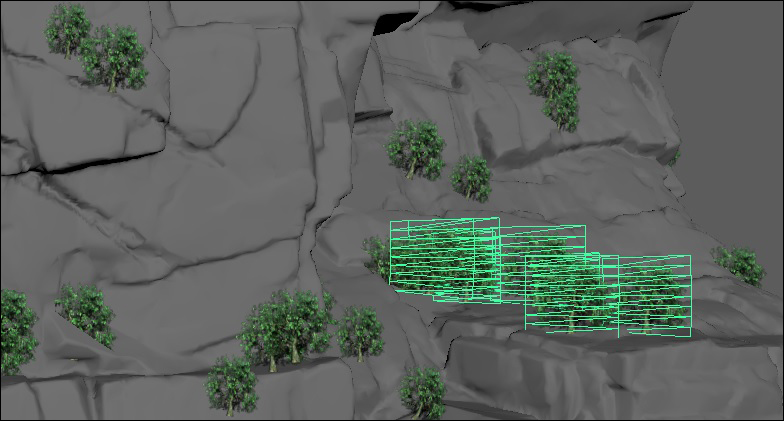
Examples of Paint Effects
To dress the pillars close to camera, Dave Murphy, the Cinematographer and Pre-Production Supervisor on Spanner, used Maya’s MASH toolset.
MASH helped us randomize the elements placed on the pillars based on each type of asset, including trees, vines, and shrubs. We combined this technique with low resolution versions of each foliage type. These were created by adding a rendered image of the SpeedTree foliage asset to a plane as a texture. MASH allowed us to randomly generate these foliage types on the pillars in a naturalistic way, similar to how trees actually grow.
Using MASH gave us the results we wanted: We painted the low-resolution foliage on to the low-res pillars using the same kinds of elements that were on the close-up pillars. When combined with the particle and lighting effects in the environment, the far-off pillars blended perfectly.
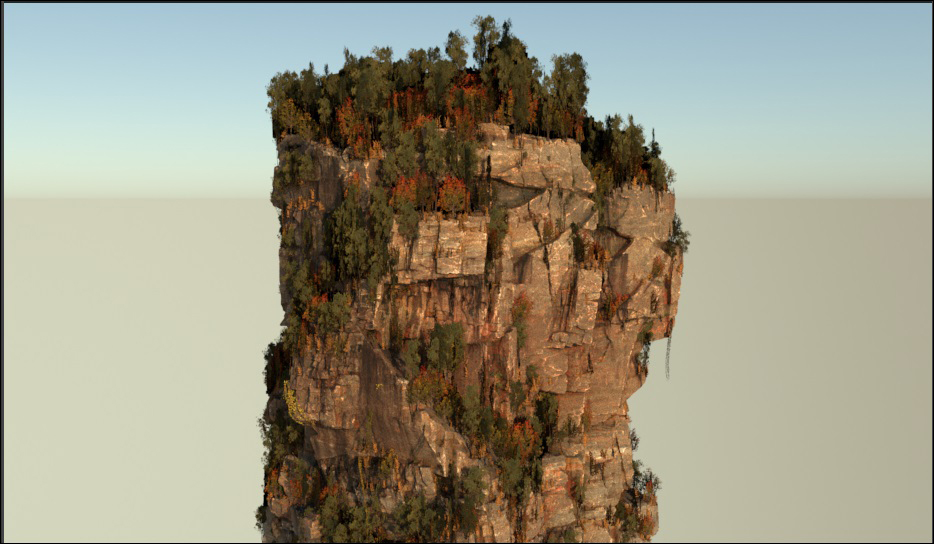
Render of low resolution pillar with low resolution foliage
The process breakdown
The following is a technical breakdown of how we achieved the look that you see in the image above. To follow along, you need a basic understanding of how to use Maya, and a Maya license. We created the film using Maya 2020, which includes the MASH plugin. If you use a different version, make sure that you have MASH. To make sure it is active in Maya, go to Windows → Settings/Preferences → Plug-in Manager and make sure that the MASH.mll is loaded.
Turning 3D geo into low resolution cards
The following images are foliage samples provided by Haley Kannall, the CG Supervisor on Spanner. Haley used SpeedTree to render out each foliage type and variant as an image, and to apply that image to a plane as a texture. From there, we connected the alpha from the texture map to the transparency on the material, so that the plane is transparent wherever the texture is not. However you design the foliage you want, be sure to save each card to its own Maya file as a low-res version for each foliage type and variant.
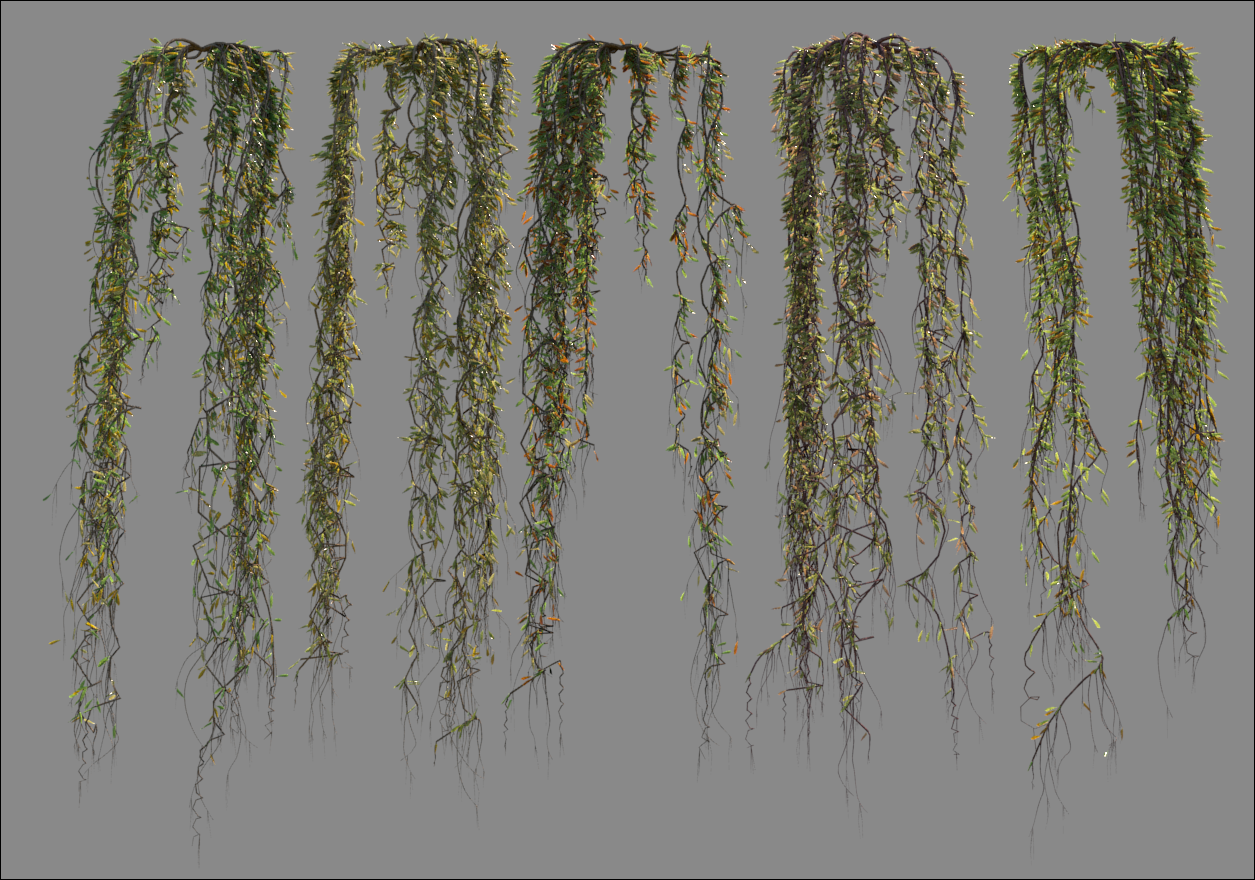
Renders of vine variations
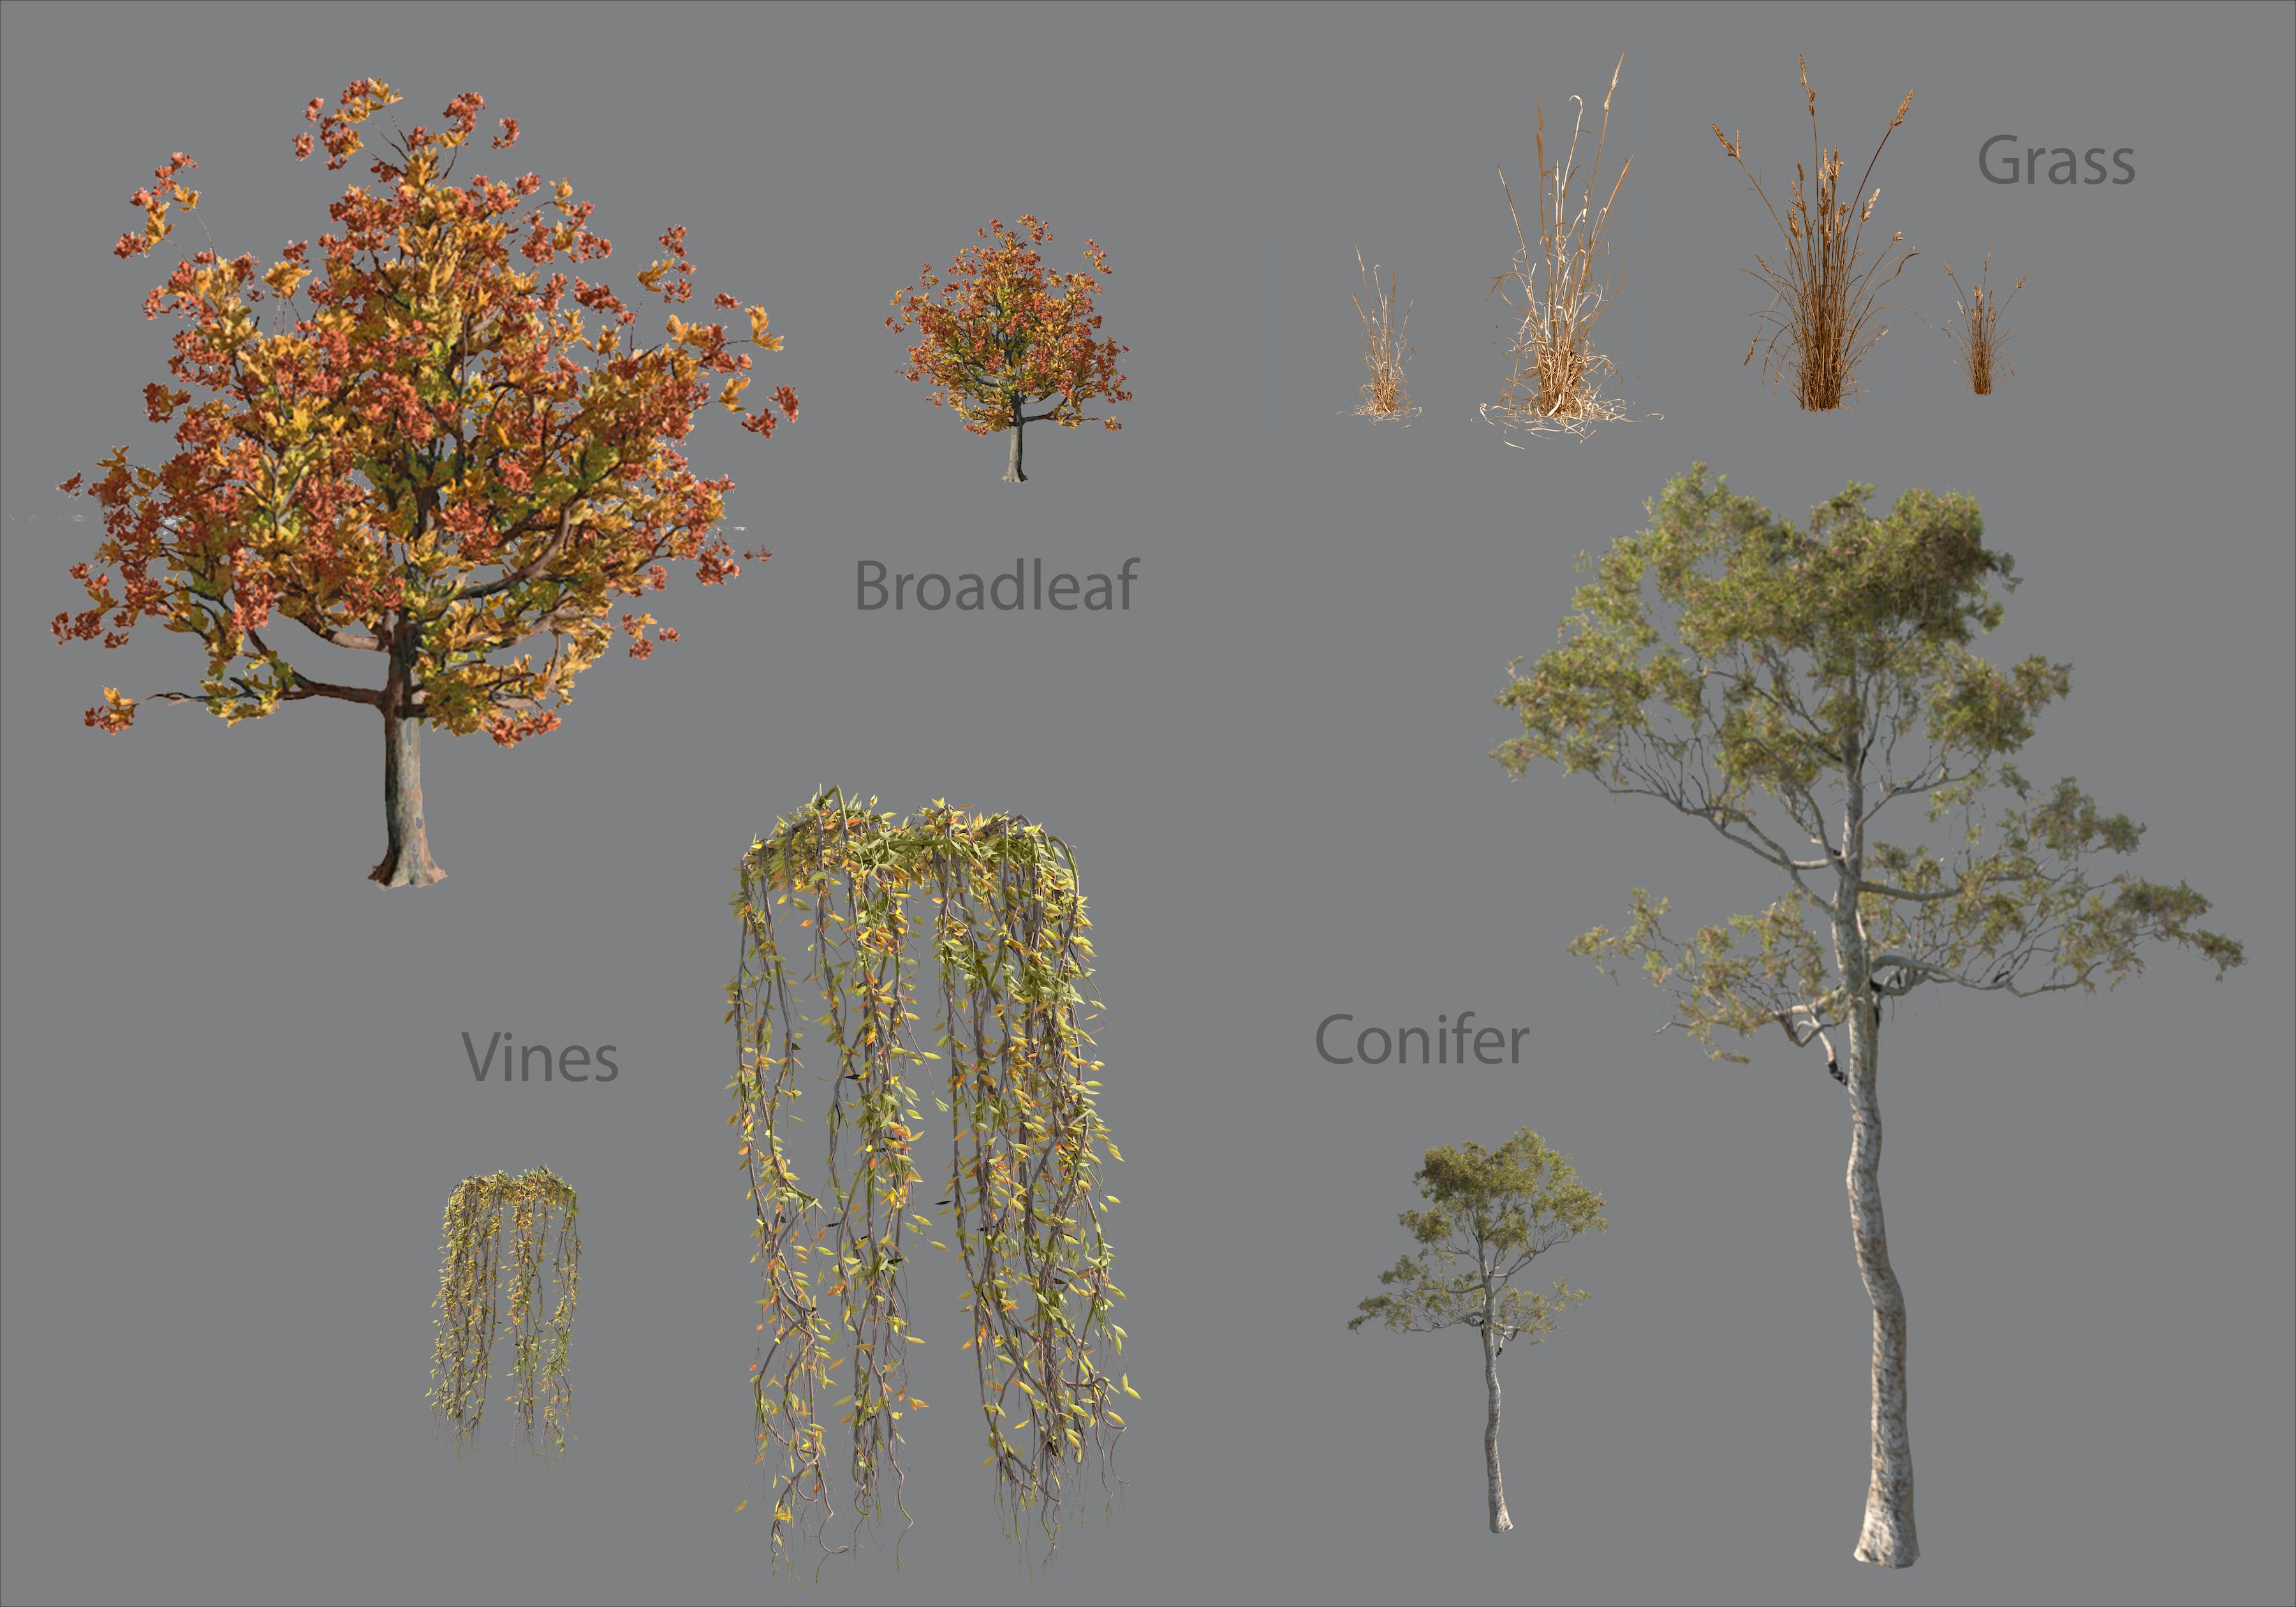
Renders of foliage types
Create a MASH network
Reference the low-resolution cards generated from the 3D foliage into the low-resolution rock pillar asset files. Next, connect them using a MASH network, a world node, and a terrestrial ecosystem node to grow the foliage like a natural ecosystem.
To add foliage to the scene with the geometry that you set up for it:
- Choose File → Create References for each of the low-res foliage cards you created
Next, set up the MASH node, which gets you a natural looking “grown forest” look. This system looks at the UVs of the pillars in the scene and the geometry needed to “grow” trees – and it will only grow trees on surfaces you tell it to.
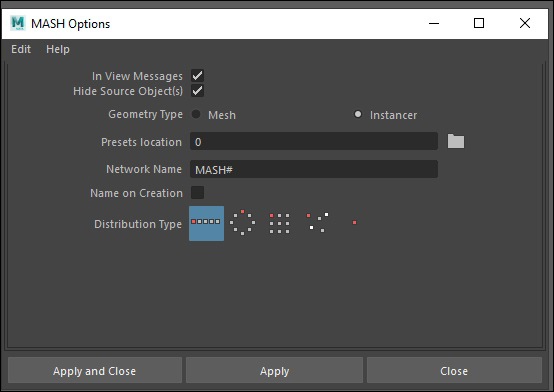
Before getting started, make sure that the MASH nodes you create are Instancer types (see image below). Here’s how:
- Make sure that you are in Animation mode to see the MASH drop down menu
- Choose MASH from the top-level menu, then choose Options
- In the Geometry Type section, select Instancer
MASH geometry in Instancer type
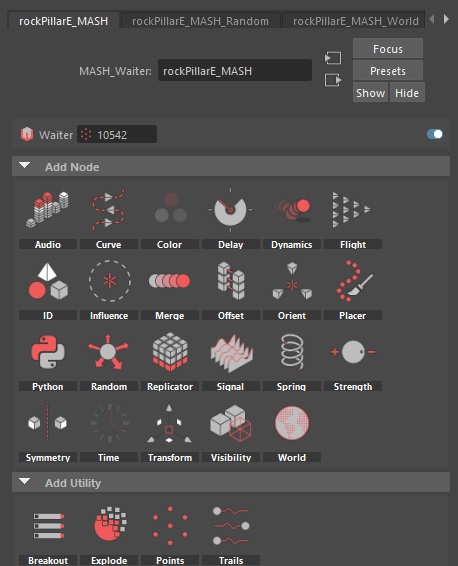
To pull in the low-res trees:
1. Create a new MASH node, then choose MASH → Ne
2. In the MASH Instancer, connect the shrub and trees by opening the Outliner menu in Maya
3. Highlight an object by clicking on it, then in the MASH_Instancer menu choose Add Selection

Example of foliage files connected to geometry
4. Use Shift+Click to grab multiple cards in the Outliner, and then CTRL + Click to select the Instancer
5. Next, click Add Selection in the Attribute Editor to populate this field
6. If you are creating hanging objects like vines, you will create a second MASH Instance later, so leave them unselected for now
Creating a world:
7. In the MASH Attribute Editor, create a World node by clicking the globe icon
8. In the same MASH Attribute Editor again, navigate to the Distribute tab:
Node types for MASH
1. Change the Number of Points to something that works for you
a) Due to the pillars’ large size, we set the number of points to 5000
b) The size of your geometry determines the number of points you use and the scale of your cards. The environment and ecosystem you design determines how lush it should be
2. Be sure to input the Mesh that you wish to connect to
a) To do this, middle-mouse click, then hold and drag the mesh name/object from the outliner into this field
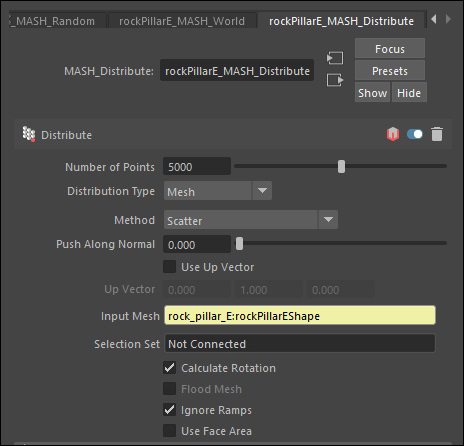
Distribute node menu in MASH
Creating a random node
Now that you let the trees know we want them to grow on the geometry, it’s time to add some randomization. To make the forest look organic, create a Random node.
- Return to the MASH Attribute Editor and create a Random node:
- This randomizes the rotations, scales, and strength of the foliage generated from the Distribution number and the Terrestrial Ecosystem setup
- Be sure to toggle Uniform Size ON so the images don’t stretch out of proportion
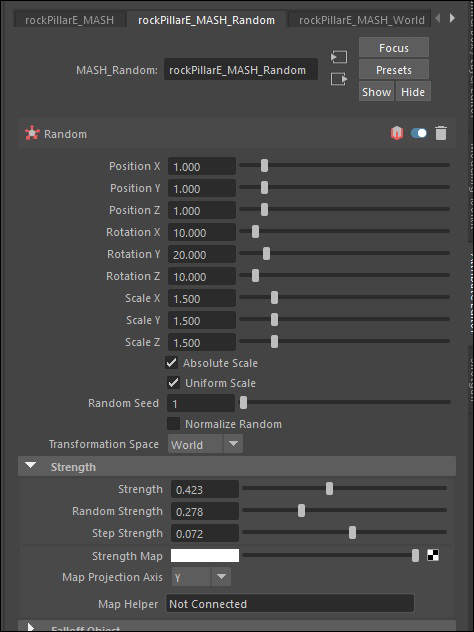
Randomization node menu
In the example above, we show the numbers used for Position, Rotation, and Scale settings. Play around with that until you get the result you want. Start by changing one at a time, so you can observe what each change does.
Create a terrestrial ecosystem node
Now that you have randomization, you will tell the World node to act like a Terrestrial Ecosystem. That means you can get the trees to behave like a natural forest. You can set the age for the ecosystem, and by connecting your geometry to the Input Mesh, you can make sure that Maya knows where to map your forest in the scene.
- In the World Node, change the mode to Terrestrial Ecosystem
- Connect your mesh to the Ground Mesh input field (highlighted in yellow) following the same middle mouse button drag technique used before
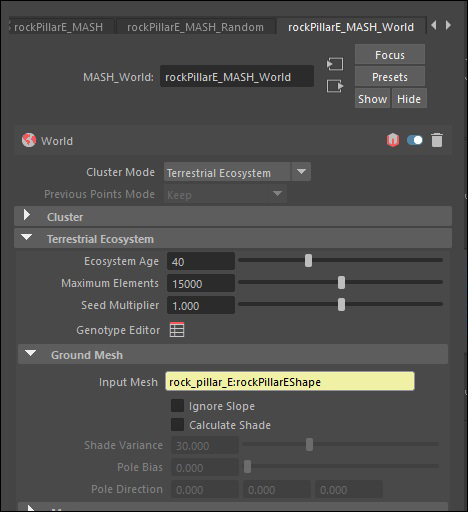
World node menu
In Ecosystem Age, every number means a new generation. For the example above, 40 means that the forest is 40 generations old. If you want an ancient forest, set the number higher. If you want to create a new forest, or the edge of a forest along a different ecosystem like a desert, set the number lower. This changes the amount of trees MASH adds.
Genotype editor
So far you have set the geometry as the base for your forest, set randomization, and given the forest many types of trees and foliage that you can work with. Now you can add some polish to your forest using the Genotype Editor. This lets you to select all sorts of details, from the size of the trees, to the slope threshold for them before they stop growing.
1. In the Terrestrial Ecosystem drop down, open the Genotype Editor popup menu by clicking on the small graph next to the words Genotype Editor
2. At the top left of the Genotype Editor, you will see an icon of a square with a plus sign on top. Click this to create a new type. After you have created that, you can rename it to something that makes sense for your project
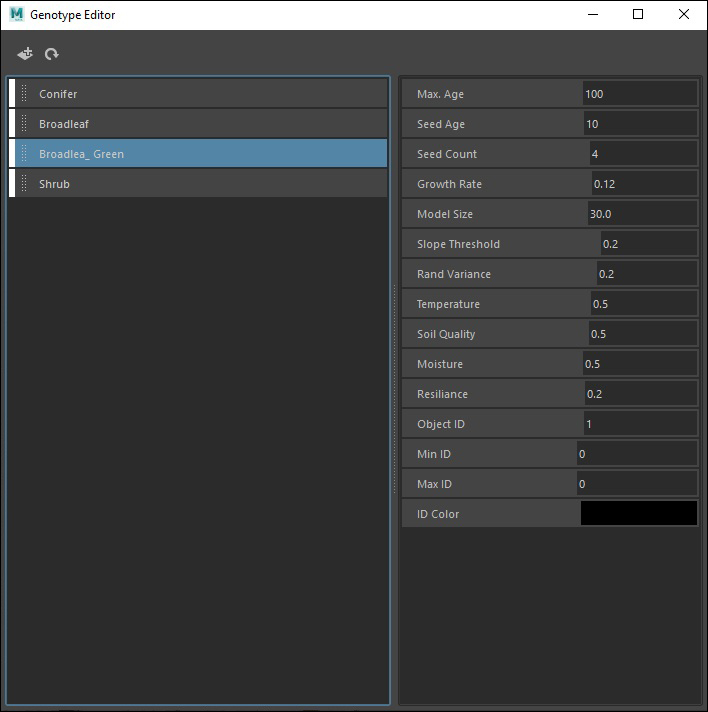
Settings for Genotype Editor
From here, you can change Seed Count, Growth Rate, Model Size, and Slope Threshold to change sizes, growth rates, and at how steep an angle your foliage can grow.
3. Now, create a new Genotype for each type of foliage that you have by using the plus icon. Then, change the Object ID to match what is in the Instancer
a) Here you will see 0, 1, 2, and 3 next to each mesh type. These are your Object IDs
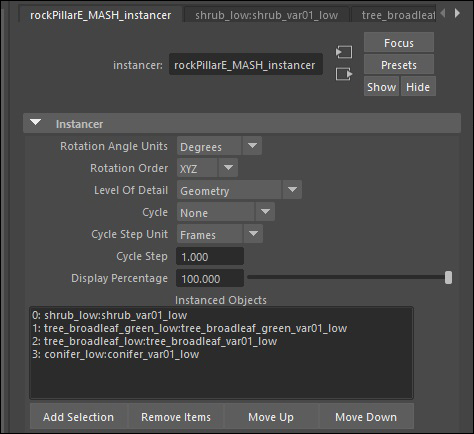
Geometry instance where Object ID’s are located
Create a MASH network for vines – placer node
If you have elements you want to hang off the edge of a cliff, this next step tells you how to do just that. Create a new type of MASH node specifically for hanging elements, or vines in this example.
1. Create a new MASH for the vines
a) In the Instancer, add the vines reference into the appropriate field, much like what you did for the other foliage
2. Return to the MASH Attribute Editor tab and create a Placer node
3. It shows you a tab that looks much like this:
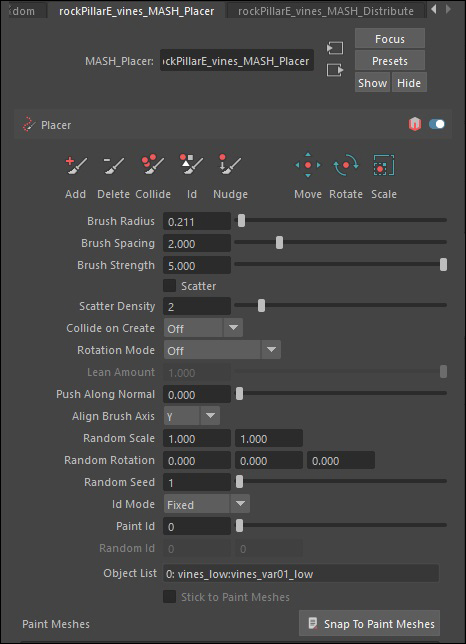
Placer node menu
4. Once created, return to MASH Attribute Editor and create a Random node (much like you did for the other foliage)
5. NOTE: The placer node can be a little tricky, so don’t worry if it doesn’t seem to work at first. To add the vines, click the Add button in the MASH_Placer node menu, make sure your Object List has your vines listed.
6.At the rock pillar in the viewport, click and hold to add new vines where you want them to be
Testing your renders
Congratulations! You now have a forest grown by MASH! If you used the flat image cards like we did, it stays low res and doesn’t slow down your file. To make sure your forest looks the way you want, we recommend you perform a test render. This gives you a preview of what it looks like in the end.
Before doing a test render, be sure to add a light into your scene. If you are using Arnold, we recommend using a Physical Sky. To set this, in the top menus go to Arnold → Lights and choose Physical Sky.
Be sure to increase the intensity, lower the angle in the sky, and rotate the light to get the mood you want. Play around until you are satisfied.
Now go into the Render Settings window and make sure that your renderer is set to Arnold. If you have a camera in your scene, you can set it as the render camera; otherwise, it will render using the perspective camera.
After the camera and light are set, choose Test Render, and Maya will produce a render of your foliage.

Render of low-resolution pillar with low resolution foliage
Using a Physical Sky light, the test render looks like our render of the pillar below.
Results
This process, along with a few other optimizations, allowed us to increase the speed at which an artist could open the environment file and begin working with it by 75%. It was important to make the file usable by our team, while maintaining a level of detail.
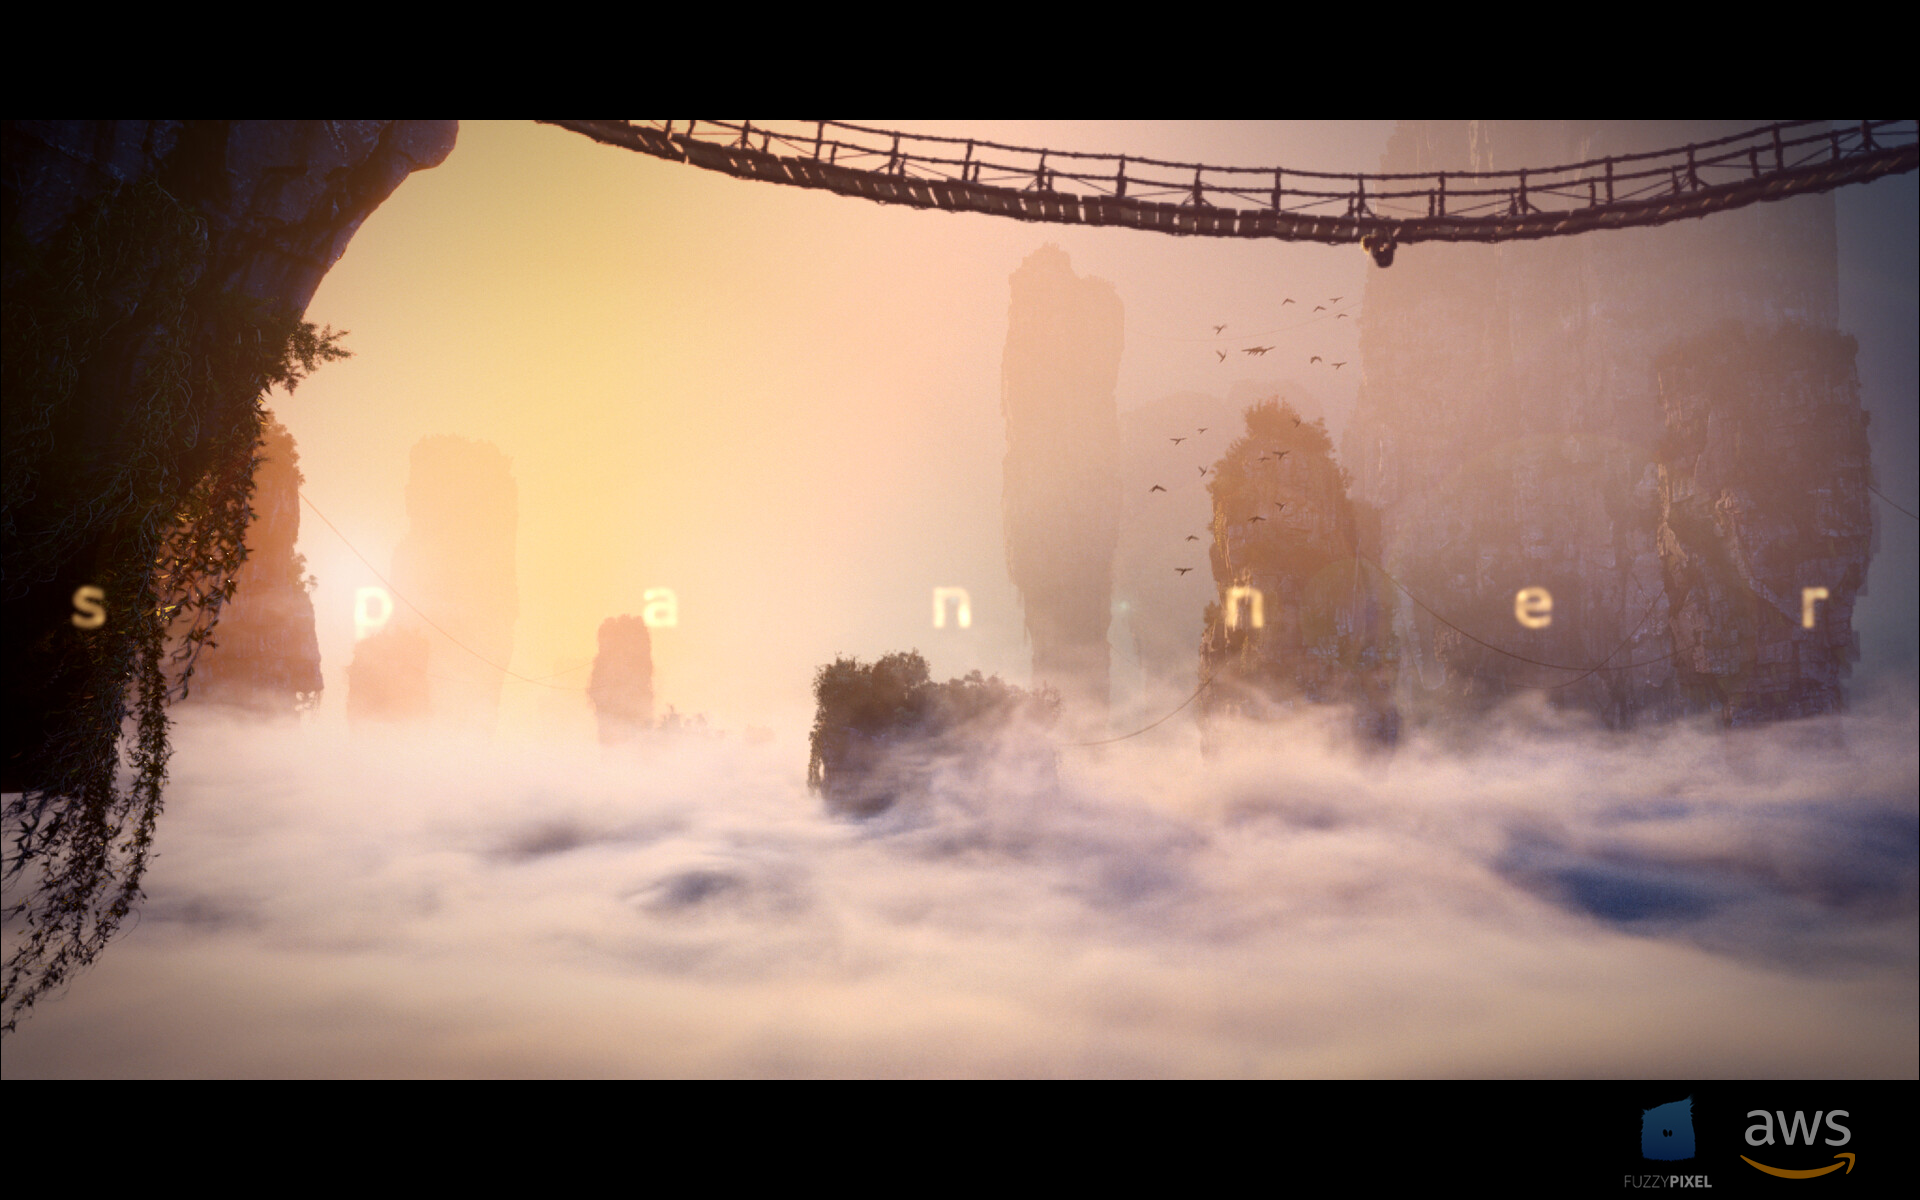
Opening title sequence for Spanner
Lessons learned
It’s hard to say if we would have done things differently knowing what we know today. We tried different solutions to see what worked best for our project. Paint Effects has its own power and taught us what is possible. Without going down that path, we may not have discovered our hybrid solution.
One bit of advice to artists is not to worry about whether a solution will fail. It’s more important to be decisive and choose a path. After a certain amount of time, if the gains decrease and the solution isn’t working, you still learn about what didn’t work.
Remember: If you try to force a solution into your workflow, and make many compromises, that’s a clue that the solution is not the right fix. Trust that there is a better one. This used to be a big hang up for me, but I’ve learned that it’s okay to turn around to find a new solution. You’ll save yourself time and pain.
In the end, it’s about being brave enough to explore, and knowing when it’s time to stop and change tactics. That’s something you only learn by taking the journey!