AWS for M&E Blog
Simplify configuration and increase video quality with new automatic encoder modes from AWS
If your business is encoding and delivering video, your primary goal is to make sure the video you distribute looks great for many types of source content. To achieve high video quality, video encoders need to use the best settings with inputs that have different content complexities, genres, and bandwidth constraints. Configuring settings can be complicated and operationally tedious to get right, but Amazon Web Services (AWS) provides services that can simplify this task.
AWS Elemental MediaConvert, a file-based video transcoding service with broadcast-grade features, and AWS Elemental Live, which efficiently formats video for delivery to broadcast televisions and streaming to internet-connected devices, now have content-adaptive automatic modes for many video settings. You can simply configure settings once and use them every time, creating an optimal viewing experience for your subscribers. The AWS approach, built on the predictive power of machine learning (ML), is comprehensive and can adjust parameters at the scene, Group of Pictures (GOP), and block levels. In this article, we describe the different encoding parameters where the automatic mode can be activated and demonstrate the benefits over the manual mode.
Automatically select quality level using the QVBR auto rate control mode
Created by AWS Elemental, Quality-Defined Variable Bitrate (QVBR) is a content-conscious version of variable bitrate (VBR) control that reduces distribution costs while maintaining a consistent quality level. QVBR uses fewer bits in low-complexity periods of the content to save bandwidth. Where complexity is higher, QVBR uses more bits—up to the maximum bitrate—delivering consistently high video quality.
To activate QVBR, you simply set the rate control mode to QVBR and set the target Quality Level, a number ranging from 1 (lowest video quality) to 10 (highest video quality). You also set the maximum bitrate allowed, based on network bandwidth and/or playback device requirements.
We commonly recommend setting the quality level to 8 or 9 for viewing on large-screen displays, 7 for viewing on PCs or tablets, and 6 for viewing on smaller mobile devices. Assuming the maximum bitrates are set to reasonable levels (for example, 6 Mbps for 1080p30 content), these settings deliver high video quality across a wide range of content types. However, in cases where the maximum bitrate is not high enough to meet the desired quality level due to content complexity, the encoder might not achieve the optimal video quality.
To consistently get the best possible video quality output for all content types given a maximum bitrate constraint, MediaConvert and Elemental Live now have a QVBR Auto quality level that automatically selects the appropriate quality level based on content complexity and encoding parameters, including maximum bitrate, resolution, and frame rate. QVBR Auto mode targets an optimal video quality output across a wide range of content types and bandwidth constraints.
Let’s look at an example from the video sequence Food Party, which consists of multiple scenes, several with challenging temporal and spatial complexity (Figure 1).

Figure 1: Scenes in the video sequence “Food Party”
This clip was encoded twice, using QVBR quality level 8 and QVBR Auto, both with a maximum bitrate of 4.5 Mbps.
Figure 2 provides comparison data based on the objective quality measurement metrics of peak signal-to-noise ratio (PSNR) and Video Multi-Method Assessment Fusion (VMAF) for selected scenes. In Scene 1, which is a simple scene, QVBR Auto led to a very slight reduction in VMAF and PSNR at the expense of good bandwidth savings. In Scene 2, which is more complex, the VMAF and PSNR scores are virtually the same, but there is a significant increase in the minimum VMAF and minimum PSNR scores (for example, 19 points difference for VMAF), leading to a better visual experience. QVBR Auto achieves this with a slight reduction in bits used for this scene. Statistics for Scene 4 are quite similar to those of Scene 2, given that the complexity for both scenes is almost the same. For Scene 7, which is quite complex, QVBR Auto allocates many more bits and therefore provides a better fidelity, as evidenced in the average scores for VMAF and PSNR (9.23 dB and 1.26 dB difference).
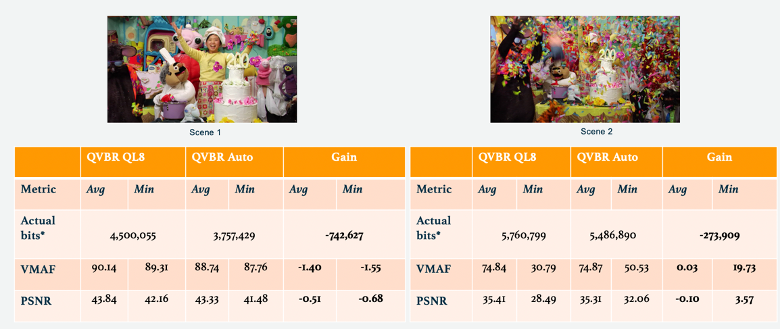
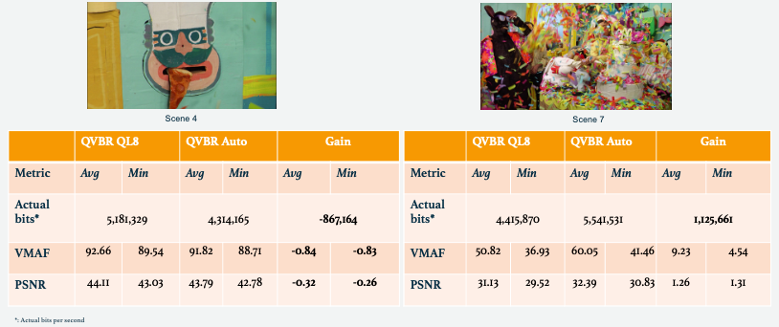
Figure 2: Objective metric comparison for selected scenes from “Food Party” between QVBR quality level 8 and QVBR Auto
Figure 3 provides the same video quality statistics for the entire clip. And in Figure 4, an example of the video quality performance difference is provided, where QVBR Auto leads to better fidelity in the output video quality (right) compared to QVBR quality level 8’s output video quality (left).
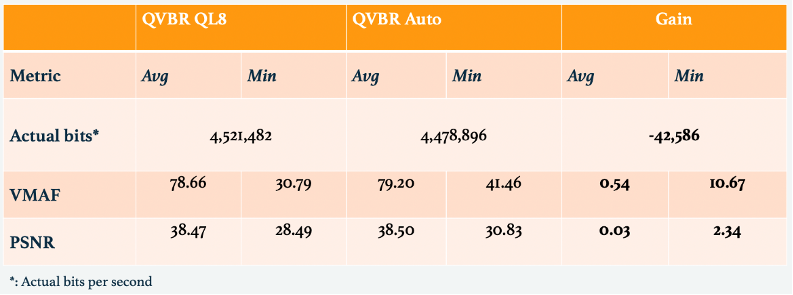
Figure 3: Objective metric comparison for the entire “Food Party” sequence between QVBR quality level 8 and QVBR Auto

Figure 4: Frame captures for encodings at a maximum bitrate of 4.5 Mbps, comparing (a) QVBR quality level 8 and (b) QVBR Auto
With the QVBR quality level set to QVBR Auto, optimal video quality is achieved no matter what the source complexity or genre is.
Automatically set GOP structure for content
GOP structure parameters play a key role in determining bit allocation during encoding and have a direct impact on video quality. Figure 5 shows some of these parameters, including the number of B frames between reference frames, Number of reference frames, Dynamic Sub-GOP, and Min I-Interval. Although the number of B pictures dictates the maximum number of consecutive B-frames in a sub-GOP, dynamic sub-GOP lets the encoder vary the number of B-frames—up to the specified maximum—to preserve quality based on whether the content contains slow motion, fades, or complex scenes with lots of motion.
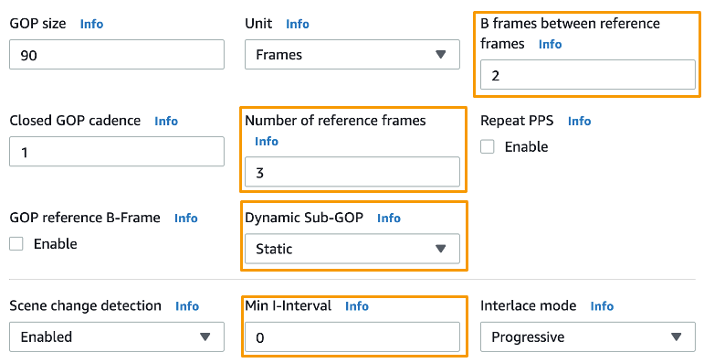
Figure 5: Parameters of interest for content-adaptive GOP structure
If you specify a Min I-interval, when there is a scene change within the specified number of frames in the GOP cadence, the encoder moves the I-frame GOP cadence to the frame where the scene change occurs. This reduces the possibility of having multiple I-frames close to each other. Because I-frames are larger than P and B frames, optimizing the I-frame placement and reducing the number of I-frames will improve bitrate allocation.
In MediaConvert, you can now set the GOP parameters to Auto, and the settings will be automatically optimized no matter what type of content you are encoding.
Figure 6 shows the difference in I, P, and B statistics when GOP parameters are set to Auto (bottom) versus Default (top). In Auto mode, the I-frame placement is optimized in the presence of scene changes, reducing the number of I-frames from 3 percent to 2 percent in this example. Because I-frames consume high bandwidth, such reduction will likely lead to better bitrate use and better picture quality overall.
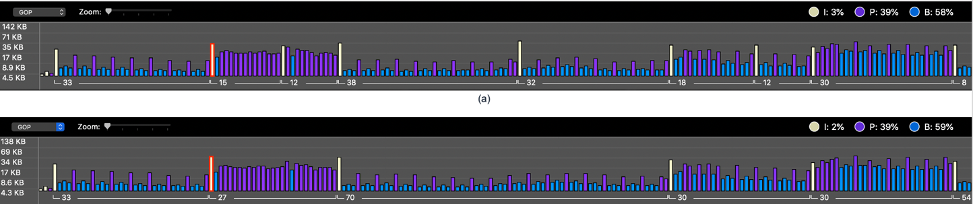
Figure 6: I, P, and B frame statistics with GOP settings set to Default (top) versus Auto (bottom)
Automatically set the configuration of AQ parameters
Adaptive Quantization (AQ) is a module in the encoder that plays a key role in allocating bits, either within a frame (Spatial AQ) or within a group of frames (Temporal AQ or Flicker AQ). For instance, in a soccer video, Spatial AQ might decide to provide more bandwidth to the soccer pitch, in which artifacts can be visible on soft textures in the grass, and reduce the bits for the spectators in the stands, where it is difficult to perceive less fidelity. How much bandwidth to add or reduce is dictated by a strength parameter for AQ, which ranges from Low to Max (Figure 7).
Using the best settings for the content type being encoded is important. For graphics or text, a setting of Low drastically limits the change in quantization parameters, so visible artifacts are reduced. For content such as a sporting event in a stadium, a setting of either High or Higher will provide enough range to trade bits from the coarse texture area in the crowd in favor of better fidelity on the field and in the players. Similarly, Temporal AQ favors blocks that are important over multiple frames and decides on bit allocation depending on the content type.
In addition, activating Flicker AQ reduces the pulsing effect that can occur on I-frames, caused by the picture fidelity dropping in the frames just before the I-frame. When Flicker AQ is activated, the encoder alters decisions in the frames preceding the I-frame, so fidelity across these frames is visually smoother. This issue is most visible for specific content and bitrates, so it is challenging to determine when best to activate Flicker AQ.
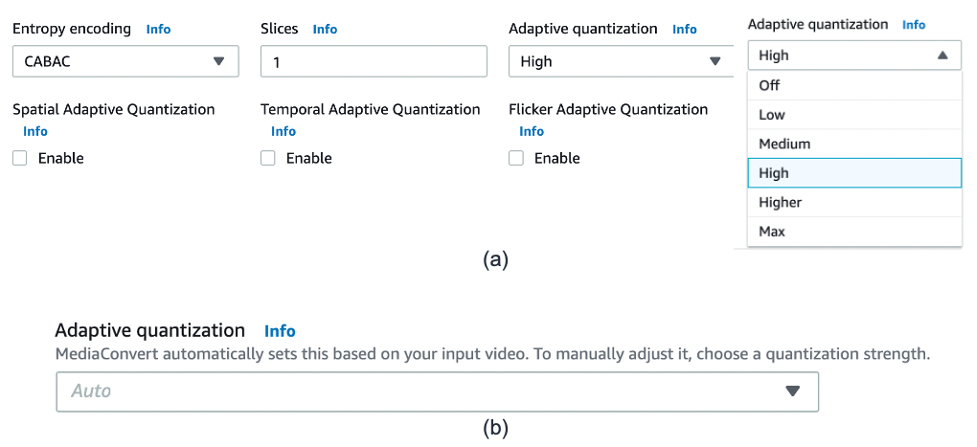
Figure 7: Adaptive AQ settings using (a) Default settings and (b) Auto AQ mode
Based on ML-driven content-aware techniques, the new Auto AQ mode adaptively sets AQ strength automatically, adapting to the current content. Auto AQ uses ML models trained offline on an expansive and curated set of content covering a wide spectrum of video content. For instance, this mode might automatically set the AQ strength to High for a soccer pitch scene and then Low for another scene where text or graphics are predominant. This approach is designed with both low latency and reduced compute overhead in mind, making it suitable for video-on-demand (VOD) and live applications.
Figure 8 shows a comparison for Spatial AQ with the strength set to High (left) versus Auto (right) from the complex clip Crowd Run, encoded at 6 Mbps. Note the improved fidelity on the faces with Auto mode.

Figure 8: Spatial AQ with strength set to (a) High and (b) Auto
Figure 9 shows an example for Temporal AQ when AQ strength is set to High (left) and Auto (right). Note the improved rendition of the edges around the on-screen text on the right side.

Figure 9: Temporal AQ with strength set to (a) High and (b) Auto
Auto AQ also adaptively controls when Flicker AQ is activated, automatically detecting where I-frame pulsing is likely to occur and facilitating the right amount of compensation.
Save time on encoding parameters using automatic modes for AWS Elemental
When configuring job settings, you no longer need to go through the time-consuming process of tweaking encoding parameters for different types of content. Instead, you can simply use the automatic modes for QVBR quality level, GOP structure, and Adaptive Quantization strength. These modes automatically configure and adjust the optimal parameters based on the content you are encoding, providing high video quality.
The QVBR Auto and Auto AQ modes are available for the Advanced Video Coding (AVC) codec in MediaConvert and in Elemental Live software version 2.22 or newer. The automatic GOP setting is available in the AVC codec for MediaConvert. Visit the Media, Video, Quality, Content Aware, Content Adaptive for more information.