AWS Messaging Blog
Auto-reply to incoming emails using Amazon Simple Email Service (SES)
Both Amazon Pinpoint and Amazon Simple Email Service (SES) are known for their ability to send out transactional and promotional emails at scale and with ease. However, both are often not set up to receive email replies. Owners often assume that the “no-reply” addresses they are using do not require much consideration. This means that if a customer does reply, they would get an unhelpful server rejection indicating that the address is invalid. They would also not be able to unsubscribe via the simple reply, which is an otherwise established common practice. Automated guidance that the address is not monitored and who and how to reach for assistance would never be provided. In summary, a very unprofessional experience.
If you do have full control over the DNS and are not already receiving emails at the subdomain used for these emails, you can follow this short guide. It walks you through all the setup needed to have automated and templated responses to any address at the domain. This includes the address you use to send emails. Follow this post to ensure that your Amazon SES and Amazon Pinpoint are set up in accordance with common configuration and best business practices to have professional auto-reply to emails sent to the configured sending email addresses.
Solution overview
The proposed solution does not rely on any additional services. It does not add any additional charges beyond the cost directly associated with receiving and sending the emails and the minimal AWS Lambda function for the automated logic. It relies on SES built-in capability to receive emails, Amazon Pinpoint native templates, and uses Lambda for basic orchestration.
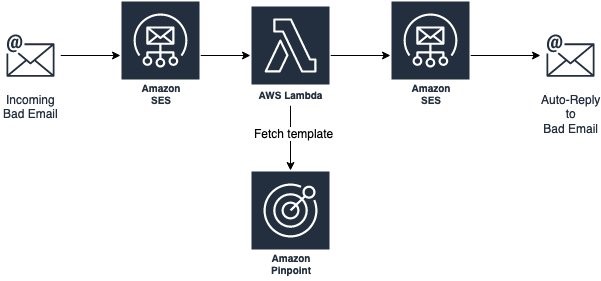
Note, in this walkthrough and related code, we are using Amazon Pinpoint templates as they can be managed and maintained directly via the console, but you can choose to use SES templates (via the CreateTemplate API) or, if it makes better sense in your scenario, even just hardcode the template into the AWS Lambda function itself.
To complete the setup, all you must do is follow these steps:
-
-
- Confirm (Sub-) Domain setup in SES (even if you use Amazon Pinpoint to send your emails out, the SES portion of the console should show the validated domain as well). See SES Developer Guide.
- Ensure that your SES domain is verified and you are out of the sandbox. If still in the sandbox, you can only send emails to the Amazon SES mailbox simulator addresses and email addresses/domains that you have pre-verified. See Moving out of the Amazon SES sandbox.
- Configure SES to receive incoming emails. Please note that this must be done on the whole subdomain you use, not just a single email address. See Setting up Amazon SES email receiving.
- Create/add a new template you want to use via Amazon Pinpoint. Simply switch the console over to Amazon Pinpoint, select Message templates, click Create, select Email, and fill out the rest of the self-explanatory field.
- Plaintext portion is optional – you can either skip it or fill it out and enable in the Lambda function we are deploying in the next step.
- Similarly, if you prefer to use the SES template, you can instead. Just use the associated line in that same code.
- Same with a hardcoded template, if you prefer that for some reason.
- Have this pre-defined CloudFormation create the required SES receive rule, and Lambda function. This processes the incoming email and sends back the response, all using the code shared in the dedicated portion of our GitHub, AWS Digital User Engagement Reference Architectures repository. Specifically:
-
- Download the YAML from SES_Auto_Reply.yaml.
- Go to CloudFormation in AWS Management Console. (Remember to choose the region you want it deployed on)
- Click Create Stack and then choose With new resources
- Leave the default “Template is ready“, but switch to ”Upload a template file“ and choose the file you just downloaded
- Follow the wizard to give the “stack” a new name and enter the name of the template you created in step 4.
- Optionally you can also set the default response address, the addresses and/or domains you want to limit the auto-response to, and adjust the incoming email rule-set it should be stored under (the default should be fine, unless you have manually adjusted it in the past)

-
- Once deployed, the behavior is immediately active and you can further adjust any of these elements.
-
Conclusion and what’s next?
This architecture, once deployed, sends out the templated auto-response using the SES/Pinpoint domain/email address it received the original email on.
The new rule is added to the SES email receiving rule set to allow further customization:
- The rule can be limited to specific email address, specific domain, or just be set to be across all domains.
- It can also have the default response address set or reuse the address that the original rejected email was sent to.
- It can be moved down on the priority with other rules taking precedence and possibly even overriding it.
- It can have other actions added to it, like notifying SNS for additional tracking.
The Lambda function looks up the chosen Amazon Pinpoint template and uses it to reply. Here are some of the customizations you may want to consider within this function and the template:
- When sending the automated reply, by default, the template’s configured subject is appended with the original incoming email subject. You can adjust this to fit your company’s brand better.
- By default, the function supports an optional template tag %%NAME%% and %%ID%%. If the first appears in the template, it is automatically replaced with the original email’s FROM address. And if %%ID%% appears in the template, it is replaced with the SES’s original email message id, to help with any required audits.
- It is assumed that no additional tracking and actions are needed on such rejected and auto-replied emails, but you can further modify the flow by moving the rule around and adding more actions (as mentioned above), and even specify a particular/different SES Configuration Set for the outgoing emails.
Are you using this flow as a baseline for a more complex business flow or have other questions about it? We want to hear back – please comment here or file an issue in the GitHub repository. If you want to file a pull request to make it even more useful for others, please do so, we do appreciate community participation.
If you liked this article, we are continually expanding our Amazon Pinpoint and SES Architecture References and publish new solutions for these and other services. For most recent SES documentation, please see official SES documentation site, and for Amazon Pinpoint, please see Amazon Pinpoint documentation site.