Front-End Web & Mobile
Accessing resources in a Amazon Virtual Private Cloud (Amazon VPC) from Next.js API Routes
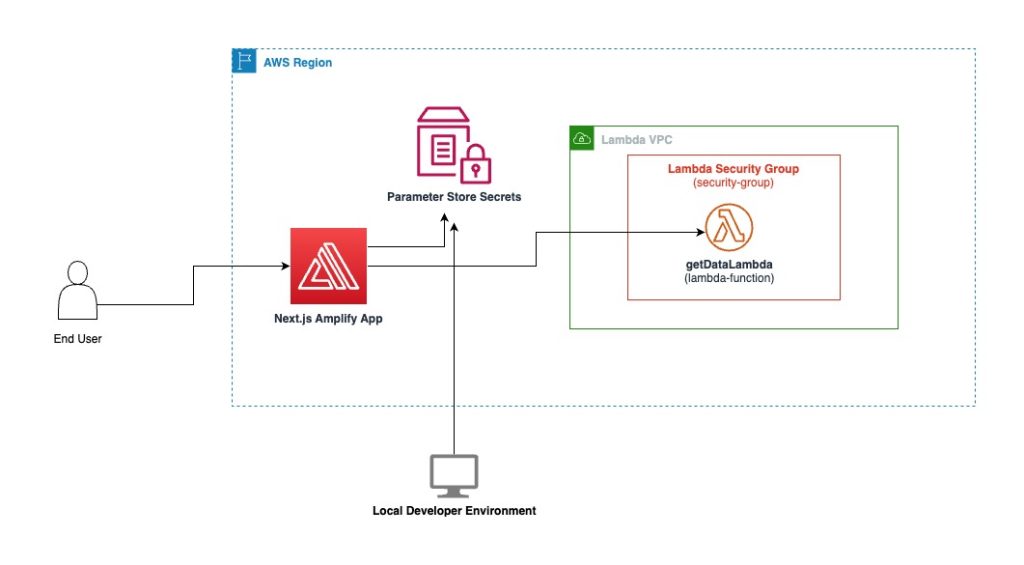
Developers often need to access resources deployed inside of a Amazon Virtual Private Cloud (Amazon VPC) from Next.js applications deployed to AWS Amplify Hosting.
An Amazon VPC can enable enterprises to launch resources in an isolated virtual network; however, developers may find it challenging to connect frontend applications to call APIs and databases within the Amazon VPC due to complex network access controls and security groups.
In this post, we will implement a solution for accessing resources such as Amazon Relational Database Service (Amazon RDS) or AWS Lambda or inside of a VPC from a Next.js Server Side Rendered (SSR) application running on AWS Amplify Hosting.
Solution Overview
First, we’ll build and deploy a Lambda function inside of an Amazon VPC using the AWS Cloud Development Kit (AWS CDK). Then we’ll create a Next.js app to access the data inside the Amazon VPC through a Next.js API route using the Pages Router and onto a React UI hosted on AWS Amplify Hosting. API keys and other configuration data using AWS Systems Manager Parameter Store will be demonstrated.
The result is a publicly accessible Next.js app that and end user can access to view data from within the Amazon VPC.
Prerequisites
In this tutorial you’ll need the following:
- An active AWS Account
- Node.js installed with NPM
Creating a Lambda function in a VPC stack
To illustrate the protected Amazon VPC resources for a Next.js application to access, we will create a Amazon VPC with a Lambda function running in it.
First, we’ll install the AWS CDK (refer to Getting started with the AWS CDK for details on its prerequisites).
$ npm install -g aws-cdkNext, we’ll generate a AWS CDK application by running the following command
$ cdk init lambda-in-a-vpc --language typescriptOnce generated, replace the contents of lib/lambda-in-a vpc-stack.ts with the the following code.
The AWS CDK Stack creates a Amazon VPC with public, private, and isolated subnets, a security group and a Node.js Lambda function that will be placed in the isolated subnet of the Amazon VPC.
By placing the Lambda function in a private subnet with a security group, it isolates the function within the Amazon VPC. This provides a secure network environment for the Lambda function separate from the public internet but with access to resources in the Amazon VPC like databases in the private subnets.
// lib/lambda-in-a-vpc-stack.ts

import {
  CfnOutput,
  Duration,
  Stack,
  StackProps,
  aws_ec2 as ec2,
  aws_lambda as lambda,
} from "aws-cdk-lib";
import { NodejsFunction } from "aws-cdk-lib/aws-lambda-nodejs";
import { Construct } from "constructs";
import path = require("path");

export class LambdaInAVpcStack extends Stack {
  constructor(scope: Construct, id: string, props?: StackProps) {
    super(scope, id, props);

    const vpc = new ec2.Vpc(this, "LambdaVpc", {
      subnetConfiguration: [
        {
          name: "Isolated",
          subnetType: ec2.SubnetType.PRIVATE_ISOLATED,
        },
        {
          name: "Private",
          subnetType: ec2.SubnetType.PRIVATE_WITH_EGRESS,
        },
        {
          name: "Public",
          subnetType: ec2.SubnetType.PUBLIC,
        },
      ],
    });

    // Create a security group to be used on the lambda functions
    const lambdaSecurityGroup = new ec2.SecurityGroup(
      this,
      "Lambda Security Group",
      {
        vpc,
      }
    );

    const getDataLambda: NodejsFunction = new NodejsFunction(
      this,
      id + "-getDataLambda",
      {
        memorySize: 1024,
        timeout: Duration.seconds(5),
        runtime: lambda.Runtime.NODEJS_18_X,
        handler: "handler",
        entry: path.join(__dirname, "../lambda/getData.ts"),
        vpc: vpc,
        vpcSubnets: { subnetType: ec2.SubnetType.PRIVATE_ISOLATED },
        securityGroups: [lambdaSecurityGroup],
      }
    );

    new CfnOutput(this, "getDataLambdaArn", {
      value: getDataLambda.functionArn,
      exportName: "getDataLambdaArn",
    });
  }
}
Inside the Node.js Lambda function we can retrieve data from any resource inside our Amazon VPC such as an Amazon RDS instance, Amazon S3 bucket, other protected resource or externally like calling a 3rd-party API.
Next, create a lambda directory and under it getData.ts. For illustration purposes our data is hard coded, but this Lambda function could retrieve the geographical data from Amazon RDS or any other data source and perform validations or transformations to it before returning it.
// lambda/getData.ts

import { APIGatewayProxyResultV2 } from "aws-lambda";

const geoData = [
  {
    name: "United States",
    states: [
      "Alabama",
      "Alaska",
      "Arizona",
      //...
    ],
  },
  {
    name: "Canada",
    states: [
      "Alberta",
      "British Columbia",
      "Manitoba",
      // ...
    ],
  },
  {
    name: "Mexico",
    states: [
      "Jalisco",
      "Mexico City",
      "Oaxaca",
      // ...
    ],
  },
];

exports.handler = async function (): Promise<APIGatewayProxyResultV2> {
  try {
    return {
      statusCode: 200,
      headers: { "Content-Type": "application/json" },
      body: JSON.stringify(geoData, null, 2),
    };
  } catch (error) {
    console.error("Unable to return data:", error);
    return {
      statusCode: 500,
      headers: { "Content-Type": "application/json" },
      body: JSON.stringify(error),
    };
  }
};
Deploy the AWS CDK stack by running cdk deploy and note the output returned for use with the Next.js application in the following section.
$ cdk deploy

[+] Building 92.4s (14/14) FINISHED                                                                                                                                   8.4s
WARNING: The requested image's platform (linux/amd64) does not match the detected host platform (linux/arm64/v8) and no specific platform was requested

  asset-output/index.js  831b

⚡ Done in 102ms

✨  Synthesis time: 97.21s

LambdaInAVpcStack: deploying... [1/1]
LambdaInAVpcStack: creating CloudFormation changeset...

 ✅  LambdaInAVpcStack

✨  Deployment time: 33.99s

Outputs:
LambdaInAVpcStack.getDataLambdaArn = arn:aws:lambda:us-east-1:074128318641:function:LambdaInAVpcStack-LambdaInAVpcStackgetDataLambda1E-33sG563OFj2H
Stack ARN:
arn:aws:cloudformation:us-east-1:074128318641:stack/LambdaInAVpcStack/1fbc2790-2a57-11ee-9757-0ecf5ea19ac5

✨  Total time: 131.2s
Note the Lambda function name on the end of the LambdaInAVpcStack.getDataLambdaArn , in this case LambdaInAVpcStack-LambdaInAVpcStackgetDataLambda1E-33sG563OFj2H .
Creating the Next.js Amplify App
Next we need to generate the Next.js application using the Pages Router by running the following command and select the prompts shown below
$ npx create-next-app@latest geo-web-app
✔ Would you like to use TypeScript? … No / Yes
✔ Would you like to use ESLint? … No / Yes
✔ Would you like to use Tailwind CSS? … No / Yes
✔ Would you like to use `src/` directory? … No / Yes
✔ Would you like to use App Router? (recommended) … No / Yes
✔ Would you like to customize the default import alias (@/*)? … No / Yes
Install the AWS Amplify JavaScript, AWS Amplify UI libraries. These dependencies are optional, but will be used to build the UI for the Next.js application in this post.
npm i aws-amplify @aws-amplify/ui-reactConfigure the styles for Amplify UI by updating pages/_app.tsx with the following import
// Import Amplify UI styles
import "@aws-amplify/ui-react/styles.css";
import type { AppProps } from "next/app";

export default function App({ Component, pageProps }: AppProps) {
  return <Component {...pageProps} />;
}
Commit the updates to Git and push to a Git provider.
Deploy the Next.js App to Amplify
With your app pushed to a Git provider, you are ready to deploy to Amplify Hosting.
Start by visiting the Amplify Console. If you have not created an Amplify app before, scroll to the bottom of the page then select Amplify Hosting > Host your web app > Get started. If you have created an app before, select New app > Host web app.
Choose your Git repository hosting provider then select Continue.
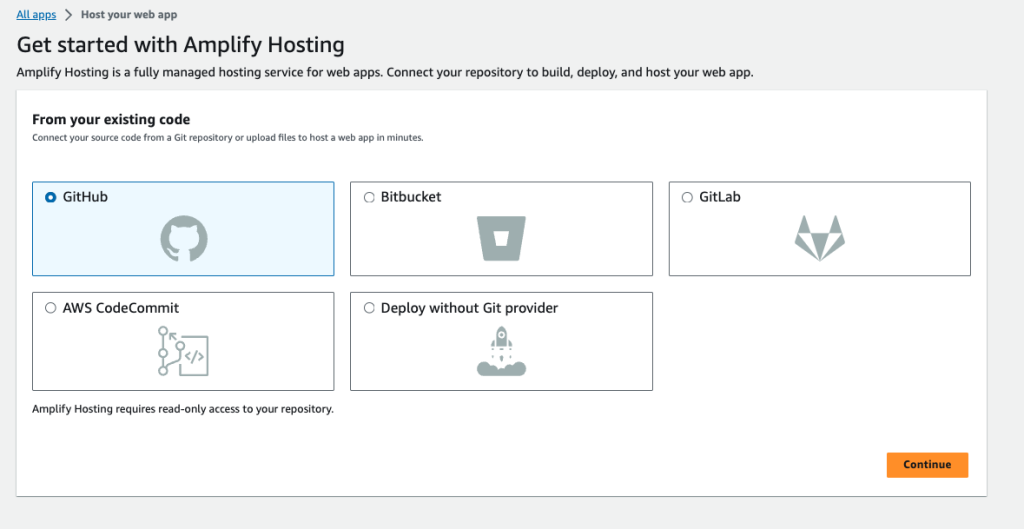
Depending on your Git provider, you will be prompted to allow Amplify Hosting access to your repositories. After a successful authorization, choose the repository for this app from the Recently updated repositories list then select Next.

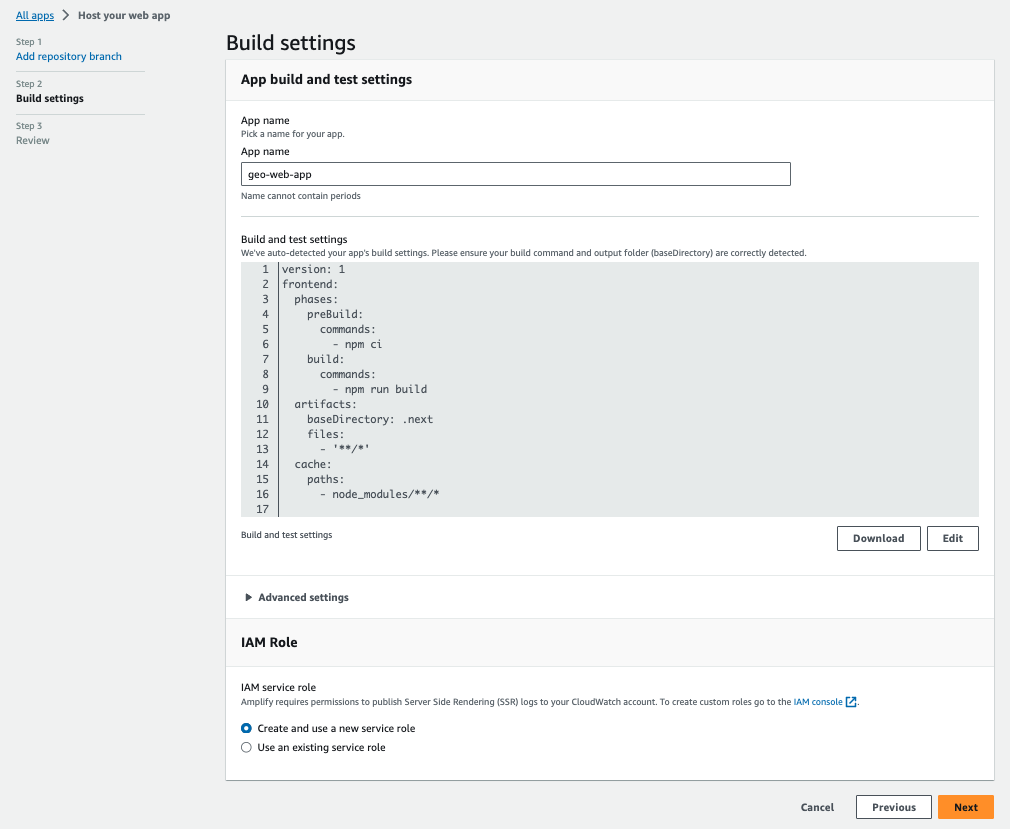
On the Build settings page, Amplify automatically detects the correct build settings so there is no need to make any configuration change. Accept the default by selecting Next.
On the Review page, select Save and deploy.
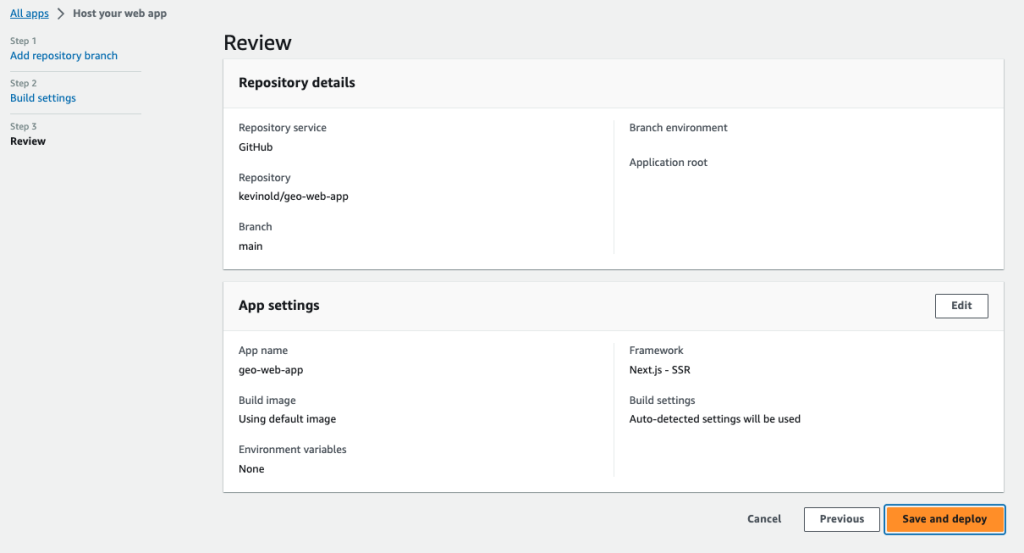
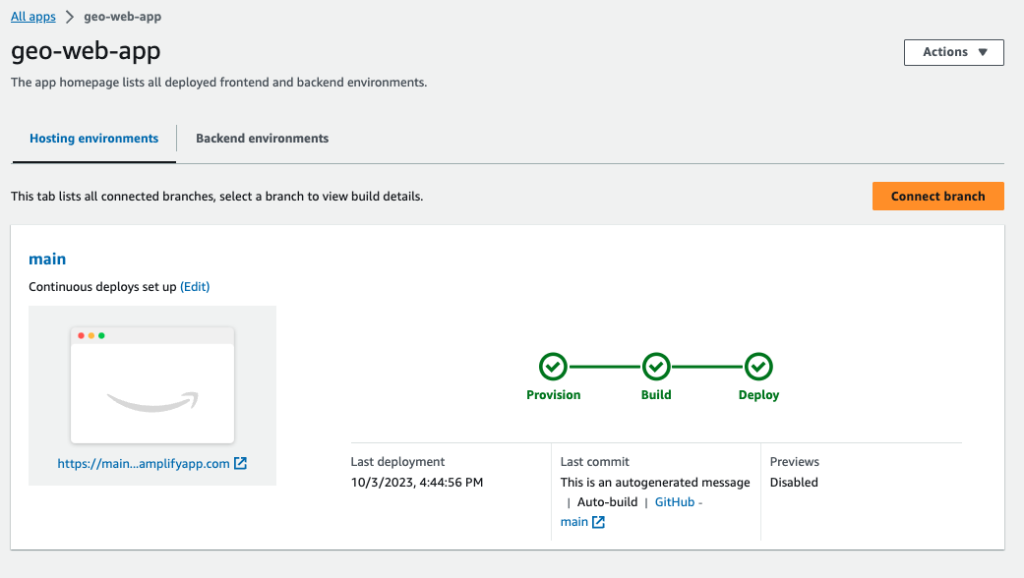
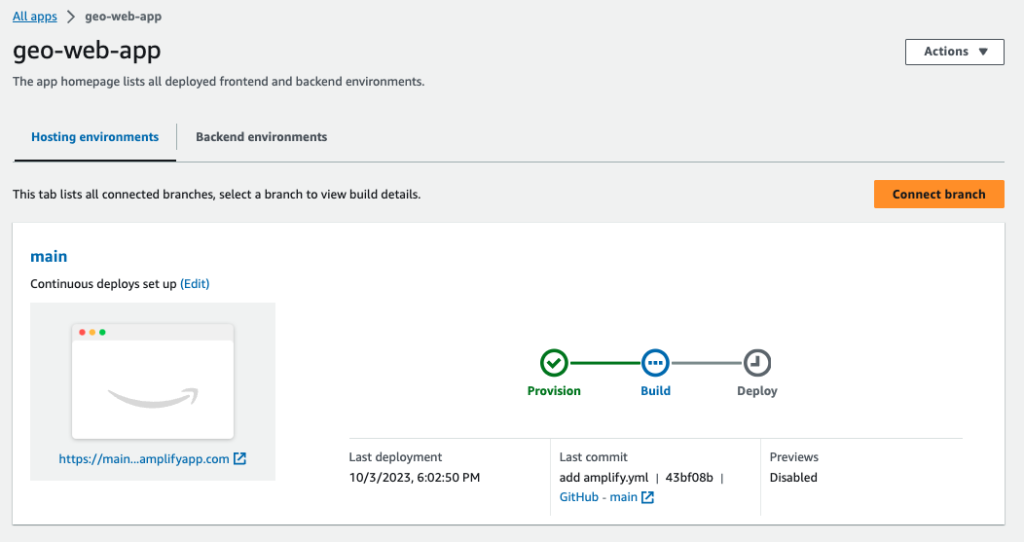
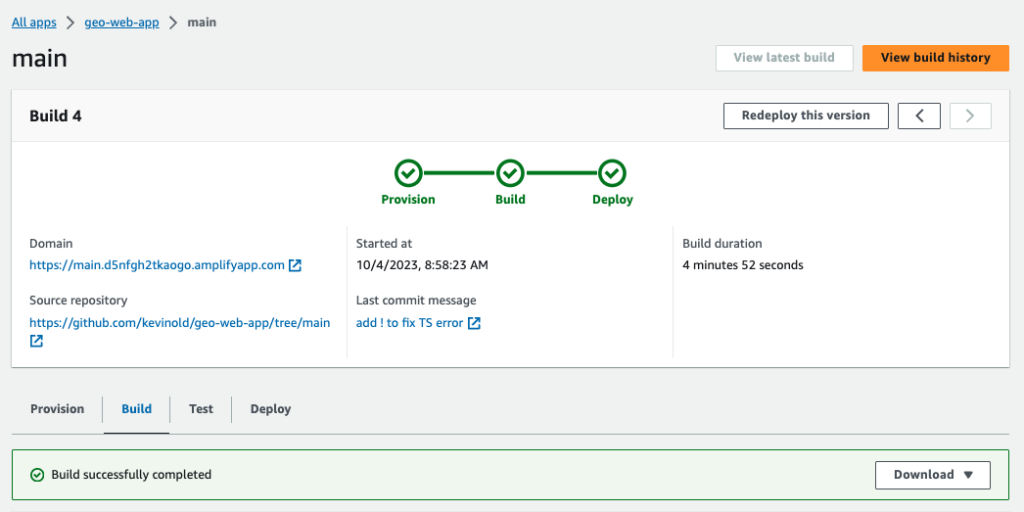
Your app will be created and you will be taken to the app’s page in the Amplify Hosting console. Amplify Hosting will provision an isolated build and hosting environment for your project and deploy it. The process will take 2–3 minutes; you can monitor progress by selecting the Provision, Build or Deploy links as shown below.
Manually creating secrets in Parameter Store
Our Next.js API route will need access to secrets for the AWS SDK to invoke the Lambda function that lives inside the Amazon VPC.
We will store the secrets in the Parameter Store which provides secure, hierarchical storage for configuration data management and secrets management.
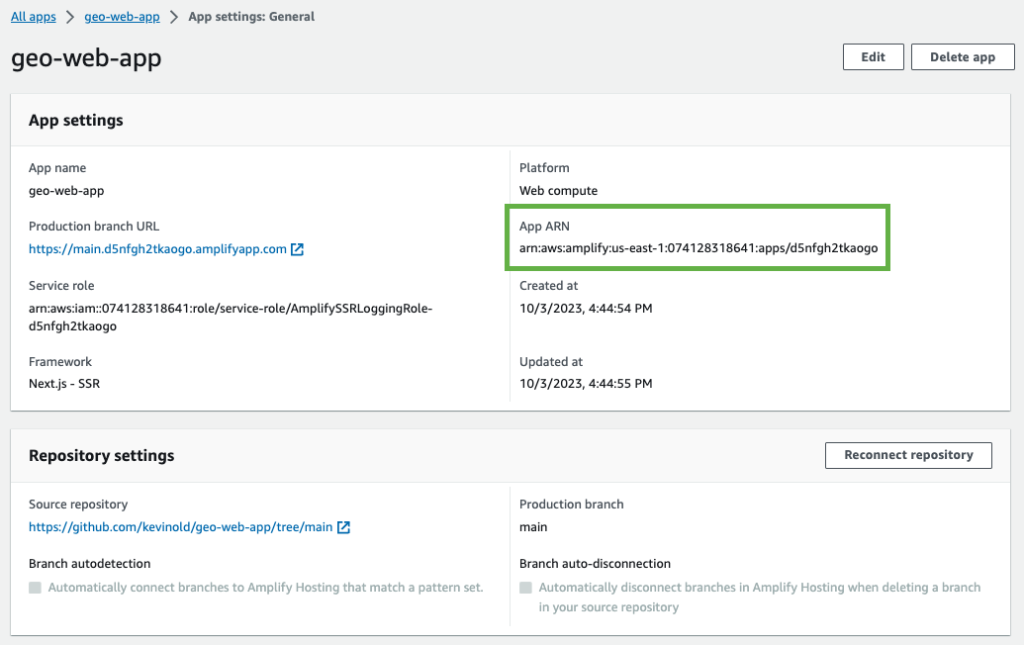
In the Amplify Hosting console, go to App Settings: General and get the App ARN. The value after the last slash (/) is the App Id, which will be used when saving the keys to Parameter Store.
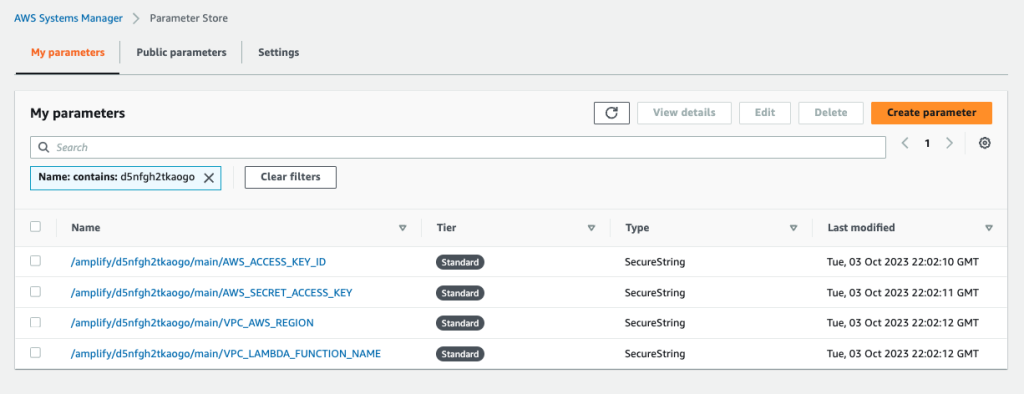
We need to create secrets for VPC_AWS_REGION, VPC_LAMBDA_FUNCTION_NAME which we get from our CDK output from the VPC stack.
The integration point between the Next.js API route and the AWS Lambda in the Amazon VPC is facilitated by an IAM user or role with access to call the VPC Lambda function. For this user or role, an AWS_ACCESS_KEY_ID and AWS_SECRET_ACCESS_KEY with permissions to call the VPC Lambda function is required. Reference creating an IAM user, create an access key for an IAM user and best practices for scoping access using the shared responsibility model.
These secrets can be set up manually by navigating to Parameter Store in the AWS Console. Following the instructions in the Environment variables page of the Amplify Hosting documentation, parameters names should follow the following format. In our case, we do not have a Amplify Backend, we will use the Branch Name, in this case main .
/amplify/{your_app_id}/{your_backend_environment_name}/{your_parameter_name}Once completed, they will look like the following in Parameter Store.
Automate secret creation in Parameter Store
Optionally, you may leverage the following .env.local template and Bash script, sync-ssm-params.sh , to save secrets directly to Parameter Store from the .env.local file inside your project. This script requires the AWS CLI and jq to be installed in your local development environment along with the Amplify App Id.
In .env.local set VPC_AWS_REGION and VPC_AWS_REGION, VPC_LAMBDA_FUNCTION_NAME and set AWS_PROFILE to the profile you wish to use as configured for the AWS CLI. AWS_ACCESS_KEY_ID and AWS_SECRET_ACCESS_KEY will be pulled by the script using the AWS CLI.
# .env.local

AWS_APP_ID=<Copy from Amplify Hosting Console>
AWS_PROFILE=default
VPC_AWS_REGION=
VPC_LAMBDA_FUNCTION_NAME=
#!/bin/bash
# sync-ssm-params.sh
# Allow list of parameters
allowlist=(
AWS_ACCESS_KEY_ID
AWS_SECRET_ACCESS_KEY
VPC_AWS_REGION
VPC_LAMBDA_FUNCTION_NAME
)
# Get the name of the current branch
APP_BRANCH=$(git rev-parse --abbrev-ref HEAD)
# Load .env into environment
export $(cat .env.local | grep -v '^#' | xargs)
# Get AWS access keys from AWS CLI profile
AWS_ACCESS_KEY_ID=$(aws configure get aws_access_key_id --profile $AWS_PROFILE)
AWS_SECRET_ACCESS_KEY=$(aws configure get aws_secret_access_key --profile $AWS_PROFILE)
for key in "${allowlist[@]}"; do
aws ssm put-parameter --name "/amplify/$AWS_APP_ID/$APP_BRANCH/$key" --value "${!key}" --type SecureString --overwrite
doneUpdate the Amplify Hosting Service Role with a custom policy
Before we are able to access the secrets saved in Parameter Store, we need to update the Service Role created by Amplify Hosting when our application was deployed, to have permission to read from Parameter Store for this application.
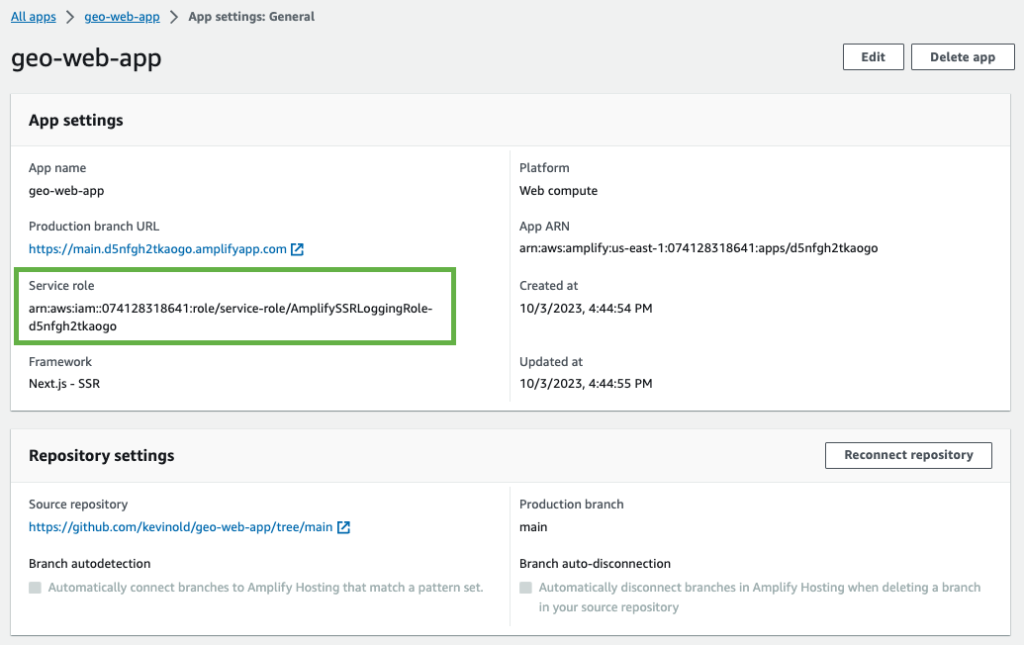
Navigate to the Amplify Hosting Console and to the application, then go to App Settings: General and note the Service Role.
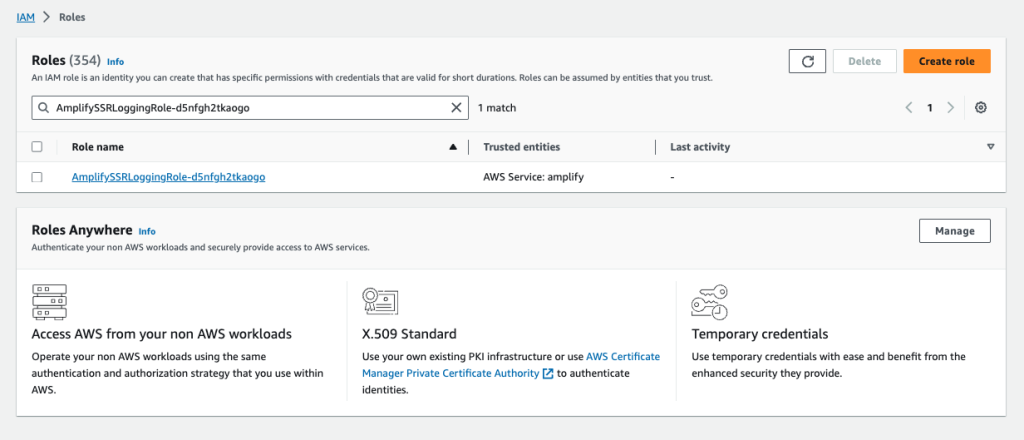
Navigate to IAM in the AWS Console and search for the Service Role.
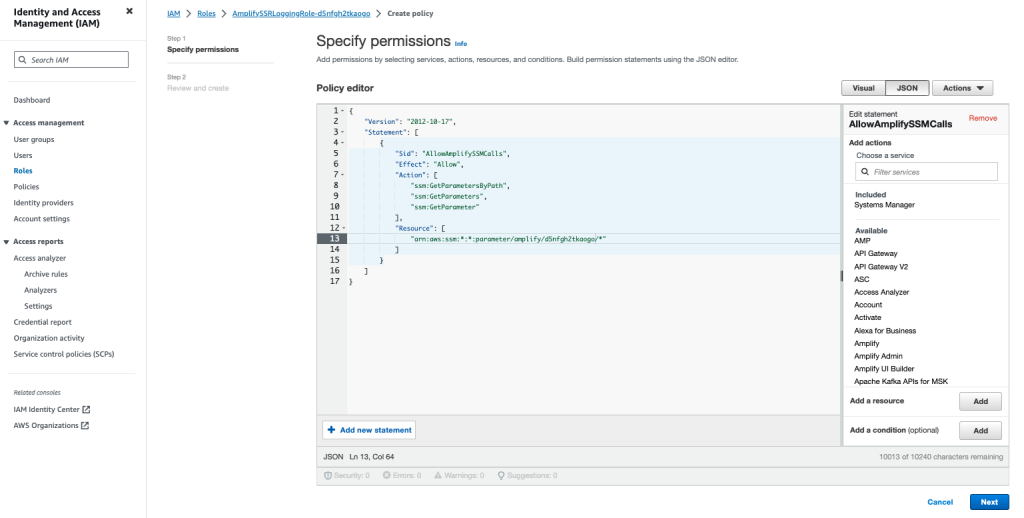
Add an inline policy AllowAmplifySSMCalls to the role by selecting Add permissions > Attach policy. Update the policy below with the Amplify App Id and paste in the JSON editor.
{
    "Version": "2012-10-17",
    "Statement": [
        {
            "Sid": "AllowAmplifySSMCalls",
            "Effect": "Allow",
            "Action": [
                "ssm:GetParametersByPath",
                "ssm:GetParameters",
                "ssm:GetParameter"
            ],
            "Resource": [
                "arn:aws:ssm:*:*:parameter/amplify/<AMPLIFY_APP_ID>/*"
            ]
        }
    ]
}
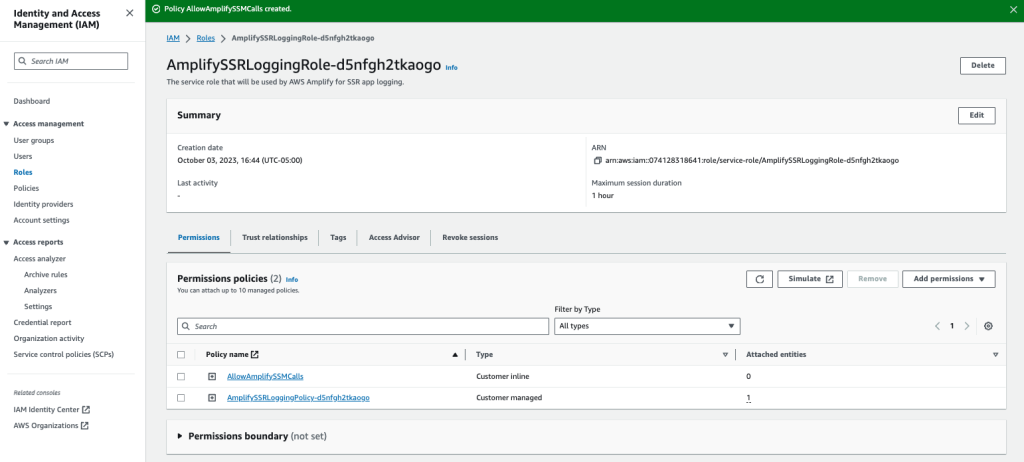
Once the policy is saved it will be displayed with the other policies under Permissions policies.
Customize the Amplify build to load secrets from Parameter Store
Finally, we need to update the Amplify CI build configuration file, amplify.yml , to load the secrets from Parameter Store into an environment file ( .env) that Next.js will reference during its build process.
Add an amplify.yml file to your project that will install the jq utility (needed to parse the $secrets value) and add the following command to load the secrets from Parameter Store into .env during the build. Using jq is optional and grep or other utilities may be used per guidance in Making environment variables accessible to server-side runtimes.
echo $secrets | jq -r 'to_entries|map("\(.key)=\(.value)")|.[]' >> .envThe complete amplify.yml file is below for reference.
version: 1

frontend:
  phases:
    preBuild:
      commands:
        - yum -y install jq
        - jq --version
        - npm ci
    build:
      commands:
        - echo $secrets | jq -r 'to_entries|map("\(.key)=\(.value)")|.[]' >> .env
        - npm run build
  artifacts:
    baseDirectory: .next
    files:
      - "**/*"
  cache:
    paths:
      - node_modules/**/*
Commit the files to Git and push to your Git provider to begin the deployment.
Update the Next.js app with data from the Amazon VPC Lambda function
After storing the secrets in Parameter Store we can now access data inside the Amazon VPC from our Next.js app.
We’ll be relying on the AWS SDK, so we need to install it using the following command
$ npm install aws-sdkCreate a Next.js API route, getGeoData.ts, under pages/api with the following code which initializes the AWS SDK and invokes the Amazon VPC Lambda function.
// pages/api/getGeoData.ts
import { Lambda } from "aws-sdk";
import { NextApiRequest, NextApiResponse } from "next";
const lambda = new Lambda({
region: process.env.VPC_AWS_REGION,
accessKeyId: process.env.AWS_ACCESS_KEY_ID,
secretAccessKey: process.env.AWS_SECRET_ACCESS_KEY,
});
export default async (req: NextApiRequest, res: NextApiResponse) => {
lambda.invoke(
{
FunctionName: process.env.VPC_LAMBDA_FUNCTION_NAME!,
Payload: JSON.stringify({}),
},
(err, data) => {
if (err) {
console.log(err);
res.status(500).json({ error: err });
} else {
res.status(200).json({ data });
}
}
);
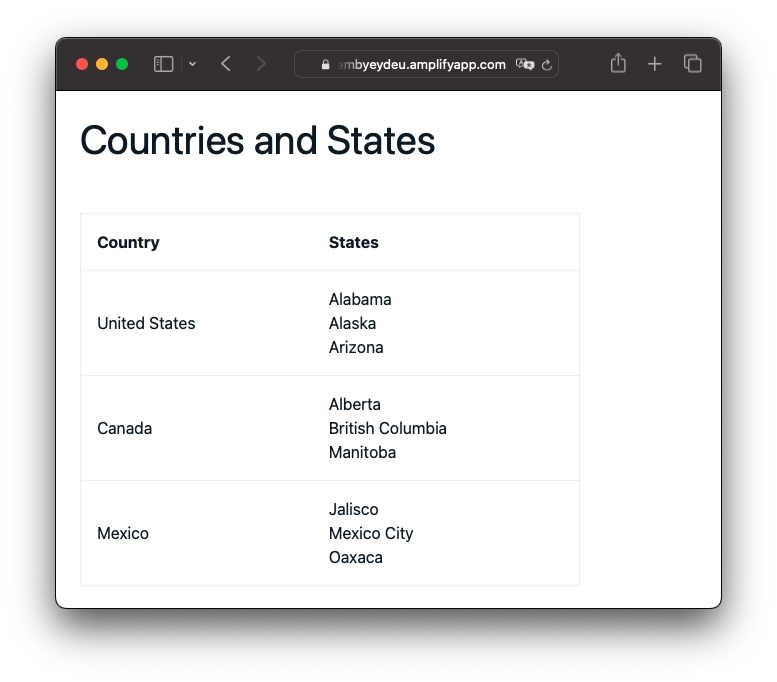
};Next, we can write the frontend code to access the data. Replace pages/index.ts with the following code which makes an API call to pages/api/getGeoData and displays the results in a table using AWS Amplify UI.
// pages/index.tsx

import {
  Heading,
  Table,
  TableBody,
  TableCell,
  TableHead,
  TableRow,
  View,
} from "@aws-amplify/ui-react";
import { useEffect, useState } from "react";

type Country = {
  name: string;
  states: string[];
};

export default function Home() {
  const [geoData, setGeoData] = useState<Country[]>([]);

  useEffect(() => {
    fetch("/api/getGeoData")
      .then((res) => res.json())
      .then((data) => {
        const payload = JSON.parse(data.data.Payload);
        const body = JSON.parse(payload.body);
        setGeoData(body);
      });
  }, []);

  return (
    <View padding="1rem">
      <Heading level={2} marginBottom={25}>
        Countries and States
      </Heading>
      <br />

      {geoData.length === 0 && <div>Loading...</div>}
      {geoData.length > 0 && (
        <Table width={500}>
          <TableHead>
            <TableRow>
              <TableCell as="th">Country</TableCell>
              <TableCell as="th">States</TableCell>
            </TableRow>
          </TableHead>

          <TableBody>
            {geoData.map((country) => (
              <TableRow key={country.name}>
                <TableCell>{country.name}</TableCell>
                <TableCell>
                  {country.states.map((state) => (
                    <div key={state}>{state}</div>
                  ))}
                </TableCell>
              </TableRow>
            ))}
          </TableBody>
        </Table>
      )}
    </View>
  );
}
Commit the files to Git and push to your Git provider to begin the final deployment.
Cleanup
To delete the resources in the AWS CDK stack run cdk destroy from the root of the lambda-in-a-vpc CDK project.
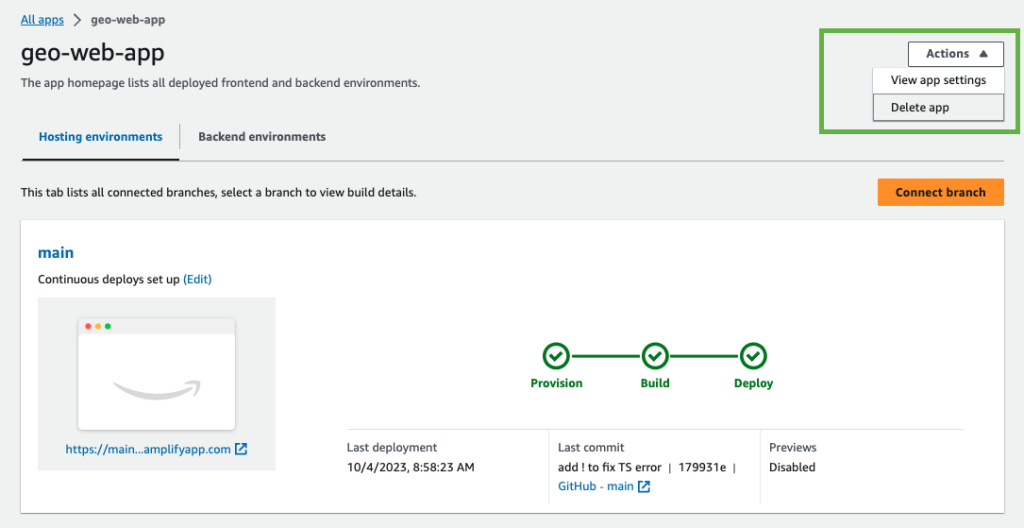
To delete the Next.js Amplify app, navigate to the app in Amplify Hosting and choose Actions > Delete app.
Conclusion
In this post we’ve built and deployed a Lambda function in a private subnet with a security group to isolate the function within a Amazon VPC using the AWS CDK.
Then we created a Next.js app to access the data inside the Amazon VPC through a Next.js API route and into a React UI hosted and deployed to AWS Amplify Hosting. We demonstrated best practices for securely storing and accessing API keys and other configuration data using Parameter Store.
To learn more about Amplify Hosting’s features including, custom domain names, web previews for pull requests, and feature branches visit the AWS Amplify Hosting Documenation.