Microsoft Workloads on AWS
How to use AWS App2Container to automate the setup of Azure DevOps CI/CD pipelines
Introduction
In this blog post, we will walk through how to automate the creation of an Azure DevOps release pipeline that deploys containerized applications to AWS. This solution will save you time and effort if you’re using Azure DevOps for version control or CI/CD and if you’re modernizing your applications using containers. We will use AWS App2Container (A2C) to modernize a sample .NET application into a container and then automate the creation of an Azure DevOps release pipeline. With A2C, you can transform existing applications running in virtual machines into containers without changing any code.
Containerization is a key part of a modernization strategy. Our customers are rapidly adopting containers to gain agility, simplify operational tooling, and standardize deployments. They’re also using CI/CD pipelines to complement containerization by allowing the end-to-end automation of build and release processes, which increases the reliability of deployments while reducing time and effort.
The high-level steps in this walkthrough are:
- Set up Azure DevOps integration with AWS.
- Containerize a .NET application using A2C.
- Generate the infrastructure for application deployment using Amazon Elastic Container Service (Amazon ECS).
- Deploy the Azure DevOps pipeline.
Prerequisites
For this walk through, you will need:
- A sample .NET application running on Windows Server. Refer to supported applications for Windows.
- An Amazon Simple Storage Service (Amazon S3) bucket to store A2C generated artifacts.
- A Microsoft Azure account with the following resources
- An Azure DevOps organization. Refer to create an organization.
- An Azure DevOps project. Refer to create a project.
- An agent pool that contains Microsoft-hosted agents. Refer to create and manage agent pools and choose the Azure Pipelines default agent pools.
- An AWS Identity and Access Management (IAM) user and policy to use with A2C. Refer to IAM policy for Amazon ECS.
- An Amazon Elastic Compute Cloud (Amazon EC2) instance using the Amazon ECS-optimized Windows AMI as the worker machine, or an on-premises virtual machine with Docker installed.
- An IAM user and policy to use with Azure DevOps. Refer to IAM policy for Azure DevOps pipelines.
Step 1: Create a service connection in Azure DevOps
To deploy your application to Amazon ECS using Azure DevOps, you need to create a service connection from Azure Pipelines to the AWS Cloud.
To create a service connection to AWS:
- Log in to the Azure DevOps portal
- Under “Project Settings”, choose “Service connections”
- Select “AWS” in “Choose a service or connection type” search box and choose “Next”
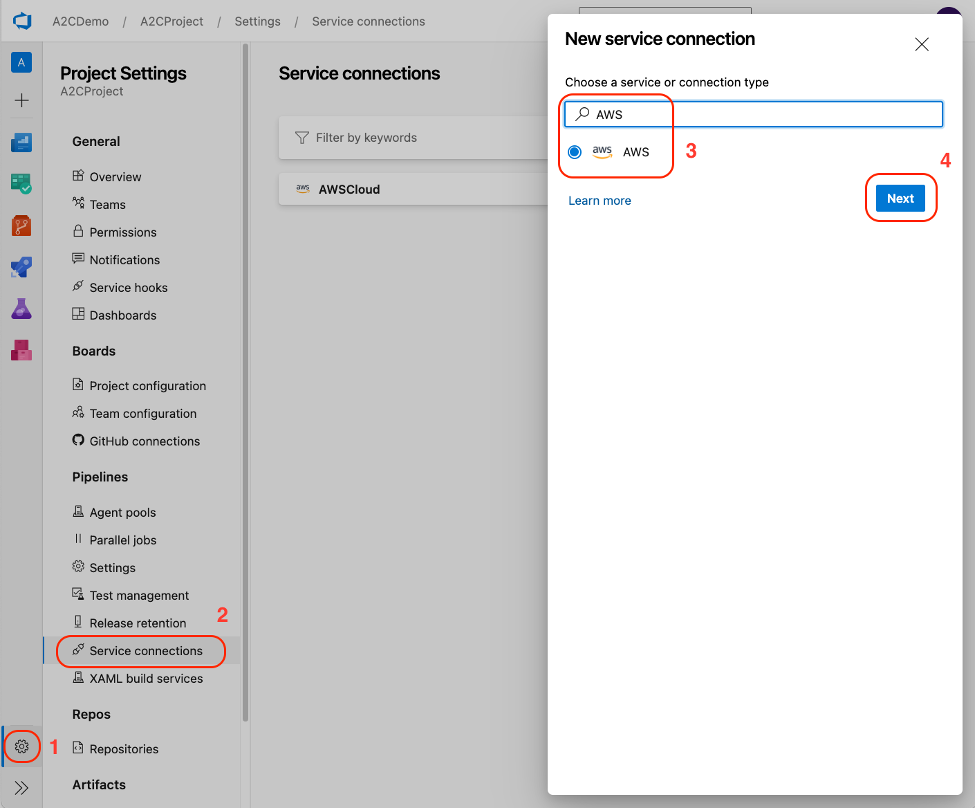
Figure 1: Create Service Connection – Azure DevOps Portal
- Provide Azure DevOps IAM user’s “Access Key ID”, “Secret Access Key” from Step 6 of prerequisites and choose “Save”
Step 2: Create a Personal Access Token (PAT) in Azure DevOps
A personal access token (PAT) contains your security credentials for Azure DevOps. A PAT identifies you, your accessible organizations, and scopes of access. A2C uses a PAT to authenticate with Azure DevOps to generate resources like code repositories, pipelines, etc.
To generate a new PAT with custom-defined scopes (refer to Figure 2.1):
- Choose the profile settings icon (1) and select “Personal access tokens” (2)

Figure 2.1: Create Personal Access token – Azure DevOps Portal
- In the “Create a new personal access token” page (refer to Figure 2.2), enter below details
- Name: A2CToken
- Organization: A2CDemo
- Expiration (UTC): 30 days
- select the following settings for the custom scopes:
- Agent Pools: Read & manage
- Build:Read & execute
- Code:Full
- Extensions:Read & manage
- Release:Read, write, execute, & manage
- Service Connections:Read & query

Figure 2.2: Create Personal Access token – Azure DevOps Portal
- Choose “Create” (2) and save the PAT for later use.
Step 3: Create an AWS Secrets Manager secret
Use AWS Secrets Manager service to securely access the PAT. To create a Secrets Manager secret for the PAT (refer to Figure 3):
- Login to AWS Secrets Manager Console
- Choose “Store a new Secret” and select “Other type of secret” for secret type
- Enter the details below and choose “Next”:
- key: azure-personal-access-token
- value: <<your PAT token generated in Step 2>>

Figure 3: Create AWS Secrets Manager Secret – AWS Console
- Provide a secret name and choose “Store” to create the secret. Copy the secret ARN for later use.
Step 4: Containerize the application
To initialize your application containerization process, refer to the Containerizing legacy ASP.NET applications using AWS App2Container blog post, and follow steps 1 through 5. You will then have A2C installed on the application server and the extracted application artifacts in an Amazon S3 bucket.
Connect to the worker machine with Docker and A2C components installed and run the `app2container containerize` command to generate the container image. Refer to Figure 4.1. By default, A2C generates a Dockerfile, which you can review and customize.
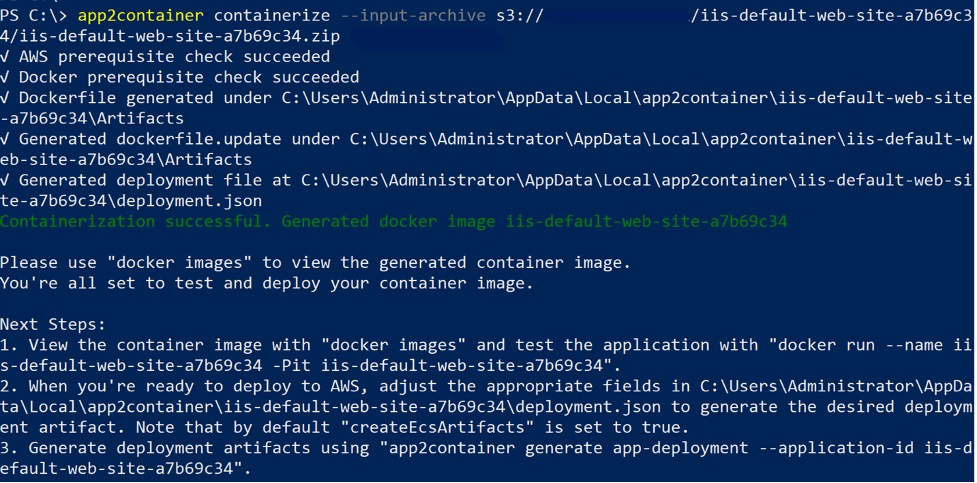
Figure 4.1: App2container Containerize command – Worker Instance
Run the `docker images` command to view the created container image, as shown in Figure 4.2

Figure 4.2: View docker images – Worker Instance
Step 5: Generate deployment artifacts
To generate the application artifacts to be used with Amazon ECS or Amazon Elastic Kubernetes Service (Amazon EKS), run the following command (as shown in Figure 5):
app2container generate app-deployment --application-id APP-IDThroughout this post, we refer to `iis-default-web-site-a7b69c34` as the application ID. Replace it with your application ID before running the commands.
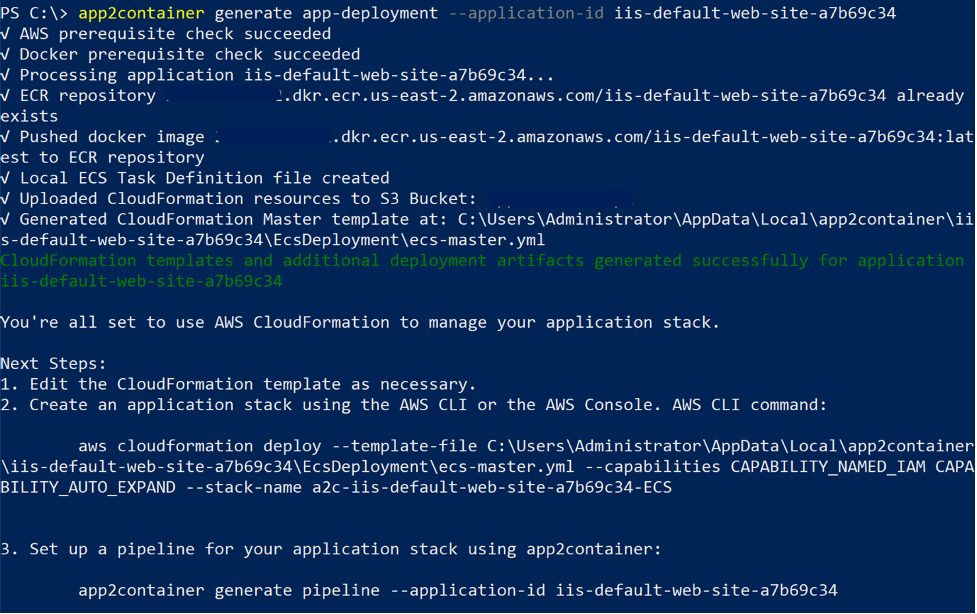
Figure 5: Generate App deployment – Worker Instance
Step 6: Deploy the stack to AWS
Run the AWS CloudFormation deploy command from the above output to create the baseline application stack, as shown in Figure 6.1. This will provision the necessary infrastructure components, including a virtual network and an Amazon ECS cluster to run the container.

Figure 6.1: Deploy the ECS Stack to AWS – Worker Instance
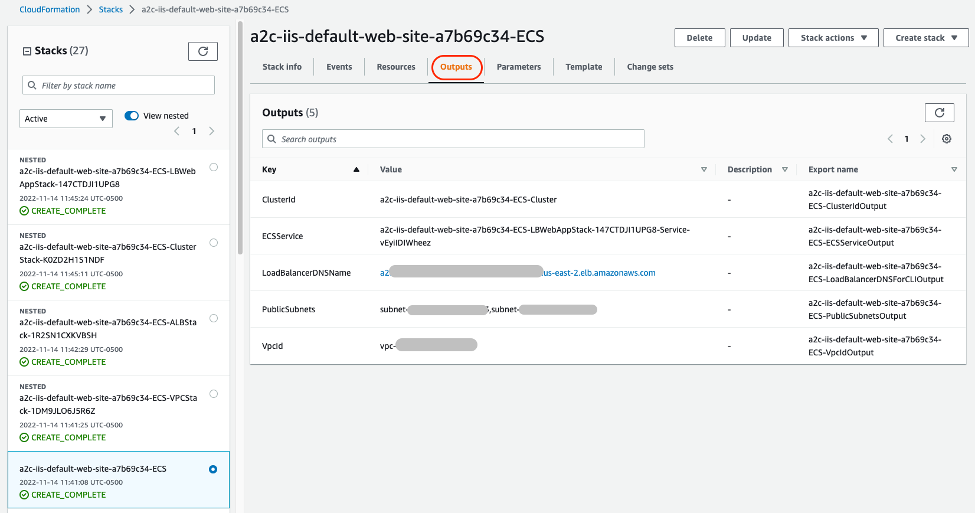
Figure 6.2: CloudFormation Stack Outputs – AWS Console
Run the following commands to extract the ECS cluster details from the deployed CloudFormation stack (Figure 6.2):
Note: Replace “a2c-iis-default-web-site-a7b69c34-ECS” with your stack name from the “app2container generate app-deployment” output (Figure 6.1).
aws cloudformation  describe-stacks --stack-name a2c-iis-default-web-site-a7b69c34-ECS \
--output text --query 'Stacks[0].Outputs[?OutputKey==`ClusterId`].OutputValue'
aws cloudformation  describe-stacks --stack-name a2c-iis-default-web-site-a7b69c34-ECS \
--output text --query 'Stacks[0].Outputs[?OutputKey==`ECSService`].OutputValue'

Figure 6.3: Describe the ECS CloudFormation Stacks – Worker Instance
When you run the `generate app-deployment` command, A2C creates a pipeline.json file. The `generate pipeline` command uses this file, along with others, to generate pipeline deployment artifacts.
Update the pipeline.json in A2C application directory (C:\Users\Administrator\AppData\Local\app2container\iis-default-web-site-a7b69c34) with the ECS cluster ID and the ECS service name (Figure 6.3).
Step 7: Generate Pipeline
Below is a sample pipeline.json generated from the step 5 (Generate deployment artifacts). Replace the placeholder values with the values from the previous steps.
{
	"a2CTemplateVersion": "1.0",
	"sourceInfo": {
		"AzureRepo": {
			"enabled": true,
			"repositoryName": "a2c-iis-default-web-site-a7b69c34",
			"branch": "main"
		}
	},
	"imageInfo": {
		"image": "YOUR IMAGE URI FROM STEP 4"
	},
	"releaseInfo": {
		"ECS": {
			"beta": {
				"clusterName": "YOUR ECS CLUSTER NAME FROM STEP 6",
				"serviceName": "YOUR ECS SERVICE NAME FROM STEP 6",
				"enabled": true
			}
		}
	},
	"resourceTags": [
		{
			"key": "AppName",
			"value": "iis-website"
		}
	],
	"pipelineInfo": {
		"AzureDevOps": {
			"enabled": true,
			"organizationName": "YOUR AZURE DEVOPS ORGANIZATION NAME",
			"projectName": "YOUR AZURE DEVOPS PROJECT NAME",
			"serviceCredName": "YOUR SERVICE CONNECTION NAME",
			"agentPoolName": "Azure Pipelines",
			"personalAccessTokenArn": "AWS SECRETS MANAGER SECRET ARN FROM STEP 3"
		}
	}
}
To create the pipeline in Azure DevOps, run the following `app2container generate pipeline` command with the –deploy option, as shown in Figure 7.1
app2container generate pipeline --application-id APP-ID --deploy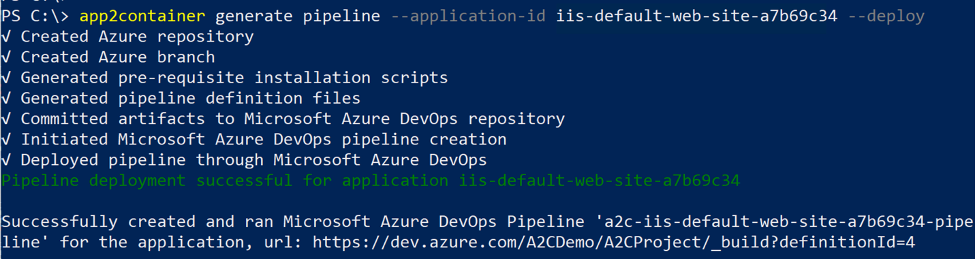
Figure 7.1: Generate Pipeline – Worker Instance
Once the command is successfully completed, login to the “Azure DevOps” portal to view the generated pipeline (refer to Figure 7.2):
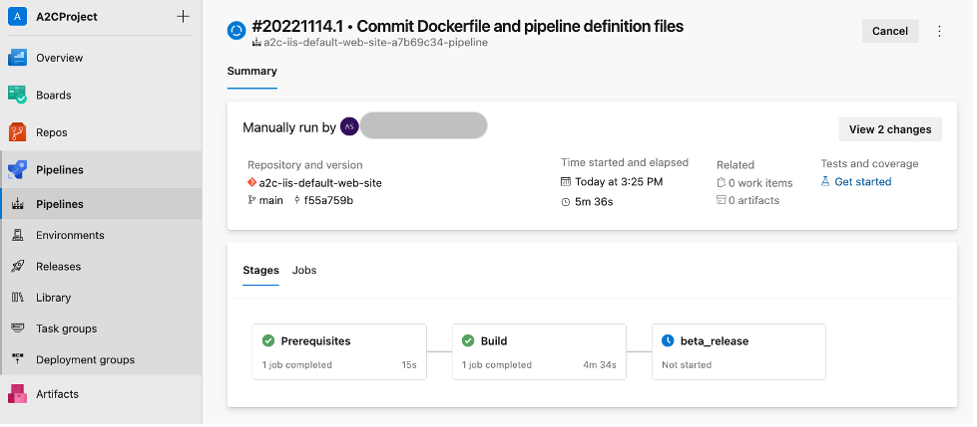
Figure 7.2: Azure Pipelines – Azure DevOps Console
Choose “Repos” from the Project menu and select the repo (a2c-iis-default-web-site) named after your application. Update the image-build.yaml and beta-ecs-release.yaml files in the code repository with the code snippets shown in Figures 7.3 and 7.4:
stages:
  - stage: Build
    jobs:
      - job: Build
        steps:
          - task: AWSShellScript@1
            displayName: 'Authenticate with ECR'
            inputs:
              awsCredentials: 'AWSCloud'
              scriptType: 'inline'
              inlineScript: 'aws ecr get-login-password --region us-east-2 | docker login --username AWS --password-stdin REPLACE_WITH_YOUR_AWS_ACCOUNT_NUMBER.dkr.ecr.us-east-2.amazonaws.com/iis-default-web-site-a7b69c34:latest'

          - task: Bash@3
            displayName: 'Set Git Commit ID'
            name: SetGitCommitID
            inputs:
              targetType: 'inline'
              script: |
                GIT_COMMIT=$(git rev-parse --short HEAD)
                echo "GIT_COMMIT: ${GIT_COMMIT}"
                #
                # set env variable to allow next task to consume
                #
                echo "##vso[task.setvariable variable=GIT_COMMIT]${GIT_COMMIT}"

          - task: Docker@0
            displayName: 'Build an image'
            inputs:
              containerRegistryType: 'Container Registry'
              dockerFile: Dockerfile
              imageName: 'iis-default-web-site-a7b69c34'
              additionalImageTags: $(Build.SourceBranchName)-$(Build.BuildId)-$(GIT_COMMIT)

          - task: AmazonWebServices.aws-vsts-tools.ECRPushImage.ECRPushImage@1
            displayName: 'Push an image to ECR'
            inputs:
              awsCredentials: 'AWSCloud'
              regionName: 'us-east-2'
              imageSource: imageid
              sourceImageId: 'iis-default-web-site-a7b69c34'
              repositoryName: 'iis-default-web-site-a7b69c34'
              pushTag: $(Build.SourceBranchName)-$(Build.BuildId)-$(GIT_COMMIT)
              autoCreateRepository: true
stages:
  - stage: beta_release
    jobs:
      - job: beta_release
        steps:
           - task: AWSShellScript@1
            displayName: 'Register task definition'
            inputs:
              awsCredentials: 'AWSCloud'
              scriptType: 'inline'
              inlineScript: |
                GIT_COMMIT=$(git rev-parse --short HEAD)
                IMAGE_URI=$(Build.SourceBranchName)-$(Build.BuildId)-$GIT_COMMIT
                sed -i 's@IMAGE_URI@'$IMAGE_URI'@g' taskdef.json
                TASKDEF_ARN=$(aws ecs register-task-definition --region us-east-2 --cli-input-json file://taskdef.json --query 'taskDefinition.taskDefinitionArn' --output text)
                echo $TASKDEF_ARN
                echo "##vso[task.setvariable variable=TASKDEF_ARN]${TASKDEF_ARN}"

          - task: AmazonWebServices.aws-vsts-tools.AWSCLI.AWSCLI@1
            displayName: 'Update ECS service (beta)'
            inputs:
              awsCredentials: 'AWSCloud'
              regionName: 'us-east-2'
              awsCommand: ecs
              awsSubCommand: 'update-service'
              awsArguments: '--cluster REPLACE_WITH_YOUR_ECS_CLUSTER_NAME --service REPLACE_WITH_YOUR_ECS_SERVICE_NAME --task-definition $(TASKDEF_ARN) --force-new-deployment'
              failOnStandardError: true
After the update, trigger the pipeline to see the change going through the end-to-end automation: building and pushing the container image, registering the task definition, and deploying it to the ECS cluster.
Cleanup
Please follow the steps in the documentation to cleanup and delete the resources you have provisioned.
- Delete stack on the AWS CloudFormation console to delete your resources deployed on Amazon ECS
- Cleanup App2Container to remove App2Container from your application server.
- Delete “a2c-iis-default-web-site-a7b69c34-ECS” pipeline from Azure DevOps portal.
Conclusion
In this blog post, we demonstrated how to use AWS App2Container to automate a release pipeline in Azure DevOps that deploys a containerized application to AWS. We deployed the containerized application into Amazon ECS, but you can customize the solution to deploy to other AWS container services like Amazon EKS or AWS App Runner.
Also, check out the AWS Toolkit for Azure DevOps, an extension for hosted and on-premises Microsoft Azure DevOps that make it easy to manage and deploy applications using AWS.
AWS can help you assess how your company can get the most out of cloud. Join the millions of AWS customers that trust us to migrate and modernize their most important applications in the cloud. To learn more on modernizing Windows Server or SQL Server, visit Windows on AWS. Contact us to start your modernization journey today.