AWS Cloud Operations Blog
Customize Amazon CloudWatch alarm notifications to your local time zone – Part 1
This two-part series discusses how to customize Amazon CloudWatch alarm notifications to your local time zone. Part 1 covers customizing using CloudWatch Events rule. Part 2 covers customizing using Amazon SNS.
You can use Amazon CloudWatch to set alarms and automate actions based on predefined thresholds or machine learning algorithms that identify anomalous behavior in your metrics. For example, you can start Amazon EC2 Auto Scaling automatically or stop an instance to reduce billing overages.
You can customize CloudWatch alarm notifications as appropriate for your scenarios. For example, if you create a metric filter on CloudWatch Logs and want to get the event cause in the notification message, you can use CloudWatch Logs Customize alarms. If you want to attach graphs for your alarm metrics where the alarm was triggered, you can use the GetMetricWidgetImage action to retrieve the metric at the alarm state change. You can also change the time zone of your alarm notifications to your local time zone.
There are two ways to get details about an alarm state change:
- CloudWatch sends events to Amazon EventBridge when a CloudWatch alarm changes state.
- If you add an Amazon Simple Notification Service (Amazon SNS) topic in the alarm action, the SNS topic sends a JSON object that contains details about the alarm state change to the subscribed endpoints.
You can parse the alarm state change details to create a customized notification message.
In this post, I show you how to use an AWS Lambda function to change the alarm notification to your local time zone using CloudWatch Events rule.
Overview
CloudWatch uses Coordinated Universal Time (UTC) when returning timestamps for an alarm. It can be time-consuming and confusing to convert this information to your local time zone. In this blog post, I describe a solution that includes a Python Lambda function with the Python Time Zone library. The way in which the Lambda function parses the alarm state change event depends on which method you use: a CloudWatch Events rule or an Amazon SNS subscription. You can edit the Lambda function environment variable to change the time zone based on the alarm Region. Instead of having a fixed time zone, you can get support for multiple local time zones by editing the Lambda function code to change the time zone based on the alarm Region.
Customize CloudWatch alarms by using a CloudWatch Events rule
You can use a CloudWatch Events rule that matches on alarm evaluation changes and then triggers a Lambda function that parses the alarm event and creates a customized notification.
Pros:
- Faster notification because there is no additional Amazon SNS layer to invoke the Lambda function.
- Can match on all alarms in the AWS Region. Although you need to create a rule that matches all Regions for your alarms and a Lambda function in each Region.

Customize CloudWatch alarms by using a Lambda function subscribed to an SNS topic
You can use a Lambda function subscribed to an SNS topic, where the Lambda function parses the alarm event and creates a customized notification.
Pros:
- You can create one Lambda function in any AWS Region and subscribe it to the SNS topic that the alarm will trigger. Note that you will incur additional charges for using two SNS topics, check Amazon SNS pricing.

For information about the Amazon SNS method, see the Customize Amazon CloudWatch alarm notifications to your local time zone- Part 2 blog post.
Walkthrough
To customize your alarm using a CloudWatch Events rule:
- Create an Amazon SNS topic and use your email address to subscribe to it.
- Install the PyTZ library and package with custom functions as AWS Lambda layer. With layers, you can use libraries in your function without needing to include them in your deployment package.
- Create AWS Lambda execution role. This is the AWS Identity and Access Management (IAM) role that AWS Lambda assumes when it runs your function.
- Create a Lambda function with code using custom functions in the layer, add environment variables with your time zone, time zone abbreviation, and SNS topic ARN.
- Create a CloudWatch Events rule pattern to match on your CloudWatch alarm state. Changes and set the created Lambda function as target for the rule.
If you prefer to use a CloudFormation template to create these resources, launch the following stack.
![]()
Prerequisites
If you want to follow along make sure you have access to the AWS Management Console with the proper IAM permissions required to create CloudWatch Events rule, AWS Lambda layer, AWS Lambda function, AWS Lambda execution role and Amazon SNS topic.
Create an SNS topic
Create an SNS topic and use your email address to subscribe to it. Later you’ll add the ARN of this SNS topic to the Lambda function environment variable.
To create SNS topic
- Sign in to the Amazon SNS console, and from the left navigation pane, choose Topics.
- On the Topics page, choose Create topic.
- By default, the console creates a FIFO topic. Choose Standard.
- In the Details section, enter a name for the topic, such as NotificationSNSTopic.
- Scroll to the end of the form and choose Create topic.
To create a subscription to the topic
- In the left navigation pane, choose Subscriptions.
- On the Subscriptions page, choose Create subscription.
- On the Create subscription page, choose the Topic ARN field to see a list of the topics in your AWS account.
- Choose the topic that you created in the previous step.
- For Protocol, choose Email.
- For Endpoint, enter an email address that can receive notifications.
- Choose Create subscription.
- Check your email inbox and choose Confirm subscription in the email from AWS Notifications. The Sender ID is usually no-reply@sns.amazonaws.com.
- Amazon SNS opens your web browser and displays a subscription confirmation with your subscription ID.
Create a Lambda layer package
Install the PyTZ library dependencies for your Lambda function.
- Install the libraries in a package directory with the pip’s –target
mkdir python
pip3 install -t /python pytz- Under the python directory, create changeAlarmToLocalTimeZone.py file that contains three functions:
- getAllAvailableTimezones to print all available time zones.
- searchAvailableTimezones to print time zones that match the sub string.
For example, TimeZone.SearchAvailableTimezones(‘sy’)
Returns:
Matched zone: Antarctica/Syowa
Matched zone: Australia/Sydney
- changeAlarmToLocalTimeZone to change the local time zone of the alarm.
import json
import boto3
import datetime
import pytz
import re
import urllib
import pytz
import re

def searchAvailableTimezones(zone):
    for s in pytz.all_timezones:
        if re.search(zone, s, re.IGNORECASE):
            print('Matched Zone: {}'.format(s))

def getAllAvailableTimezones():
    for tz in pytz.all_timezones:
        print (tz)

def changeAlarmToLocalTimeZone(event,timezoneCode,localTimezoneInitial,platform_endpoint):
    tz = pytz.timezone(timezoneCode)
 #exclude the Alarm details from CloudWatch event rule passed event JSON
    alarmName=event['detail']['alarmName']
    descriptionexist=0
    if "description" in event['detail']['configuration']:
        description= event['detail']['configuration']['description']
        descriptionexist=1
    reason=event['detail']['state']['reason']
    region=event['region']
    state=event['detail']['state']['value']
    previousState=event['detail']['previousState']['value']
    timestamp=event['detail']['state']['timestamp']
    Subject= state + ': "'+ alarmName + '" in '+ region
    alarmRule='x' #event['detail']['configuration']['alarmRule']
    alarmARN=event['resources'][0]
    AccountID=event['account']

    #get the datapoints substring
    pattern = re.compile('\[(.*?)\]')

    #test if pattern match and there is datapoints
    if pattern.search(reason):
        Tempstr = pattern.findall(reason)[0]

        #get in the message all datapoints timestamps and convert to localTimezone using same format
        pattern = re.compile('\(.*?\)')
        m = pattern.finditer(Tempstr)
        for match in m:
            Tempstr=match.group()
            tempStamp = datetime.datetime.strptime(Tempstr, "(%d/%m/%y %H:%M:%S)")
            tempStamp = tempStamp.astimezone(tz)
            tempStamp = tempStamp.strftime('%d/%m/%y %H:%M:%S')
            reason=reason.replace(Tempstr, '('+tempStamp+')')


    #convert timestamp to localTimezone time
    timestamp = timestamp.split(".")[0]
    timestamp = datetime.datetime.strptime(timestamp, "%Y-%m-%dT%H:%M:%S")
    localTimeStamp = timestamp.astimezone(tz)
    localTimeStamp = localTimeStamp.strftime("%A %B, %Y %H:%M:%S")

    #create Custom message and change timestamps

    customMessage='You are receiving this email because your Amazon CloudWatch Alarm "'+alarmName+'" in the '+region+' region has entered the '+state+' state, because "'+reason+'" at "'+localTimeStamp+' '+localTimezoneInitial +'.'

    # Add Console link
    customMessage=customMessage+'\n\n View this alarm in the AWS Management Console: \n'+ 'https://'+region+'.console.aws.amazon.com/cloudwatch/home?region='+region+'#s=Alarms&alarm='+urllib.parse.quote(alarmName)

    #Add Alarm Name
    customMessage=customMessage+'\n\n Alarm Details:\n- Name:\t\t\t\t\t\t'+alarmName

    # Add alarm description if exist
    if (descriptionexist == 1) : customMessage=customMessage+'\n- Description:\t\t\t\t\t'+description
    customMessage=customMessage+'\n- State Change:\t\t\t\t'+previousState+' -> '+state

    # Add alarm reason for changes
    customMessage=customMessage+'\n- Reason for State Change:\t\t'+reason

    # Add alarm evaluation timeStamp
    customMessage=customMessage+'\n- Timestamp:\t\t\t\t\t'+localTimeStamp+' '+localTimezoneInitial

    # Add AccountID
    customMessage=customMessage+'\n- AWS Account: \t\t\t\t'+AccountID

    # Add Alarm ARN
    customMessage=customMessage+'\n- Alarm Arn:\t\t\t\t\t'+alarmARN

    #push message to SNS topic
    response = platform_endpoint.publish(
        Message=customMessage,
        Subject=Subject,
        MessageStructure='string'
    )
Create a deployment package from the installed libraries and the .lib file under the python directory.
zip -r EventRule-pytzLayer.zip ./python/*To create a Lambda layer
- In the AWS Lambda console, open the Layers page and choose Create layer.
- Enter a name and optional description for your layer.
- To upload your layer code, do one of the following, and then choose Create.
- To upload a .zip file from your computer, choose Upload a .zip file, choose your .zip file, and then choose Open.
- To upload a file from Amazon Simple Storage Service (Amazon S3), choose Upload a file from Amazon S3. For Amazon S3 link URL, enter a link to the file.
- (Optional) For Compatible runtimes, choose up to five runtimes.
- (Optional) For License, enter any required license information.
Create AWS Lambda execution role
By default, when you create a function in the console, AWS Lambda creates an execution role. You can also create an execution role in the IAM console.
To create an execution role in the IAM console
- Open the IAM Roles page and choose Create role.
- Under Common use cases, choose Lambda.
- Choose Next: Permissions.
- Choose Next: Tags.
- Choose Next: Review.
- Enter a name and description for the role and choose Create role.
- Open the role and add an inline policy.
- On the JSON tab, add the following permission. Enter your values for Region ID, Account ID, Lambda function Name, and SNS Topic ARN.
{
    "Version": "2012-10-17",
    "Statement": [
        {
            "Effect": "Allow",
            "Action": "logs:CreateLogGroup",
            "Resource": "arn:aws:logs:[Region ID]:[Account ID]:log-group:/aws/lambda/[Lambda function Name]"
        },
        {
            "Effect": "Allow",
            "Action": [
                "logs:CreateLogStream",
                "logs:PutLogEvents"
            ],
            "Resource": [
                "arn:aws:logs:[Region ID]:[Account ID]:log-group:/aws/lambda/[Lambda function Name]:*"
            ]
        },
        {
            "Effect": "Allow",
            "Action": "sns:Publish",
            "Resource": "[SNS Topic Arn]"
        }
    ]
}
- Review the policy.
- Enter a name for the policy and then choose Create policy.
Create a Lambda function
- Open the AWS Lambda console and choose Create a function.
- Select Author from scratch.
- Under Basic information, enter a name for the function. For Runtime, confirm that Python 3.8 is selected.
- Under Change default execution role, select Use an existing role, and then choose the Lambda execution role.
- Choose Create function.
- On the Configuration tab, in Designer, choose Layers.
- Choose Add a layer, select Custom layers, choose the created layer, and then choose Add.
- On the Configuration tab, in Designer, choose the Lambda function name.
- In Environment variables, choose Edit and then add three variables:
- In Key, enter NotificationSNSTopic. In Value, enter the SNS topic ARN.
- In Key, enter TimeZoneCode. In Value, enter your time zone code (for example, Australia/Sydney).
- In Key, enter TimezoneInitial. In Value, enter the abbreviation for your time zone (for example, AEST). Time zones are often named by how many hours they are different from UTC time, so for example, you can also enter UTC+11.
- Choose Save.
- Overwrite your function code in the embedded editor with the following code.
import boto3
import os
from changeAlarmToLocalTimeZone import *

#Get SNS Topic ARN from Environment variables
NotificationSNSTopic = os.environ['NotificationSNSTopic']

#Get timezone corresponding to your localTimezone from Environment variables
timezoneCode = os.environ['TimeZoneCode']

#Get Your local timezone Initials, E.g UTC+2, IST, AEST...etc from Environment variables
localTimezoneInitial=os.environ['TimezoneInitial']

#Get SNS resource using boto3
SNS = boto3.resource('sns')

#Specify the SNS topic to push message to by ARN
platform_endpoint = SNS.PlatformEndpoint(NotificationSNSTopic)

def lambda_handler(event, context):

    #Call Main function
    changeAlarmToLocalTimeZone(event,timezoneCode,localTimezoneInitial,platform_endpoint)

    #Print All Available timezones
    #getAllAvailableTimezones()

    #search if Timezone/Country exist
    #searchAvailableTimezones('sy')
- Choose Deploy.
The Lambda function will receive the following event JSON from the CloudWatch Events rule:
{
  "version": "0",
  "id": "bba1bcef-5268-9967-8628-9a6d09e042e9",
  "detail-type": "CloudWatch Alarm State Change",
  "source": "aws.cloudwatch",
  "account": "[Account ID]",
  "time": "2020-11-17T06:25:42Z",
  "region": "[region Id]",
  "resources": [
    "arn:aws:cloudwatch:[region Id]:[Account ID]:alarm:CPUUtilize"
  ],
  "detail": {
    "alarmName": "CPUUtilize",
    "state": {
      "value": "ALARM",
      "reason": "Threshold Crossed: 1 out of the last 1 datapoints [4.314689265544354 (17/11/20 06:20:00)] was less than the threshold (70.0) (minimum 1 datapoint for OK -> ALARM transition).",
      "reasonData": {
        "version": "1.0",
        "queryDate": "2020-11-17T06:25:42.491+0000",
        "startDate": "2020-11-17T06:20:00.000+0000",
        "statistic": "Average",
        "period": 300,
        "recentDatapoints": [
          4.314689
        ],
        "threshold": 70
      },
      "timestamp": "2020-11-17T06:25:42.493+0000"
    },
    "previousState": {
      "value": "OK",
      "reason": "Threshold Crossed: 1 out of the last 1 datapoints [4.484088172640544 (17/11/20 05:44:00)] was not greater than or equal to the threshold (70.0) (minimum 1 datapoint for ALARM -> OK transition).",
      "reasonData": {
        "version": "1.0",
        "queryDate": "2020-11-17T05:49:53.688+0000",
        "startDate": "2020-11-17T05:44:00.000+0000",
        "statistic": "Average",
        "period": 300,
        "recentDatapoints": [
          4.484088
        ],
        "threshold": 70
      },
      "timestamp": "2020-11-17T05:49:53.691+0000"
    },
    "configuration": {
      "description": "Alarm Notification in my local timezone",
      "metrics": [
        {
          "id": "16baea70-421b-0a6e-f6f1-bc913d2bf647",
          "metricStat": {
            "metric": {
              "namespace": "AWS/EC2",
              "name": "CPUUtilization",
              "dimensions": {
                "InstanceId": "i-0e448XXXXXXXXXXXX"
              }
            },
            "period": 300,
            "stat": "Average"
          },
          "returnData": true
        }
      ]
    }
  }
}
Create a CloudWatch Events rule
Create a CloudWatch Events rule with the following custom event pattern and your Lambda function as a target.
- Open the CloudWatch console, choose Rules, and then choose Create rule.
- For Event source, choose Event pattern, and then choose Custom event pattern. To match on specific alarm state transitions, add the ARNs of your alarms. To match on an alarm state, in Value, specify the state (for example, ALARM, OK, INSUFFICIENT_DATA).
{
    "source": [
      "aws.cloudwatch"
    ],
    "detail-type": [
      "CloudWatch Alarm State Change"
    ],
    "resources": [
      "[Alarm1 ARN]","[Alarm2 ARN]"
    ],
    "detail": {
      "state": {
        "value": [
          "ALARM","OK"
        ]
      }
    }
  }
- For Targets, choose Add target, and then choose Lambda function.
- For Function, choose the Lambda function you created.
- Choose Configure details. For Rule definition, enter a name and description for the rule. The rule name must be unique in your selected AWS Region.
- Choose Create rule.
Output result
When you use the Australia/Sydney time zone (AEST):
Original message
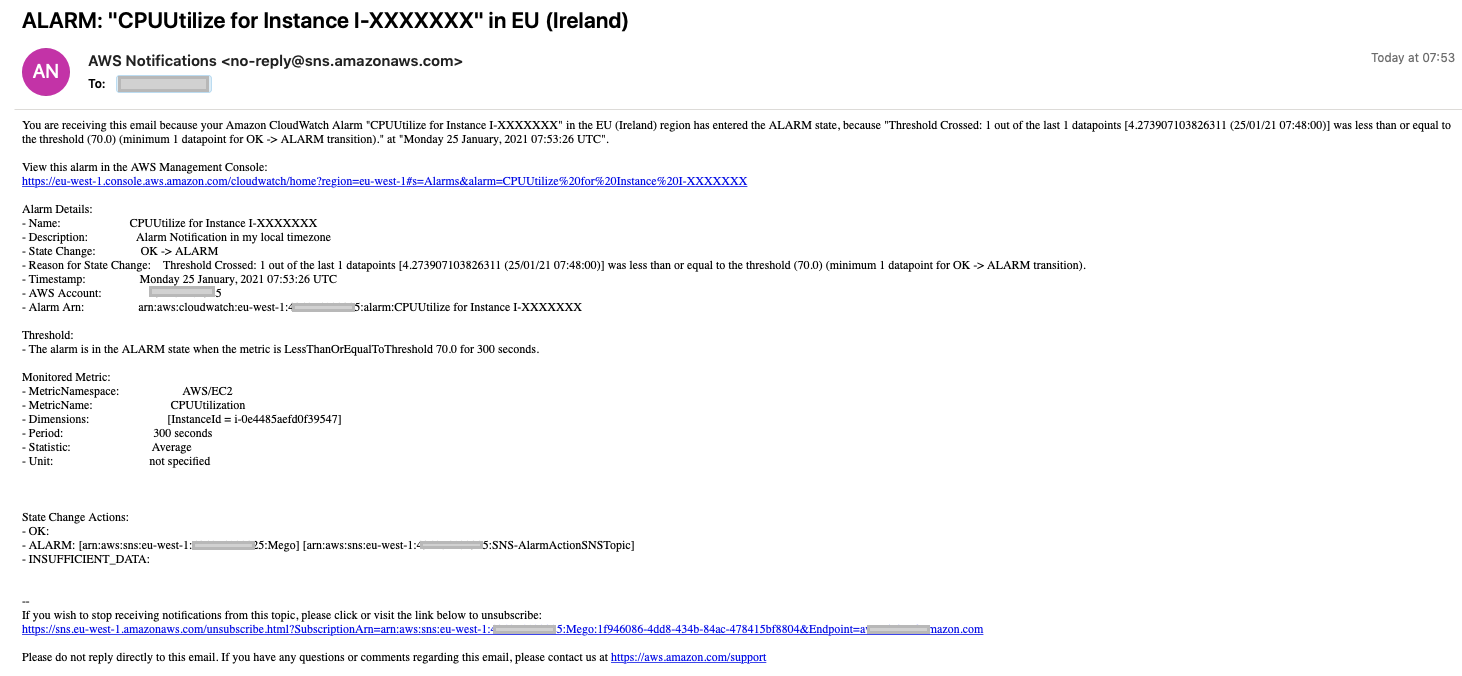
Customized CloudWatch alarm notification

Clean up
To avoid ongoing charges to your account, delete the resources you created in this walkthrough.
- Delete the CloudWatch Events rule.
- Delete the Lambda function.
- Delete the SNS topics and subscriptions.
If you are using AWS CloudFormation template, then delete the stack.
Conclusion
In this blog post, I’ve shown you how to use a CloudWatch Events rule and Lambda function to customize CloudWatch alarm notification to the local time zone of your resources, logs, and metrics. For more information, check Amazon CloudWatch Alarms documentation.
About the Author

Ahmed Magdy Wahdan
Magdy is a Cloud Support Engineer and CloudWatch SME for Amazon Web Services. He helps global customers design, deploy, and troubleshoot large-scale networks built on AWS. He specializes in CloudWatch, Elastic Load Balancing, Auto Scaling, and Amazon VPC. In his spare time, he loves to free-dive and make desserts.