AWS Cloud Operations Blog
How to perform Failover and Failback using AWS Elastic Disaster Recovery (AWS DRS) between VMware and AWS environments
Enterprises face a variety of threats such as natural disasters, cyber-attacks and technology failures that could severely disrupt operations. A comprehensive disaster recovery plan is crucial to quickly respond and recover from these events.
In this blog post, we’ll show how to plan and implement a comprehensive disaster recovery solution between your VMware on-premises environment and AWS using the AWS Elastic Disaster Recovery (AWS DRS). We will cover how to build redundancy, establishing secure data backups, and test recovery procedures to safeguard business continuity.
Solution Walkthrough
In this solution, we will cover two scenarios:
- Failover from your VMware on-premises environment to AWS: Using AWS DRS for creating a full replica of on-premises servers, including the root volume and operating system, on AWS. AWS DRS continuously replicates machines into a low-cost staging area in the target AWS account in the preferred AWS Region. The block level replication is an exact replica of the server storage including the operating system, system state configuration, databases, applications, and files. If there is a disaster, AWS DRS can quickly launch thousands of machines in their fully provisioned state within minutes.
- Failback from AWS to on-premises with AWS DRS failback agent:
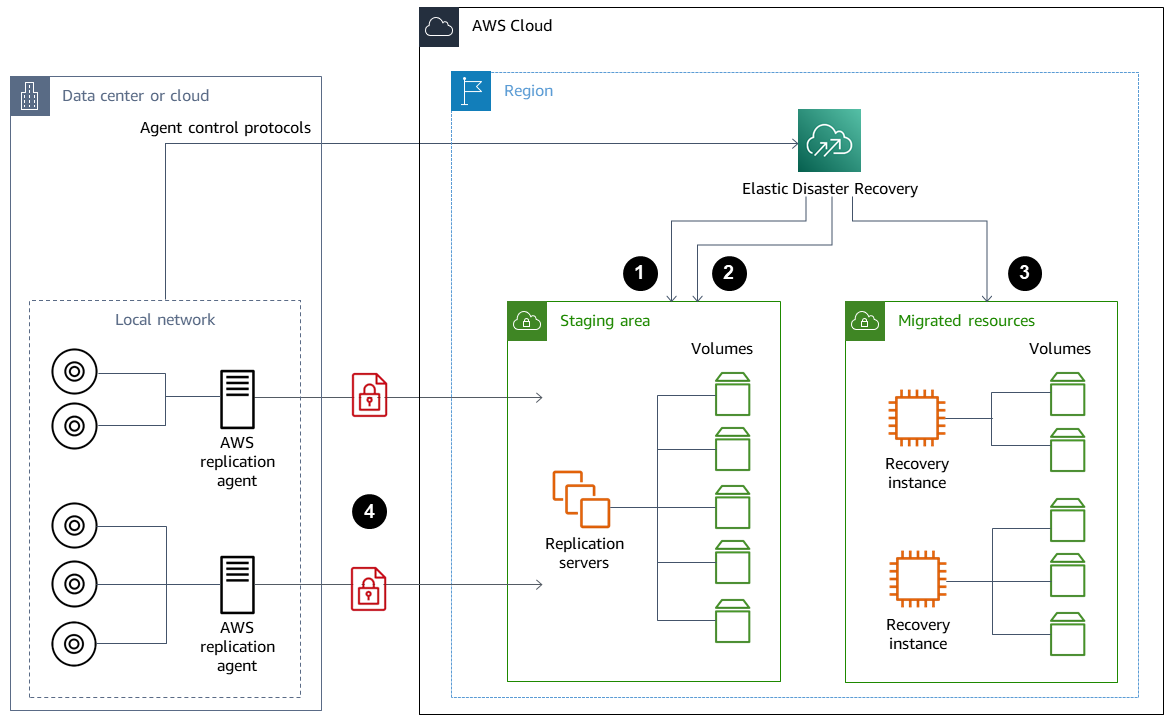
Figure 1. Architecture Diagram of AWS DRS
Pre-Requisites:
- It is assumed that you already have a working setup of your business workloads including application servers, databases, active directory etc. at your on-premises on VMware.
- AWS Account and Access: You will need an AWS account and AWS Identity and Access Management (IAM) user to use AWS DRS. Please refer to AWS DRS initialization and permissions for details.
- Initialize AWS DRS to use it. See AWS DRS User Guide for details.
- VMware vCenter: You will need VMware vCenter installed and configured in your on-premises environment. This is your source environment.
- Network Connectivity: You will need to verify that your on-premises environment has network connectivity to AWS. You can use either AWS Site-to-Site VPN or AWS Direct Connect to establish network connectivity between your on-premises environment and AWS environment.
- Replication and launch settings: Configure replication settings and launch settings in AWS DRS.
- Agent installed: You should have agents setup on the source VMs and replicating to AWS DRS.
Scenario 1: Failover from VMware to AWS:
We are going to setup replication agent on Ubuntu 16 VM running on VMware environment on-premises.
Step1: Download and install the replication agent (see Figure 2) based on your source OS (Linux or Windows). For details see Installing the AWS Replication Agent

Figure 2. Command line output showing installation of DRS agent on source server
Step 2: Once agent is installed, it will start replicating data to AWS. You can review this process in real time (see Figure 3) on the Source servers page in the AWS DRS console.

Figure 3. Shows status and details of Source servers on AWS DRS console
Figure 4 below display replication and launch settings for this individual source server which can be changed as per the requirement.

Figure 4. Shows status and details of replication and launch settings
Step 3: While replication is in progress, you would be able to see AWS DRS Replication server under Amazon Elastic Compute Cloud (Amazon EC2) console which is responsible for performing the replication. Once the source server displays status as Ready, you are ready for failover to AWS (see Figure 5).

Figure 5. Source server status as ready
Step 4: Now you can select the initiate recovery job button (see Figure 6) and choose to either initiate a recovery drill or an actual recovery. Select the point in time snapshot from which you want to launch a recovery instance.

Figure 6. Shows initiate recovery
Step 5: After recovery job is created, the console will display a job ID such as drsjob-XXX which you can monitor from recovery job history on left-hand side pane. This job will create a conversion server which converts the disks to boot and run on AWS. Specifically, the machine conversion server makes bootloader changes, injects hypervisor drivers and installs cloud tools.
Step 6: Once conversion is completed, the recovery instance will be launched in AWS, which can be monitored from recovery job history. Once the job finishes successfully, the failover is completed and the console displays the recovery instance ID. Now, the production traffic can be routed to the workloads recovered on EC2 that got launched as recovery instance (see Figure 7) (Please note that you would need to make required other changes such as DNS to route traffic).

Figure 7. Shows recovered EC2 instance
Scenario 2: Failback to VMware from AWS
Failback redirects traffic from your recovery system to your primary system. This is an operation that is performed outside of AWS DRS.
AWS DRS helps you prepare for failback to the on-premises environment by replicating the data from the recovery instances on AWS back to the source servers using the Failback Client.
Step 1: In order to set up the Failback Client, you must meet the failback prerequisites and generate failback AWS credentials. Failback replication is performed by booting the Failback Client on the source server. The AWS DRS Console allows you to track the progress of the failback replication on the Recovery instances page. In this example, we are failing back to VMware.
Step 2: Download the AWS DRS Failback Client ISO (aws-failback-livecd-64bit.iso) from the Amazon Simple Storage Service (Amazon S3) bucket that corresponds to the AWS Region in which your recovery instances are located. Stop VM on VMware side, modify boot settings and attach failback ISO. Follow sequence below (see Figure 8):
Stop VM -> Attach failback ISO -> Edit settings to boot from CD-ROM at next bootup

Figure 8. This image shows VMware setting to change after stopping source VM and makes sure that new VM boots from failback ISO you downloaded
Step 3: Under VM options, select During the next boot, force entry into the BIOS setup screen (see Figure 9).

Figure 9. Shows VM setting to enter BIOS mode at the next start-up and bios settings to boot from CD-ROM
Step 4: System will boot from AWS DRS failback ISO and will wait for your input on AWS region you want to failback from (see Figure 10).

Figure 10. Shows that VM booted from AWS DRS failback ISO
Step 5: After you enter the AWS region, the failback ISO will try to apply network settings. and will try get an IP from DHCP. If DHCP fails to provide IP settings, users can manually run the below script passing network parameters
IPADDR="enter IPv4 address" NETMASK="subnet mask" GATEWAY="default gateway" DNS="DNS server IP address" CONFIG_NETWORK=1 /usr/bin/start.sh
Step 6: Enter your AWS credentials that you created earlier (in step1) during the Failback Client installation. Leave the session token if you are not using temporary credentials. If you are failing back to the original source machine, the Failback Client will automatically choose the correct corresponding recovery instance. If the Failback Client is unable to automatically map the instance, then you will be prompted to select the recovery instance to fail back from.
Step 7: The Failback Client will display a list with all recovery instances. Select the correct recovery instance by either entering the numerical choice from the list that corresponds to the correct recovery instance (see Figure 11) or by typing in the full recovery instance ID.

Figure 11. shows that failback client mapping with the recovery instance.
Step 8: If you are failing back to the original source server, then the Failback Client will attempt to automatically map the volumes of the instance. Once volumes are mapped, the Failback Client will verify connectivity between the recovery instance and AWS DRS. After verifying connectivity, the Failback Client will download the replication software from Amazon S3 onto the source server and configure the replication software.
The Failback Client will pair with the AWS Replication Agent running on the recovery instance and will establish a connection. Once pairing with recovery instance is completed, reverse replication to on-premise will start which can be monitored under recovery instances over DRS console (see Figure 12).

Figure 12. Shows that failback client is setting up replication software and pairing with AWS replication agent
Step 9: Once you see replication status as Healthy and reversed direction launch state as Ready, please click on complete failback from AWS DRS console (see Figure 13). Over VMware VM console, you would see Data Replication completed.

Figure 13. Shows the reverse replication as ‘ready’, it also shows that replication is completed and to complete the failback process on DRS console
Once failback is complete, the on-premises VM would reboot automatically from root disk. On the DRS console, you will see failback completed (see Figure 14).

Figure 14. Shows that on-prem VM failedback successfully
Step 10: You can opt to either terminate, delete, or disconnect the Recovery instance after failback and testing is complete which would save costs (see Figure 15).

Figure 15. Clean up the recovery instance on AWS DRS console
Clean Up
After successfully completing the failover and failback process using AWS DRS, it’s crucial to perform some housekeeping activities to optimize resource utilization and control expenses.
- Terminate recovery Instances: Once you have completed the failback to your on-premises VMware environment, you can terminate the recovery instances launched on AWS during the failover process. These instances were created for temporary use and can terminate them to stop incurring charges.
- Delete replication Instances: The replication instances created by DRS for handling data replication between your on-premises and AWS environments can be deleted. These instances are no longer required after the failback is complete.
- Remove Replication Agent: Uninstall the AWS DRS replication agent from your on-premises VMware virtual machines if you don’t plan to use the service for future failover operations.
- Clean up storage: Delete any temporary storage volumes or snapshots created by AWS DRS during the replication and failover/failback processes.
- Review and adjust Settings: Revisit the replication and launch settings within the DRS console to verify they are configured correctly for any future disaster recovery operations.
- Update documentation: Update your disaster recovery plan and documentation to reflect any changes or lessons learned during the failover and failback processes with DRS
Enhancing Disaster Recovery with AWS
AWS DRS allows you to perform a scalable failback for vCenter with the DRS Mass Failback Automation Client (DRSFA Client). This allows you to perform a one-click or custom failback for multiple vCenter machines at once.
The DRS Mass Failback Automation client (DRSFA client) brings flexibility and speed to large-scale failback operations where multiple virtual machines failback simultaneously. This innovative tool empowers you to seamlessly fail back multiple servers to your primary vCenter environment simultaneously, streamlining the recovery process and minimizing downtime. With the DRSFA client, you have the freedom to fail back all of your Recovery instances or selectively choose a subset, tailoring the process to your specific needs. In the event of a disruption, AWS DRS equips you with the ability to recover applications on AWS within minutes, ensuring minimal impact on your operations.
The DRSFA client provides two convenient options for failback:
1. One-click Failback: With a single click, you can initiate the failback of all recovery instances in your AWS account to their original source servers.
2. Custom Failback: If you prefer more granular control, you can select a subset of recovery instances or customize settings to suit your specific needs.
By leveraging the power of AWS DRS and the DRSFA client, you can facilitate a seamless transition back to your primary vCenter environment after a disaster recovery event.
This streamlined failback process minimizes downtime and disruption, allowing your business to resume normal operations quickly.
To learn more about Mass Failback Automation using AWS Elastic Disaster Recovery and unlock its full potential, please see the official documentation.
Benefits of using AWS DRS
Using AWS DRS offers several benefits for disaster recovery, including seamless disaster recovery between VMware and AWS environments, a pay-as-you-go pricing model without long-term commitments, automated replication and failover/failback processes, and minimal infrastructure investment for disaster recovery.
Summary
In this blog, we demonstrated how to set up AWS DRS for failover and failback between the VMware on-premises environment and AWS. It covered the prerequisites , failover to AWS, monitoring the recovery instance creation, and performing failback to the original VMware source by using the failback ISO and client. This process demonstrated the automated replication, failover and failback capabilities of AWS DRS while highlighting its benefits like seamless disaster recovery, pay-as-you-go model, and minimal infrastructure needs.
Stay tuned for more updates and enhancements to our disaster recovery solutions, as we continue to empower businesses with reliable and innovative tools for business continuity.