AWS Public Sector Blog
Using Amazon IVS for turnkey town halls

Many nonprofit organizations need to provide their donors, members, and beneficiaries with relevant information that they can access from anywhere. For example, nonprofit healthcare providers often need to provide their members with information about how to make the most of healthcare benefits such as Medicare and Medicaid.
Over the past few years, nonprofit organizations have seen positive results by hosting live town hall events in which members can receive important information and ask questions. These events can be completely online or have both in-person and online attendees.
Amazon Web Services (AWS) offers a service called Amazon Interactive Video Service (Amazon IVS), which organizations can use to host their own video streaming platform – no specialized knowledge or training required. In this walkthrough, learn how to set up Amazon IVS to build a turnkey live-streaming platform that integrates into an existing website.
About Amazon IVS
AWS built Amazon IVS using the same technology that powers the popular live-streaming platform Twitch. By implementing Amazon IVS, you can use the same innovative technology that Twitch has refined over a decade. When you send your livestreams to Amazon IVS, it automatically handles the complicated processes that are normally required to make those streams available to your viewers. Simply put, it handles the heavy technical lifting for you. As a result, you can focus on creating content that advances your mission.
Like other AWS services, Amazon IVS offers pay-as-you-go pricing. You pay for the total duration of video input to Amazon IVS, the total duration of video output delivered to your viewers, and the number of messages sent and delivered (if you use the Amazon IVS Chat feature). Amazon IVS is also AWS Free Tier eligible; learn more about Amazon IVS pricing.
Solution overview: How to create turnkey townhalls with Amazon IVS
This example walkthrough uses Open Broadcaster Software (OBS), an open-source video recording and live streaming platform, to stream a town hall event to Amazon IVS. This walkthrough also shows how to embed the Amazon IVS web player into a page on an example website. Because OBS is open source, you can use it at no cost.
To complete the steps in this walkthrough, you need an AWS account. If you don’t already have an AWS account, see the AWS Support Knowledge Center for complete instructions.
Setting up Amazon IVS
To start, sign in to your AWS account and then go to the Amazon IVS console. In the Get Started section, select Amazon IVS Channel, and then choose Get started, as shown in Figure 1.

Figure 1. The Get Started section of the Amazon IVS welcome page
Give the channel a name and then choose Default configuration and click Create channel, as shown in Figure 2.
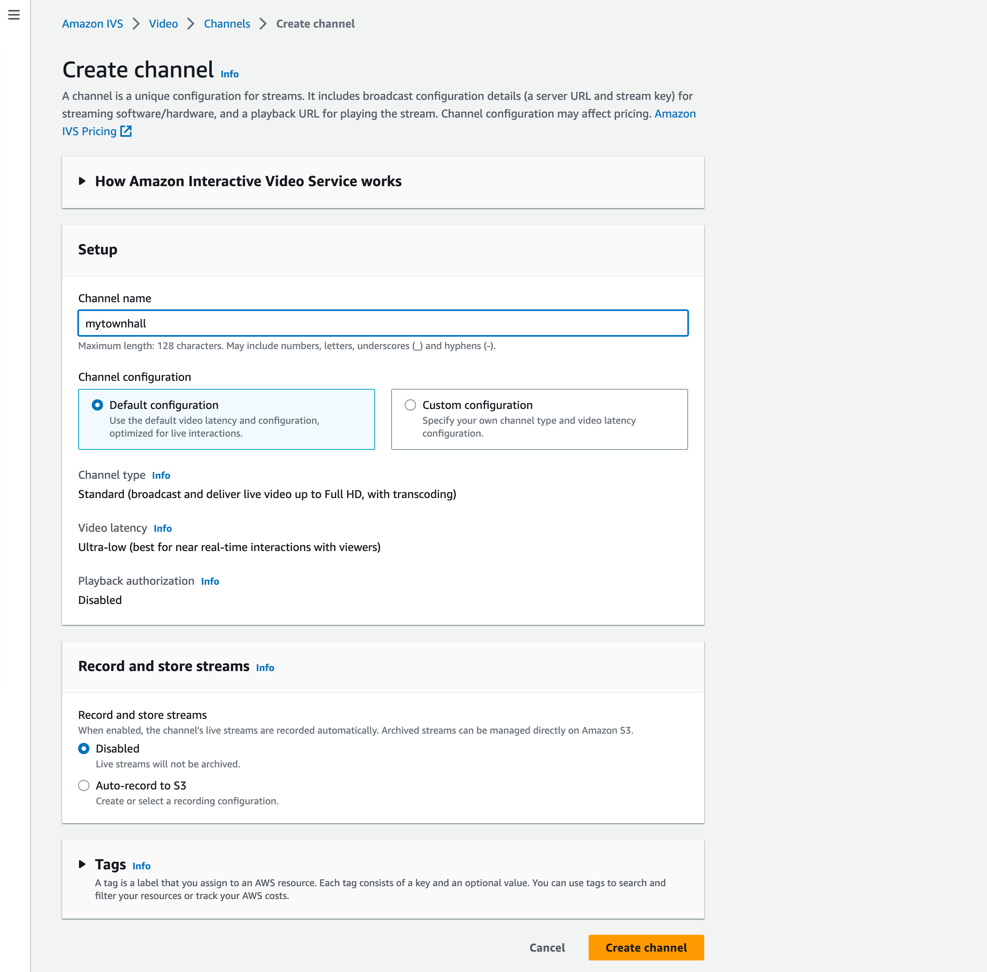
Figure 2. The Create Channel page in the Amazon IVS console. For this walkthrough, the channel is named “mytownhall,” and the remaining settings on the page are unchanged.
The next page should resemble the example shown in Figure 3. On this page, copy the values for:
- Stream key
- Ingest server
- Playback URL
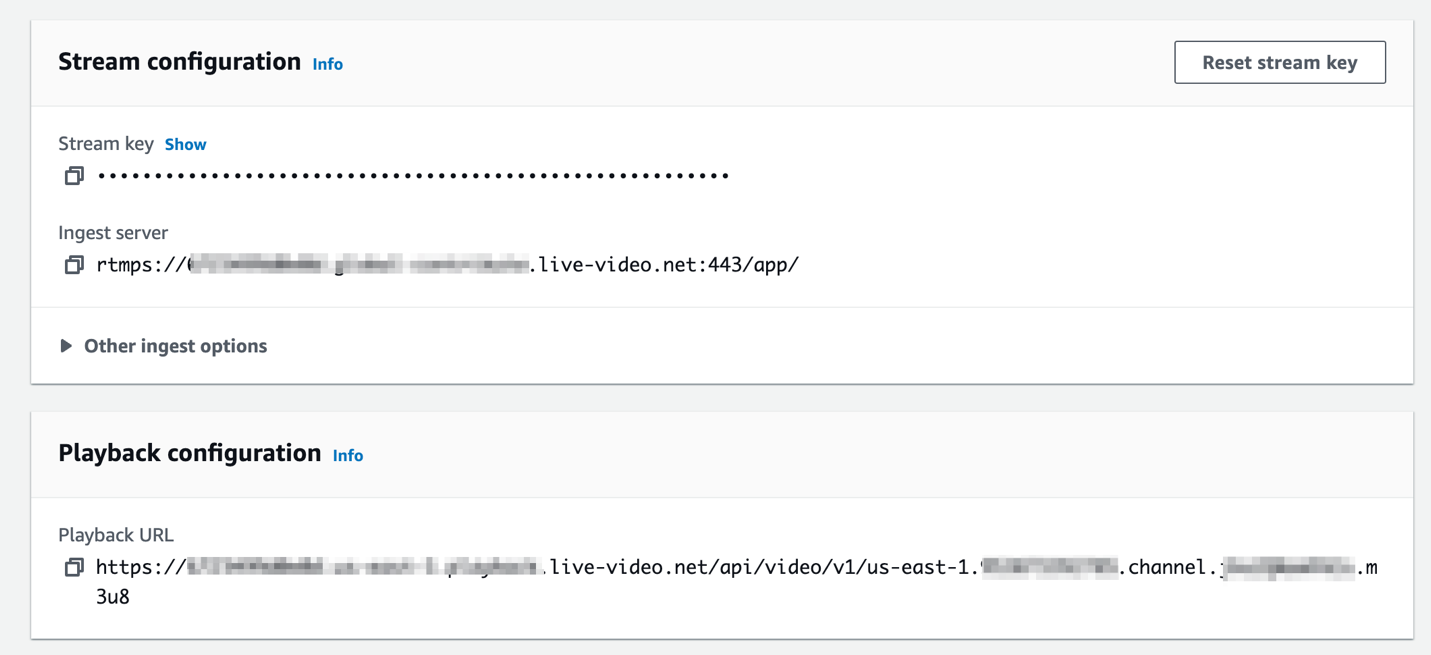
Figure 3. The Stream configuration and Playback configuration sections in the Amazon IVS console.
You’ve now set up a fully managed video streaming service with Amazon IVS. In the next section, you’ll use these three values to set up OBS.
Configuring OBS
Download and install OBS Studio from the OBS Project website. After you finish the installation process, open the OBS application.
Next, on the Preferences menu in OBS, choose Stream and then complete the following steps:
- For Service, choose Custom.
- For Server, enter the Amazon IVS ingest server address (the address that begins with rtmps://), which you copied in the previous section.
- For Stream Key, enter the Amazon IVS stream key that you copied in the previous section.
Select Ok to save the changes. When you finish, the Preferences window should resemble the example in Figure 4.
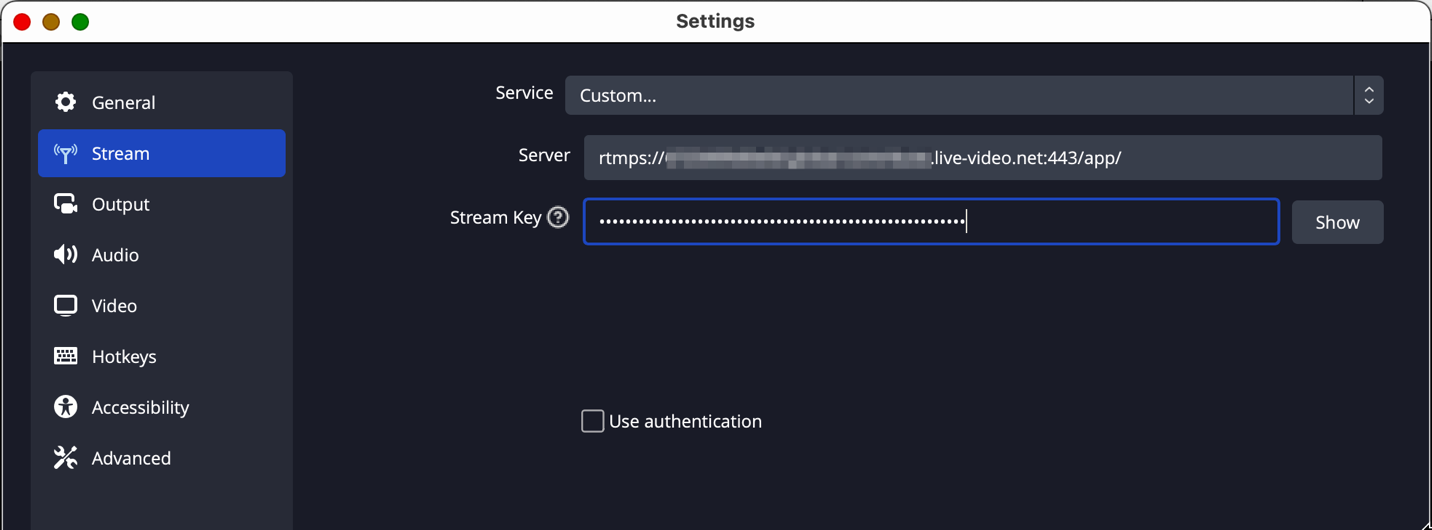
Figure 4. The Preferences window in OBS. In this example, the Server and Stream Key fields are filled in with values provided by Amazon IVS.
OBS is now connected to Amazon IVS. The next step is to create a scene, which is a streaming setup configuration that can include screen sharing, camera, and titles. These elements are known as “sources.” You can add these sources to the predefined scene according to your needs. For more information about adding sources to a scene, see the OBS Quick Start Guide on the OBS Project website.
In this example, I created a basic scene with three sources: a panel that contains a PowerPoint presentation, one that contains video from a webcam, and a title at the top of the window. You can see what this scene looks like in Figure 5.
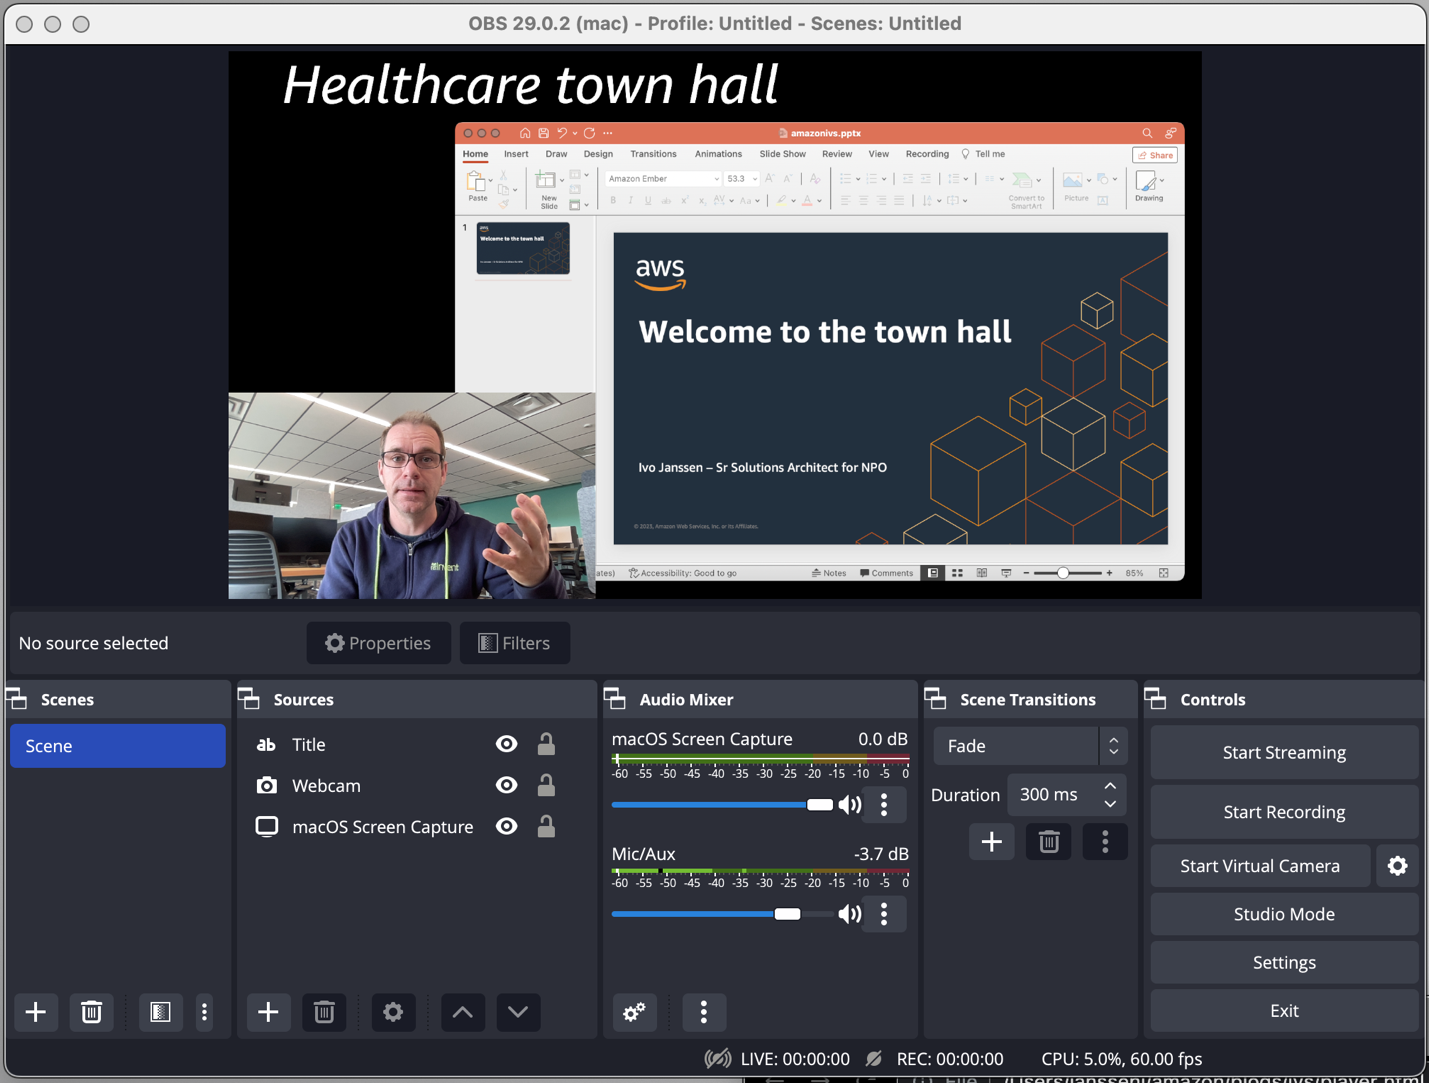
Figure 5. An example scene created in the OBS application. This scene contains a window with live video, one with a slide presentation, and a title.
When you finish creating your scene, choose Start Streaming to tell OBS to start sending your stream to Amazon IVS. In the Amazon IVS console, you can see a preview of your stream in the Live stream tab.
Now that we’re ready to stream video, the final step is to embed the stream player into our webpage.
Integrating the Amazon IVS Player into your site
An important component of Amazon IVS is the Amazon IVS Player, which you can embed directly into your website. The Amazon IVS Player is supported in all common web browsers, including Chrome, Firefox, Edge, and Safari, on both mobile and desktop platforms. In this section, we’ll integrate the player into a webpage using the HTML <video> tag.
To add the Player to your webpage, you’ll need to be able to edit the HTML for that page. At the point in the webpage where you want to add the player, insert the following code:
In the preceding example, replace PLAYBACK_URL with the Playback URL for your Amazon IVS channel.
Note: The Amazon IVS Player also includes some advanced configuration options. For example, if your website already uses a video framework such as Video.js, you can add a plugin for streaming content from Amazon IVS. See the Amazon IVS Player User Guide for more information.
Your website is now ready to start streaming video. If you want to add interactive elements to your stream, continue to the next section to learn about adding an interactive question-and-answer system.
Adding interactive chat capabilities
Now that the basic streaming components are up and running, we can optionally extend the experience so that viewers and members can ask questions directly to the presenters. To add this capability, we use Amazon IVS Chat.
Learn how to add an Amazon IVS chat room to your stream in this blog post, where you can find a GitHub repository that you can use to deploy the chat service quickly. When you complete the steps, you end up with a src/config.js file that resembles the example shown in Figure 6. You will need to populate the four variables with the values from Amazon IVS and the API_URL provided by the chat stack.
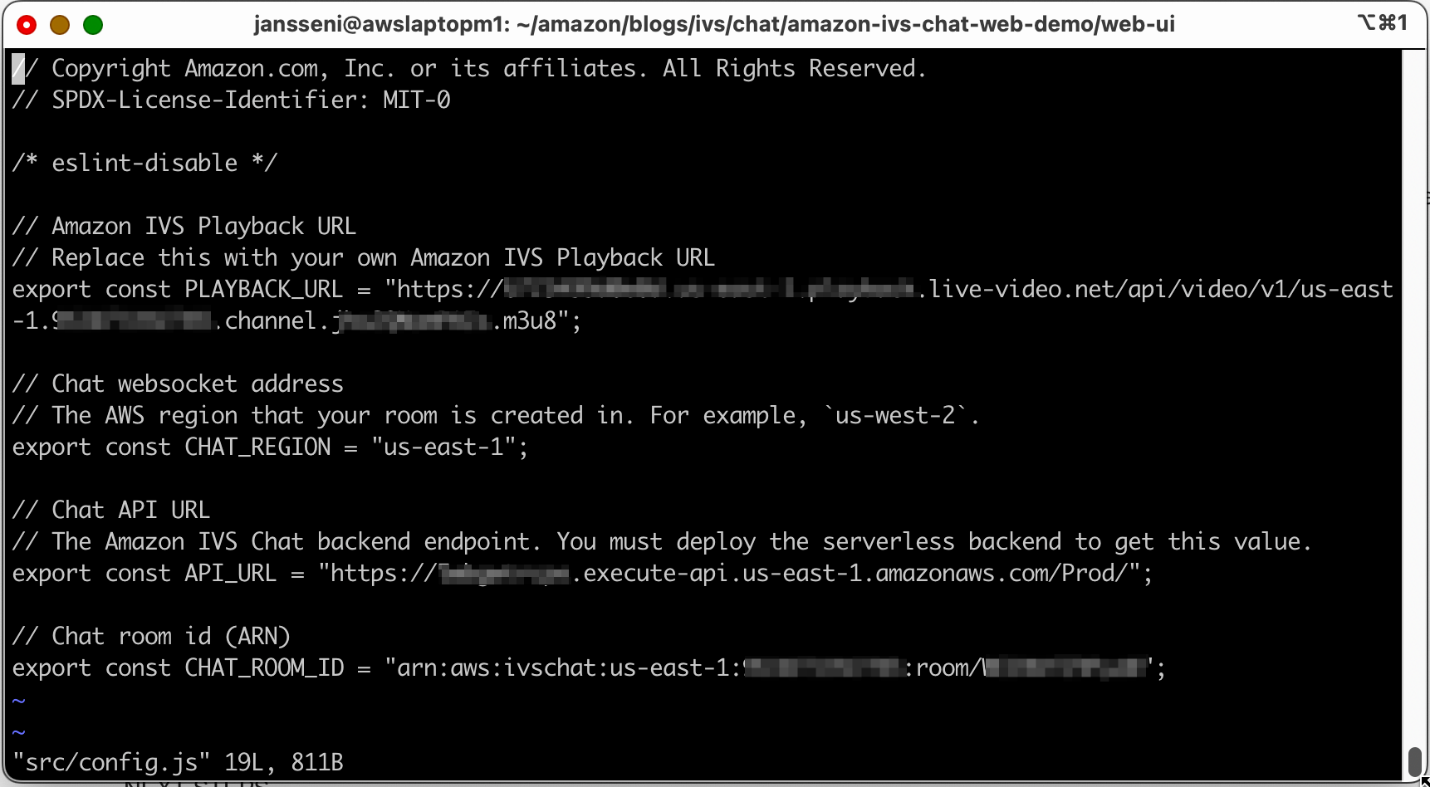
Figure 6. The contents of the src/config.js file that you create when you deploy the Amazon IVS Chat feature.
When you launch the demo app, you can see the full town hall experience, including presentation, video live stream, and moderated chat session. Figure 7 shows what the final user experience looks like.
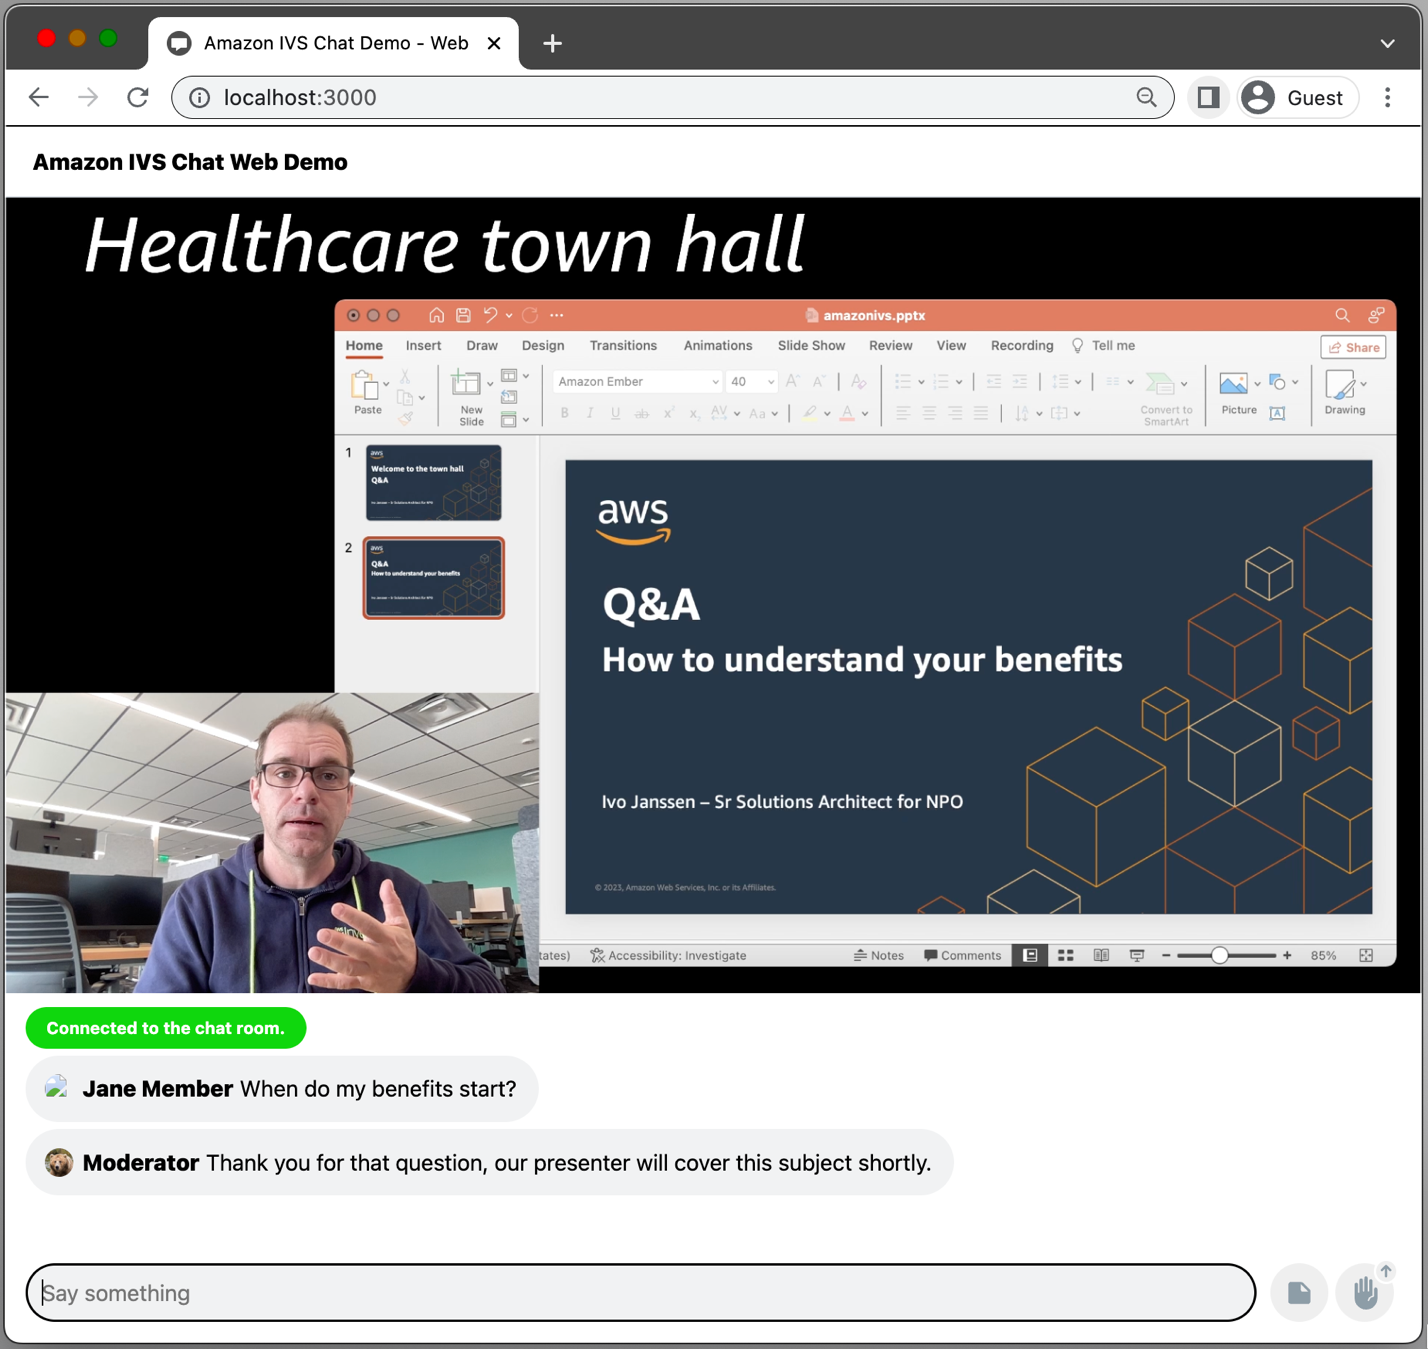
Figure 7. The final town hall solution, which includes a title, video stream, presentation, and chat window.
Cost
The cost of using Amazon IVS is based on the duration of incoming video (that is, video sent from you to Amazon IVS) and the duration of outbound video (from Amazon IVS to your viewers). If you use the Amazon IVS Chat feature, you also pay based on the number of messages sent and delivered. For more information, see Amazon Interactive Video Service pricing.
Cleanup
To make sure you don’t continue to pay for any resources associated with this workload that you no longer want, shut down the Amazon IVS Chat web application and delete the AWS CloudFormation stack (if you deployed the Amazon IVS Chat solution). Next, in the Amazon IVS console, delete the Channel and the Chat Room.
Conclusion and next steps
Many nonprofit organizations have a need to connect with their member base via online channels. Amazon IVS and Amazon IVS Chat provide a quick, scalable, cost-effective solution for nonprofit organizations that need to be able to provide their members with interactive streaming video. With Amazon IVS, you only pay for the amount of video that you stream. Amazon manages the technical aspects of hosting the streaming video platform so that you can focus on creating content that is valuable to your viewers.
As a next step, you can further customize the webpage hosting the video stream, experiment with advanced OBS options for an enhanced video experience, and implement live chat features, such as adding automated content moderation.
For more solutions designed specifically for the needs of nonprofits, browse the AWS Solutions Library for Nonprofits.
Nonprofits of all sizes are using AWS to increase support, expand awareness, and advance mission impact locally and globally. Whether you are working to generate donor, member, or volunteer insights through managed databases and analytics, accelerate research through machine learning and artificial intelligence, optimize program delivery through scalable websites and applications, or just getting started – AWS is here to help. Learn more about AWS for nonprofits.
Read more about AWS for nonprofits:
- Optimizing your nonprofit mission impact with AWS Glue and Amazon Redshift ML
- Using machine learning to customize your nonprofit’s direct mailings
- Creating a video storage and management system for your nonprofit
- Hosting streaming video for your nonprofit with Video on Demand on AWS
- Building a team knowledge base with Amazon Lightsail
- Managing nonprofit members and donors with CiviCRM on AWS
Subscribe to the AWS Public Sector Blog newsletter to get the latest in AWS tools, solutions, and innovations from the public sector delivered to your inbox, or contact us.
Please take a few minutes to share insights regarding your experience with the AWS Public Sector Blog in this survey, and we’ll use feedback from the survey to create more content aligned with the preferences of our readers.