AWS Public Sector Blog
Using AWS SSO with Microsoft Azure AD to federate to AWS GovCloud (US)
Update Feb 23, 2021: For the latest information on how to set up Azure AD with AWS SSO for automatic provisioning, see our documentation here.
Many government customers use AWS GovCloud (US) because it provides an environment for sensitive data and regulated workloads by addressing a number of U.S. government security and compliance requirements. In many cases, customers have a number of AWS GovCloud (US) accounts and managing authentication and authorization can require a lot of work. These customers may also use Microsoft Azure Active Directory (Azure AD) for identity management, single sign-on (SSO), and multi-factor authentication (MFA).
This post builds on features and functionality announced earlier by demonstrating the necessary steps to configure Azure AD, AWS SSO, and the AWS GovCloud (US)-specific identity provider centrally for ease of management.
Prerequisites
For this walkthrough, you should have the following prerequisites:
Solution Overview
The end result of this solution allows a user to log into AWS GovCloud (US) using their credentials from Azure AD.

- User opens AWS SSO User Portal.
- SSO redirects user to Azure AD for authentication.
- With a successful login, Azure provides a SAML token to SSO and redirects the user back to AWS SSO.
- User selects the AWS GovCloud application in AWS SSO.
- SSO opens a new browser window and passes a new, valid SAML token with a pre-defined role to the AWS GovCloud (US) account to log the user in.
Walkthrough
Configuring Azure with AWS SSO
First, Azure AD needs to be integrated with AWS SSO. When these steps are completed, a user can go to the AWS SSO User portal URL and use their Azure AD credentials to log on.
1. Open an Azure Account.
2. Go to Azure Active Directory, and create a new tenant.
3. Create a new user in the tenant you just created (email address is a required attribute).
4. Go to Enterprise Applications and select new application. In the Browse Azure AD Gallery, select create your own application.
5. Give your application a name, and leave the default setting of “Integrate any other application you don’t find in the gallery” to create it.
6. Navigate back to your Azure AD Tenant.
7. Select “App registrations.” Then select “All applications” in the main panel. The SSO App that you created in step 5 should appear (refer to Figure 1).

Figure 1
8. Select the app, and look for “Manifest” (refer to Figure 2).

Figure 2
9. Modify this manifest to create a role for Azure to pass to AWS SSO. This template may be used substituting the following attributes:
– A unique UUID can be generated here.
– Replace the account number (123123123123 in this example) with your AWS GovCloud (US) account number.
– Substitute <you-provider-name> and <your-sso-role> with the values you use later to create the SAML provider and SSO Role.
Note: This step may not be necessary if you are able to provision groups within Azure AD. The following instructions work for Azure accounts at all plan levels while Azure AD groups are only available for a subset of plans.
The code goes inside the appRoles square brackets.
        {
            "allowedMemberTypes": [
                "User"
            ],
            "description": "sso-admin",
            "displayName": "sso-admin",
            "id": "<your-unique-uuid-from-somewhere>",
            "isEnabled": true,
            "lang": null,
            "origin": "Application",
            "value": "arn:aws-us-gov:iam::123123123123:saml-provider/<you-provider-name>,arn:aws-us-gov:iam::123123123123:role/<your-sso-role>"
        },
10. Save the manifest file and go back to Enterprise Apps.
11. Add the user you created earlier to your new application. To do this, select the application. Then select Users and groups.
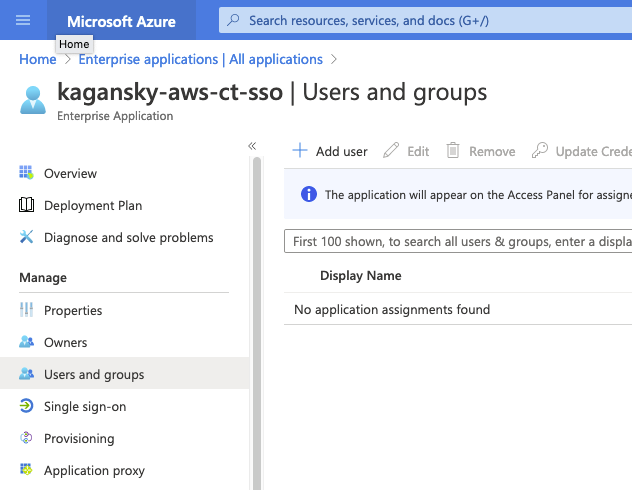
Figure 3
a. Select Add User at the top of the main panel. Select your user, and the “sso-admin” role which was created in step nine:

Figure 4
Note: See previous note in step 9; this configuration is necessary because the free plan level of Azure AD does not allow group synchronization, so at least one role has to be present in order to configure the provisioning.
b. Seeing the role selected under the ‘Role assigned’ column is an indication that the user is properly configured:

Figure 5
Next, collect some information to create a SAML provider in the AWS account. In another browser tab, log on to your (Non AWS GovCloud (US)) AWS account. If your account is a part of an AWS organization, you need to complete the following steps with the management account.
1. Navigate to the AWS SSO console and select Settings.
a. From there locate and select Change for your identity source.
b. Select External identity provider.
c. Then, select Download metadata file. This downloads an XML metadata file.
2. Back in the Azure console, select Single sign-on, and then SAML as your sign on method.

Figure 6
3. Upload the XML file from the last step into Azure by selecting the Upload metadata file button; upload the XML file you downloaded from the AWS SSO console and save.

Figure 7
4. Go to step 3 in the SSO panel, and download the Azure XML file from the Federation Metadata XML link:
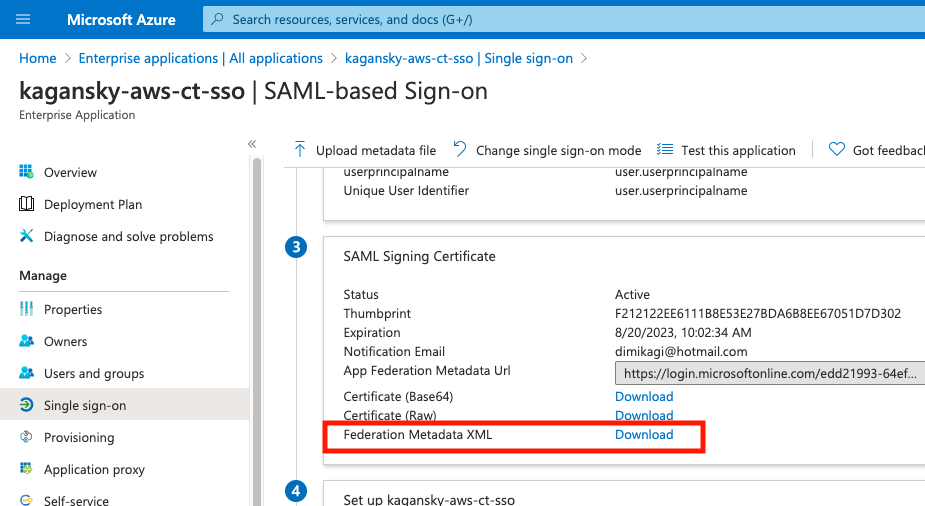
Figure 8
5. Now, go back to the AWS SSO Console. Under the identity provider metadata heading, upload the Azure federation metadata XML that you just downloaded. Select Review, and Accept the changes to your identity source.
Note: These two files are the federated trust getting exchanged between Azure and AWS SSO. Changes to URLs, SAML Tokens, and other environmental setting may require these two files to get updated. They are always updated in tandem, and if only one is updated, things may not work properly.
6. Click on Settings, and then View details in the Identity Source section. Confirm that your SSO SAML 2.0 authentication looks similar to Figure 9.
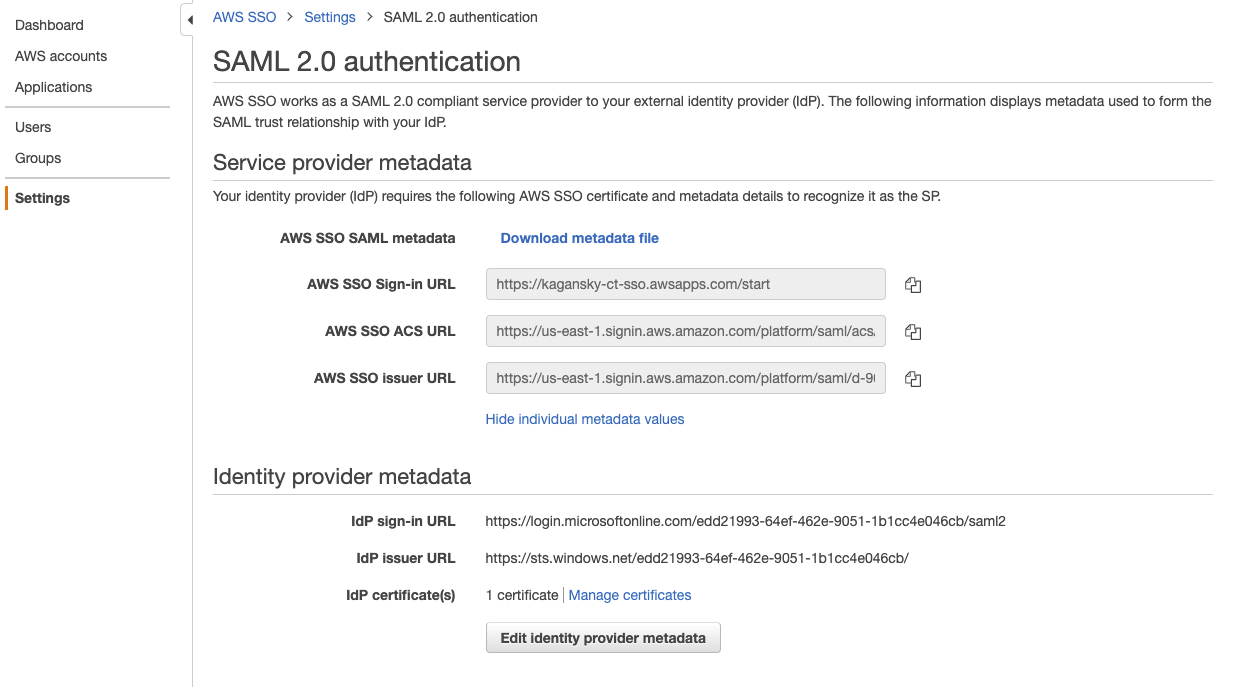
Figure 9
Configure Automatic Provisioning from Azure AD to AWS SSO
This optional step creates an automated, scheduled sync between Azure AD and AWS SSO to copy over users and roles from Azure AD to AWS SSO. While optional, it allows control of AWS SSO access from Azure.
1. In the AWS SSO console, select the Enable automatic provisioning link in the identity source settings. Leave the Inbound automatic provisioning tab open to copy the SCIM endpoint and Access token values in the next step.

Figure 10
2. In the Azure tab, select Provisioning from the left-hand side, and then click Get Started in the main panel.
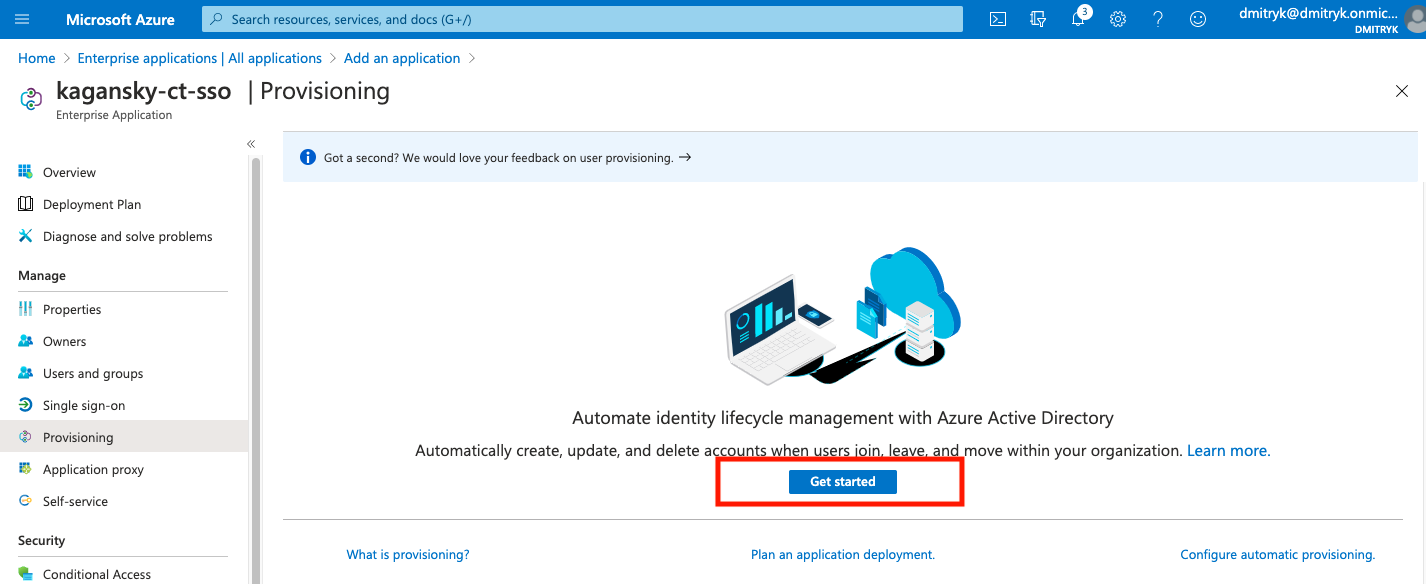
Figure 11
3. Change the ‘Provisioning Mode’ to ‘Automatic’ and copy the SCIM endpoint and the token from the AWS SSO tab over to the Tenant URL and Secret Token fields, respectively:

Figure 12
Note: It is suggested that a notification email be configured and enabled for failure notifications.
4. Once you save the configuration, make sure you select Start provisioning and then Save to begin the synchronization.
Note: It may take up to 40 minutes for the sync to start and is scheduled. Your Azure account may have the option to ‘Provision on demand,’ which does not seem to work consistently from customer to customer. If it is available, you can use this to sync a specific user, and use that as a test to confirm that you can log into AWS SSO with Azure tenant credentials.
After completing this step, you should be able to test provisioning and authentication from Azure AD. However, since you have not assigned any permissions to this user, the AWS SSO won’t display any accounts.
This concludes the steps necessary to configure Azure AD for integration with AWS SSO. The next two sections cover the specific use case of creating an external AWS GovCloud (US) application in AWS SSO, providing console and Command Line Interface (CLI) access to the end user. This walk through accounts for the differences in this configuration from a regular (“Commercial”) account that is already documented at AWS Single Sign-On (AWS SSO) Integration Guide for External AWS Account.
Configure the AWS GovCloud (US) IAM Identity Provider
The end result of this configuration creates an application in AWS SSO. On the AWS GovCloud (US) side, you need to get the ARNs for the provider itself, and a SAML role created in the account, along with the XML metadata file from the specific account. On the SSO side, the metadata file is used to provide federation from AWS SSO over to the individual AWS GovCloud (US) account.
5. Log into your AWS GovCloud (US) account, and go to the Identity Provider in the IAM console:

Figure 13
6. Select ‘Create Provider’ and select ‘SAML’ from the provider type drop down. Give this provider the same name that you entered into the manifest file earlier for the <you-provider-name> value.
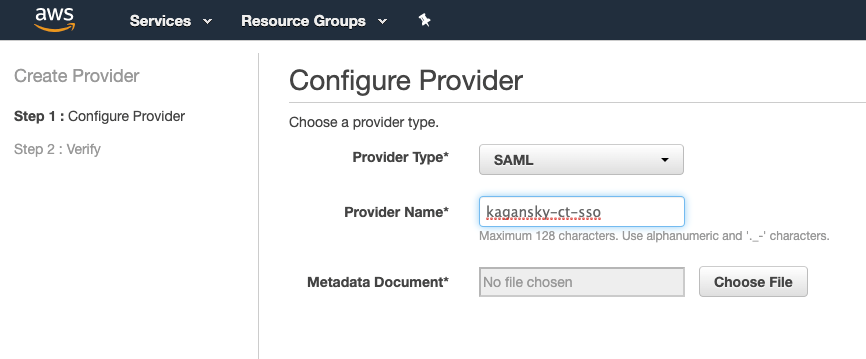
Figure 14
7. In a second browser (different browser or incognito) window, open the AWS SSO Console in your commercial account where you configured the Azure AD federation. Select Applications:

Figure 15
8. Select Add a new application and then search for AWS in the resulting search window:
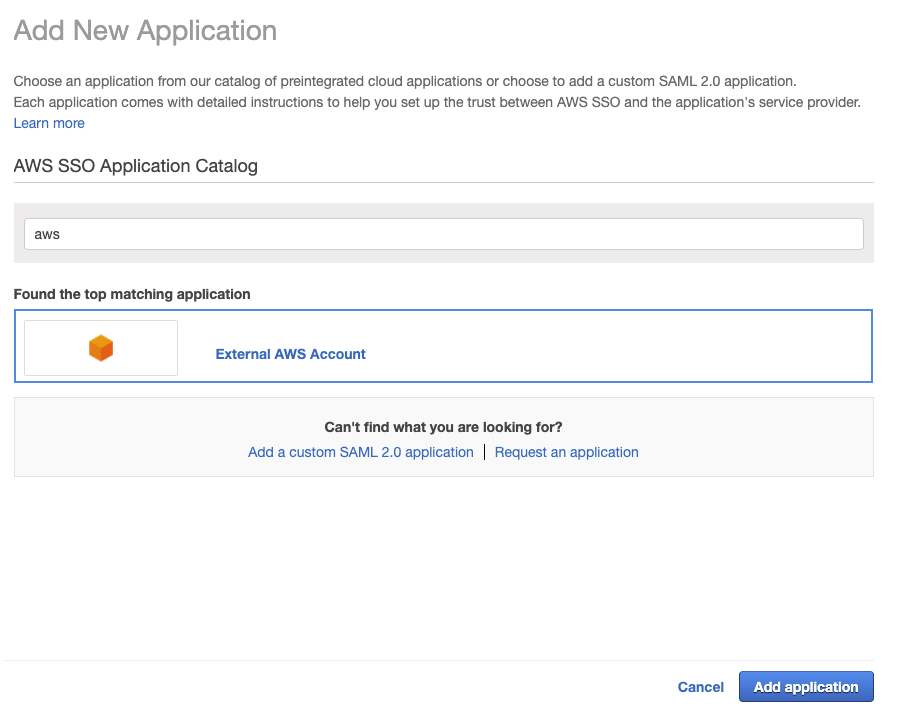
Figure 16
9. Select External AD Account, and Add application. Give the new application a meaningful name and description. Then, select the Download link next to the AWS SSO SAML metadata file:
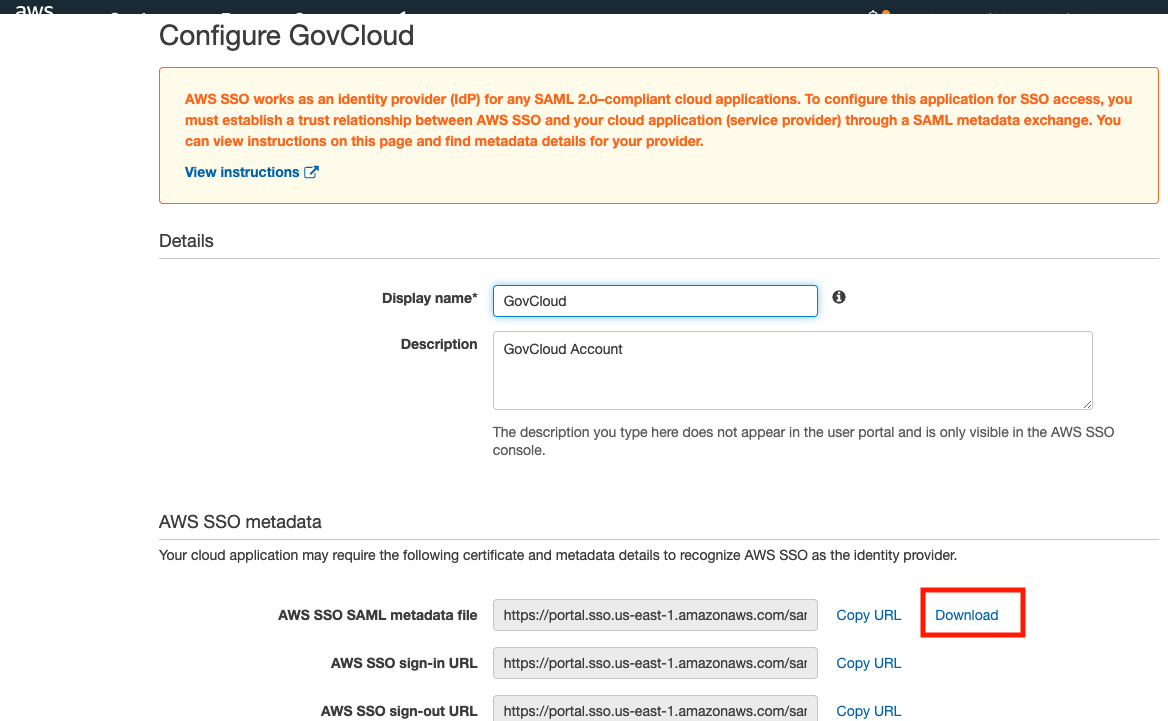
Figure 17
10. Back on the AWS GovCloud (US) IAM console, upload the AWS SSO SAML metadata file you just downloaded. Once uploaded, select Next Step to get to the confirmation step and select Create.
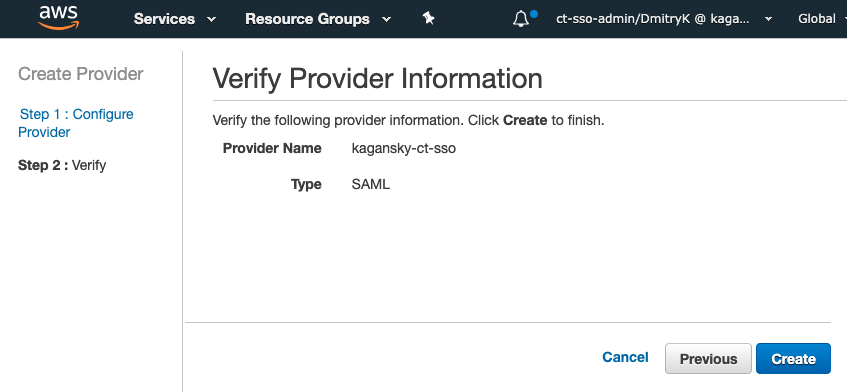
Figure 18
11. Once the Provider is created, copy the ARN of the Provider into a notepad to add in the AWS SSO Application later.
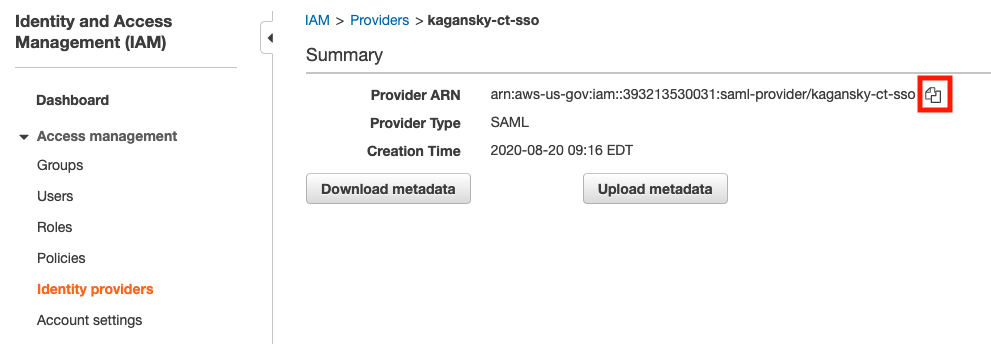
Figure 19
12. Next, select Roles in the IAM Console, and then select the Create role button:

Figure 20
13. In the first ‘Create role’ page, select SAML 2.0 federation for the type of trusted entity and then select the SAML provider from the drop-down list presented:

Figure 21
14. Select the desired permissions for the role (in the example below, AdministratorAccess is selected), and then click the ‘Next: Tags’ button:
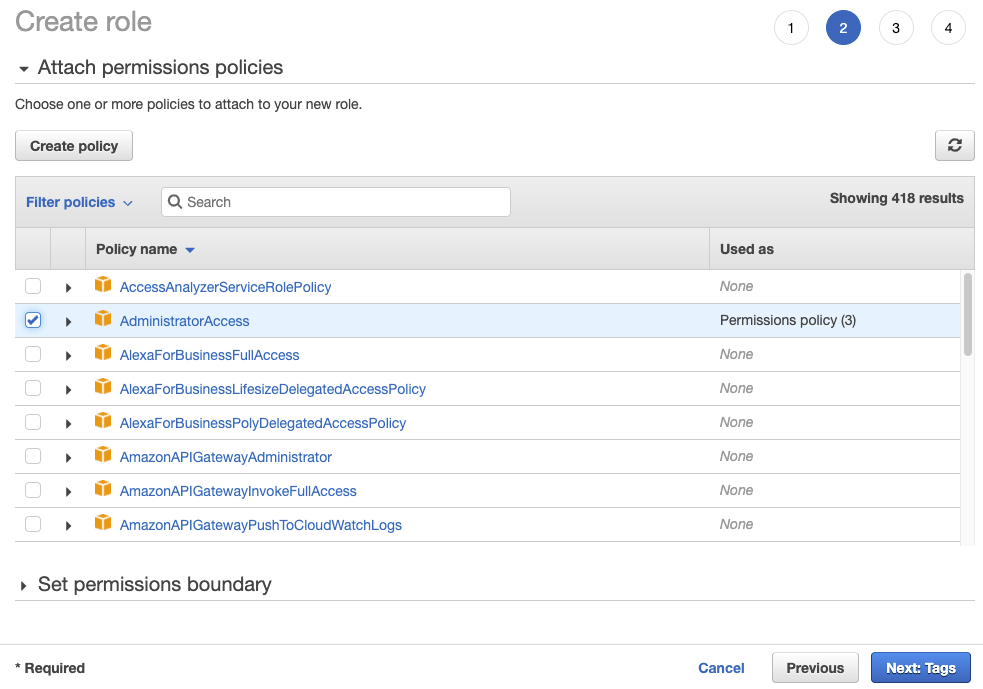
Figure 22
15. Add any additional tags you wish to the role, and then click ‘Next:Review’ to continue to this page. Fill the page out with the name used in the manifest file earlier for the <your-sso-role> value, a description, and then click ‘Create role’:

Figure 23
16. Once the role is created, find and select the role to copy to the full ARN of that role. That ARN is used in the next set of steps:

Figure 24
17. (((Transition back to SSO browser))) Heading back to the AWS GovCloud (US) application configuration, put in the following values as shown below and then click ‘Save changes’:
Application ACS URL: https://signin.amazonaws-us-gov.com/saml
Application SAML Audience: urn:amazon:webservices:govcloud

Figure 25
The application is now created, and a final configuration is needed to allow users to federate into the account.
Configure the AWS GovCloud (US) Application in AWS SSO
This final step sets up the federation of the AWS GovCloud (US) account with SSO. These steps configure the expected SAML token values that are passed to AWS GovCloud (US) as the user is logged in. There are many variances of this configuration, but this is the simplest one to provide an example.
18. With the application created, select the Attribute mappings tab on the resulting page:

Figure 26
2. On the Attribute mappings page, you need to add an additional attribute with the ARNs of the AWS GovCloud (US) Provider and Role created in steps 7 and 12, respectively. That additional attribute is:
https://aws.amazon.com/SAML/Attributes/Role
and the mapped value should be in the format of <PROVIDER-ARN>,<ROLE-ARN>. As an example, the value shown below is:
arn:aws-us-gov:iam::393213530031:saml-provider/kagansky-ct-sso,arn:aws-us-gov:iam::393213530031:role/ct-sso-admin
Note: This same value is also put into the Azure manifest from step 9. Copy the same “<Provider-ARN>,<Role-ARN>” value back into the Azure manifest for the application and save it.
The two existing attribute values should be changed from:
${user:email}
to:
${user:name}
This is because the users created in Azure may not have valid email addresses, but the name attribute is included in the initial provisioning and subsequent SAML tokens from Azure regardless of the rest of the Azure configuration. If email addresses are configured for users, those settings can be left alone. The resulting page should look like this, and can be saved by selecting the ‘Save changes’ button:

Figure 27
3. Once the attribute mappings are saved, select the ‘Assigned users’ tab and grant access to the Azure users that should have gotten synced over using the SCIM configuration from step 4. If the users are not present, you may have to wait for the SCIM to complete the first sync, or you can attempt an ‘On demand Provisioning’ from Azure to get a user copied over for testing. Once the user is visible, select it, and select ‘Assign users.’
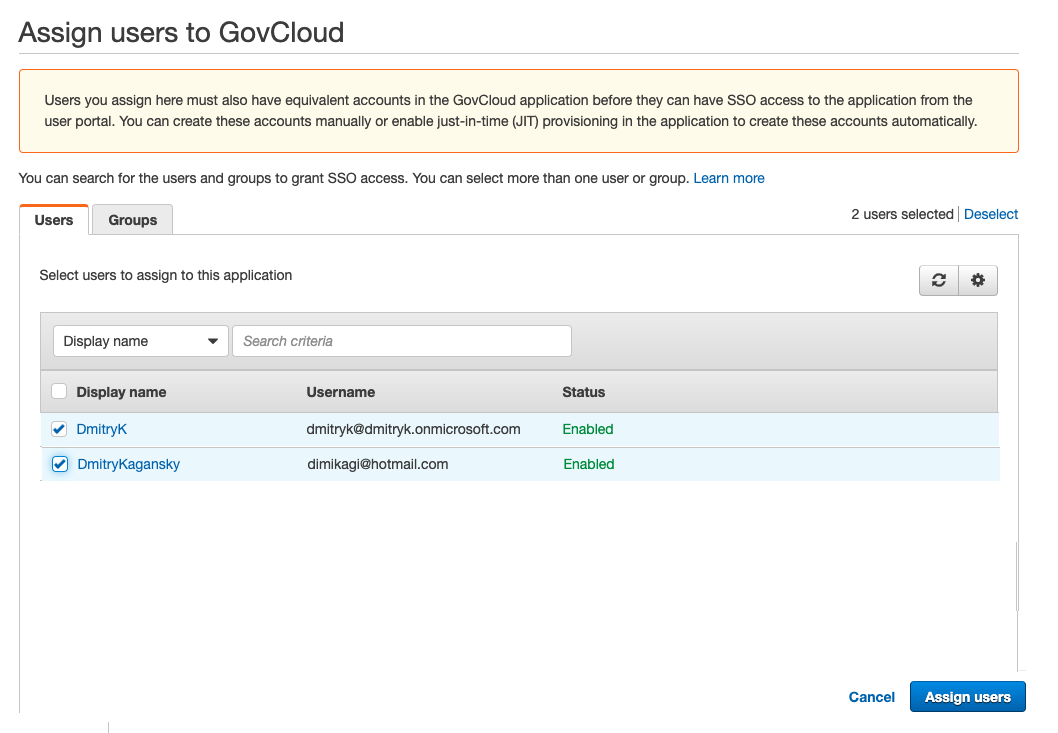
Figure 28
Users that are configured for SSO should now be able to go to the Start URL for AWS SSO and get prompted to enter their Azure AD credentials.
Conclusion
AWS GovCloud (US) is a separate set of regions allowing U.S. customers to adhere to a number of regulations and programs. Before using this solution, please review your specific compliance and regulatory requirements against the current AWS Services in Scope. Providing SSO integration with Azure AD for end users allows easier administration and usage of AWS GovCloud (US) by reducing the number of credentials each user has to manage.
Subscribe to the AWS Public Sector Blog newsletter to get the latest in AWS tools, solutions, and innovations from the public sector delivered to your inbox, or contact us.