AWS Storage Blog
Transferring files from on premises to AWS and back without leaving your VPC using AWS DataSync
AWS DataSync is a service we launched at re:Invent 2018 to simplify, automate, and accelerate data transfer between on-premises storage and AWS, such as Amazon Elastic File System (EFS) and Amazon S3. We recently expanded the service to support direct transfers to all S3 storage classes. Many of our customers are using DataSync to migrate on-premises storage to AWS, in order to shut down entire data centers, or move cold data to more cost-effective storage. DataSync adheres to high standards of information security: all data transferred between the source and destination is encrypted via TLS, data is never persisted by DataSync, and access to AWS storage locations is entirely in your control. DataSync is also managed by standard AWS tools such as IAM (for S3) and security groups (for EFS). In addition to these security measures, some of our customers need to move data from their on-premises storage to AWS via Direct Connect or VPN, without traversing the public internet, to further increase the security of the copied data. In this post, I’ll briefly walk through the services that enable such network setup, the security benefits that they provide, and the best practices to set up the transfer.
The benefits of using DataSync with VPC endpoints
DataSync allows you to configure a source storage location (NFS or SMB share) on-premises, and a destination in AWS storage services (Amazon S3 or Amazon EFS). It uses a purpose-built network protocol and scale-out architecture to accelerate the transfer of data to AWS. To operate the service and to transfer your files, you can either utilize public service endpoints in their respective AWS Regions (such as datasync.us-east-1.amazonaws.com), or transfer files via your Direct Connect or VPN utilizing private IP addresses accessible only from within your VPC.
When using only private IPs, you can ensure that your VPC is not reachable over the internet, and prevent any packets from entering or exiting the network. This means that you can eliminate all internet access from your on-premises, but still use DataSync for data transfers to and from AWS using Private IP addresses.
How this works

DataSync uses an agent to transfer data from your on-premises storage. The agent is deployed as a virtual machine that should be deployed on-premises in the same LAN as your source storage to minimize the distance traveled via protocols, such as NFS. Once deployed, the agent acts as an extension of the DataSync service, and is managed seamlessly by AWS. Using DataSync with VPC endpoints means that your agent can communicate with the DataSync service endpoints using private IPs. In configuring this setup, you’ll place a private VPC endpoint in your VPC that connects to the DataSync service. This endpoint will be used for communication between your agent and the DataSync service. This includes commands to the service, such as starting a data transfer. In addition, for each transfer task, four elastic network interfaces (ENIs) will automatically get placed in your VPC. Your DataSync agent will send traffic through these ENIs in order to transfer data from your on-premises shares into AWS.
Setting up the transfer
Below I provide a step-by-step guide for configuring DataSync to use private IPs. This includes a one-time setup of an agent that reads from your source storage, and a one-time setup of a VPC endpoint that the agent communicates with. Once this setup is completed, you can create as many transfer tasks as you need, connecting between your on-premises storage and storage in AWS. The diagram below illustrates the setup in more detail, and specifies the AWS resources mentioned in the different steps.
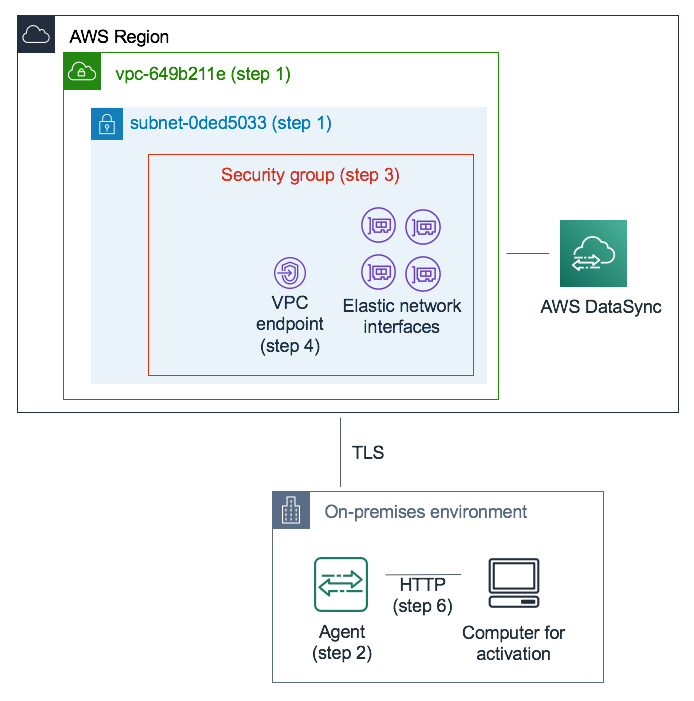
1. Choose the VPC and subnet where you’d like to set up the DataSync private IPs. This should be a VPC that extends to your on-premises environment via routing rules over Direct Connect or VPN. All communication between your DataSync agent and the DataSync service remains in this VPC.
2. Deploy a DataSync agent on-premises, where it can access your source storage location via NFS or SMB. The OVA for the agent deployment can be downloaded from the DataSync console. Your agent does not need a public IP.
- Note that a single agent can only be used for one type of transfer: over private or public endpoints. If you have an existing agent transferring data over the public internet, you’ll need to deploy a new agent to transfer data to private DataSync endpoints.
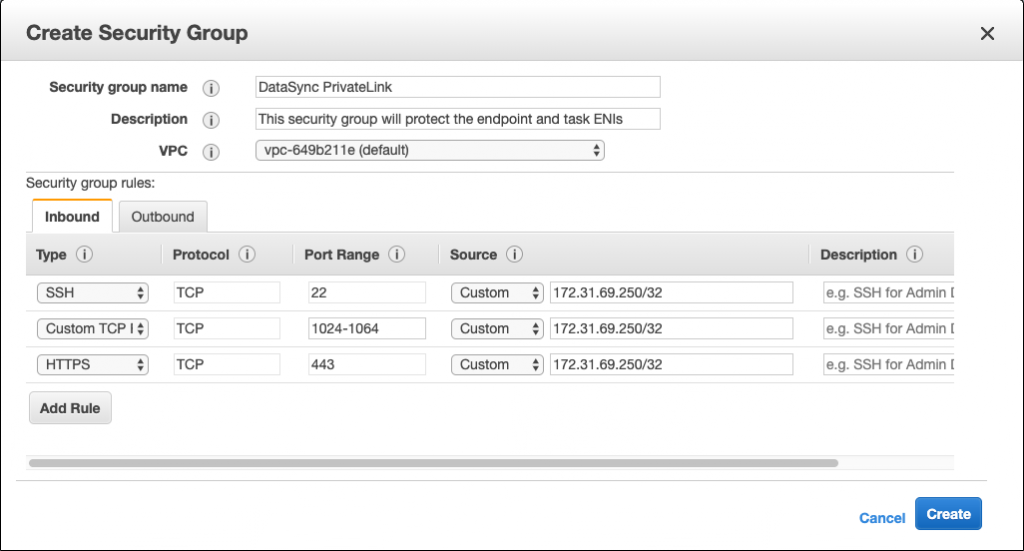
3. Create a security group that will ensure correct access to the private IPs DataSync will use: a single VPC endpoint for control traffic and four ENIs that will be used for the data transfer. The security group will manage access to these private IPs and make sure your agent can route to them. Since the agent needs to establish connections to these IPs, configure inbound rules allowing the agent’s private IP (172.31.60.250 in the screenshot) to connect to the IPs DataSync uses. The agent needs to talk to ports 1024-1064, 443, and port 22.
- Note: No outbound rules are required. When configuring the security group, remember to select the VPC you chose in step 1.
4. Create a VPC endpoint for the DataSync service. In the Amazon VPC console, choose Endpoints from the navigation pane on the left, and click Create Endpoint. For Service category, choose AWS service. For Service Name choose DataSync in your region (e.g. com.amazonaws.us-east-1.datasync). Then select the VPC and security group you chose in the first and third steps, respectively. Make sure you uncheck Enable Private DNS Name.

5. Once the VPC endpoint you create becomes available, make sure the network configuration for your on-premises environment allows agent activation. Activation is a one-time operation which securely associates the agent with your AWS account. To activate the agent, use a computer that can reach the agent via port 80. After activation this access can be revoked. The agent should be able to reach the Private IP of the VPC endpoint you created in step 4. To find this IP, navigate to the Amazon VPC console, and choose Endpoints from the navigation pane on the left. Select the DataSync endpoint and look in the Subnets There you can find the private IP that corresponds to the subnet you chose.
- Note: Make sure to allow outbound traffic from the agent to the VPC Endpoint via ports 443, 1024 – 1064, and port 22 (optional, for support channel).

6. You’re now ready to activate your agent. If you have a computer that can route to the agent via port 80, and also access the DataSync console, navigate to the console and hit Create Agent. In the service endpoint form section, select VPC endpoints using AWS PrivateLink.
- Select the VPC endpoint created in step 4, the subnet you chose in step 1, and the security group created in step 3. Enter your agent’s IP. If you cannot access the agent and the DataSync console using the same computer, you can activate the agent using the command line from a computer that can reach the agent’s port 80.

7. Choose Get Key, and optionally enter an agent name and tags, and choose Create agent. Your new agent is now visible in the Agents tab of the DataSync console. The green VPC Endpoint banner indicates that all tasks performed via this agent will use private endpoints, without traversing the public internet.

8. Create your task by configuring a source and a destination for your data transfer.
9. To facilitate transfer via private IPs, the task creates four elastic network interfaces (ENIs) on your behalf, in the VPC and subnet that you chose. Make sure your agent can reach them. To find these IPs, navigate to the Amazon EC2 console and choose the Network Interfaces tab on the left. Enter the task ID into the search filter to see the four ENIs for the task. Make sure you allow outbound traffic from the agent to these ENIs via port 443.

That’s it. You can now start your task, see its progress in the DataSync console, and re-run regularly to pick up incremental updates as needed.
For more tips and best practices when using DataSync, check out our prior posts, covering migrating storage, migrating hundreds of TB of data to Amazon S3, using common file and folder filters, and transferring data to the various S3 storage classes.
We are constantly enhancing AWS DataSync, and would love to hear your feedback and ideas. Contact my team through the DataSync developer forum, AWS Support, or comment below.