Artificial Intelligence
Integrate Your Amazon Lex Bot with Any Messaging Service
Is your Amazon Lex chatbot ready to talk to the world? When it is, chances are that you’ll want it to be able to interact with as many users as possible. Amazon Lex offers built-in integration with Facebook, Slack and Twilio. But what if you want to connect to a messaging service that isn’t supported? Well, there’s an API for that–the Amazon Lex API. In this post, I show how to integrate an Amazon Lex bot with an external messaging service by using Twilio Programmable SMS as the example service.
You can integrate any messaging service that provides the right APIs with Amazon Lex using the design pattern described in this post. The solution includes a serverless middle tier or a preprocessing layer “in front of” Amazon Lex. This is useful if you want to incorporate Amazon Lex as another building block into your systems. For example, if you’re in an enterprise, you could use this solution to implement custom message routing to specialized bots developed by different business units.
For simpler uses cases, the built-in integration for Twilio in the Amazon Lex console might be a better option.
Architecture and message flow
For this integration, I chose a serverless architecture that uses Amazon API Gateway and AWS Lambda to robustly and scalably integrate the Amazon Lex bot with the Twilio messaging service. Going serverless means that you don’t have to worry about managing individual instances, and that you incur costs only for the resources that your application uses. API Gateway provides the secure API endpoint for a Lambda function that implements your business logic.
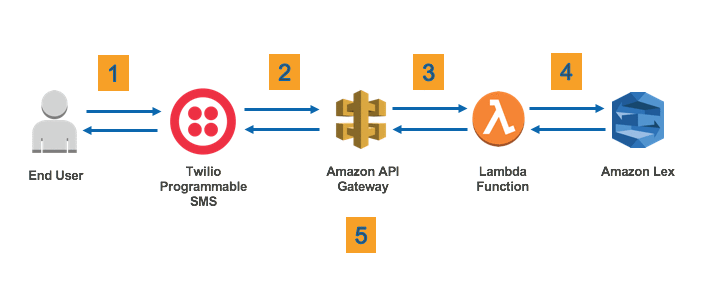
Before diving into the details, let’s examine how messages flow between the end user and your bot:
- The end user sends an SMS text to your Twilio number.
- Based on your configuration, Twilio makes an API call to the HTTPS endpoint hosted by API Gateway.
- API Gateway optionally authenticates the request, and then passes the request parameters to a Lambda function.
- The Lambda function runs your business logic and uses the PostText runtime API call to communicate with your chatbot(s). For the sake of brevity, I haven’t included custom logic in this example. You can implement your own custom routing logic and send messages to different bots based on your own business rules.
- An HTTPS response is sent to the Twilio endpoint, which relays the message to the user as an SMS text message.
Now let’s set up each component.
Creating an Amazon Lex bot
Start by creating a bot. For this example, use one of the example bots that are provided in the Amazon Lex console. This is what you need to do:
- Log in to the Amazon Lex console, and choose Create in the Bots
- Choose the BookTrip sample, note the name of the AWS Identity and Access Management (IAM) role, and choose Create.
- After Amazon Lex builds the bot, test it in the console.
- Publish the bot. For the Alias, use dev.
You now have a working bot, but it can’t communicate with anyone outside the console. Let’s change that!
Setting up an SMS-enabled Twilio phone number
Next, set up a Twilio SMS-enabled phone number where users can send SMS messages to interact with your bot. If you don’t already have a Twilio account, you can sign-up for a trial account, which includes a free phone number. Make sure that your Twilio number has SMS capability turned on, and that you verify your own phone number with Twilio for testing.
On the Twilio Console Dashboard, note your Twilio AUTH TOKEN.
We’ll return to the Twilio Console to configure the webhook that posts the SMS message to our serverless application. But first, you need to create your serverless application.
Lambda–the preprocessing layer between Amazon Lex and Twilio
Lambda gives you the ability to run custom code based on an event. In this case, that event is an HTTPS call to API Gateway made by Twilio.
Before diving into coding the Lambda function, you need to set up permissions.
- Sign in to the IAM console at https://console.aws.amazon.com/iam/.
- For Roles, choose Create a new role. For AWS Service Role, choose Lambda.
- On the next page, choose Next Step without selecting a policy (you’ll define a custom policy). Name this role lambda-exec-role-for-lex, and then choose Create role.
- Search the list of roles to find the new role. Expand the Inline Policies section and create a new custom policy by pasting in this JSON:
This policy permits Lambda to use the PostText API call and Amazon CloudWatch Logs.
Now create the Lambda function:
- If you haven’t already, install Node.js.
- Clone the GitHub repository:
If you’re interested in the validation checks and the call to the Amazon Lex API, see the comments in index.js.
- Navigate to the project directory and install the necessary Node.js modules:
- Compress the contents of the project directory into a .zip file. For example, on a Mac, you can use the following command:
- Log in to the AWS Lambda console, and choose Create a Lambda function.
- Choose the Blank Function blueprint, and choose Next.
- Leave the trigger empty, and then choose Next.
- For the Lambda function, type LexTwilioIntegration, and for the Runtime environment, choose js 4.3.
- Because the Node.js application uses third-party modules, you can’t use the Lambda console editor to edit code. Choose Upload a .ZIP file, and choose the .zip file that you created in step 4.
- The Lambda function uses four environment variables. Add them:

You need to create the gateway before you can set the API_GATEWAY_URL value, so leave that field blank for now. You will provide this value later. - Leave the Handler set to index.handler, and then choose Choose an existing role. Type lambda-exec-role-for-lex, which is the role that you created for this Lambda function to assume.
- To review the details for the Lambda function, choose Next, and then choose Create function. This sets up the Lambda function.
- Quickly test to see if the Lambda function can communicate with your chatbot. Choose Actions, and then choose Configure test event and paste in the following JSON:
This simulates the From and Body parameters that the Twilio webhook will submit to your HTTPS endpoint. You should see a response from the chatbot that looks something like this:

You’ve gotten a response from your bot! Now you can create your API endpoint.
Using AWS API Gateway to create an HTTPS endpoint
You need an HTTPS endpoint that can receive POST requests from Twilio and relay your bot’s responses to Twilio. Instead of configuring multiple web servers to create a highly-available API endpoint, use API Gateway. It not only provides an API endpoint, but also additional security and monitoring capabilities.
- Log in to the API Gateway console, and choose Create API.
- Give the API the name LexTwilioIntegration. Choose Create API.
- On the Resources page, choose Actions, and then choose Create Method.

- Choose POST, and then choose the checkmark to save the new method.

- On the POST-Setup page, leave the Integration Type Lambda Function. Choose the Lambda Region (us-east-1, for this example), for Lambda Function, type LexTwilioIntegration, and then choose Save.

- Choose Method Execution, and then choose Integration Request.

- Expand Body Mapping Templates, and for Request body passthrough, choose When there are no templates defined.

- Define a body mapping template for the Content-Type header in the request coming in from Twilio. This ensures that the request parameters are transformed into a format that your Lambda function can understand. Choose Add mapping template and for Content-Type, type application/x-www-form-urlencoded. That’s the header that we expect from the Twilio webhook. To save the mapping template, choose the checkmark next to the text field. To expand and populate the template definition, choose the name of the template. Fortunately, there’s a canned template that will work for the Lambda function. Under Generate template, select the Method request passthough template, and then choose Save.

- For testing purposes, add another mapping template for the Content-Type application/json. Choose the Method request passthrough template for, too.
- Return to Method Execution, and choose Method Response. Expand the HTTP Status 200. For Response Headers for 200, add a new header named Content-Type, and then choose the checkmark to save it.
- Return to Method Execution again, and choose Integration Response. Expand the method response status for 200, and then expand the Header Mappings section. You should see the Content-Type header that we added in the last step. Now give it a value by typing 'text/xml' (be sure to include the single quotes). Now expand Body Mappings Templates. For Content-Type, choose application/json, add the following line, and then choose Save.
- You’re now ready to test your new API to make sure it triggers your Lambda function. Navigate to Method Execution, and choose Test. In the Body field, type "From=867-5309&Body=book+hotel" and choose Test. This should trigger the Lambda function. You should see the response from the chatbot in the Logs section.

This shows the response from the chatbot both before and after it has been transformed by the Body Mapping Template. If you look closely, you will see that the template removed the enclosing double quotes to make the response compliant with Twilio SMS’s expectations. - Deploy the API by choosing Actions, and then choosing Deploy API. When you deploy for the first time, you have to create a new stage. Record the Invoke URL for the stage that you deployed to.
Filling in the blanks
Before you can start interacting your awesome bot, you need to provide a few more parameters.
- Log in to the Twilio console, navigate to phone numbers (“#”), and select the phone number that you were given.
- On the Configure tab, find the Messaging For Configure With, choose Webhooks/TwiML, and then, in the A MESSAGE COMES IN–Webhook field, add the API Gateways Invoke URL that you recorded.

- Log in to the Lambda console, and select your Lambda function. Add the Lambda API_GATEWAY_URL environment variable. You should now be able to send an SMS message to your Twilio number and interact with your bot.

Tip: If you don’t get an SMS response, log in to the Twilio SMS console and use the SMS logs to debug.If you don’t want to see the Twilio trial account note, upgrade your Twilio account. This also removes other trial account restrictions, like the requirement to verify phone numbers before you can receive SMS messages. For detailed cost information for sending and receiving SMS messages in your region, see the Twilio SMS pricing page.
- If you are going to use this solution in production, we highly recommend that you uncomment the block of code in js that checks for the Twilio signature and validates that the request is, in fact, coming in from Twilio (index.js: line 30 thru 45).
Adding support for voice
Your bot can text, but what if someone calls your Twilio phone number? The great thing about Amazon Lex is that it can communicate using both text and voice.
To add voice support, you need to create two additional API Gateway resources (/prompt and /audio) to handle voice recordings sent by Twilio Voice. The first resource (/prompt) prompts the caller by using the Twilio <record> verb to record user responses. The second API resource allows you to receive the voice recording posted by Twilio Voice. In your Lambda function, use the PostContent API call instead of PostText to submit the voice recording to Amazon Lex. Be sure to add PostContent to the IAM role permissions. For Twilio, you need to respond with TwiML, so when using the PostContent API, specify text/plain as the value for the accept header This tells Amazon Lex to respond in text, which Twilio can then convert into voice by using the TwiML <say> verb.
Conclusion
It’s easy to create a sophisticated chatbot for your applications With Amazon Lex. By using Amazon API Gateway and AWS Lambda, you can quickly integrate your bot with any messaging service that exposes the right API. You can also use this solution to filter, preprocess, or introduce custom message routing between multiple bots. There’s no need to create a separate application to handle voice–the same Amazon Lex bot can handle both text and voice.
Congratulations–your bot can now text!
If you have any questions or suggestions, please comment below.
About the Author
 Ahmad R. Khan is a Solutions Architect at AWS. He lives in Southern California and helps customers on the West Coast architect and optimize their workloads on AWS. In his spare time, he enjoys the outdoors and spending time with his wife and two kids who take pride in peppering Amazon Alexa with obscure questions.
Related
Building Better Bots Using Amazon Lex
