Networking & Content Delivery
Providing controlled internet access through centralised proxy servers using AWS Fargate and PrivateLink
In this post we provide a regional solution for controlling outbound internet access to 1000s of Amazon Virtual Private Clouds (VPCs) using AWS Fargate and AWS PrivateLink. It removes the need to manage any proxy servers or to provide Layer 3 connectivity between your VPCs. It also provides an end-to-end deployment pipeline with a simple, scalable approach to managing your list of permitted URLs and proxy server configuration.
Allowing access to internet URLs from your Amazon VPC is a common requirement. You may need to access software repositories, communicate with partner APIs, or download packages from trusted vendors. This is relatively simple when your resources reside in public subnets, but private subnets require the use of a Network Address Translation (NAT) Gateway or a proxy server to provide outbound internet access.
Providing internet access to resources in your private subnets can be achieved through several approaches. One common approach is an Internet Gateway with a public subnet and NAT Gateway for every Amazon VPC. In highly regulated environments, this approach can cause challenges because as the AWS footprint grows, so does the number of ingress/egress points to the internet.
Customers choosing to adopt a centralised internet model to overcome this problem can use AWS Network Firewall, which can be deployed using a centralised or decentralised model to control internet traffic through an inspection VPC. Although AWS Network Firewall provides a fully managed service to control access to approved domains, it acts as a ‘transparent’ proxy to route traffic to the internet. This means that the instances accessing the internet are not aware that they are behind a proxy.
An explicit proxy requires ‘awareness’ of a proxy server and instances need to be configured to use a proxy server to connect to the internet. Proxy authentication can also be added to provide more granular control and restrict access to specific instances or resources in a VPC. The solution in this blog uses a fleet of Squid proxies running in explicit mode, requiring instances to be configured to use your proxy to connect to the internet.
The Solution Architecture
This solution is based on a fleet of opensource Squid proxies running on Amazon Elastic Container Service (ECS) with AWS Fargate. Internet access is provided centrally via a NAT Gateway and an Internet Gateway deployed in the central VPC. Amazon ECS uses a Network Load Balancer (NLB) configured as an endpoint service to make the solution available to ‘spoke’ VPCs. Interface endpoints are deployed into the ‘spoke’ (application) VPCs to enable resources inside these VPCs to use the deployed endpoint as its proxy server. Some key points to note about this solution are:
- L3 network connectivity is NOT required between the central hub and ‘spoke’ account VPCs, as it leverages AWS PrivateLink.
- The allowlist is managed centrally and can be version controlled in your git-based repository.
- The solution only uses AWS managed services, so there are no Amazon Elastic Compute Cloud (EC2) instances or cluster nodes to manage.
- The solution can scale to 1000s of VPCs and ‘proxy endpoints’.
- The ECS service automatically scales the required number of tasks based on the CPU load of the proxy service.
- Squid proxy is configured to act as an explicit proxy, so instances must be configured to be ‘proxy aware’ to access the internet.
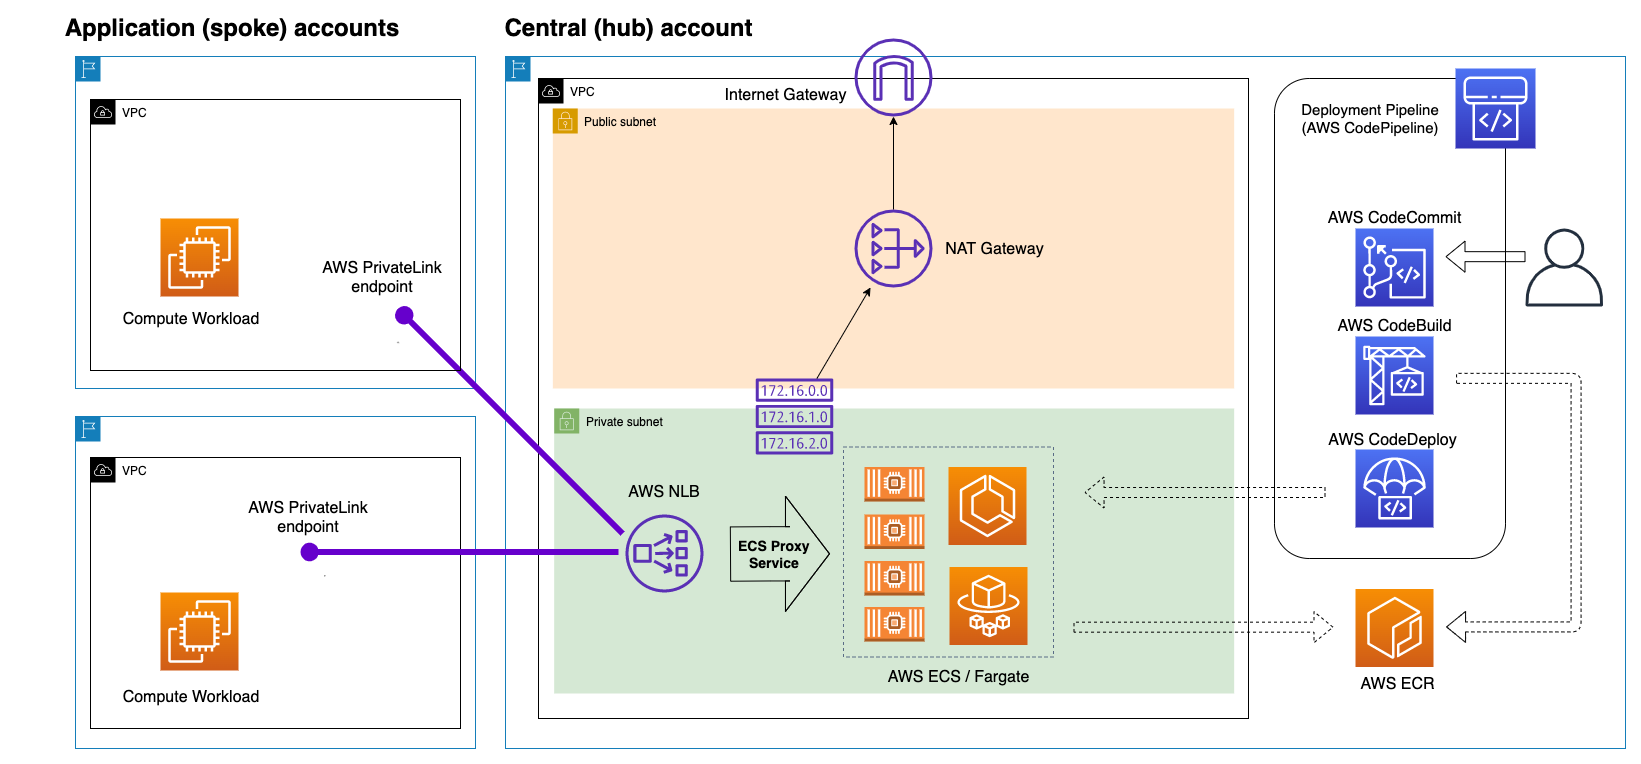
Figure 1: Solution Overview
The endpoint service can be configured to permit individual AWS accounts to use the central proxy service. An optional private DNS name can also be configured for the endpoint service to allow the ‘spoke’ accounts to use a common hostname as their proxy. This allows hosts or applications across different accounts and ‘spoke’ VPCs to be configured to use a common proxy hostname, which resolves to the unique local endpoint within each VPC.
ECS on Fargate running the Squid Proxy Service
The Squid proxy service uses AWS Fargate with Amazon ECS to run a scalable fleet of proxy servers behind a Network Load Balancer. The container image running the squid proxy contains the squid.conf configuration file and the associated allowlist.txt file, which maintains the list of the domains permitted by the proxy service. Both of these files can be updated in the git-based repo to trigger the deployment pipeline described below.
The Network Load Balancer used by ECS is configured as an Endpoint Service powered by AWS PrivateLink. With AWS PrivateLink, service consumers create interface VPC endpoints to connect to endpoint services that are hosted by service providers. The hub account for our solution is the ‘Service Provider’ and the AWS account where the proxy endpoint is deployed is the ‘Service Consumer’.
The Deployment Pipeline
On initial deployment of the solution, AWS CodePipeline uses AWS CodeBuild to build the Squid proxy container using the Dockerfile and configuration files from the AWS CodeCommit repo. The container image is then pushed to the Amazon Elastic Container Registry (ECR) repo, and AWS CodeDeploy is used to deploy the container image to ECS. Any subsequent updates to the squid.conf or allowlist.txt files in CodeCommit will trigger the deployment pipeline to rebuild a new container image and deploy it to ECS using a rolling update to replace the running containers one at a time. The pipeline will complete once all of the running containers have been replaced with a new image.
The Service Consumer (Spoke Accounts)
AWS PrivateLink enables private connectivity between VPCs. The service consumer (the application ‘spoke’ accounts) for this solution will have a ‘proxy endpoint’ deployed inside the VPC which permits internet access to the list of domains permitted in the central account.
The proxy endpoint can be deployed to 1000s of VPCs (within the same region) across any AWS account that has been permitted to use the endpoint service in the list of principals. The permitted principals can be a specific user or role, but for our solution we will leverage the account Amazon Resource Name (ARN) to permit any principal in our consumer account to create an interface endpoint. For more information, review the Configure an endpoint service document.
Deploying the Solution
The solution can be deployed in 4 steps to get you up and running:
- Step 1: Create a CodeCommit repo and stage the Dockerfile and associated configuration files.
- Step 2: Create a Service Linked Role for ECS.
- Step 3: Deploy the solution via the Cloudformation template provided. This solution deploys everything required for the central hub account in the solution overview
- Step 4: Create your VPC endpoint in your spoke account along with an EC2 instance for testing.
Step 1: Create your CodeCommit repo
Create your CodeCommit repo, and stage the configuration files required to build the solution. The configuration files can be found in the following Github Repository.
- Navigate to the AWS CodeCommit console, then choose Create repository.
- Enter a name, optional description, and then choose Create. You will be taken to your repository after creation.

Figure 2: AWS CodeCommit Repository Settings
- Add the 4 configuration files from the Github Repository directly from the console or by cloning the repository to your local computer, creating commits, and uploading the content to the new repository.
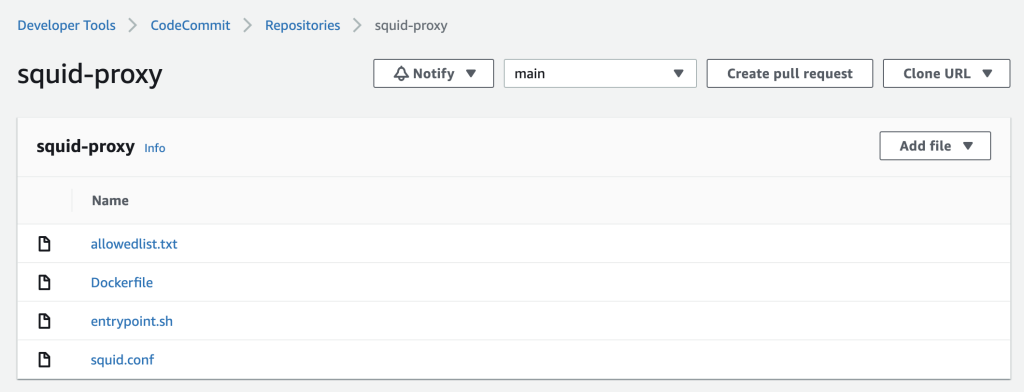
Figure 3: AWS CodeCommit Repository
Step 2: Create the ECS Service Linked Role
If your AWS account does not have the ECS Service link role: AWSServiceRoleForECS, you will need to create the role using the following CLI command:
For additional information, see the Service-linked roles for Amazon ECS guide.
Step 3: Deploy the Proxy Solution using CloudFormation
Use AWS CloudFormation to provision the required resources for the hub account. Select the Launch Stack button below to open the CloudFormation console and create a stack from the template. Then, follow the on-screen instructions.

CloudFormation will create the following resources in your AWS account:
- A Virtual Private Cloud (VPC) with an Internet Gateway
- Public and Private subnets in the VPC
- Two route tables, one for the private subnets and another for the public subnets
- An ECS service using AWS Fargate
- A deployment pipeline consisting of:
- CodeBuild for building the docker container
- CodeDeploy for deploying the container image to ECS
- CodePipeline for orchestrating the end to end build and deployment
- An ECR Repository for the container image
- The required IAM roles and policies
- Cloudwatch Events and Log Groups
The following parameters are required to deploy the CloudFormation stack:
- CodeCommit Repo & Branch name from Step 1
- The Number of AZs to deploy the solution
- Allowed Principles for the Endpoint Service (this will be the AWS account ARN for your service consumer account (ie: where you will deploy the proxy endpoint), eg: arn:aws:iam::<aws-account-id>:root
Using Private DNS (Optional Step)
When you create a VPC endpoint, AWS generates an endpoint-specific DNS hostname that you can use to communicate with the endpoint service. For example: vpce-xxxxxxxxxxxxxxxx.vpce-svc-yyyyyyyyyyyyyyy.eu-west-2.vpce.amazonaws.com.
By default, this is the hostname that your applications can use to proxy internet traffic. As this hostname is unique for every VPC endpoint deployed, using the AWS generated hostname may not be preferable, as the proxy server you direct applications to will differ for every VPC.
An alternative option is to enable Private DNS for your endpoint service and use this private DNS name as the proxy server hostname in every ‘spoke’ account. Enabling private DNS creates a managed AWS Route 53 record for your VPC that resolves the private DNS name to the IPs of the endpoint inside your VPC.
To use the private DNS feature, you must have a registered domain name to verify domain ownership before you can permit your ‘spoke’ accounts to use this hostname. After the domain ownership verification completes, consumers can access the endpoint by using the private DNS name.
As private DNS can be optionally enabled for new or existing endpoint services, the following instructions provide a guide for adding private DNS to the endpoint service after it has been deployed via the CloudFormation template in the previous section:
- Select your Endpoint Service in the VPC console
- Select Actions → Modify private DNS name
- Enable “Associate a private DNS name with the service”
- Enter your private DNS name eg: aws.ssproxy.co.uk
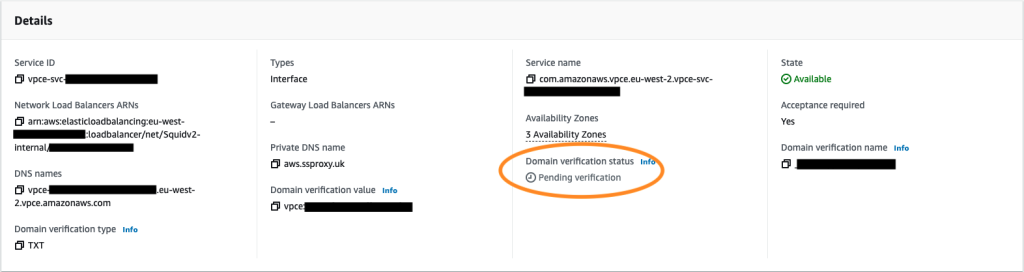
Figure 4: VPC endpoint details -pending verification
The domain verification status will show as ‘pending verification’ and you will be required to use the domain verification name and value shown in the screenshot above to create a TXT record with your DNS provider to verify ownership of the record. To learn more, view the AWS PrivateLink documentation.
After creating the verification TXT record, you will need to wait up to 10 minutes before performing the following actions:
- Select your Endpoint Service in the VPC console
- Select Actions → Verify domain ownership for private DNS name
- Confirm verification
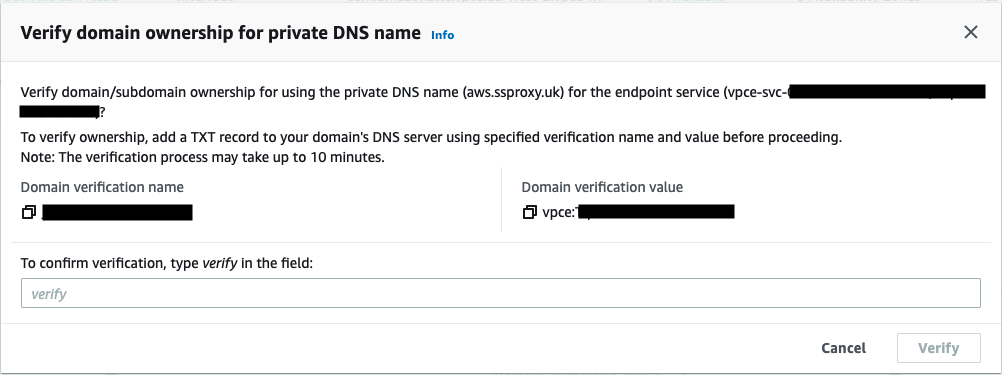
Figure 5: VPC endpoint domain ownership verification
Once verification has been completed, your Domain verification status should change to ‘Verified’.
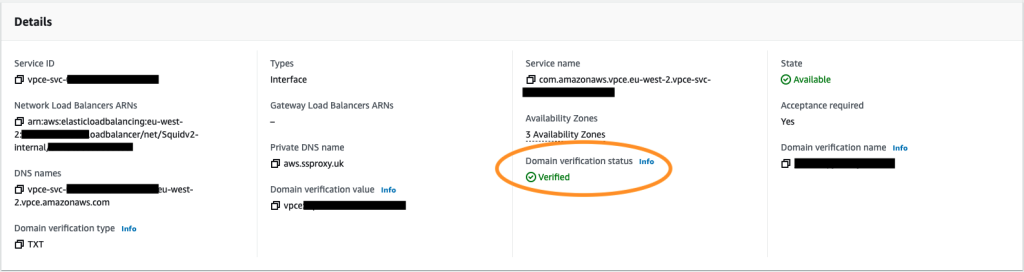
Figure 6: VPC endpoint details – verified domain
Step 4: Deploy the proxy endpoint in your application (spoke) account
The proxy endpoint is deployed into every private VPC where you want to use the proxy service. You will need an existing VPC with an EC2 instance for testing. To deploy the endpoint, follow these steps:
- Log in to the consumer AWS account where you will deploy your proxy endpoint. The account ARN should have been permitted when you ran the CloudFormation stack. If it wasn’t, you can re-deploy the stack, adding the account ARN in the AllowedPrincipalsList parameter.
- In the VPC console, go to endpoints and ‘Create Endpoint’.
- Select ‘Other endpoint services’ and enter the Service Name for the endpoint service provided in the CloudFormation outputs e.g. com.amazonaws.vpce.eu-west-2.vpce-svc-xxxxxxxxxxxxxxxx and click verify.
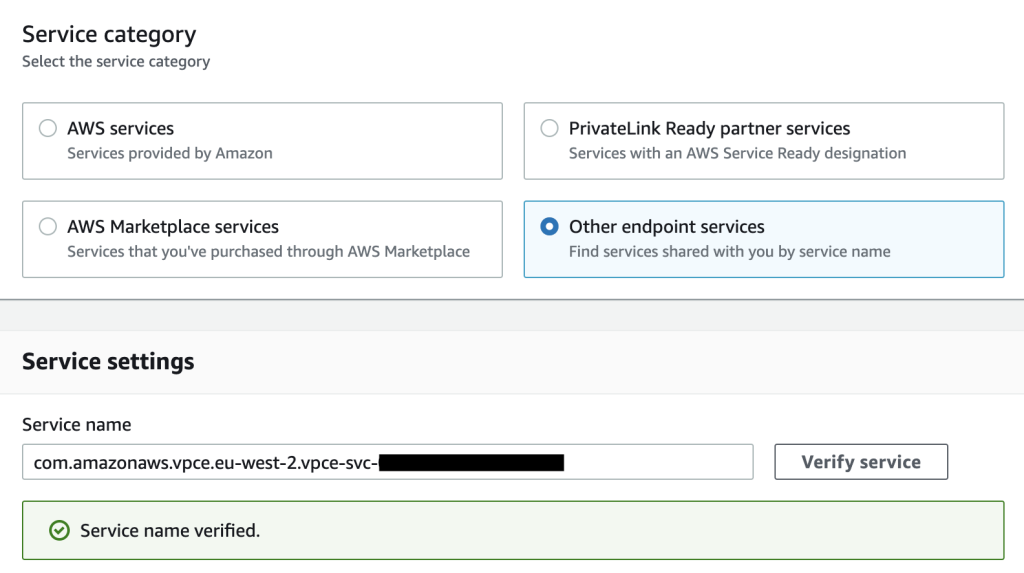
Figure 7: VPC endpoint creation – Service Name verification
- Select your VPC and subnets where the endpoint will be deployed. See the Additional Considerations section for more information about AZ alignment requirements between the provider and consumer accounts.
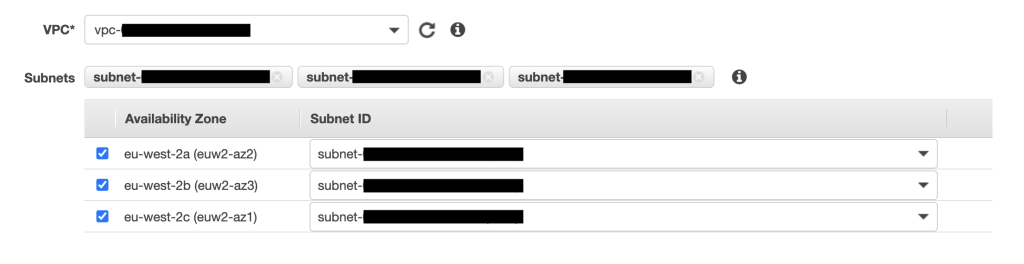
Figure 8: VPC endpoint creation – Subnet selection
- If you enabled private DNS for your endpoint service in the provider account, you can enable the DNS name in the Additional settings section.
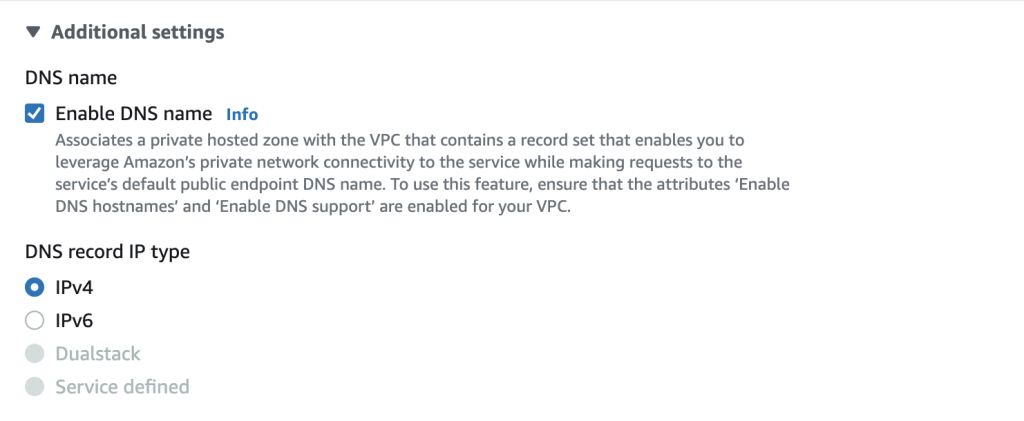
Figure 9: VPC endpoint creation – Enable DNS name
- Add a security group to the endpoint that permits your VPC CIDR or test EC2 instance to communicate with the endpoint via the TCP protocol on port 3128.
- Click Create Endpoint.
Testing the proxy
Deploy a test EC2 instance (Linux) to the VPC where your proxy endpoint was deployed in Step 4. You need to use Session Manager to connect to the instance, as the consumer VPC is private and therefore has no ingress route for SSH. Follow the user guide here to use Session Manager.
From the EC2 terminal, configure the instance to use your proxy using the following export commands:
$ export http_proxy=http://<Proxy-DOMAIN>:<Proxy-Port>
$ export https_proxy=http://<Proxy-DOMAIN>:<Proxy-Port>
eg without private DNS:
$ export http_proxy=http://vpce-0e92264eb3c2d222d-166ar2fp.vpce-svc-0407aa3b85114a062.eu-west-2.vpce.amazonaws.com:3128
$ export https_proxy=http://vpce-0e92264eb3c2d222d-166ar2fp.vpce-svc-0407aa3b85114a062.eu-west-2.vpce.amazonaws.com:3128
eg with Private DNS:
$ export http_proxy=http://aws.ssproxy.uk:3128
$ export https_proxy=http://aws.ssproxy.uk:3128
You can use curl to test that you are able to connect to URLs permitted by your allow list but not to any other URLs. For example:
curl https://aws.amazon.com loads page.
curl https://www.microsoft.com returns 403 error or <!-- ERR_ACCESS_DENIED
Clean up
Don’t forget to clean up the resources to avoid unwanted charges. To delete the resources deployed in this blog, you can follow these steps:
- Navigate to the VPC endpoints section in the ‘spoke’ account and ‘delete’ the proxy endpoint.
- Delete the CloudFormation stack in the hub account.
- Delete the files and CodeCommit repo in the hub account.
Conclusion
In this post we have shown you one of the options available in AWS to build a centralised internet egress solution across a multi-account environment. The solution is based on a fully ‘serverless’ and managed infrastructure solution using AWS Fargate and a deployment pipeline to manage your URL allow list. The solution is scalable across 1000s of AWS accounts and provides granular control and additional security controls, such as proxy-based authentication.
About the Authors

Sanjay Dandeker
Sanjay is a Principal Partner Solutions Architect at AWS. He works with customers and partners in the Financial Services industry to build solutions and capabilities that help highly regulated customers as they move to the cloud.

Saurabh Kothari
Saurabh is Senior Cloud Infrastructure and Application Architect at AWS. He works closely with customer teams in the Financial Services industry to help them build scalable and secure solutions in the AWS cloud.