By Linh Lam, Head of Solutions Architecture – Kubecost
By Jason Janiak, Partner Solutions Architect – AWS
 |
| Kubecost |
 |
In August 2022, Amazon Elastic Kubernetes Service (Amazon EKS) launched a collaboration with Kubecost, a Kubernetes and cloud cost management tool that helps customers to monitor, track, optimize, and govern their cloud and Kubernetes spending.
Kubecost can be installed easily in just a few minutes, but many customers are looking for a cloud-native way to expose Kubecost user interface (UI) for their internal team to access the costs report. This post describes how to authenticate Kubecost users via Application Load Balancer and Amazon Cognito.
Utilizing an Application Load Balancer (ALB) and Amazon Cognito in conjunction with Kubecost allows for Kubecost user authentication via native AWS services, without the need for creating and maintaining a third-party identity management system. Application Load Balancer can handle user registration/authentication and related tasks, while Cognito supports access via username and password or third-party providers.
Kubecost is an AWS Partner and AWS Marketplace Seller that provides real-time cost visibility and insights for teams using Kubernetes, helping you continuously reduce your cloud costs.
Solution Overview
This architecture provides an overview of the process in which Kubecost ingests, reconciles, and prepares data. During the process in which authentication occurs via Application Load Balancer and Amazon Cognito, Kubecost exposes an endpoint via ALB and users are directed to Cognito. They are registered or authenticated, and redirected to ALB.
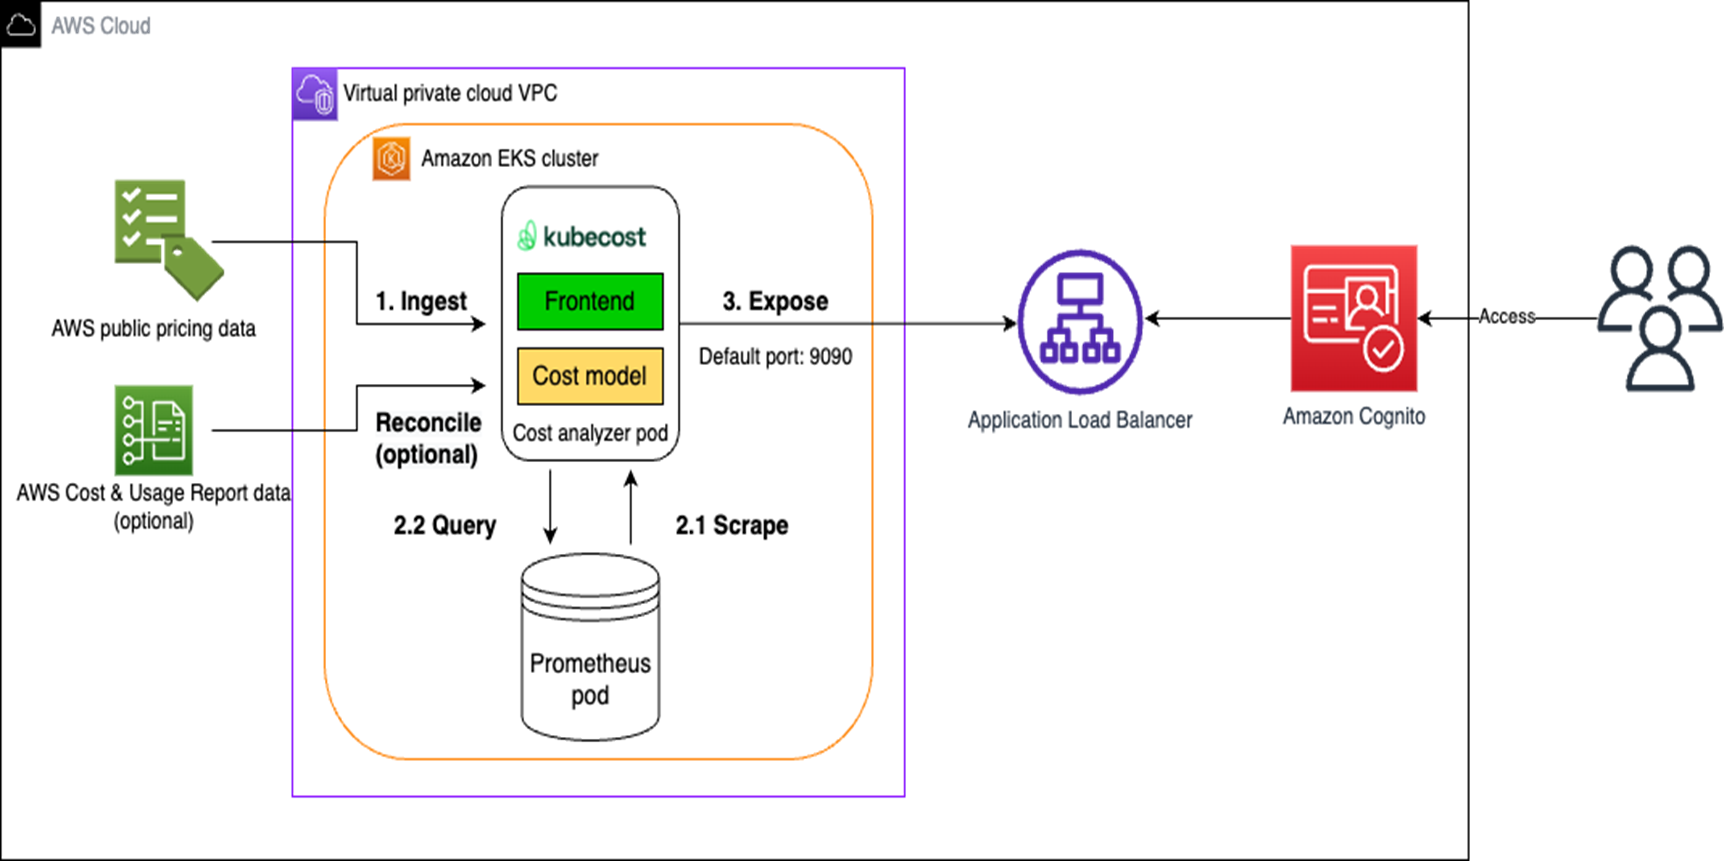
Figure 1 – Kubecost ingestion, reconciliation, and data preparation.
Walkthrough
The following steps outline the process for configuring Amazon Cognito and an Application Load Balancer with Kubecost:
- Set environmental variables
- Create public certificate
- Amazon Route 53 record creation
- Amazon Cognito configuration
- External domain name system (DNS) deployment
- Expose Kubecost via ALB and integrate with Cognito
- Cleanup
- Conclusion
Prerequisites
This walkthrough can be completed either using the AWS Command Line Interface (CLI) or AWS CloudShell. For this walkthrough, you should have the following prerequisites:
- Existing Amazon EKS cluster with Kubecost pre-installed
- External domain name for use with this demo, in conjunction with Kubecost
- AWS load balancer controller
- IAM permissions for these AWS services:
- Amazon EKS
- Amazon Route 53
- AWS Certificate Manager
- Amazon Cognito
- Application Load Balancer
- Tools to be installed/used either locally or via AWS CloudShell:
Set Environmental Variables
Below are the variables that will be referenced in this demo; please update per your requirements. Guidance for setting persistent variables can be found in the following articles:
Bash

AWS_REGION=ap-northeast-2 #Change this to match your region

ACCOUNT_ID=$(aws sts get-caller-identity --query 'Account' --output text)

EKS_CLUSTER_NAME=YOUR_EKS_CLUSTER_NAME #Change this to match your cluster name

MY_DOMAIN=example.com #Change this to match your domain name
HOSTED_ZONE_ID=Z08358793I6A34JGOVZFS #Change this to match your Route 53 hosted zone ID
Create Public Certificate
In this demo, when users visit the Kubecost app at ‘https://demo.example.com’ (reference your domain name) then Amazon Route 53 routes traffic to the Application Load Balancer that exposes the Kubecost application. We’ll use AWS Certificate Manager to create a TLS certificate to use with the ALB.
Run the following command in your workspace to create a public certificate:
Bash
ACM_CERT_ARN=$(aws acm request-certificate \
  --domain-name demo.${MY_DOMAIN} \
  --validation-method DNS \
  --idempotency-token 1234 \
  --options CertificateTransparencyLoggingPreference=DISABLED \
  --region $AWS_REGION \
  --query 'CertificateArn' \
  --output text)
Route 53 Record/ACM Validation
Run the following command in your workspace to create a record in your appropriate Route 53 hosted zone so ACM can validate the new certificate:
Bash
cat << EOF > validate_acm_cert_dns.json
{
   "Changes":[
      {
         "Action": "UPSERT",
         "ResourceRecordSet":{
            "Name": "$(aws acm describe-certificate --certificate-arn $ACM_CERT_ARN --query 'Certificate.DomainValidationOptions[].ResourceRecord[].Name' --region $AWS_REGION --output text)",
            "Type": "CNAME",
            "TTL": 300,
            "ResourceRecords": [
               {
                  "Value": "$(aws acm describe-certificate --certificate-arn $ACM_CERT_ARN --query 'Certificate.DomainValidationOptions[].ResourceRecord[].Value' --region $AWS_REGION --output text)"
               }
            ]
         }
      }
   ]
 }
EOF
aws route53 change-resource-record-sets \
  --hosted-zone-id $HOSTED_ZONE_ID \
  --change-batch file://validate_acm_cert_dns.json --region $AWS_REGION
Bash
Wait for a few minutes and verify the certificate has been validated. The output of following command should be ‘ISSUED’:
Bash
aws acm describe-certificate \
  --certificate-arn $ACM_CERT_ARN \
  --region $AWS_REGION \
  --query 'Certificate.Status' --region $AWS_REGION
Cognito Configuration
When a user registers to access the demo Kubecost application, their information is stored in the Amazon Cognito user pool. These user pools also provide a pre-built login/registration page to sign in and register users.
Run the following command in your workspace to create an Amazon Cognito user pool:
Bash
COGNITO_USER_POOL_ID=$(aws cognito-idp create-user-pool \
  --pool-name kubecost-demo \
  --username-attributes email \
  --username-configuration=CaseSensitive=false \
  --region $AWS_REGION \
  --query 'UserPool.Id' \
  --auto-verified-attributes email \
  --account-recovery-setting 'RecoveryMechanisms=[{Priority=1,Name=verified_email},{Priority=2,Name=verified_phone_number}]' \
  --output text)
Next, run the following command in your workspace to create an Amazon Cognito user pool app client:
Bash
COGNITO_USER_POOL_CLIENT_ID=$(aws cognito-idp create-user-pool-client \
  --client-name kubecost-demo-app-client \
  --user-pool-id $COGNITO_USER_POOL_ID \
  --generate-secret \
  --region $AWS_REGION \
  --query 'UserPoolClient.ClientId' \
  --output text
Update the below reference to your domain name. Run the following command in your workspace to configure the app client:
Bash
aws cognito-idp update-user-pool-client \
  --client-id $COGNITO_USER_POOL_CLIENT_ID \
  --user-pool-id $COGNITO_USER_POOL_ID \
  --region $AWS_REGION \
  --allowed-o-auth-flows code \
  --callback-urls https://demo.example.com/oauth2/idpresponse \ #Change this to match your domain name
  --allowed-o-auth-flows-user-pool-client \
  --allowed-o-auth-scopes openid \
  --supported-identity-providers COGNITO
now, create the hosted Amazon Cognito domain for the registration page to sign in and sign up users. Run the following command in your workspace to configure Cognito domain:
Bash
COGNITO_DOMAIN=(kubecost-demo-$(whoami))
aws cognito-idp create-user-pool-domain \
  --user-pool-id $COGNITO_USER_POOL_ID \
  --region $AWS_REGION \
  --domain $COGNITO_DOMAIN
External DNS Deployment
ExternalDNS is an open source Kubernetes controller that helps you to create an ‘alias record’ in Route 53 for DNS management automatically.
Create an AWS Identity and Access Management (IAM) policy to allow ExternalDNS controller to update your Route 53 DNS record.
Note that if you deploy this in your production environments, you can consider scoping the policy to a specific hosted zone IDs. The following IAM policy is for demo purpose only.
Run the following command in your workspace to create an IAM policy:
Bash
cat << EOF > external_dns.json
{
  "Version": "2012-10-17",
  "Statement": [
    {
      "Effect": "Allow",
      "Action": [
        "route53:ChangeResourceRecordSets"
      ],
      "Resource": [
        "arn:aws:route53:::hostedzone/*"
      ]
    },
    {
      "Effect": "Allow",
      "Action": [
        "route53:ListHostedZones",
        "route53:ListResourceRecordSets"
      ],
      "Resource": [
        "*"
      ]
    }
  ]
}
EOF
aws iam create-policy \
    --policy-name kubecost-demo-route53-policy \
    --policy-document file://external_dns.json
Bash
You can create an IAM role service account with the above policy. Note that you need to verify IAM Open ID Connect provider for cluster created, and/or create accordingly.
Run the following command in your workspace to create IAM roles for service accounts:
eksctl create iamserviceaccount \
  --cluster=$EKS_CLUSTER_NAME \
  --namespace=kubecost \
  --name=external-dns \
  --attach-policy-arn=arn:aws:iam::${ACCOUNT_ID}:policy/kubecost-demo-route53-policy \
  --region $AWS_REGION \
  --approve --override-existing-serviceaccounts
Run the following command to install ExternalDNS:
Bash
cat << EOF > cognito-external-dns.yaml
apiVersion: rbac.authorization.k8s.io/v1
kind: ClusterRole
metadata:
  name: external-dns
rules:
- apiGroups: [""]
  resources: ["services","endpoints","pods"]
  verbs: ["get","watch","list"]
- apiGroups: ["extensions","networking.k8s.io"]
  resources: ["ingresses"]
  verbs: ["get","watch","list"]
- apiGroups: [""]
  resources: ["nodes"]
  verbs: ["list","watch"]
---
apiVersion: rbac.authorization.k8s.io/v1
kind: ClusterRoleBinding
metadata:
  name: external-dns-viewer
roleRef:
  apiGroup: rbac.authorization.k8s.io
  kind: ClusterRole
  name: external-dns
subjects:
- kind: ServiceAccount
  name: external-dns
  namespace: kubecost
---
apiVersion: apps/v1
kind: Deployment
metadata:
  name: external-dns
  namespace: kubecost
spec:
  strategy:
    type: Recreate
  selector:
    matchLabels:
      app: external-dns
  template:
    metadata:
      labels:
        app: external-dns
    spec:
      serviceAccountName: external-dns
      containers:
      - name: external-dns
        image: k8s.gcr.io/external-dns/external-dns:v0.13.2
        args:
        - --source=service
        - --source=ingress
        - --domain-filter=demo.${MY_DOMAIN}
        - --provider=aws
        - --policy=sync
        - --aws-zone-type=public
        - --registry=txt
        - --txt-owner-id=${HOSTED_ZONE_ID}
      securityContext:
        fsGroup: 65534
EOF
kubectl apply -f cognito-external-dns.yaml
Next, run the following command to confirm the ExternalDNS deployment by verifying the logs:
Bash
kubectl logs -f $(kubectl get po -n kubecost | egrep -o 'external-dns[A-Za-z0-9-]+') -n kubecost
You should see the expected results looks like the following example:
Bash
time="2023-02-09T18:44:15Z" level=info msg="Applying provider record filter for domains: [test.kubecost.io. .test.kubecost.io.]"
time="2023-02-09T18:44:15Z" level=info msg="All records are already up to date"
time="2023-02-09T18:45:16Z" level=info msg="Applying provider record filter for domains: [test.kubecost.io. .test.kubecost.io.]"
time="2023-02-09T18:45:16Z" level=info msg="All records are already up to date"
time="2023-02-09T18:46:17Z" level=info msg="Applying provider record filter for domains: [test.kubecost.io. .test.kubecost.io.]"
time="2023-02-09T18:46:17Z" level=info msg="All records are already up to date"
Expose Kubecost Deployment and Integrate with Cognito
Next, we’ll create an internet-facing Application Load Balancer to expose Kubecost. The ALB controller helps create appropriate listeners, rules, and integrates with Amazon Cognito. It uses the ACM certificates created previously.
You can learn more about Ingress annotations, that align with this implementation.
Bash
cat << EOF > kubecost_ingress.yaml
apiVersion: networking.k8s.io/v1
kind: Ingress
metadata:
  name: demo.${MY_DOMAIN}
  namespace: kubecost
  annotations:
    kubernetes.io/ingress.class: alb
    alb.ingress.kubernetes.io/scheme: internet-facing
    alb.ingress.kubernetes.io/tags: Environment=test,Project=cognito
    external-dns.alpha.kubernetes.io/hostname: demo.${MY_DOMAIN}
    alb.ingress.kubernetes.io/listen-ports: '[{"HTTPS":443}]'
    alb.ingress.kubernetes.io/actions.ssl-redirect: '{"Type": "redirect", "RedirectConfig": { "Protocol": "HTTPS", "Port": "443", "StatusCode": "HTTP_301"}}'
    alb.ingress.kubernetes.io/auth-type: cognito
    alb.ingress.kubernetes.io/auth-scope: openid
    alb.ingress.kubernetes.io/auth-session-timeout: '3600'
    alb.ingress.kubernetes.io/auth-session-cookie: AWSELBAuthSessionCookie
    alb.ingress.kubernetes.io/auth-on-unauthenticated-request: authenticate
    alb.ingress.kubernetes.io/auth-idp-cognito: '{"UserPoolArn": "$(aws cognito-idp describe-user-pool --user-pool-id $COGNITO_USER_POOL_ID --region $AWS_REGION --query 'UserPool.Arn' --output text)","UserPoolClientId":"${COGNITO_USER_POOL_CLIENT_ID}","UserPoolDomain":"${COGNITO_DOMAIN}.auth.${AWS_REGION}.amazoncognito.com"}'
    alb.ingress.kubernetes.io/certificate-arn: $ACM_CERT_ARN
    alb.ingress.kubernetes.io/target-type: 'ip'
spec:
  rules:
    - host: demo.${MY_DOMAIN}
      http:
        paths:
          - path: /
            pathType: Prefix
            backend:
              service:
                name: kubecost-cost-analyzer
                port:
                  number: 9090
EOF
kubectl apply -f kubecost_ingress.yaml
You have successfully completed the integration with Amazon Cognito!
To verify the integration, you can access the https endpoint in your browser and register an account to login. Retrieve the https endpoint URL using the following command:
Bash
Echo demo.${MY_DOMAIN}
Cleanup
To avoid incurring future charges, clean up resources used as part of this, if no longer needed.
kubectl -n sample delete ingress ${MY_DOMAIN}
kubectl delete ns sample helm delete aws-load-balancer-controller -n kube-system
cat << EOF > validate_acm_cert_dns.json
{
   "Changes":[
      {
         "Action": "DELETE",
         "ResourceRecordSet":{
            "Name": "$(aws acm describe-certificate --certificate-arn "Your ARN" --query 'Certificate.DomainValidationOptions[].ResourceRecord[].Name' --region $AWS_REGION --output text)",
            "Type": "CNAME",
            "TTL": 300,
            "ResourceRecords": [
               {
                  "Value": "$(aws acm describe-certificate --certificate-arn "Your ARN" --query 'Certificate.DomainValidationOptions[].ResourceRecord[].Value' --region $AWS_REGION --output text)"
               }
            ]
         }
      }
   ]
 }
EOF
aws route53 change-resource-record-sets \
  --hosted-zone-id $HOSTED_ZONE_ID \
  --change-batch file://validate_acm_cert_dns.json --region $AWS_REGION
aws route53 delete-hosted-zone --id $HOSTED_ZONE_ID
aws acm delete-certificate --certificate-arn “Your ARN” --region $AWS_REGION
eksctl delete iamserviceaccount --cluster $EKS_CLUSTER_NAME --name external-dns --namespace sample --region $AWS_REGION
eksctl delete iamserviceaccount --cluster $EKS_CLUSTER_NAME --name aws-load-balancer-controller --namespace “Your Namespace” --region $AWS_REGION
aws cognito-idp delete-user-pool-domain --domain “Your Domain” --user-pool-id “Your ID” --region $AWS_REGION
aws cognito-idp delete-user-pool “Your ID” --region $AWS_REGION
eksctl delete cluster --name $EKS_CLUSTER_NAME --region $AWS_REGION
aws iam delete-policy --policy-arn “Your ARN”
Conclusion
This post has shown how to leverage Kubecost with Application Load Balancer and Amazon Cognito for user authentication. This will streamline the process for user registration and authentication, and do so without the need for deploying or managing a third-party identity management solution.
This approach also saves time and effort by not having to invest in development cycles to build out the process.
You can learn more about Kubecost in AWS Marketplace.
.

.
Kubecost – AWS Partner Spotlight
Kubecost is an AWS Partner that provides real-time cost visibility and insights for teams using Kubernetes, helping you continuously reduce your cloud costs.
Contact Kubecost | Partner Overview | AWS Marketplace