AWS Partner Network (APN) Blog
Federated Access to AWS Single Sign-On with CyberArk Workforce Identity
By Roy Rodan, Sr. Partner Solutions Architect – AWS
 |
| CyberArk |
 |
AWS Single Sign-On (AWS SSO) is where you create or connect your workforce identities in Amazon Web Services (AWS) once and manage access centrally across your AWS Organization.
We recently announced a new integration with CyberArk Workforce Identity to provide simplified access management and provisioning to AWS.
As a supported identity provider (IdP) for AWS SSO, CyberArk Workforce Identity enables you to manage AWS user identities outside of AWS and give these users permissions to access AWS resources across all of your AWS Organizations accounts.
With this integration, you can have a single point of truth for all enterprise identities and enforce consistent management of users, groups, permissions, and access policies while reducing redundancies and errors.
AWS SSO allows customers to efficiently manage user identities at scale by establishing a single identity and access strategy across their own applications, third-party applications (SaaS), and AWS environments.
Benefits of using CyberArk Workforce Identity as an external IdP for AWS SSO are:
- Centralized management of your enterprise and AWS identities to ensure consistent configuration, control, and reduction of errors across systems. With this integration, you don’t need to manually create and maintain user identities in AWS Identity and Access Management (IAM).
- Improved user experience with federated access to AWS accounts sing Security Assertion Markup Language (SAML). Once set up, users can access different roles in AWS accounts with just two clicks without reauthentication.
- Streamlined provisioning using System for Cross-domain Identity Management (SCIM); once connectivity is established, changes to user attributes are automatically synched and access to AWS accounts can be added or removed as users change roles.
- Leveraging Attribute-Based Access Control (ABAC) to provide granular access control to resources based on session tags.
In this post, I will explore the integration of AWS SSO with CyberArk Workforce Identity. CyberArk is an AWS Security Competency and global leader in privileged access security.
The steps we’ll take are:
- Setting up CyberArk Workforce Identity application with AWS SSO.
- Configuring AWS SSO to use CyberArk Workforce Identity as an identity source using SAML.
- Setting up SCIM between AWS SSO and CyberArk Workforce Identity.
Configurating CyberArk Workforce Identity
- Sign in to the CyberArk Workforce Identity admin portal.
- Choose Apps, Web Apps.
- Choose Add Web App.
- Search for AWS Single Sign-On, and choose Add.

Figure 1 – CyberArk Workforce Identity admin portal application selection.
- In the AWS SSO application you just created, go to Trust to set up SAML.
- At the top, under Identity Provider Configuration, copy the IdP Entity ID and Single Sign-On URL to be used later to set up AWS SSO.
- Download the Certificate to be used later in AWS SSO.
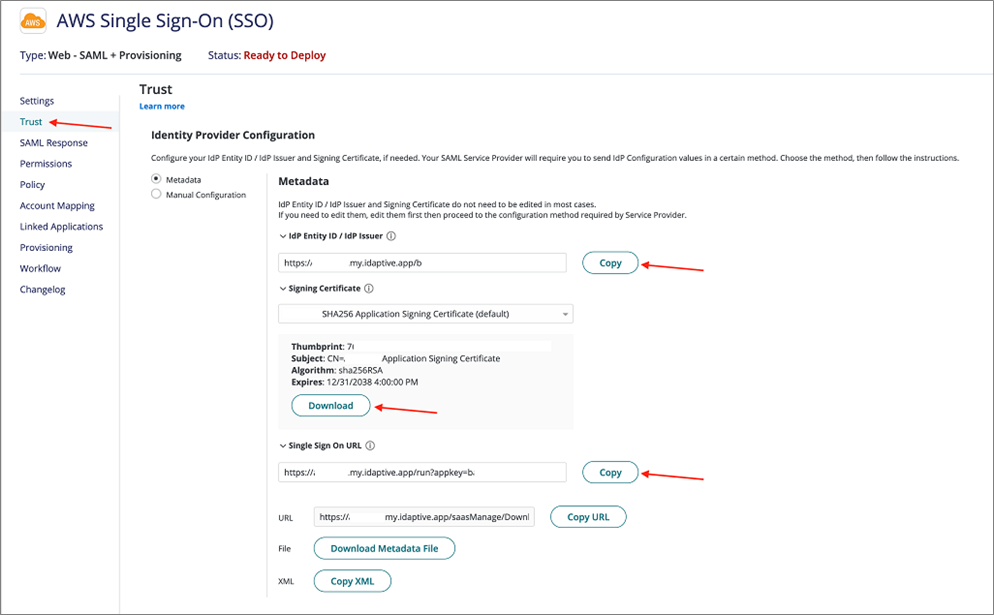
Figure 2 – CyberArk Workforce Identity admin portal IdP SAML settings.
Configuring New External Identity Provider
- Log in to your AWS account and go to the Single Sign-On service.
- Within AWS SSO, go to the Settings page and choose Change in the Identity Source.

Figure 3 – Changing the identity source in AWS SSO.
- In the Change Identity Source page, choose External Identity Provider.
- Under the Service provider metadata, expand the view to see all of the values and copy AWS SSO ACS URL and AWS SSO issuer URL to be used later in CyberArk AWS SSO application configuration.
- Under the Identity provider metadata section, paste the Single Sign-ON URL and IdP Entity ID you copied from CyberArk to the IdP sign-in URL and IdP issuer URL fields, respectively.
- Upload the CyberArk certificate you downloaded earlier to the IdP certificate and then choose Next: Review.

Figure 4 – Setting up identity provider configuration AWS SSO.
- On the next screen, type ACCEPT to Changes identity source.
CyberArk Workforce Identity – Configuring AWS SSO Application
- Back in the CyberArk admin portal where you have the AWS SSO app configured, under the Trust section go to the Service Provider Configuration and choose Manual Configuration.
- Paste the AWS SSO issuer URL you copied from AWS SSO in the SP Entity ID/ SP Issuer/Audience field.
- Paste the AWS SSO CS URL you copied from AWS SSO in the Assertion Consumer Service (ACS) URL field.
- The Recipient field should be the same as the ACS URL.
- Make sure the NameID Format is set to emailAddress.
- Choose Save Settings.

Figure 5 – CyberArk Workforce Identity admin portal SP SAML configuration.
AWS SSO – Setting Up SCIM
- In AWS SSO, go to the Settings page and choose Enable automatic provisioning.

Figure 6 – Enable SCIM in AWS SSO.
- Copy the SCIM endpoint and Access token; note that after closing this window the Access token cannot be viewed again and a new key will be needed.

Figure 7 – Copy SCIM value in AWS SSO.
CyberArk Workforce Identity – Configuring SCIM
- Return to the CyberArk Workforce Identity admin portal. Go to the Provisioning tab and check the box to Enable Provisioning for this application.
- Make sure the Authentication Type is Authorization Header and the Header Type is Bearer Token.
- Paste the SCIM endpoint from AWS SSO in the SCIM service URL field. Important: Make sure to remove the trailing “/”.
- Paste the Access token from AWS SSO in the Bearer Token field.
- Choose Verify to make sure the setting is correct and the link is up.
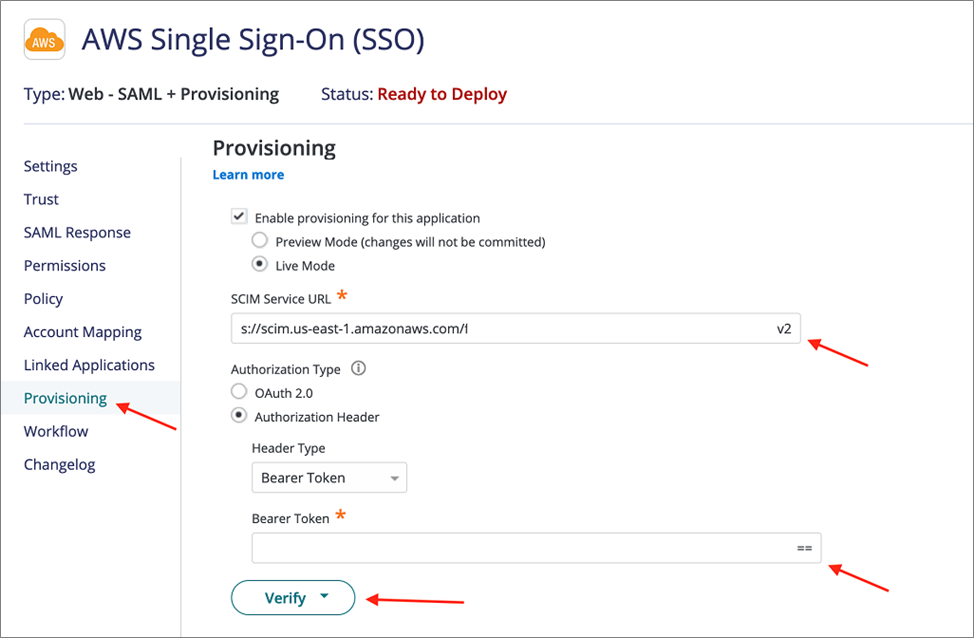
Figure 8 – Setting up provisioning in CyberArk Workforce Identity portal.
- At the bottom of the Provisioning page you can choose your sync options and add Role Mapping.

Figure 9 – Sync options and Role Mapping in CyberArk portal.
- When you select the sync group option, all of the groups from the AD will be synced and the group membership of the role (added in role mapping below screenshot) will be synced.
- AWS SSO is using the terminology of “groups” while in CyberArk the equivalent is “roles.” At the bottom of the Provisioning page you have the option to map CyberArk Role to an AWS Group, add the relevant Roles you want to be synchronized via SCIM and the synchronization rules.
- The destination group section is not mandatory.
- For SCIM sync you can either force an immediate sync between CyberArk Workforce Identity and AWS SSO, schedule a time to sync, or let CyberArk Workforce Identity sync identities based on changes to the user or role configuration. To do so, go to Settings and then Users, choose Outbound Provisioning, and either choose Start Sync or set a daily sync interval.

Figure 10 – SCIM sync configuration in CyberArk Workforce Identity portal.
- Lastly, to deploy and enable this new application you need to assign it to certain roles or users. Go to the Permissions tab and choose Add.
- Search and choose which users and roles you want to have permissions for this application and then Add them.
- Once this step is completed you’ll see the status change from Ready to Deploy to Deployed

Figure 11 – Adding permissions to the application.
AWS SSO – Confirm Configuration
- In the AWS SSO console, go to the Users and then Groups tabs and make sure the users and roles you set up in CyberArk Workforce Identity are showing with the correct attributes.

Figure 12 – Group sync in AWS SSO console.
- When you go into the user configuration, you’ll be able to see if it was manually created or if it was synched via SCIM as expected by looking at the Updated By field.
- Now, all you need to do is to set up the user, permission sets, and accounts they have access to in AWS SSO; this is covered in the AWS documentation.
Conclusion
Integrating CyberArk Workforce Identity with AWS Single Sign-On (AWS SSO) is easy and provides centralized, secured access and identity management across CyberArk and AWS accounts.
With this integration, you can have a single point of truth for all enterprise identities and enforce consistent management of users, groups, permission sets, and access policies while reducing redundancies and errors.
In addition, end users will have a single sign-on experience to access all of their assigned AWS accounts and services, and they can use their corporate credentials to log into the AWS Management Console, AWS Command Line Interface (CLI), and AWS mobile app.
Security teams gain visibility into access activities and improve operational efficiencies by eliminating the need for multiple identity siloes.
Additional Resources
- More information about CyberArk Workforce Identity
- CyberArk AWS integration announcement blog post
- CyberArk AWS integration documentation
- AWS-supported identity providers
.

.
CyberArk – AWS Partner Spotlight
CyberArk is an AWS Competency Partner and global leader in privileged access security, a critical layer of IT security to protect data, infrastructure, and assets across the enterprise.
Contact CyberArk | Partner Overview | AWS Marketplace
*Already worked with CyberArk? Rate the Partner
*To review an AWS Partner, you must be a customer that has worked with them directly on a project.