AWS Partner Network (APN) Blog
Integrating Your SaaS Control Plane with AWS Marketplace
By Toby Buckley, Sr. Partner Solutions Architect – AWS SaaS Factory
By Ujwal Bukka, Sr. Partner Solutions Architect – AWS SaaS Factory
Software as a service (SaaS) providers often view AWS Marketplace as a key channel for listing and selling their offerings. To simplify the listing process, AWS created a serverless quick start solution that fulfills some of the core integration requirements of AWS Marketplace, including accepting new customer registrations and reporting metered usage.
Connecting the quick start to your actual SaaS application, however, is something that you, the SaaS provider, are still responsible for.
In this post, we’ll build on the foundation the quick start provides, and offer some strategies for completing this integration. We’ll cover some techniques to support the automation of onboarding new tenants into your SaaS application, as well as a strategy for leveraging the billing capabilities of AWS Marketplace to charge for usage.
Prerequisites
The techniques in this post assume you have registered as a seller, and have created your SaaS application’s listing in AWS Marketplace. We also assume you’ve installed and configured the AWS Marketplace Serverless SaaS quick start to accomplish the requisite AWS Marketplace API integration.
For instructions on these steps, refer to the following resources:
- 7 tips to successfully submit your product listing in AWS Marketplace
- Best practices to successfully list your SaaS contract solution in AWS Marketplace
- Using AWS Marketplace SaaS quick start to simplify your SaaS integration
Integration Overview
AWS Marketplace exposes a number of APIs you must integrate with as a SaaS provider. Fortunately, the quick start does much of this integration on your behalf. However, the quick start is a general integration solution, and requires additional code in order to get your specific SaaS application connected.
Please refer to the following diagram where we provide an example of one such integration.
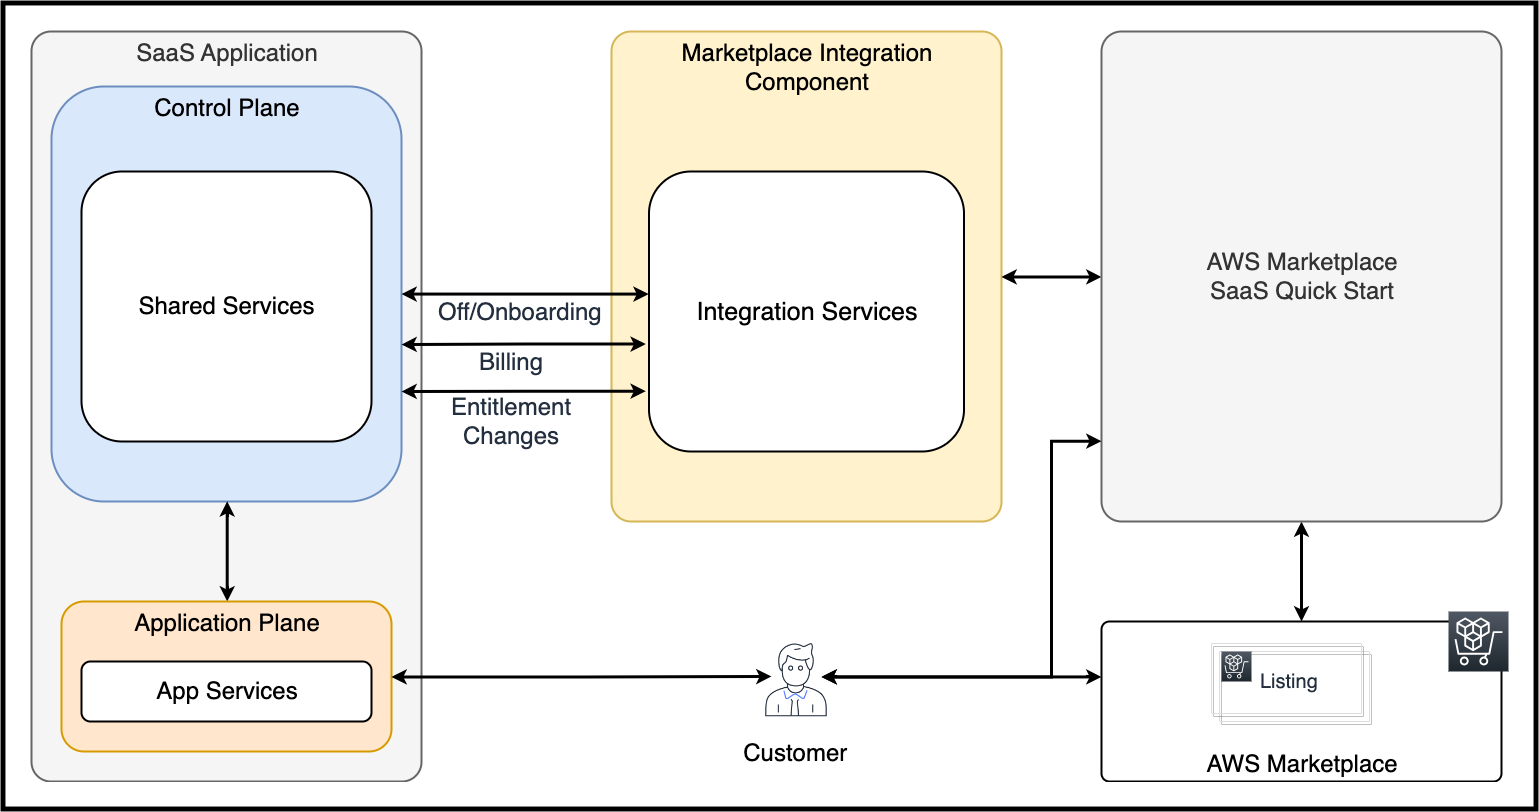
Figure 1 – Solution overview.
On the right side of Figure 1, the quick start provides a simple registration website to capture prospective tenant details, as well as the messaging infrastructure required to receive and respond to customer events. It also provides a mechanism for sending billing data back to AWS Marketplace. We dive deep into the inner workings of the billing integration later in this post.
On the left side is our SaaS application. For this post, we’ll refer to AWS SaaS Factory’s serverless SaaS reference architecture as a sample application. Although not a production SaaS application, it provides a solid technical foundation for many SaaS concepts, and gives you a real-life example and control plane to build on.
The middle box in Figure 1 (labeled “Marketplace Integration Component”) provides the glue between the quick start (and by extension AWS Marketplace) and our SaaS application. This is where the custom integration code lives. In this example, the integration code is implemented primarily using Amazon EventBridge.
Subscription Workflow
We’re going to begin by looking at the messages that flow between our SaaS application and the quick start. An in-depth overview of the quick start is out of scope for this post; we encourage you to refer to the GitHub repo for a deeper understanding of what it’s doing and how it does it.
The following diagram is an overview of the onboarding flow.
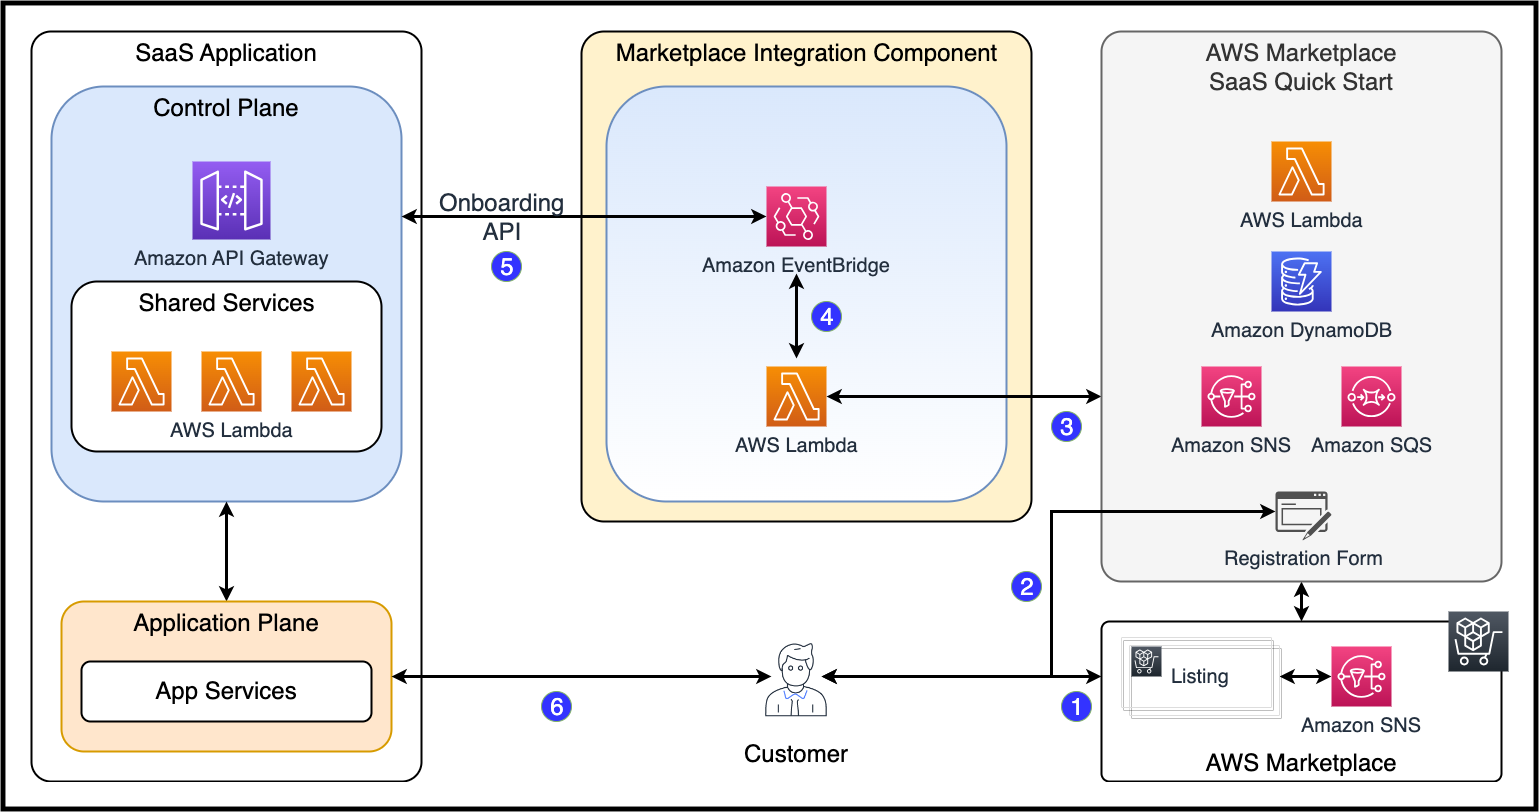
Figure 2 – Onboarding flow.
AWS Marketplace produces several types of events in response to customer activity such as subscribing or changing entitlements. The events are fairly chatty in nature, and can mean different things depending on where a customer is in the signup process (Step 1 and Step 2 in Figure 2). The quick start’s business logic understands these nuances and publishes a different, essentially distilled, version of notifications that our SaaS application will act upon (Step 3).
Note that the quick start is deployed with an AWS CloudFormation template. One of the resources created in the stack is an Amazon Simple Notification (SNS) topic with a resource name of “SupportSNSTopic.”
The following is a sample onboarding notification the quick start publishes to that topic. Notice it has an event type, followed by a colon, followed by the event detail packaged as JSON.
Our integration begins by connecting an AWS Lambda handler to the “SupportSNSTopic” (Step 3). The following code is a snippet of that handler:
This handler parses out everything before the opening curly brace as the event’s DetailType, and then forwards the entirety of the JSON message as the event detail to Amazon EventBridge (Step 4). EventBridge allows you define rules which specify the criteria for matching events; then, once matched, it forwards those events to a target of your choosing using little to no custom code.
The following CloudFormation snippet defines the EventBridge rule that listens to customer onboarding events:
This rule is listening to events that show up with a source attribute of aws-marketplace-serverless-quickstart, and have a detail-type of “New AWS Marketplace Subscriber” which is the same event type we received on the “SupportSNSTopic” detailed previously. When a rule matches, EventBridge can send the event to one or many targets. Note that EventBridge supports many different target types.
For this example, we forward the event to a single endpoint: the onboarding API in our SaaS application’s control plane. We use EventBridge’s API destination target type to make that connection.
Although the quick start’s onboarding event includes all of the information our onboarding API requires, it requires some massaging before we can send it to our onboarding API. Fortunately, EventBridge also gives us the ability transform event data to match target needs, as seen in the InputTransformer portion of the rule. The InputPathsMap section of the transformer populates variables based on incoming event data.
The InputTemplate defines the shape of the data after it leaves the transformer, and is provided as input to the API destination. The angle-bracketed values refer to the variables we populated from event data.
Notice our API is expecting the tenant’s name, email, phone number, and customer identifier. The customer identifier is a random string generated by AWS Marketplace when we onboard customers into our SaaS application. We need this customer identifier later when we discuss billing.
With this rule in place and connected to the appropriate event source, whenever we receive a new subscription event from the quick start, we call our Onboarding API with a tenant-specific payload (Step 5). Although not detailed in this post, we perform a similar integration for our “Unsubscribe” and “ChangeEntitlement” events.
Billing Workflow
The quick start already provides much of the infrastructure needed to get billing data back to AWS Marketplace. The quick start deploys an Amazon DynamoDB table into your environment specifically for recording billing data. It monitors this table and periodically sends new billing records to the appropriate AWS Marketplace API, marking records as sent as appropriate.
The quick start expects billing records to be in a particular format (for more information, refer to meter for usage). The following is a sample of that format:
The dimension_usage key is used to record tenant usage according to the specific billing configuration you set up when you created your AWS Marketplace listing. Notice it contains an array of objects, and each include a dimension key.
The value for this key must correlate to the pricing dimensions specified when you create your AWS Marketplace SaaS product listing. The following screenshot shows the dimensions we defined when creating our listing.
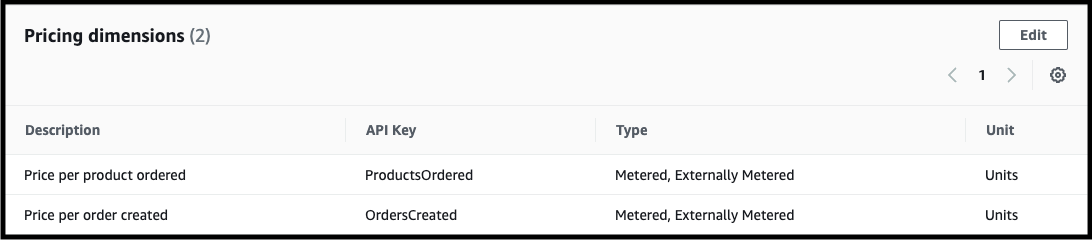
Figure 3 – Pricing dimensions defined.
The value of the customerIdentifier key here is the same string that AWS Marketplace returned when we onboarded our tenant. For convenience, we store this customer identifier, along with our application’s tenant ID, so we can look one up from the other.
The following diagram depicts the end-to-end billing integration.

Figure 4 – Billing flow.
In Step 1, our SaaS application (again, just an installation of the AWS SaaS Factory serverless reference architecture), records billing events as metrics in Amazon CloudWatch. These metrics are sent in the embedded metric format (EMF), which is a JSON specification that makes it easy to query metric values embedded in structured log events, which we take advantage of in the implementation of our tenant consumption service.
The following is a product metric sample:
In Step 2, a scheduled EventBridge rule is fired. The target of this rule is a Lambda function with authorization to call the tenant consumption API (Step 3) in our SaaS application’s control plane.
Our tenant consumption service simply aggregates metrics by the tenant over a given time frame. Because our metrics are stored in CloudWatch as EMF, the service can use the CloudWatch insights query shown in the following code:
In Step 4, we send the metrics back to the quick start and insert them into the billing table. The quick start then sends the billing data back to AWS Marketplace (Step 5) based on a trigger of its own scheduled EventBridge rule.
There’s one minor nuance to point out in this implementation. Recall that the billing data stored in the quick start’s billing table is expected to conform with the format we used earlier. You may have noticed our application is producing metrics with the labels “ProductCreated” and “OrderCreated,” while the pricing dimensions we defined in our AWS Marketplace SaaS listing are labeled “ProductsOrdered” and “OrdersCreated.”
This is a small but significant variation. If we were to send billing data that didn’t match our listing’s pricing dimensions, the integration wouldn’t work and the quick start would record an error when attempting to call the AWS Marketplace meter usage APIs.
In this solution and for simplicity, we chose to normalize the difference between our application’s metrics, and that which AWS Marketplace expects, in the CloudWatch Logs Insights query, where we alias the output column to AWS Marketplace-expected labels.
We could have opted to leave our control plane APIs pure, and free of AWS Marketplace-specific changes, and instead handled that normalization in the Lambda function that called our tenant consumption service (in the Marketplace Integration Component). Both are valid approaches.
Conclusion
This post took a deeper look at how you might connect your existing SaaS application to AWS Marketplace. We looked at some strategies for extending your control plane to include listening for customer events that originate from AWS Marketplace and how to route those events to your application via EventBridge.
We also looked at a technique for using the quick start’s ability to send billing data back to AWS Marketplace. We hope this information helps you shorten the development cycle for bringing your own SaaS applications to AWS Marketplace.
About AWS SaaS Factory
AWS SaaS Factory helps organizations at any stage of the SaaS journey. Whether looking to build new products, migrate existing applications, or optimize SaaS solutions on AWS, we can help. Visit the AWS SaaS Factory Insights Hub to discover more technical and business content and best practices.
SaaS builders are encouraged to reach out to their account representative to inquire about engagement models and to work with the AWS SaaS Factory team.
Explore today resources for any stage of your SaaS journey from design and build, to launch and optimization.