AWS Partner Network (APN) Blog
Turning Data from LoRaWAN Sensors into Insights with OrbiWise Network Server and AWS IoT Core
By Gaurav Gupta, Principal Partner SA, IoT – AWS
By Peter Kaae Thomsen, CTO – OrbiWise
By Alberto Garcia Molero, Solution Development – OrbiWise
 |
Low-power wide-area network (LPWAN) technology has emerged as a new breed of cost-efficient connectivity solutions. It enables customers to wirelessly connect large numbers of geographically dispersed Internet of Things (IoT) devices and sensors with constrained battery life and low data rate requirements.
LoRaWAN is one of the most popular LPWAN technologies, with a growing deployment footprint.
AWS IoT Core is a managed IoT platform that allows connected devices to interact with cloud applications and Amazon Web Services (AWS) easily and securely—with the ability to support billions of devices and trillions of messages.
In this post, you will learn how to integrate devices connected to your private LoRaWAN network powered by OrbiWAN with AWS IoT Core. OrbiWAN is OrbiWise’s carrier-grade LoRaWAN Network Server (LNS) and is broadly used by large public network operators and by many private networks alike.
OrbiWise is an AWS Partner whose mission is to design advanced technologies for LoRaWAN providers to maximize the performance of their service and product offerings.
By using AWS IoT rules actions, you should be able to synchronize the AWS IoT Core and OrbiWAN device registries, integrate payloads from your LoRaWAN devices with AWS services like Amazon Timestream, and add reporting dashboards to your applications in no time.
Why OrbiWise LoRaWAN Platform
OrbiWAN complies with the LoRaWAN protocol and supports a wide variety of commercial LoRaWAN gateways, offering reliability and scalability to end customers.
The OrbiWAN-Professional and OrbiWAN-Enterprise editions are available in software-as-a-service (SaaS) mode through AWS Marketplace.
The OrbiWAN-Professional edition is suited for Industrial IoT (IIoT) networks requiring a professional LNS, emphasizing ease of use and allowing for quick deployment of end-to-end solutions. It includes an intuitive user interface (UI) suitable to small and medium-sized IoT deployments. It also includes advanced features, such as the possibility to perform remote firmware updates over-the-air (FUOTA).
API support and seamless integration with the AWS IoT environment through AWS CloudFormation can help customers quickly deploy end-to-end solutions. Customers can also opt for the OrbiWAN-Enterprise edition, which includes advanced network management tools, greater flexibility in network configuration, and SLA-based professional technical support.
Integration with AWS IoT
OrbiWAN integration with AWS IoT performs two primary functions:
- Seamless bi-directional communication between connected LoRaWAN devices and AWS IoT Core.
- State synchronization of LoRaWAN devices between OrbiWAN and AWS IoT Core registry.
OrbiWAN developed the AWS CloudFormation template to automate the following steps:
- Create an AWS IoT policy to allow data transmission from OrbiWAN.
- Provision an X.509 certificate.
- Attach the policy to the X.509 certificate.
- Provide the X.509 certificate and AWS IoT endpoint to set up the bi-directional connector using secure HTTPS.
- Subscribe registered devices in OrbiWise platform to the bi-directional connector.
- Add all required AWS IoT rules and AWS Lambda functions to ensure real-time synchronization between OrbiWise and AWS IoT Core.

Figure 1 – OrbiWAN and AWS IoT Core integration.
After subscribing to OrbiWAN-Professional, you will receive a welcome email with step-by-step instructions for completing your account setup and accessing the OrbiWAN management console. You can deploy the AWS IoT integration in your chosen AWS Region.
Testing the Integration
The OrbiWAN bi-directional connector publishes event-based messages to the pre-determined topics when specific device events occur and allows applications to send commands back to the devices—for example, to update properties or invoke actions.
The available topics for uplink are the following:
orbiwan/lorawan/{deveui}/uplink_early– Uplink messages received (early notification).orbiwan/lorawan/{deveui}/uplink– Uplink message received.orbiwan/lorawan/{deveui}/downlink/status– Status of a scheduled downlink.orbiwan/lorawan/{deveui}/joininfo– Device sent join request message and the network has accepted the device.orbiwan/lorawan/{deveui}/nodeinfo– Notify device state changes.orbiwan/lorawan/{deveui}/location– Location estimate for the device.orbiwan/lorawan/{deveui}/status– Report battery level and downlink link margin.orbiwan/lorawan/appchange– Notification sent to AWS IoT when device subscribes /unsubscribes to AWS IoT application.
Downlink messages must be sent to the following topic: orbiwan/lorawan/{deveui}/downlink
Join Requests
The join request is initiated by the device for activation. The integration allows join requests visible to customers in AWS IoT Core. In this section, we will use AWS IoT Core MQTT test client to monitor the messages passed in your AWS account:
- In the AWS IoT Core console, choose Test, Subscribe to a topic.
- Configure the MQTT client to subscribe to the desired topics. To subscribe to “joininfo” messages, enter orbiwan/lorawan/+/joininfo and then choose Subscribe.
- The join procedure is initiated from the device by sending a join request message with pre-programmed DevEUI, AppEUI / JoinEUI, as well as a DevNonce. The “joininfo” notification is sent right after the LNS responds to the join request message with a ‘join accepted’ if the device is permitted to join the network. This notification is also sent if the join request is not accepted (invalid message integrity code, for example).
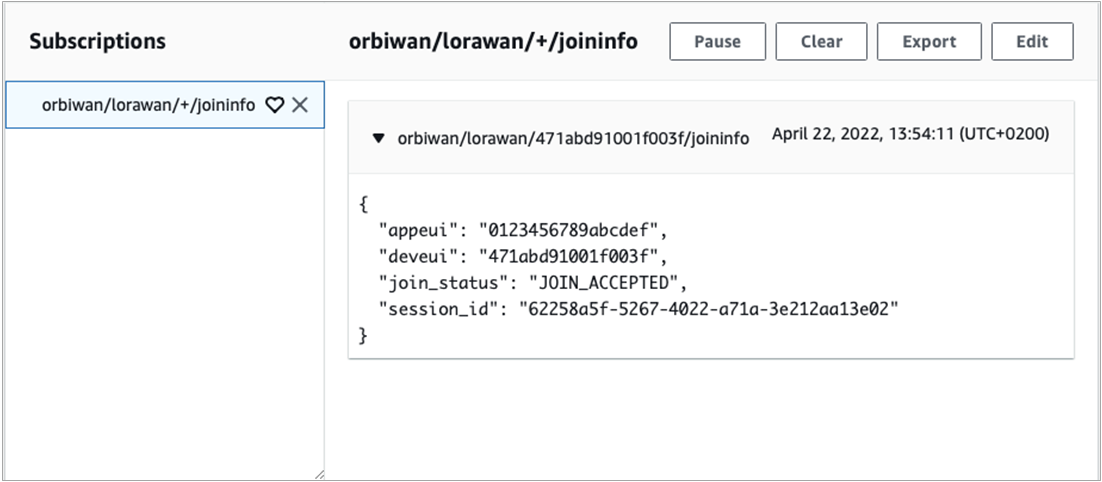
Figure 2 – Join request in AWS IoT Core.
Uplink Payloads
The connector publishes uplink messages transmitted by connected devices to AWS IoT Core on the following two topics:
orbiwan/lorawan/{deveui}/uplink_earlyorbiwan/lorawan/{deveui}/uplink
Early uplink notifications are sent as soon as a new uplink frame has been received by the LNS to allow the application enough time to send an almost immediate response when needed.
On the other hand, packets sent by LoRaWAN devices are potentially received by multiple gateways. Instead of sending all copies of the same uplink message to the applications, the data is aggregated by the LNS into a single uplink notification which may contain the full list of gateways that received the message.
Your application can subscribe to one or the other type of uplink notifications:
- In the AWS IoT Core console, choose Test, Subscribe to a topic.
- Configure the MQTT client to subscribe to the desired topics. To subscribe to “uplink” messages, enter
orbiwan/lorawan/+/uplink_earlyororbiwan/lorawan/+/uplinkand choose Subscribe.
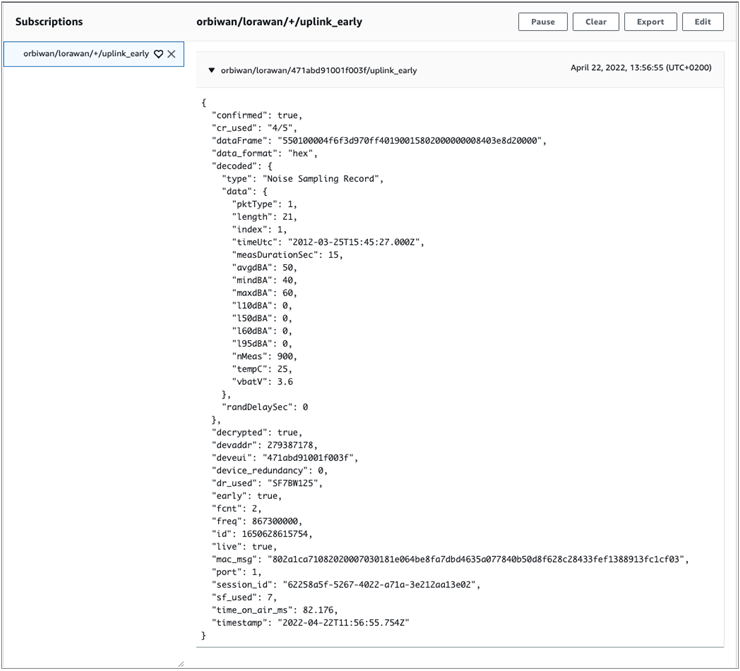
Figure 3 – Device uplink in AWS IoT Core.
Downlink Payloads
Applications built on AWS IoT can send downlink payloads to LoRaWAN devices by publishing on the topic orbiwan/lorawan/{deveui}/downlink.
The Lambda function republishes the messages by making POST requests to the OrbiWAN server to transmit the message to the devices on next opportunity. DevEUI of the target device is part of MQTT topic.
The message is a JSON object with the following format:
The diagram in Figure 4 below illustrates the overall approach:

Figure 4 – Architecture for downlink payload from AWS IoT Core.
You can use AWS IoT Core MQTT test client to publish downlink messages to OrbiWAN:
- In the AWS IoT Core console, choose Test on the navigation pane, and select Subscribe to a topic to orbiwan/lorawan/+/downlink/status to view response from OrbiWAN.
- Select Publish to topic.
- Enter the downlink topic, set the Quality of Service (QoS) level, define the message payload, and choose Publish.
- Topic name: orbiwan/lorawan/{deveui}/downlink
- Message payload:
{"data":"2005643c0affffff0312", "port":1}
- Next, monitor the response from OrbiWAN that contains the status of the scheduled downlink message.
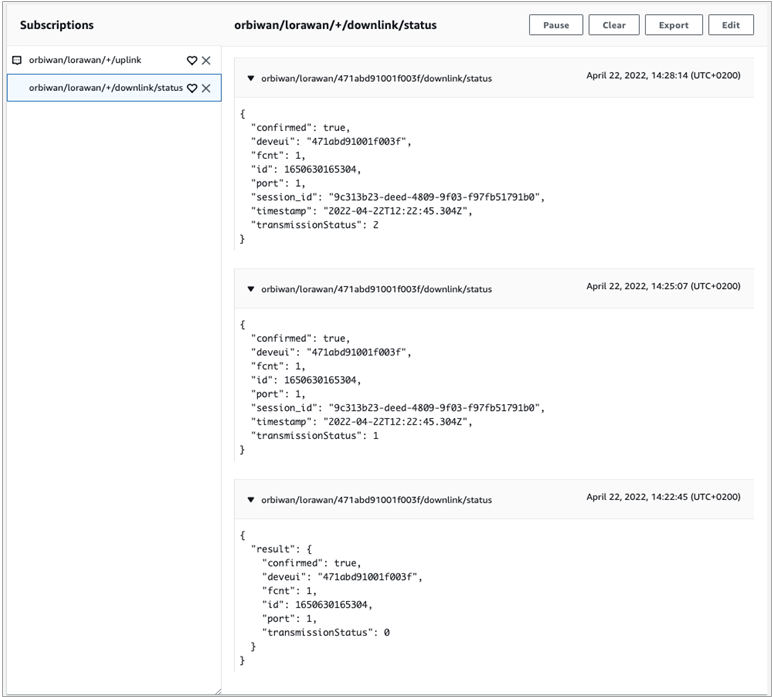
Figure 5 – Downlink status in AWS IoT Core.
Note that this notification will be sent several times as the state changes. The meaning of the transmission status is the following:
- 0: Payload pending transmission (not yet sent, for example).
- 1: Payload has been sent, but reception status unknown.
- 2: Payload has been sent and acknowledged by the device.
- 3: Payload has been sent, and NOT acknowledged by the device.
- 4: An error has been discovered on the payload.
- 5: Payload has been cancelled.
If an error happened on the downlink, it is indicated on orbiwan/lorawan/+/downlink/status.
Downlink payloads are listed in the OrbiWAN console, indicating they are successfully scheduled.
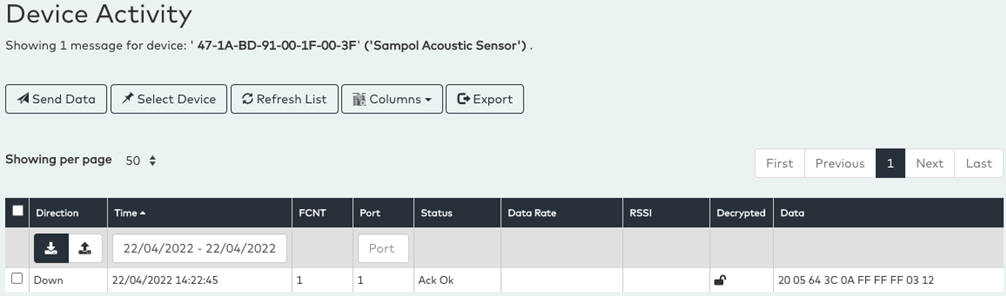
Figure 6 – OrbiWAN device activity for downlink payload.
Downlink messages are by default transmitted as confirmed messages, but setting “confirmed” to “false” will force transmission of the downlink as unconfirmed. The payload in the request message body is in hexadecimal format by default, but base64 can be used by setting “data_format” to “base64”.
Device Status Synchronization
The AWS IoT Core integration for OrbiWAN synchronizes LoRaWAN devices between AWS IoT Core Registry and OrbiWAN in real-time. It supports having either side as master device registry.
Devices DevEUI created in OrbiWAN are automatically created as AWS IoT Core as a “Thing” as soon as you assign devices to the AWS IoT application account.

Figure 7 – Setting up device synchronization from OrbiWAN.
Similarly, the integration relies on event messages from AWS IoT Core registry to act upon “Thing” creation or removal. Changes (such as new things) are automatically replicated on OrbiWAN without user interaction required.
To create devices from AWS IoT Core, you need to:
- Enable event-based messages.
- In the AWS IoT Core console, choose Settings.
- For Thing type, choose created, updated, deleted.
- Navigate to Manage, select Things. Then, choose Create things.
- You’ll need to provide the following information (at minimum) as part of the device registration: distinctive name, thing type (select orbi-lorawan-device), DevEUI, DevType (optional), and the AppKey (for OTAA devices). Additional parameters, like activation method, MAC version, regional parameters revision, or device class can also be provided.

Figure 8 – Provisioning device from AWS IoT into OrbiWAN.
- Set up an unnamed shadow for your “Thing” (optional) and finalize thing creation. You don’t need to create certificates for LoRaWAN devices.
A Lambda function created as part of AWS CloudFormation will immediately replicate the device in OrbiWAN.
Turning Data into Insights
Since the data transmitted by your devices is now received in AWS IoT Core via the connector, you can build IoT applications that store, process, analyze, and act on data generated by connected devices, without having to manage any infrastructure.
This section guides you through the steps to build a real-time dashboard solution to visualize the telemetry data and link quality indicators from your LoRaWAN devices.
First, you’ll need to configure AWS IoT Core to ingest data directly into Amazon Timestream, a time-series database particularly suited for IoT traffic, by using AWS IoT Core Rule engine.
- Log in to the AWS Management Console.
- Navigate to Amazon Timestream, and then choose Create Database.
- Select Standard Database, and then enter a name a distinctive name for your database.
- Select the created database, and then choose Create Table. Enter database name and table name.
- Navigate to the AWS IoT Core console. Go to Act and click on Rules to write attributes from incoming messages published on topic orbiwan/lorawan/+/uplink directly into the Amazon Timestream table.
Rule query statement:

Figure 9 – Setting up Timestream from AWS IoT Rule Action.
- Click on Create Rule. Note the attributes this rule stores in the Timestream database are those that result from the rule’s query statement. In our example, DevType was set to “AcousticSensor” payloads are decoded within OrbiWAN. The value of each attribute in the query statement’s result is parsed to infer its data type.
- To create a dashboard in Grafana, log in to Grafana, navigate to Configurations, and add a data source. Choose Amazon Timestream.
- Set authentication provider to “Access and Secret key,” enter your Access Key ID and Secret Access Key, and set “Default” region to your AWS region.
- Click on the + icon on the left panel, select Create Dashboard, and then click Add new panel.
- In the New Dashboard/Edit Panel view, go to the Query tab and add the query shown below:

Figure 10 – Grafana dashboard showing SNR per gateway.
Similarly, you can create a new panel to visualize the RSSI reported by the device’s best gateway.
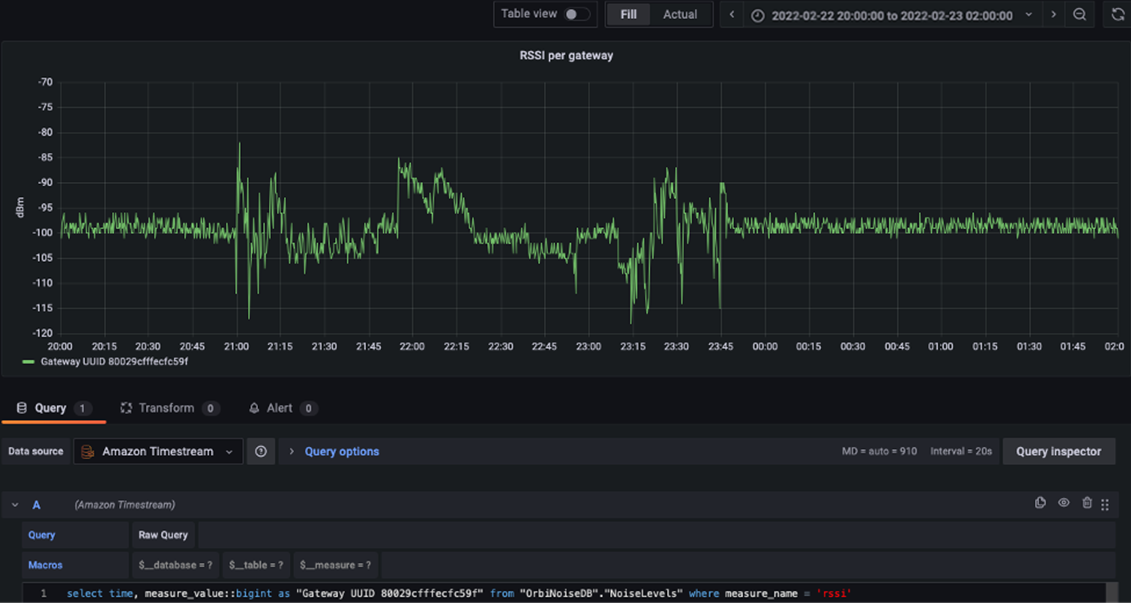
Figure 11 – Grafana dashboard showing RSSI reported by device best gateway.
Grafana allows you to easily move or re-arrange the panels in the dashboard.

Figure 12 – Grafana dashboard showing collapsed view.
To simplify setup, OrbiWise can provide an AWS CloudFormation template that will automatically create a Timestream database, a Timestream table, an IoT rule, and set up a new Grafana instance.
Conclusion
In this post, we covered how easy it is to use AWS CloudFormation to integrate OrbiWAN LoRaWAN network server with AWS IoT Core, send/receive device payload and synchronize device status, and use other cloud services available on AWS.
OrbiWAN will continue to build additional features for AWS IoT integration and enable customers to build their solutions using other AWS services.