AWS Architecture Blog
Field Notes: Using Infrastructure as Code to Manage Your AWS Networking Environment
Infrastructure as Code (IaC) brings automation to the provisioning process, which was traditionally done manually. Rather than relying on manually performed steps, both administrators and developers can instantiate infrastructure using configuration files. IaC helps avoid configuration drift through automation, and increases the speed and agility of infrastructure deployments. It also helps reduce errors and enhances the ability to apply changes through different stages consistently.
In this blog post, I demonstrate how to create a networking stack on AWS using AWS CloudFormation and manage it via IaC concepts and tools. In this blog, we create a pipeline using AWS CodeCommit and AWS CodePipeline services. Once we have created the pipeline and other required constructs to manage the infrastructure as code, we add an Amazon Managed Virtual Private Network (VPN) connection, Amazon VPC (VPC) Endpoints, VPC peering, and AWS Transit Gateway. We do this by modifying the code instead of making changes from the AWS web console. The resulting network architecture is shown in Figure 1.
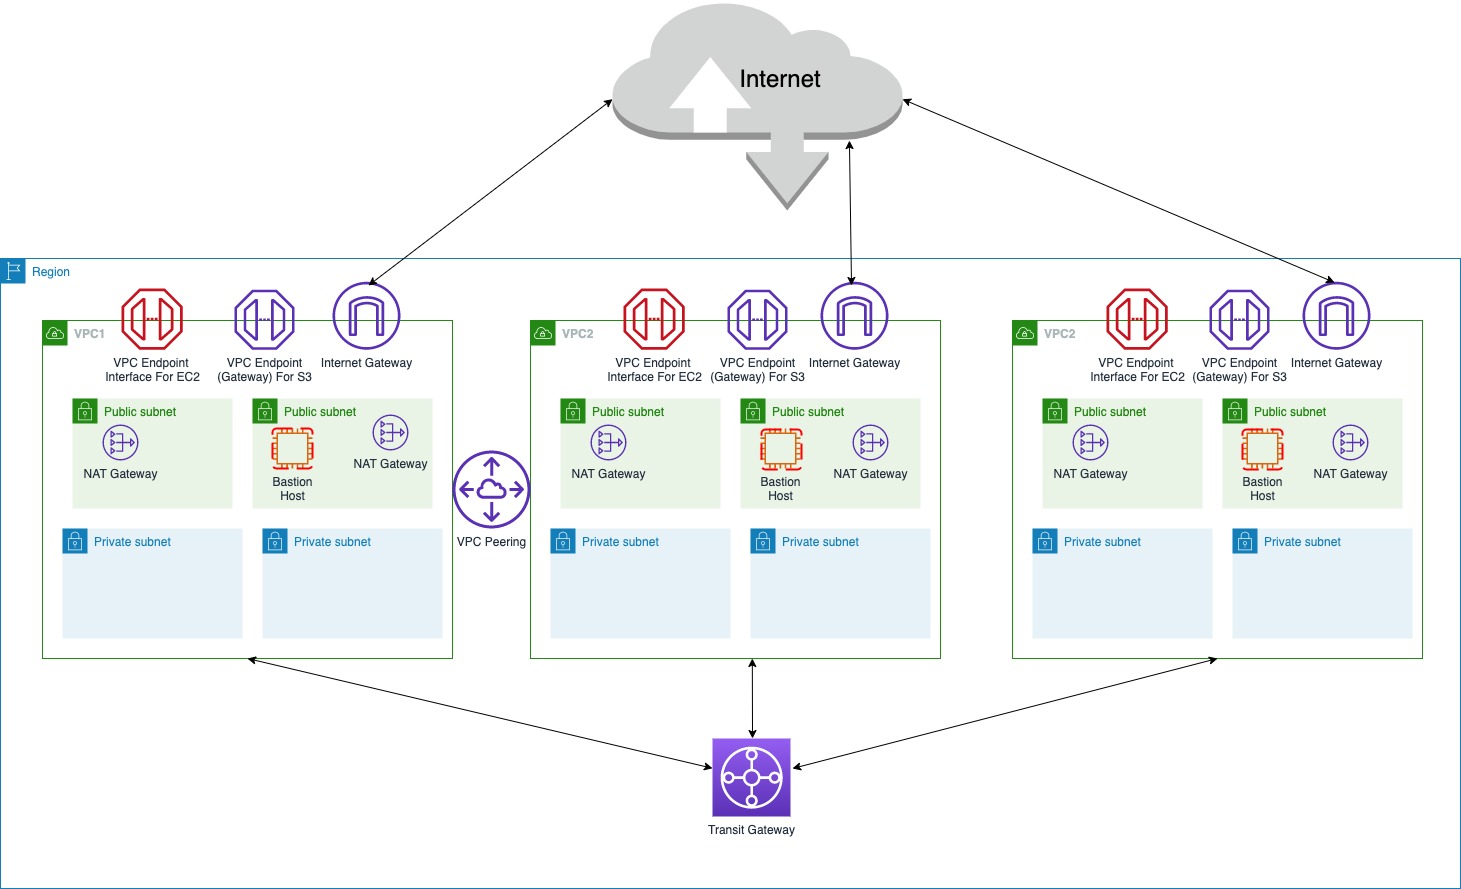
Figure 1 – Network Architecture
It consists of three Amazon VPCs (named VPC1, VPC2 and VPC3) each with Internet Gateway and VPC endpoints for EC2 API and Amazon S3. VPC1 has an Amazon Managed S2S VPN connection to a customer gateway. VPC1 and VPC2 are peered with each other using VPC peering connection.
All three VPCs are attached to AWS Transit Gateway (TGW) with appropriate route table entries for inter-VPC communication. Details on CIDRs, subnets, BGP ASN etc. can be found in the VPC parameter files explained later in the post.
Prerequisites
Readers of this blog post should be familiar with the following AWS services:
- AWS CloudFormation
- AWS Networking and Content Delivery services like Amazon VPC (VPC), AWS Transit Gateway (TGW), AWS Virtual Private Network (VPN), VPC Peering and VPC Endpoints.
- AWS Cloud9
- AWS CodeCommit
- AWS CodePipeline
- Git Commands
- Source Control concepts
For this walkthrough, you should have the following:
- AWS account with sufficient limits. You will be using 6 Amazon VPCs with Internet Gateways and VPC Endpoints, 6 Amazon EC2 instances, 12 NAT Gateways, 18 EIPs. You can create a service limit increase case from your support console if necessary.
- AWS CLI installed and configured on the workstation from where you are going to create AWS Cloud9 Integrated Development Environment (IDE).
- A base VPC from where we launch and control the CICD Pipeline. This VPC will not be used for any other purpose. You can follow the instructions to create a separate base VPC while following this blog post. Please note down the subnet-id of one of the public subnets. We use this subnet-id to launch AWS Cloud9 IDE.
- Credentials configured in AWS CLI should have the required IAM permissions to spin up and modify the resources mentioned in this post. I am using a user-id with AdministratorAccess.
- S3 bucket to store AWS CodePipeline artifacts.
- Make sure that you deploy the solution to N.Virginia (us-east-1) Region and your AWS CLI default Region is us-east-1. If us-east-1 is not the default Region, please set the Regions explicitly while running AWS CLI commands using –regionregion us-east-1 switch.
Overview
- Create an AWS Cloud9 IDE, which will be used to perform all subsequent steps mentioned in this blog post.
- Dowload and unzip the supporting files for this blog post in a subdirectory of the AWS Cloud9 IDE.
- Using AWS CLI, create an AWS CodeCommit repository and upload base AWS CloudFormation template and parameter files.
- Using AWS CLI, create an AWS CloudFormation stack to create IAM roles/ permission and SNS topics required for this blog post. Review the IAM permissions and tweak them according to your needs and policies.
- Clone the AWS CodeCommit repository to our AWS Cloud9 IDE and start modifying our stack via AWS CodePipeline.
The following diagram represents how the pipeline is set up.
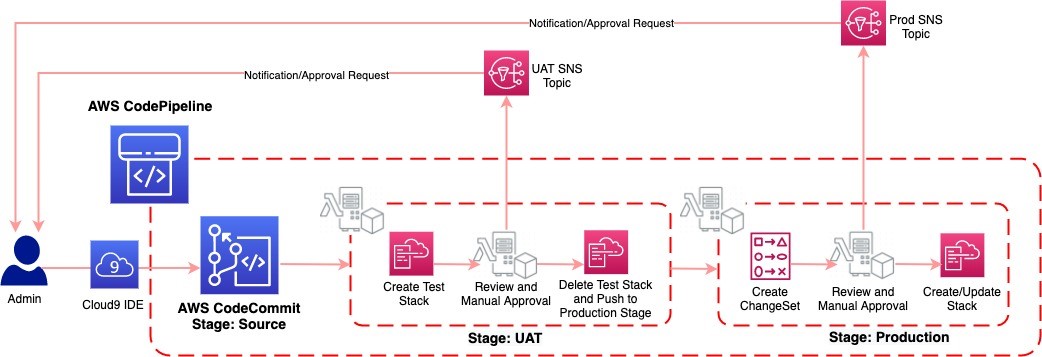
Figure 2- The IaC pipeline
Stage 1 – The name of this stage is CFNSource, which uses an AWS CodeCommit repository as source. Any changes to the branch ‘master’ will trigger the pipeline. AWS CloudFormation template ‘vpc-stack.yaml’ and parameter files ‘uat-vpc-params.json’ and ‘prod-vpc-params.json’ are in the ‘master’ branch of this repository. As we are using AWS CloudFormation templates, we do not need a build stage. AWS CloudFormation validation process takes care of that.
Stage 2 – The name of this stage is UAT, which will create a test stack for you to review and approve the changes before it is deployed in production. It has three actions:
- ‘CreateTestCFNStack’ of category Deploy, where it creates the stack based on the configuration specified in ‘vpc-stack.yaml’.
- ‘UATApproval’ of category Approval, where it sends notification to the administrator’s email address and then it waits for manual approval. The Administrator will have to check the deployment and do some manual tests like connectivity checks before approving the stack.
- ‘ProceedToProd’ of category Deploy, where the stack is deleted and the controls are handed over to next stage called ‘Production’.
Stage 3 – The name of this stage is Production where the changes are deployed in production. It has three actions:
- ‘CreateProdChangeset’ of category Deploy. In this action, based on the difference between existing stack and new configuration, a CloudFormation change set is created.
- ‘ProdApproval’ of category Approval, where it send notification to the administrator’s email address and it waits for manual approval. The Administrator will have to verify the CloudFormation change set before approving the stack.
- ‘DeployProduction’ of category Deploy, where the CloudFormation change set is deployed.
Walkthrough
This should take approximately 60 minutes to complete:
1. From your workstation with AWS CLI, create an AWS Cloud9 EC2 development environment by executing the following command. Replace value of --subnet-id with the subnet-id from prerequisites #2 and replace value of --owner-arn with arn for your IAM user-id.
aws cloud9 create-environment-ec2 --name IaC-Net-env --description "IDE for network IaC" --instance-type t2.micro --subnet-id subnet-05251bba34ad9b2bf --automatic-stop-time-minutes 60 --owner-arn arn:aws:iam::12345678901:user/vijay2. Log into AWS Cloud9 instance created in step 1 by following the instructions.
3. Download and un-compress the required files to a folder of AWS Cloud9 IDE. I use the ~/environment folder.
$ cd ~/environment/
$ wget https://github.com/aws-samples/aws-networking-infra-via-iaac-principles/archive/master.zip

$ unzip IaCBlog.zip

$ ls -l
total 440
-rw-r--r-- 1 ec2-user ec2-user  21932 Jul 30 12:23 IaCBlog.zip
-rw-r--r-- 1 ec2-user ec2-user  15373 Jul 30 09:50 IaCBlogIAMRoles.yaml
-rw-r--r-- 1 ec2-user ec2-user   5699 Jul 29 13:07 IaCBlogPipeline.yaml
-rw-r--r-- 1 ec2-user ec2-user   1629 Jul 29 12:14 IaCBlogSNSTopics.yaml
-rw-r--r-- 1 ec2-user ec2-user  33359 Jul 29 20:26 add-Add-TGW-vpc-stack.yaml
-rw-r--r-- 1 ec2-user ec2-user  27992 Jul 29 19:23 add-Endpoints-vpc-stack.yaml
-rw-r--r-- 1 ec2-user ec2-user  29998 Jul 29 20:25 add-Peering-vpc-stack.yaml
-rw-r--r-- 1 ec2-user ec2-user    839 Jul 29 14:55 add-VPCs-prod-vpc-params.json
-rw-r--r-- 1 ec2-user ec2-user    840 Jul 29 14:55 add-VPCs-uat-vpc-params.json
-rw-r--r-- 1 ec2-user ec2-user  24732 Jul 29 12:14 add-VPCs-vpc-stack.yaml
-rw-r--r-- 1 ec2-user ec2-user    443 Jul 29 14:55 add-vpn-prod-vpc-params.json
-rw-r--r-- 1 ec2-user ec2-user    444 Jul 29 14:55 add-vpn-uat-vpc-params.json
-rw-r--r-- 1 ec2-user ec2-user   9888 Jul 29 12:14 add-vpn-vpc-stack.yaml
-rw-r--r-- 1 ec2-user ec2-user    337 Jul 29 12:14 prod-vpc-params.json
-rw-r--r-- 1 ec2-user ec2-user    336 Jul 29 12:14 uat-vpc-params.json
-rw-r--r-- 1 ec2-user ec2-user   7979 Jul 29 12:14 vpc-stack.yaml
$
4. From one of the terminal windows of AWS Cloud9 environment, generate and save keys for EC2 instances.
- Create a Key Pair
aws ec2 create-key-pair \
--key-name MyKeyPairIaC \
--query 'KeyMaterial' \
--output text > MyKeyPairIaC.pem
- Change permission of the private key pair file.
chmod 400 MyKeyPairIaC.pem5. Create an AWS CodeCommit repository and note the clone URLs “cloneUrlHttp” and “cloneUrlSsh”. The following command will create a AWS CodeCommit repository named ‘IaCBlogRepo’.
aws codecommit create-repository --repository-name IaCBlogRepo --repository-description "IaC Repository"Output:
{

<snip>

"cloneUrlHttp": "https://git-codecommit.us-east-1.amazonaws.com/v1/repos/IaCBlogRepo",

"cloneUrlSsh": "ssh://git-codecommit.us-east-1.amazonaws.com/v1/repos/IaCBlogRepo",

<snip>

}
6. Clone the AWS CodeCommit repository to your AWS Cloud9 IDE by running the below git command with“cloneUrlHttp”copied in step 5.
git clone https://git-codecommit.us-east-1.amazonaws.com/v1/repos/IaCBlogRepoThis will create an empty folder by the repository name. All the git commands mentioned in this post will have to be executed from this directory.
7. Copy vpc-stack.yml, uat-vpc-prams.json and prod-vpc-params.json to the newly created directory and push it to the repository.
Note: You can make changes to uat-vpc-params.json and prod-vpc-params.json to change the VPC CIDR, Subnets, Tag prefix, Bastion host AMI id or bastion host ssh key by editing it in your AWS Cloud9 IDE. If you chose to do so, then make sure that you replicate those changes to add-vpn-uat-vpc-params.json, add-vpn-prod-vpc-params.json, add-VPCs-uat-vpc-params.json and add-VPCs-prod-vpc-params.json parameter files as well before proceeding.
$ cd IaCBlogRepo
$ cp ../vpc-stack.yaml .
$ cp ../uat-vpc-params.json .
$ cp ../prod-vpc-params.json .
$ git add .; git commit -m "Added base files"; git push origin master
8. Create IAM roles to be used by AWS Code Pipeline and AWS CloudFormation using AWS CloudFormation template IaCBlogIAMRoles.yaml downloaded in the beginning.
$ cd IaCBlogRepo
$ cp ../vpc-stack.yaml .
$ cp ../uat-vpc-params.json .
$ cp ../prod-vpc-params.json .
$ git add .; git commit -m "Added base files"; git push origin master
Check the status of the stack by running the below command every few minutes. You should see StackStatus value as CREATE_COMPLETE.
aws cloudformation describe-stacks --stack-name BlogIaCIAMRoles | grep StackStatus9. Create Amazon SNS Topics to be used by AWS CodePipeline to send notifications using template IaCBlogSNSTopics.yaml downloaded in the beginning. Replace example@exmaple.com with the email address you want to use to get notification for approvals.
aws cloudformation create-stack \
--stack-name BlogIaCSNSTopics \
--template-body file://IaCBlogSNSTopics.yaml \
--parameters ParameterKey=ProdApprovalEmail,ParameterValue=example@example.com ParameterKey=ProdTopic,ParameterValue=IaCBlogProd ParameterKey=UATApprovalEmail,ParameterValue=example@example.com ParameterKey=UATTopic,ParameterValue=IaCBlogUAT \
--capabilities CAPABILITY_NAMED_IAM
Check the status of the stack by executing the below command every few minutes. You should see StackStatus value as CREATE_COMPLETE.
aws cloudformation describe-stacks --stack-name BlogIaCSNSTopics | grep StackStatusOnce the stack is created, you will receive subscription confirmation emails on the email addresses used in above command. Click on the ‘Confirm Subscription’ link in the email before proceeding to the next step.
10. Create the AWS CodePipeline to manage networking infrastructure as code. Replace the S3 bucket in below command with one in your account or with one which is accessible from your account. I am using a bucket in my account named ‘blogiacbucket’.
aws cloudformation create-stack \
--stack-name BlogIaCPipeLine \
--template-body file://IaCBlogPipeline.yaml \
--parameters ParameterKey=CFNTemplateRepoName,ParameterValue=IaCBlogRepo ParameterKey=ArtifactStoreS3Location,ParameterValue=blogiacbucket ParameterKey=IAMStackName,ParameterValue=BlogIaCIAMRoles ParameterKey=SNSStackName,ParameterValue=BlogIaCSNSTopics \
--capabilities CAPABILITY_NAMED_IAM
Check the status of the stack by executing the below command every few minutes. You should see StackStatus value as CREATE_COMPLETE.
aws cloudformation describe-stacks --stack-name BlogIaCPipeLine | grep StackStatus11. Review the pipeline: Open the CodePipeline from AWS console page. On the All Pipelines page, choose the name of the pipeline. You will see the three stages explained earlier in the blog post. At this point the pipeline will already be executing.
- Once the test stack is up, pipeline will send an email notification to the email addresses used in step 9 for approval. Before approving you can verify the VPC and other resources like NAT Gateway, routing table etc.
- Once verified, you can click on the link in email or click on Review under UATApproval action in AWS CodePipeline and then click on Approve after entering comments. Once approved the 3rd action will go ahead and delete the test stack and proceed with deploying the Prod Stack.
12. Once the UAT stage is complete, the pipeline will create a ChangeSet for Prod Stack and send you an approval notification email.
- To verify the changes, from the AWS console, go to Cloudformation, then select the recently launched Stack for which the status is “REVIEW_IN_PROGRESS”.
- Click on Change Sets tab and then on the Change Set name to review the changes to current stack.
13. Once verified you can approve the changes by clicking on Review and then Approve after entering approval comment in CodePipeline screen. At the end of this action, the pipeline will deploy the changes to the production stack.
Making changes to the stack by modifying the CloudFormation template
Adding VPN to the first VPC (VPC1):
- Copy files
add-vpn-vpc-stack.yaml,add-vpn-uat-vpc-params.jsonandadd-vpn-prod-vpc-params.jsonto the directory where the AWS CodeCommit repository was cloned, asvpc-stack.yaml,uat-vpc-params.jsonandprod-vpc-params.jsonrespectively. - If you examine the content of these new files, you will see that it appends the VPN configuration and parameters to the current template.
- You can change remote VPN device, CIDR and BGP ASN by modifying
uat-vpc-params.jsonandprod-vpc-params.jsonfiles.
$ cd IaCBlogRepo
$ cp ../add-vpn-vpc-stack.yaml ./vpc-stack.yaml
$ cp ../add-vpn-uat-vpc-params.json ./uat-vpc-params.json
$ cp ../add-vpn-prod-vpc-params.json ./prod-vpc-params.json
Before you push the changes to the repository, you can view the difference by running ‘git diff HEAD’ command. This will show the additional Resources and Parameters we added for the VPN. Once verified, you can push the changes to the repository by executing the following commands.
$ git add .; git commit -m "Added VPN to VPC1"; git push origin masterThis will trigger the pipeline. You can follow steps 11 through 13 to verify, review and approve the changes from UAT to Production.
Adding two more VPCs:
- Copy files
add-VPCs-vpc-stack.yaml,add-VPCs-uat-vpc-params.jsonandadd-VPCs-prod-vpc-params.jsonto the directory where the AWS CodeCommit repository was cloned, asvpc-stack.yaml, uat-vpc-params.jsonandprod-vpc-params.jsonrespectively. - If you examine the content of these new files (alternatively you can use ‘
git diff HEAD’), you will see that it appends configuration and parameters for two new VPCs, VPC2 and VPC3 to the current template.
$ cd IaCBlogRepo
$ cp ../add-VPCs-vpc-stack.yaml ./vpc-stack.yaml
$ cp ../add-VPCs-uat-vpc-params.json ./uat-vpc-params.json
$ cp ../add-VPCs-prod-vpc-params.json ./prod-vpc-params.json
$ git add .; git commit -m "Added VPC2 and VPC2 to the stack"; git push origin master
This will trigger the pipeline. You can follow steps 11 through 13 to verify, review and approve the changes from UAT to Production.
Adding S3 Gateway and EC2 Interface VPC Endpoints:
- Copy
add-Endpoints-vpc-stack.yamlto the directory where the AWS CodeCommit repository was cloned, asvpc-stack.yaml. No need to copy the json files. - If you examine the content of the new file (alternatively you can use ‘
git diff HEAD’), you will see that it appends configuration and parameters for S3 and EC2 interface endpoints to the current template.
$ cd IaCBlogRepo
$ cp ../add-Endpoints-vpc-stack.yaml ./vpc-stack.yaml
$ git add .; git commit -m "Added Endpoints"; git push origin master
This will trigger the pipeline. You can follow steps 11 through 13 to verify, review and approve the changes from UAT to Production.
Peering VPC1 and VPC2:
- Copy
add-Peering-vpc-stack.yamlto the directory where the AWS CodeCommit repository was cloned, asvpc-stack.yaml. - If you examine the content of the new file (alternatively you can use ‘
git diff HEAD’), you will see that it appends configuration for peering VPC1 and VPC2. It also adds static routes in all route tables for the peered VPC’s CIDR point to the newly created VPC peering endpoint.
$ cd IaCBlogRepo
$ cp ../add-Peering-vpc-stack.yaml ./vpc-stack.yaml
$ git add .; git commit -m "Peered VPC1 and VPC2"; git push origin master
This will trigger the pipeline. You can follow steps 11 through 13 to verify, review and approve the changes from UAT to Production.
Adding Transit Gateway and attach all three VPCs:
- Copy
add-Add-TGW-vpc-stack.yamlto the directory where the AWS CodeCommit repository was cloned, asvpc-stack.yaml. - If you examine the content of the new file (alternatively you can use ‘
git diff HEAD’), you will see that it appends configuration for Transit Gateway.
Note: This Transit Gateway will have all three VPCs attached to it and associated to Default Route Table with propagation enabled. The new configuration will also add a summarized static routes to VPC route tables covering all VPCs pointing to the Transit Gateway attachment.
$ cd IaCBlogRepo
$ cp ../add-Add-TGW-vpc-stack.yaml ./vpc-stack.yaml
$ git add .; git commit -m "Added TGW and attached all VPCs"; git push origin master
This will trigger the pipeline. You can follow steps 11 through 13 to verify, review and approve the changes from UAT to Production.
Cleaning up
To avoid additional charges, ensure you do the following:
- Delete AWS CloudFormation templates
Prod-BloagIaCPipeline, BlogIaCPipeLine, BlogIaCSNSTopics, BlogIaCIAMRolesby following the steps. This will delete most of the resources created by the steps in this blog post. - Delete any S3 buckets you might have created in the beginning. For example S3 bucket for AWS CodePipeline artifacts.
- Delete AWS CodeCommit repository ‘
IaCBlogRepo’ created in beginning by following the steps. - Delete the AWS Cloud9 environment you created in the beginning of this blog by following the steps.
- Delete ssh key pair for EC2 instances created in the beginning of this blog by following the steps.
Conclusion
In this post, you learned how to use AWS Developer Tools to create a CI/CD pipeline. You can use AWS Services to automate deployments of networking infrastructure with CloudFormation Templates. You can use this technique to deploy AWS networking infrastructure services in a clearly defined and immutable process and manage the environment using Infrastructure as Code principles. This helps avoid configuration drift through automation, and increases the speed and agility of infrastructure deployments. It also helps reduce errors and enhances the ability to apply changes through different stages consistently.
To further extend this solution, you can include multiple accounts and regions using AWS CloudFormation StackSets to manage a multi-region multi-account AWS networking infrastructure environment as Code.