AWS Big Data Blog
Bring your workforce identity to Amazon EMR Studio and Athena
September 2025: This post was updated for accuracy.
Customers today may struggle to implement proper access controls and auditing at the user level when multiple applications are involved in data access workflows. The key challenge is to implement proper least-privilege access controls based on user identity when one application accesses data on behalf of the user in another application. It forces you to either give all users broad access through the application with no auditing, or try to implement complex bespoke solutions to map roles to users.
Using AWS IAM Identity Center, you can now propagate user identity to a set of AWS services and minimize the need to build and maintain complex custom systems to vend roles between applications. IAM Identity Center also provides a consolidated view of users and groups in one place that the interconnected applications can use for authorization and auditing.
IAM Identity Center enables centralized management of user access to AWS accounts and applications using identity providers (IDPs) like Okta. This allows users to log in one time with their existing corporate credentials and seamlessly access downstream AWS services supporting identity propagation. With IAM Identity Center, Okta user identities and groups can be automatically synced using SCIM 2.0 for accurate user information in AWS.
Amazon EMR Studio is a unified data analysis environment where you can develop data engineering and data science applications. You can now develop and run interactive queries on Amazon Athena from EMR Studio (for more details, refer to Amazon EMR Studio adds interactive query editor powered by Amazon Athena ). Athena users can access EMR Studio without logging in to the AWS Management Console by enabling federated access from your IdP via IAM Identity Center. This removes the complexity of maintaining different identities and mapping user roles across your IdP, EMR Studio, and Athena.
You can govern Athena workgroups based on user attributes from Okta to control query access and costs. AWS Lake Formation can also use Okta identities to enforce fine-grained access controls through granting and revoking permissions.
IAM Identity Center and Okta single sign-on (SSO) integration streamlines access to EMR Studio and Athena with centralized authentication. Users can have a familiar sign-in experience with their workforce credentials to securely run queries in Athena. Access policies on Athena workgroups and Lake Formation permissions provide governance based on Okta user profiles.
This blog post explains how to enable single sign-on to EMR Studio using IAM Identity Center integration with Okta. It shows how to propagate Okta identities to Athena and Lake Formation to provide granular access controls on queries and data. The solution streamlines access to analytics tools with centralized authentication using workforce credentials. It leverages AWS IAM Identity Center, Amazon EMR Studio, Amazon Athena, and AWS Lake Formation.
Solution overview
IAM Identity Center allows users to connect to EMR Studio without needing administrators to manually configure AWS Identity and Access Management (IAM) roles and permissions. It enables mapping of IAM Identity Center groups to existing corporate identity roles and groups. Admins can then assign privileges to roles and groups and assign users to them, enabling granular control over user access. IAM Identity Center provides a central repository of all users in AWS. You can create users and groups directly in IAM Identity Center or connect existing users and groups from providers like Okta, Ping Identity, or Azure AD. It handles authentication through your chosen identity source and maintains a user and group directory for EMR Studio access. Known user identities and logged data access facilitates compliance through auditing user access in AWS CloudTrail.
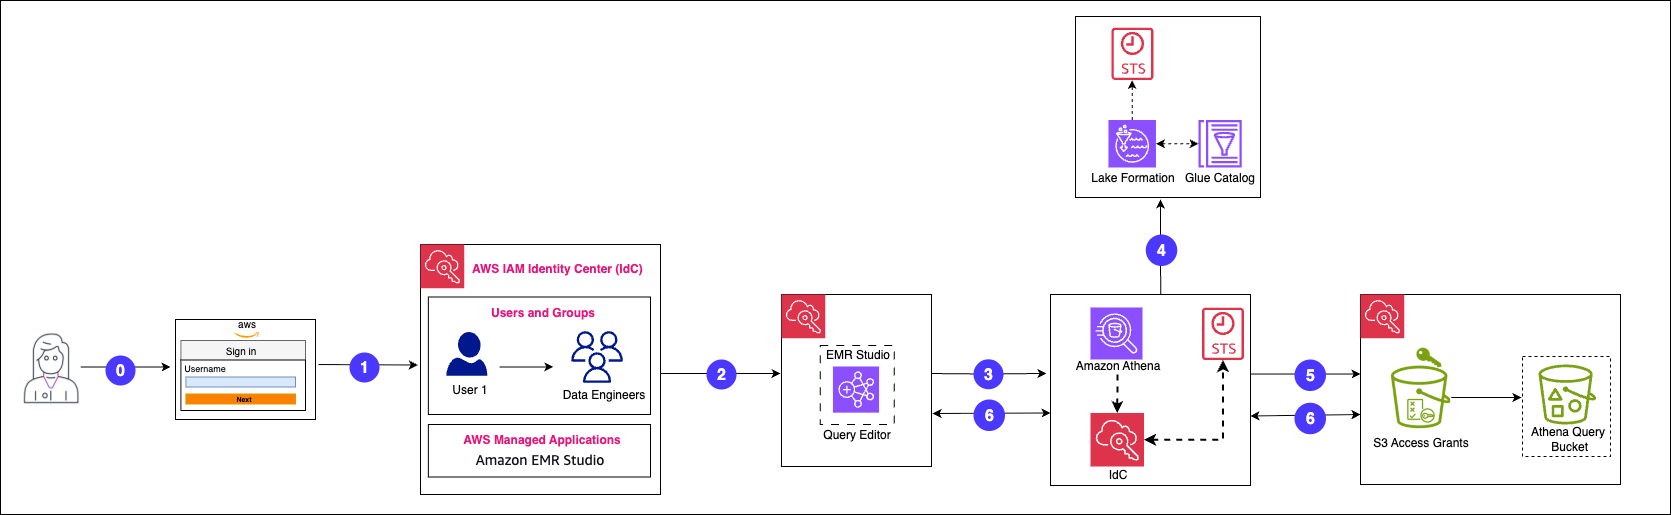
The following diagram illustrates the solution architecture.

The EMR Studio workflow consists of the following high-level steps:
- The end-user launches EMR Studio using the AWS access portal URL. This URL is provided by an IAM Identity Center administrator via the IAM Identity Center dashboard.
- The URL redirects the end-user to the workforce IdP Okta, where the user enters workforce identity credentials.
- After successful authentication, the user will be logged in to the AWS console as a federated user.
- The user opens EMR Studio and navigates to the Athena query editor using the link available on EMR Studio.
- The user selects the correct workgroup as per the user role to run Athena queries.
- The query results are stored in separate Amazon Simple Storage Service (Amazon S3) locations with a prefix that is based on user identity.
To implement the solution, we complete the following steps:
- Integrate Okta with IAM Identity Center to sync users and groups.
- Integrate IAM Identity Center with EMR Studio.
- Assign users or groups from IAM Identity Center to EMR Studio.
- Set up Lake Formation with IAM Identity Center.
- Configure granular role-based entitlements using Lake Formation on propagated corporate identities.
- Set up workgroups in Athena for governing access.
- Set up Amazon S3 access grants for fine-grained access to Amazon S3 resources like buckets, prefixes, or objects.
- Access EMR Studio through the AWS access portal using IAM Identity Center.
- Run queries on the Athena SQL editor in EMR Studio.
- Review the end-to-end audit trail of workforce identity.
Prerequisites
To follow along this post, you should have the following:
- An AWS account – If you don’t have one, you can sign up here.
- An Okta account that has an active subscription – You need an administrator role to set up the application on Okta. If you’re new to Okta, you can sign up for a free trial or a developer account.
For instructions to configure Okta with IAM Identity Center, refer to Configure SAML and SCIM with Okta and IAM Identity Center.
Integrate Okta with IAM Identity Center to sync users and groups
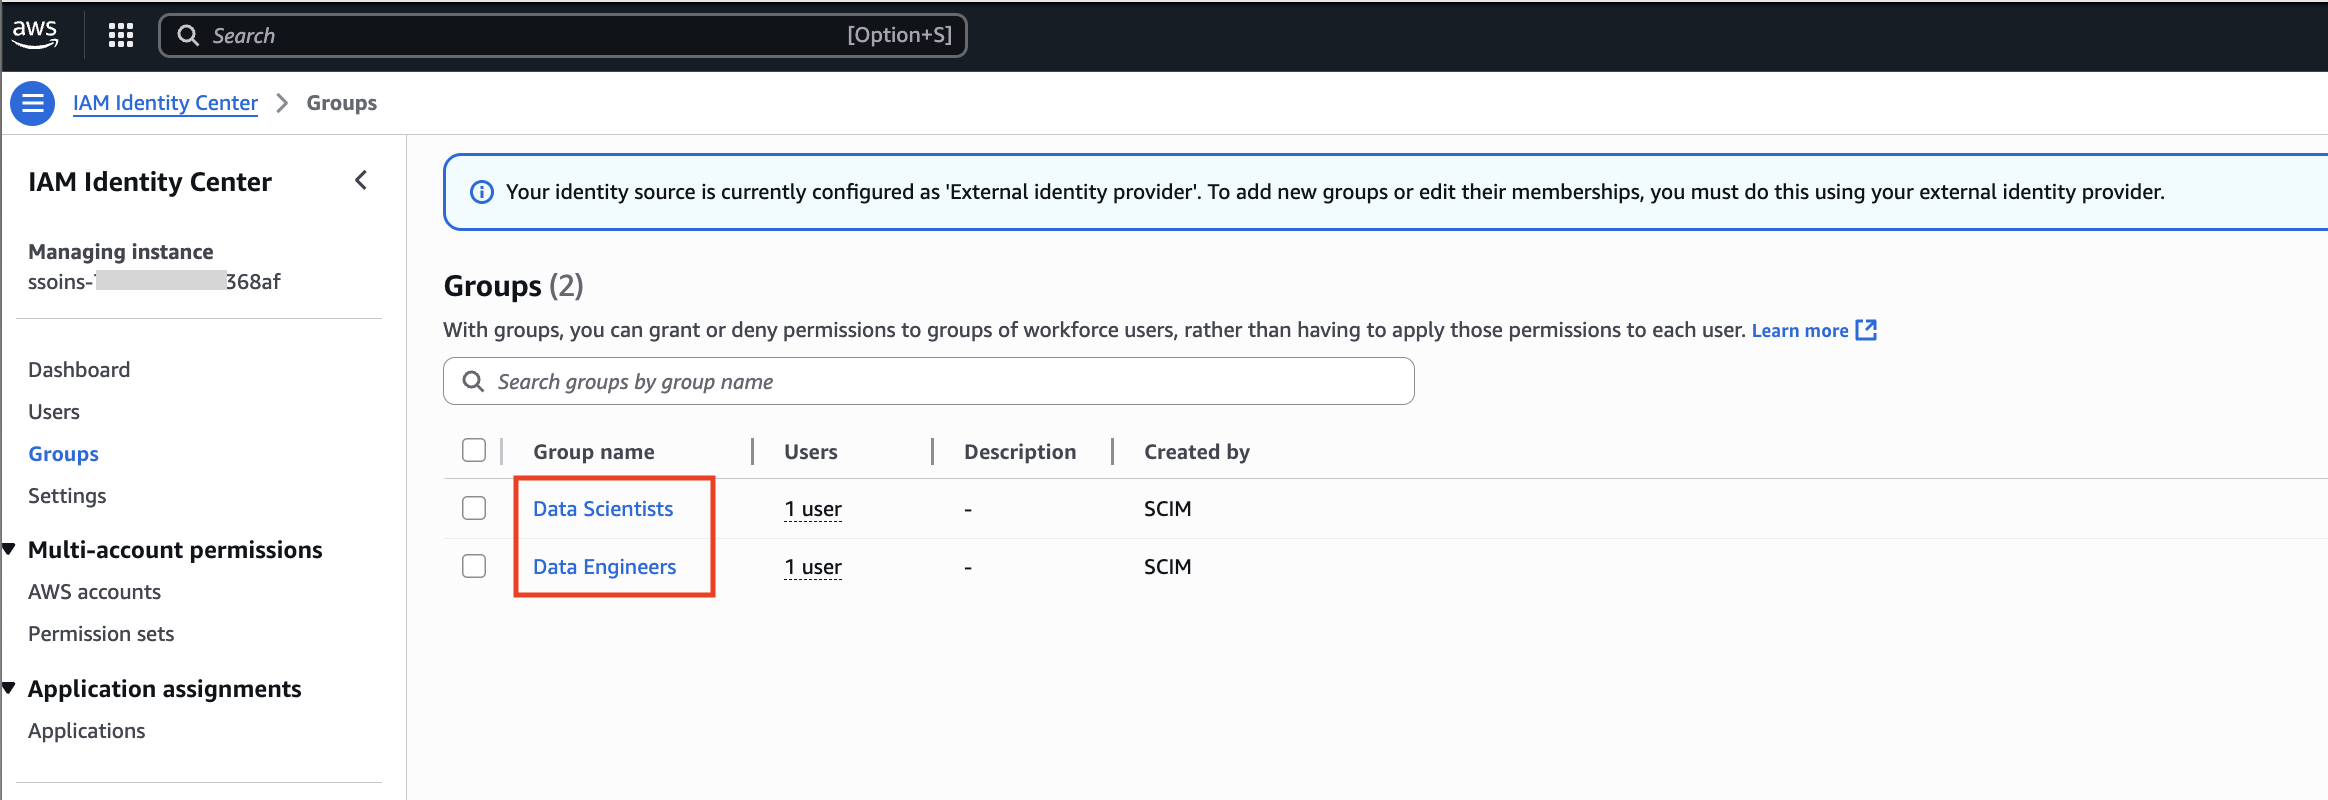
After you have successfully synced users or groups from Okta to IAM Identity Center, you can see them on the IAM Identity Center console, as shown in the following screenshot. For this post, we created and synced two user groups:
- Data Engineer
- Data Scientists
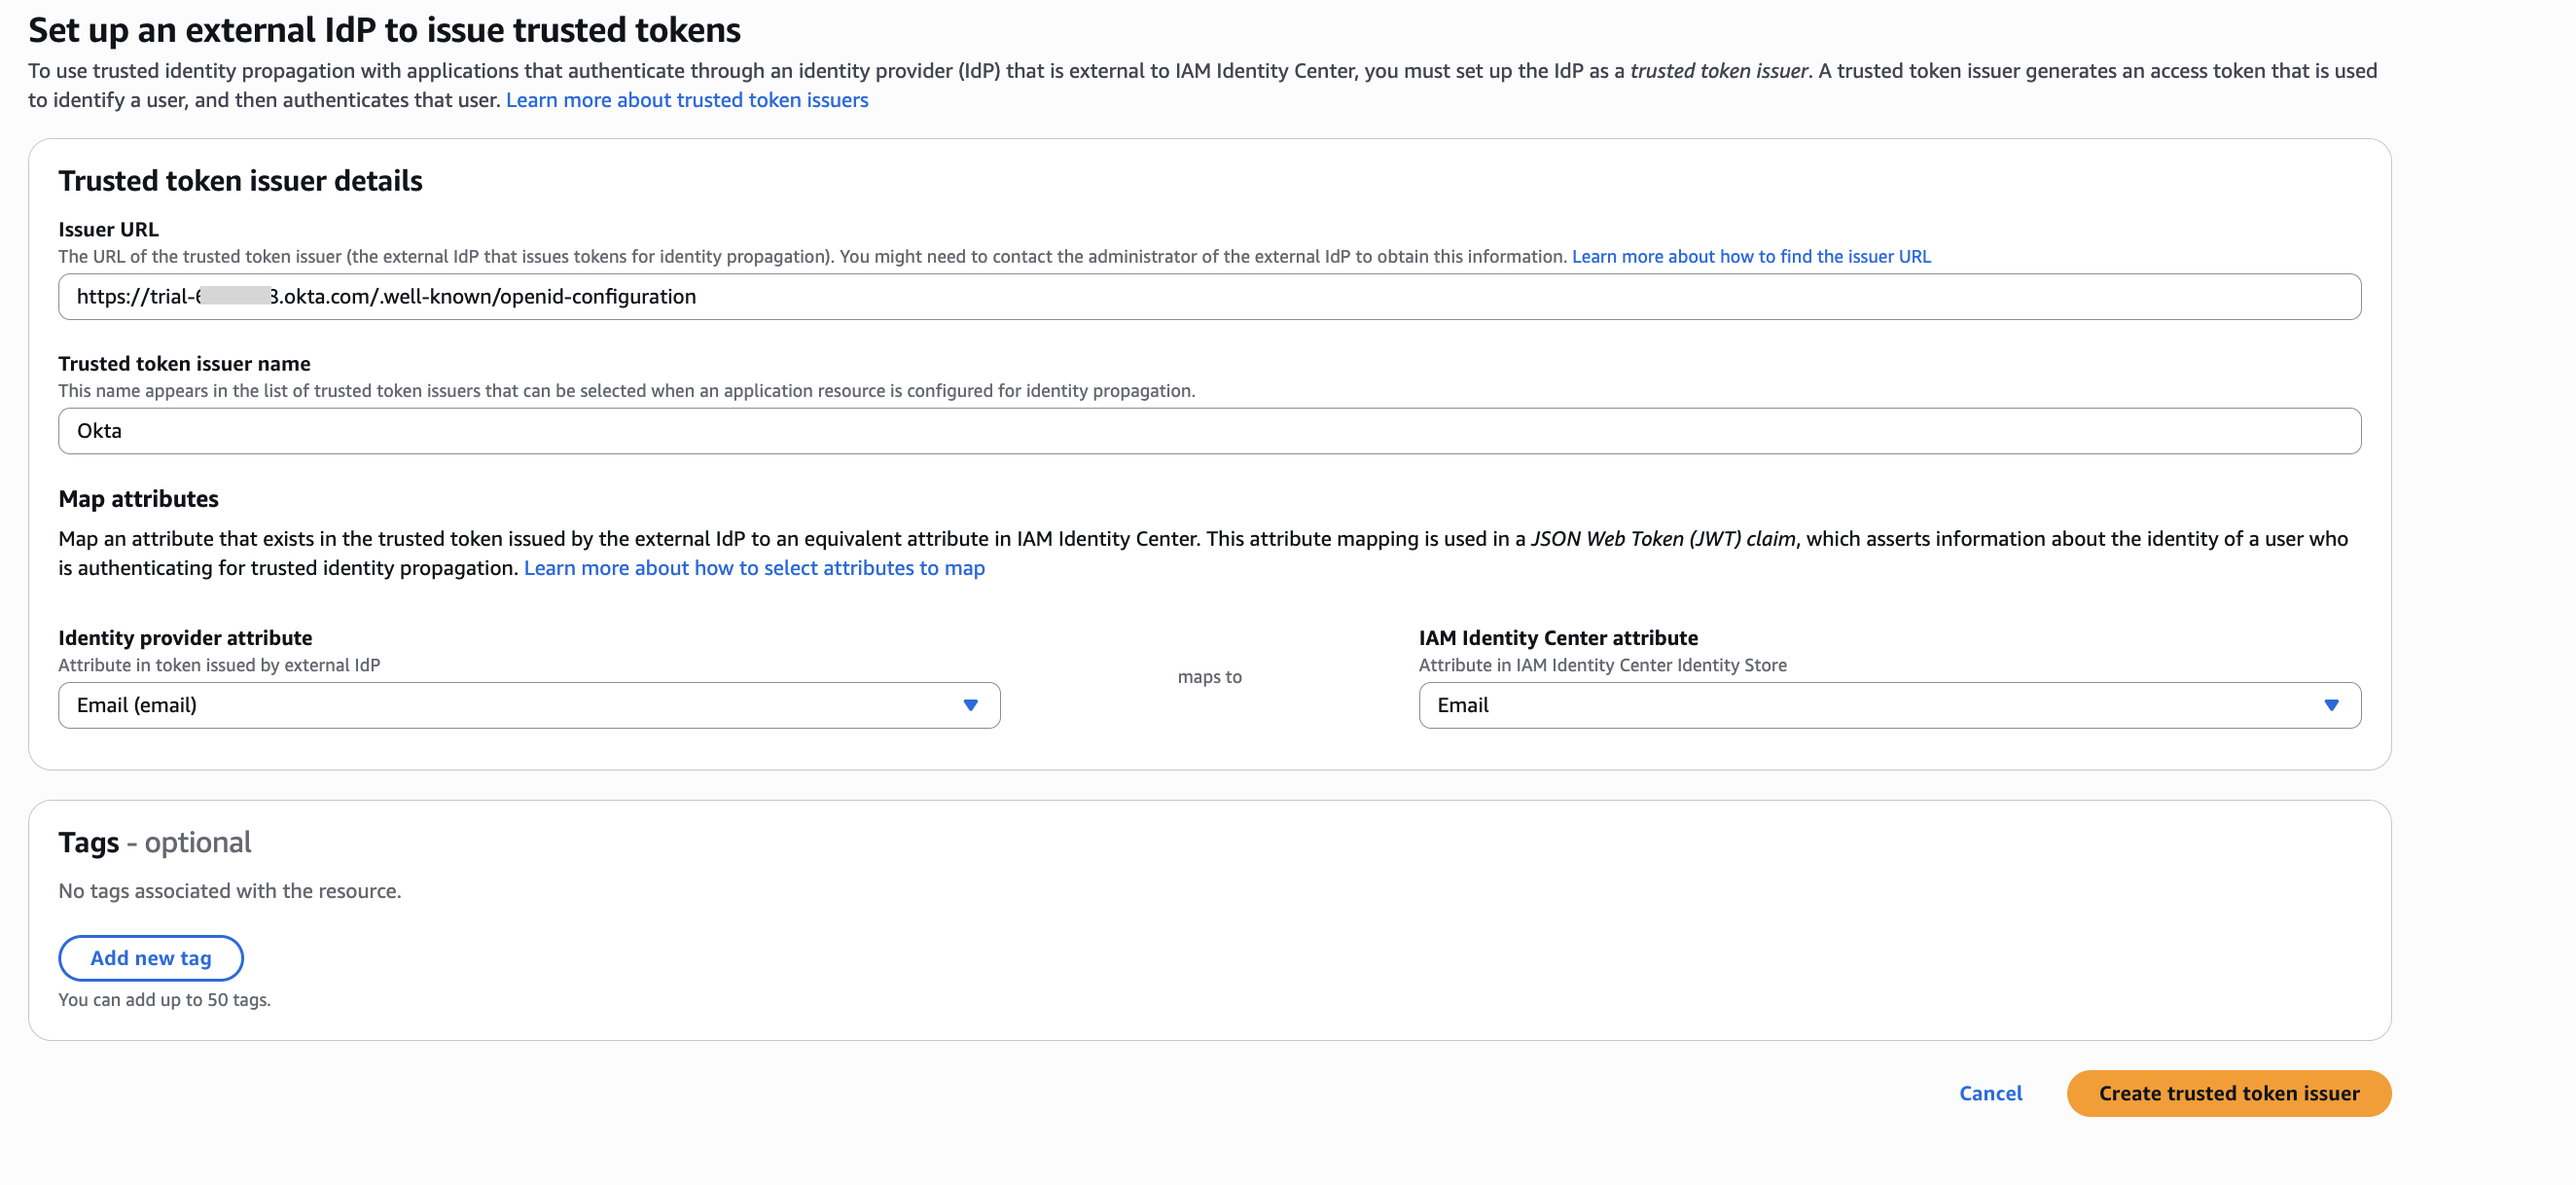
Next, create a trusted token issuer in IAM Identity Center:
- On the IAM Identity Center console, choose Settings in the navigation pane.
- Under Authentication, Choose Create trusted token issuer.
- For Issuer URL, enter the URL of the trusted token issuer.
- For Trusted token issuer name, enter Okta.
- For Map attributes¸ map the IdP attribute Email to the IAM Identity Center attribute Email.
- Choose Create trusted token issuer.
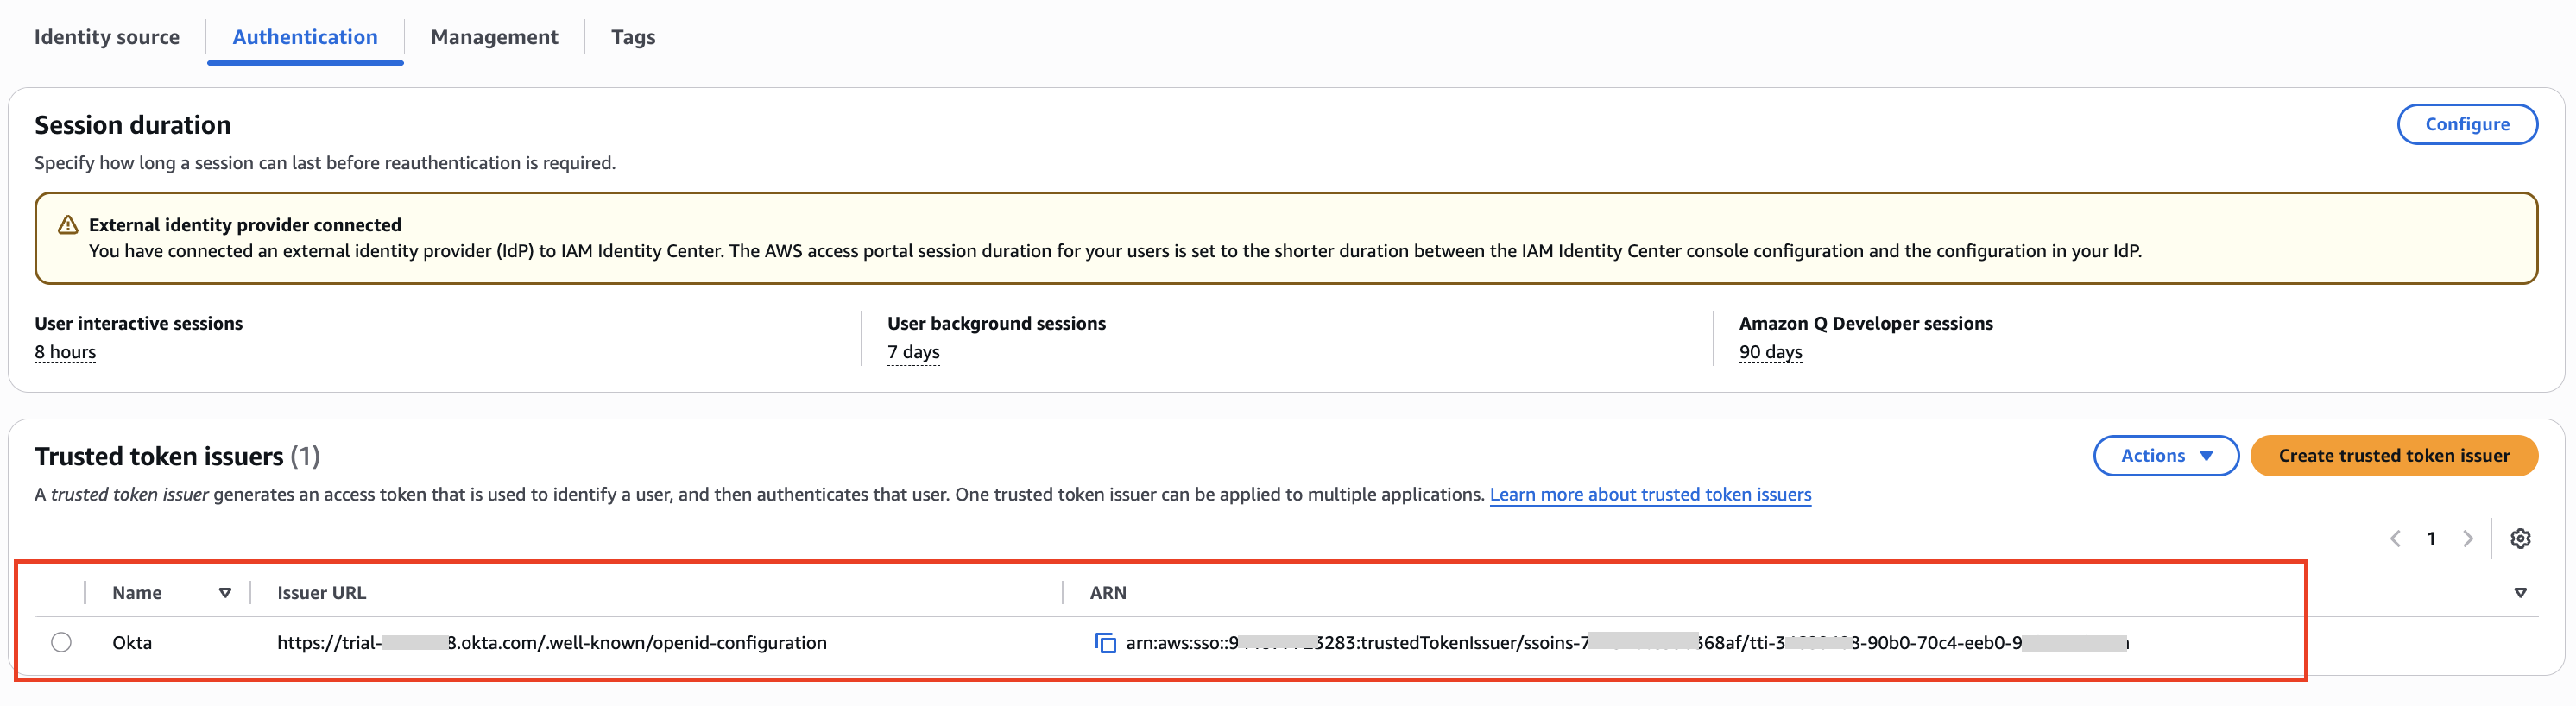
The following screenshot shows your new trusted token issuer on the IAM Identity Center console.
Integrate IAM Identity Center with EMR Studio
We start with creating a trusted identity propagation enabled in EMR Studio.
An EMR Studio administrator must perform the steps to configure EMR Studio as an IAM Identity Center-enabled application. This enables EMR Studio to discover and connect to IAM Identity Center automatically to receive sign-in and user directory services.
The point of enabling EMR Studio as an IAM Identity Center-managed application is so you can control user and group permissions from within IAM Identity Center or from a source third-party IdP that’s integrated with it (Okta in this case). When your users sign in to EMR Studio, for example data-engineer or data-scientist, it checks their groups in IAM Identity Center, and these are mapped to roles and entitlements in Lake Formation. In this manner, a group can map to a Lake Formation database role that allows read access to a set of tables or columns.
The following steps show how to create EMR Studio as an AWS-managed application with IAM Identity Center, then we see how the downstream applications like Lake Formation and Athena propagate these roles and entitlements using existing corporate credentials.
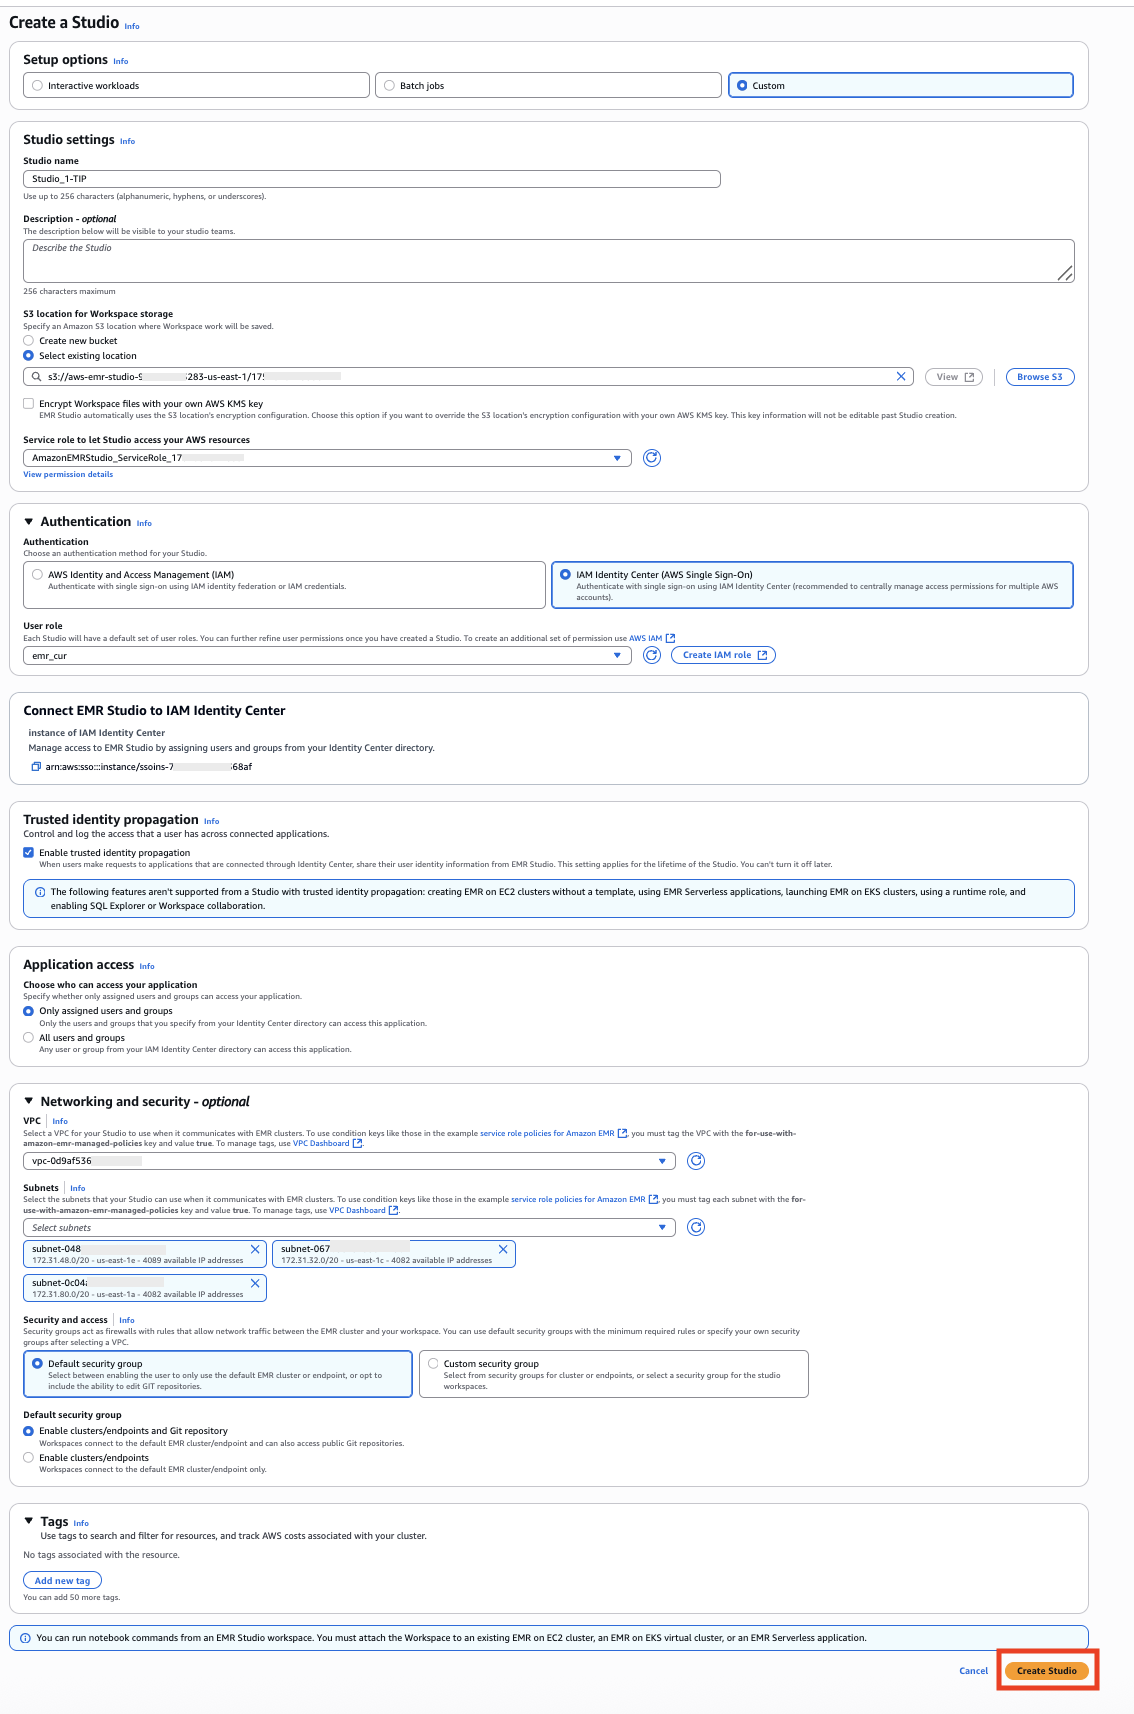
- On the Amazon EMR console, navigate to EMR Studio.
- Choose Create a Studio.
- For Setup options, select Custom.
- For Studio name, enter a name.
- For S3 location for Workspace storage, select Select existing location and enter the Amazon S3 location.

6. Configure permission details for the EMR Studio.
Note that when you choose View permission details under Service role, a new pop-up window will open. You need to create an IAM role with the same policies as shown in the pop-up window. You can use the same for your service role and User role.

Please add the below below trust policy to the EMR User Role :
{
    "Version": "2008-10-17",
    "Statement": [
        {
            "Effect": "Allow",
            "Principal": {
                "Service": "elasticmapreduce.amazonaws.com"
            },
            "Action": [
                "sts:AssumeRole",
                "sts:SetContext"
            ]
        }
    ]
}- On the Create a Studio page, for Authentication, select AWS IAM Identity Center.
- For User role, choose your user role.
- Under Trusted identity propagation, select Enable trusted identity propagation.
- Under Application access, select Only assigned users and groups.
- For VPC, enter your VPC.
- For Subnets, enter your subnet.
- For Security and access, select Default security group.
- Choose Create Studio.
You should now see an IAM Identity Center-enabled EMR Studio on the Amazon EMR console.

After the EMR Studio administrator finishes creating the trusted identity propagation-enabled EMR Studio and saves the configuration, the instance of the EMR Studio appears as an IAM Identity Center-enabled application on the IAM Identity Center console.

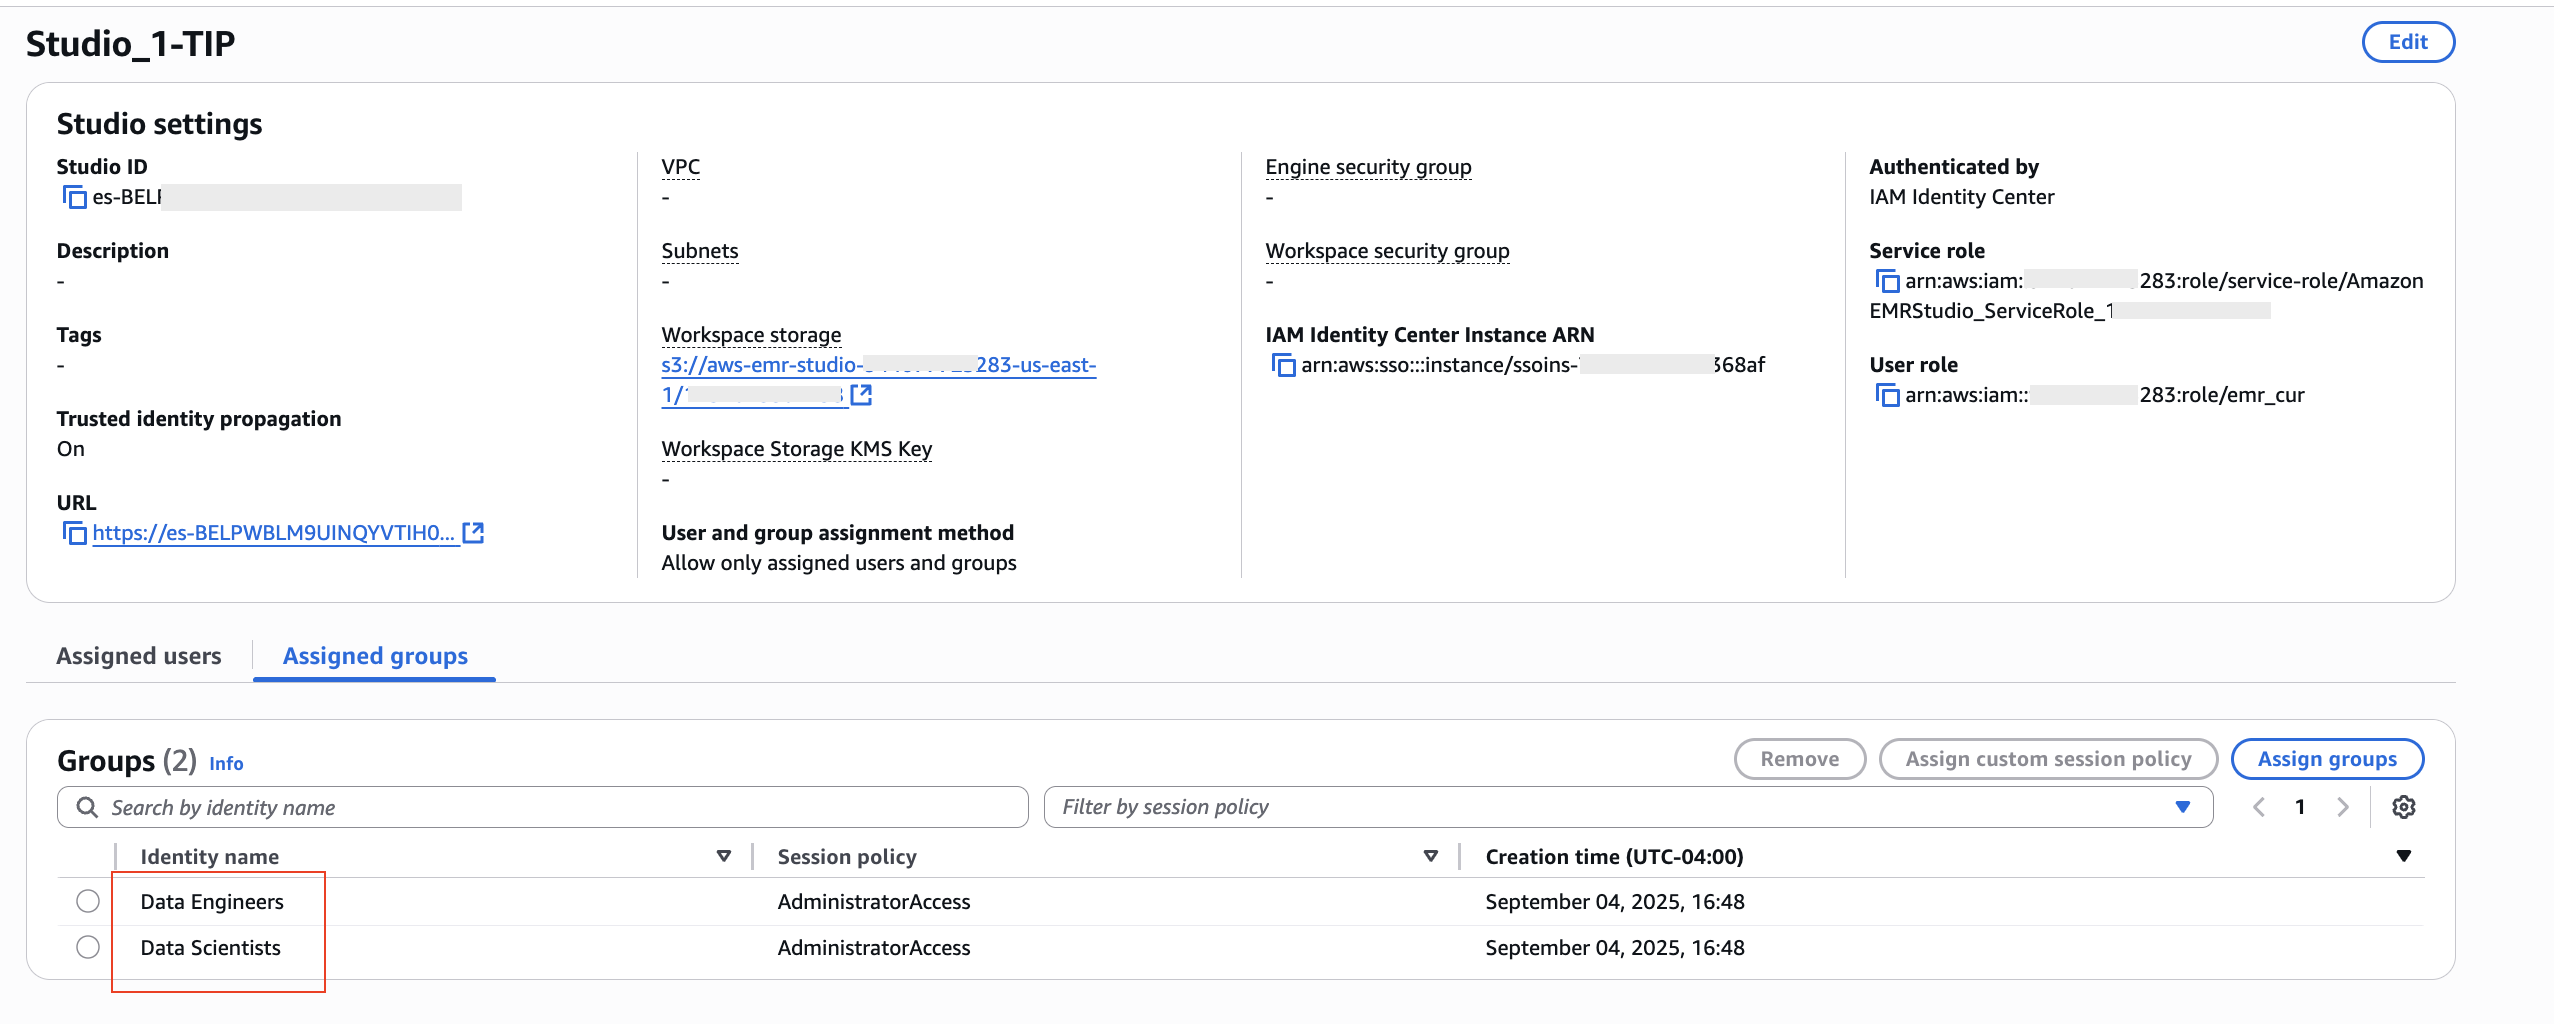
Assign users or groups from IAM Identity Center to EMR Studio
You can assign users and groups from your IAM Identity Center directory to the EMR Studio application after syncing with IAM. The EMR Studio administrator decides which IAM Identity Center users or groups to include in the app. For example, if you have 10 total groups in IAM Identity Center but don’t want all of them accessing this instance of EMR Studio, you can select which groups to include in the EMR Studio-enabled IAM app.
The following steps assign groups to EMR Studio-enabled IAM Identity Center application:
- On the EMR Studio console, navigate to the new EMR Studio instance.
- On the Assigned groups tab, choose Assign groups.
- Choose which IAM Identity Center groups you want to include in the application. For example, you may choose the Data-Scientist and Data-Engineer groups.
- Choose Done.
This allows the EMR Studio administrator to choose specific IAM Identity Center groups to be assigned access to this specific instance integrated with IAM Identity Center. Only the selected groups will be synced and given access, not all groups from the IAM Identity Center directory.
Set up Lake Formation with IAM Identity Center
To set up Lake Formation with IAM Identity Center, make sure that you have configured Okta as the IdP for IAM Identity Center, and confirm that the users and groups form Okta are now available in IAM Identity Center. Then complete the following steps:
- On the Lake Formation console, choose IAM Identity Center Integration under Administration in the navigation pane.
You will see the message “IAM Identity Center enabled” along with the ARN for the IAM Identity Center application.
- Choose Create.
In a few minutes, you will see a message indicating that Lake Formation has been successfully integrated with your centralized IAM identities from Okta Identity Center. Specifically, the message will state “Successfully created identity center integration with application ARN,” signifying the integration is now in place between Lake Formation and the identities managed in Okta.

Configure granular role-based entitlements using Lake Formation on propagated corporate identities
We will now set up granular entitlements for our data access in Lake Formation. For this post, we summarize the steps needed to use the existing corporate identities on the Lake Formation console to provide relevant controls and governance on the data, which we will later query through the Athena query editor. To learn about setting up databases and tables in Lake Formation, refer to Getting started with AWS Lake Formation
This post will not go into the full details about Lake Formation. Instead, we will focus on a new capability that has been introduced in Lake Formation—the ability to set up permissions based on your existing corporate identities that are synchronized with IAM Identity Center.
This integration allows Lake Formation to use your organization’s IdP and access management policies to control permissions to data lakes. Rather than defining permissions from scratch specifically for Lake Formation, you can now rely on your existing users, groups, and access controls to determine who can access data catalogs and underlying data sources. Overall, this new integration with IAM Identity Center makes it straightforward to manage permissions for your data lake workloads using your corporate identities. It reduces the administrative overhead of keeping permissions aligned across separate systems. As AWS continues enhancing Lake Formation, features like this will further improve its viability as a full-featured data lake management environment.
In this post, we created a database called zipcode-db-tip and granted full access to the user group Data-Engineer to query on the underlying table in the database. Complete the following steps:
- On the Lake Formation console, choose Grant data lake permissions.
- For Principals, select IAM Identity Center.
- For Users and groups, select Data-Engineer.
- For LF-Tags or catalog resources, select Named Data Catalog resources.
- For Databases, choose
zipcode-db-tip
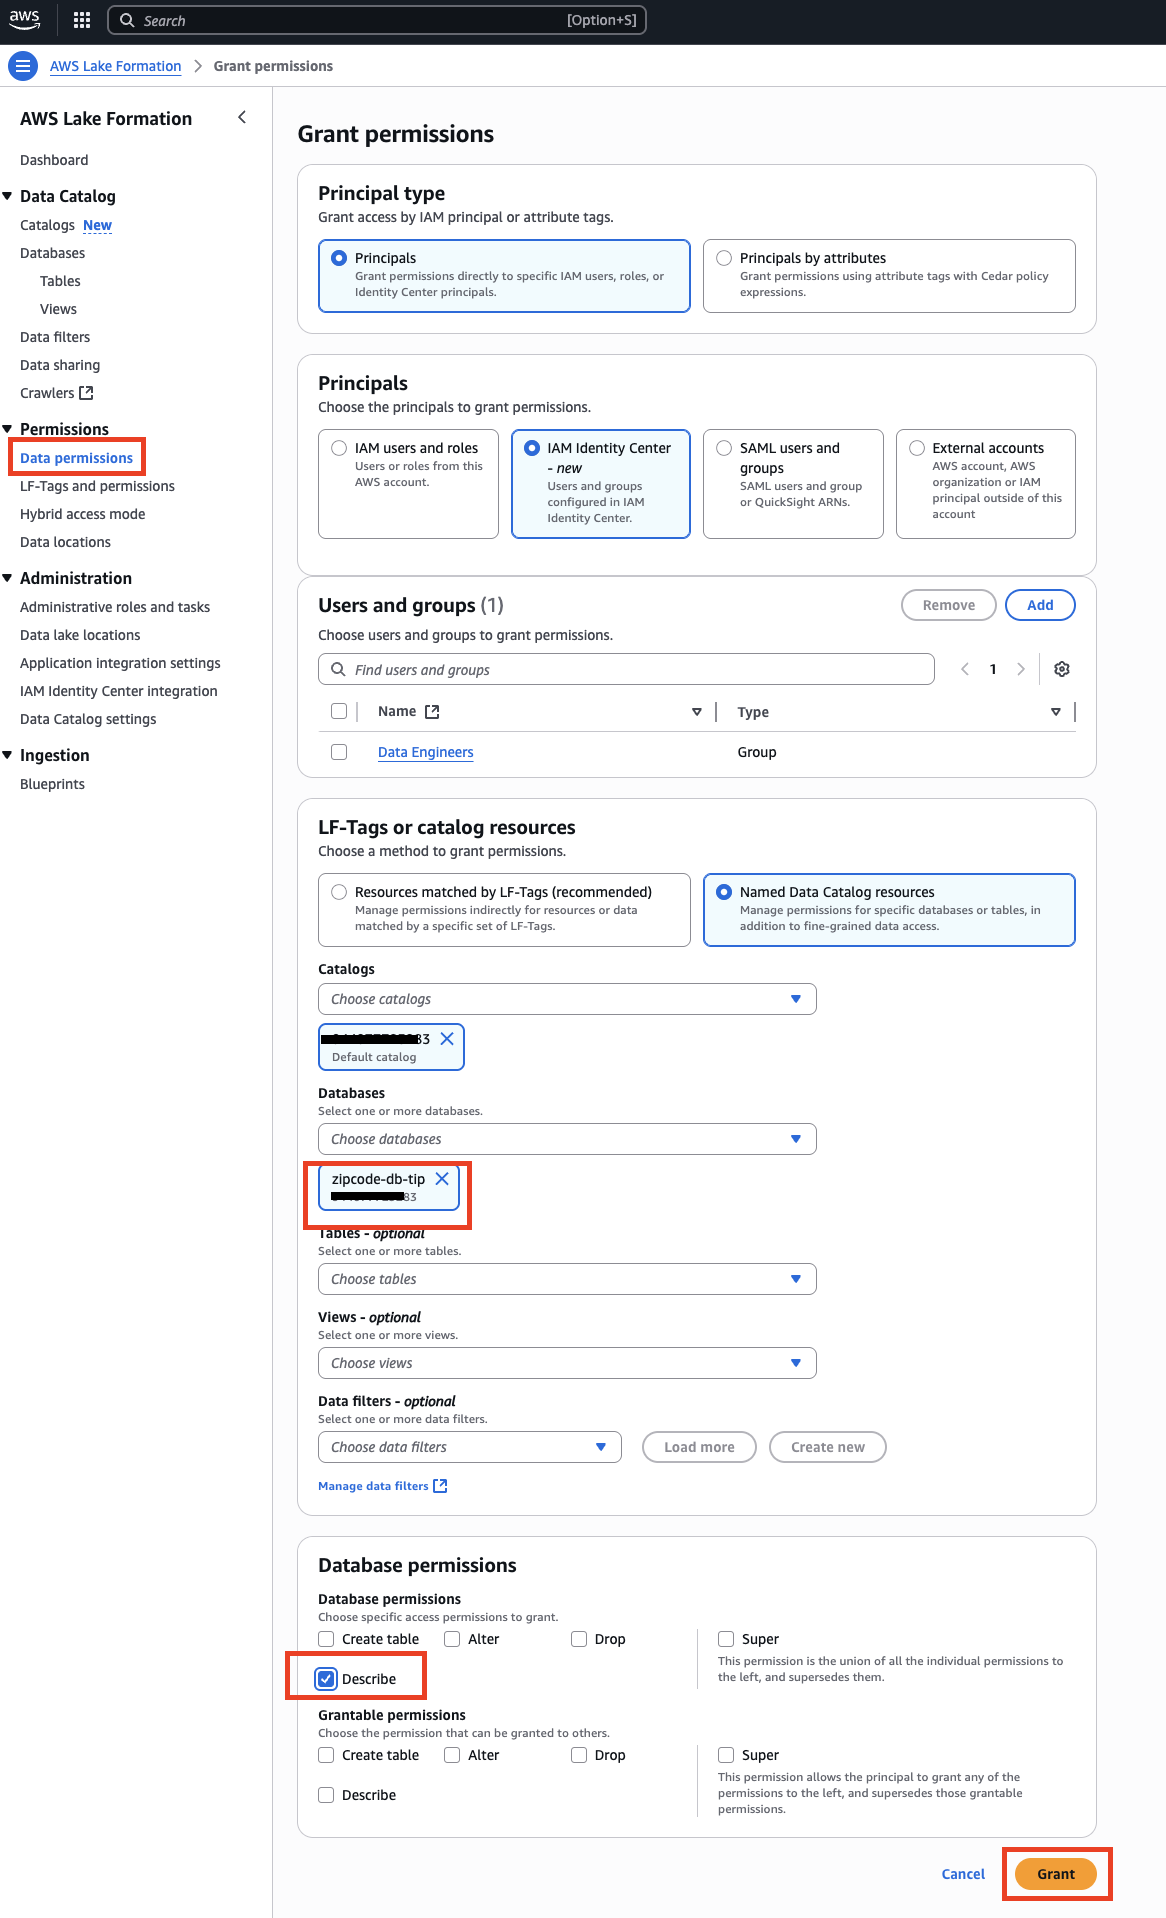
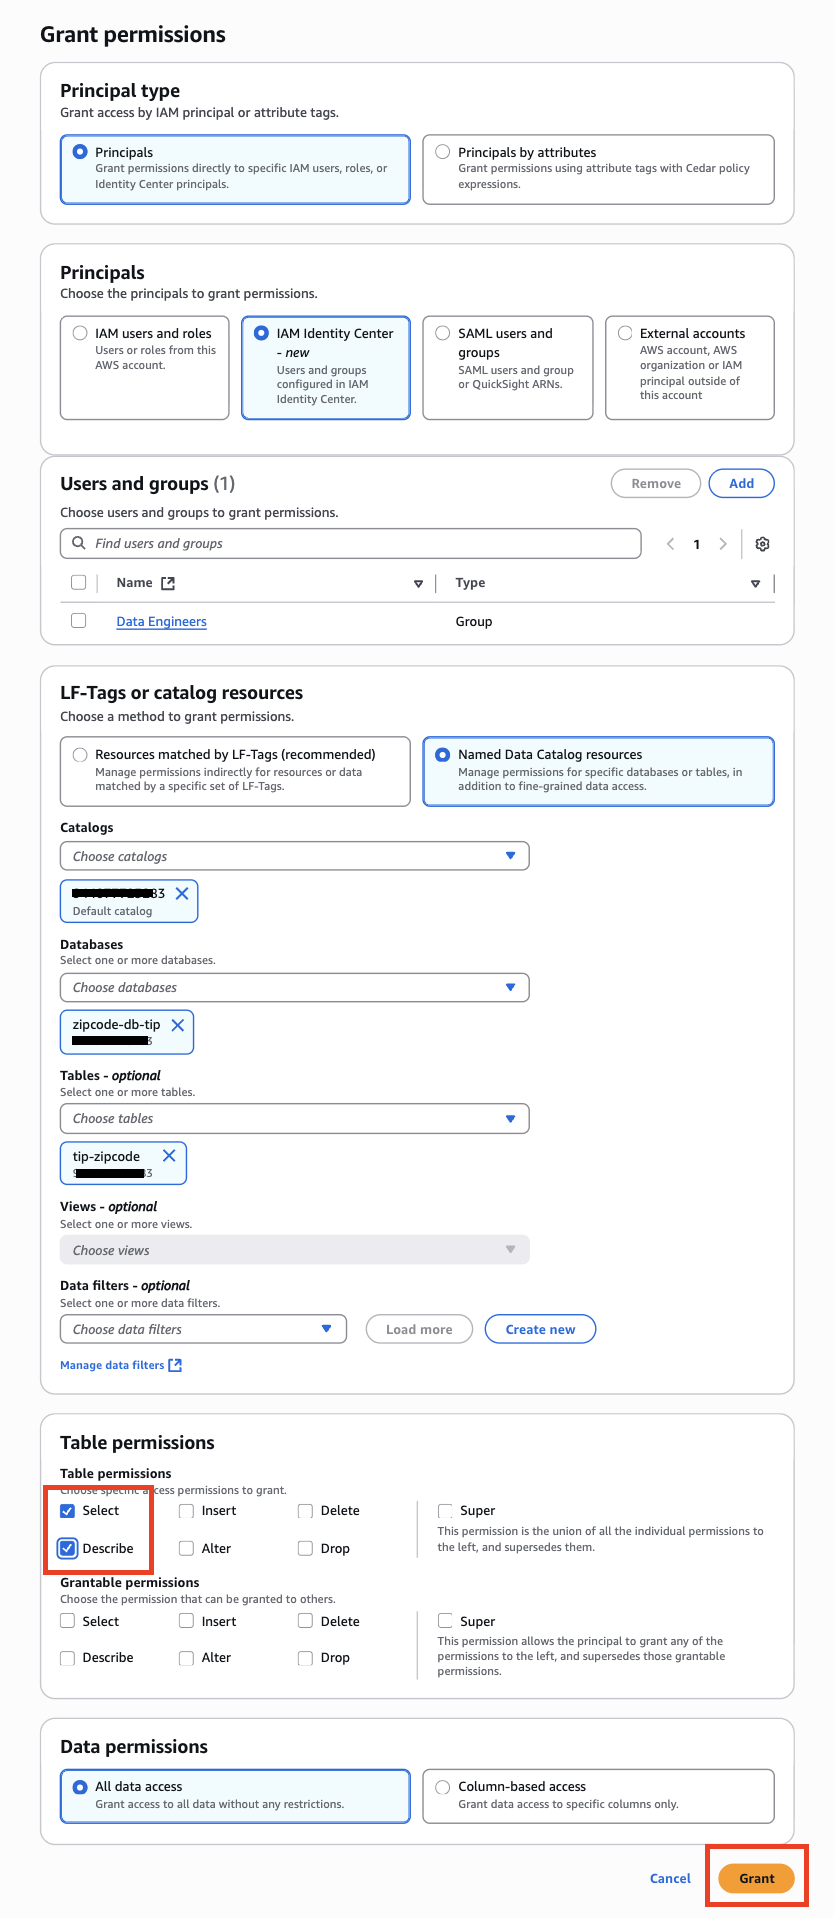
Similarly, we need to provide the relevant access on the underlying tables to the users and groups for them to be able to query on the data.
- Repeat the preceding steps to provide access to the Data-Engineer group to be able to query on the data.
- For Table permissions, select Select and Describe.
- For Data permissions, select All data access.
You can grant selective access on rows and comments as per your specific requirements.
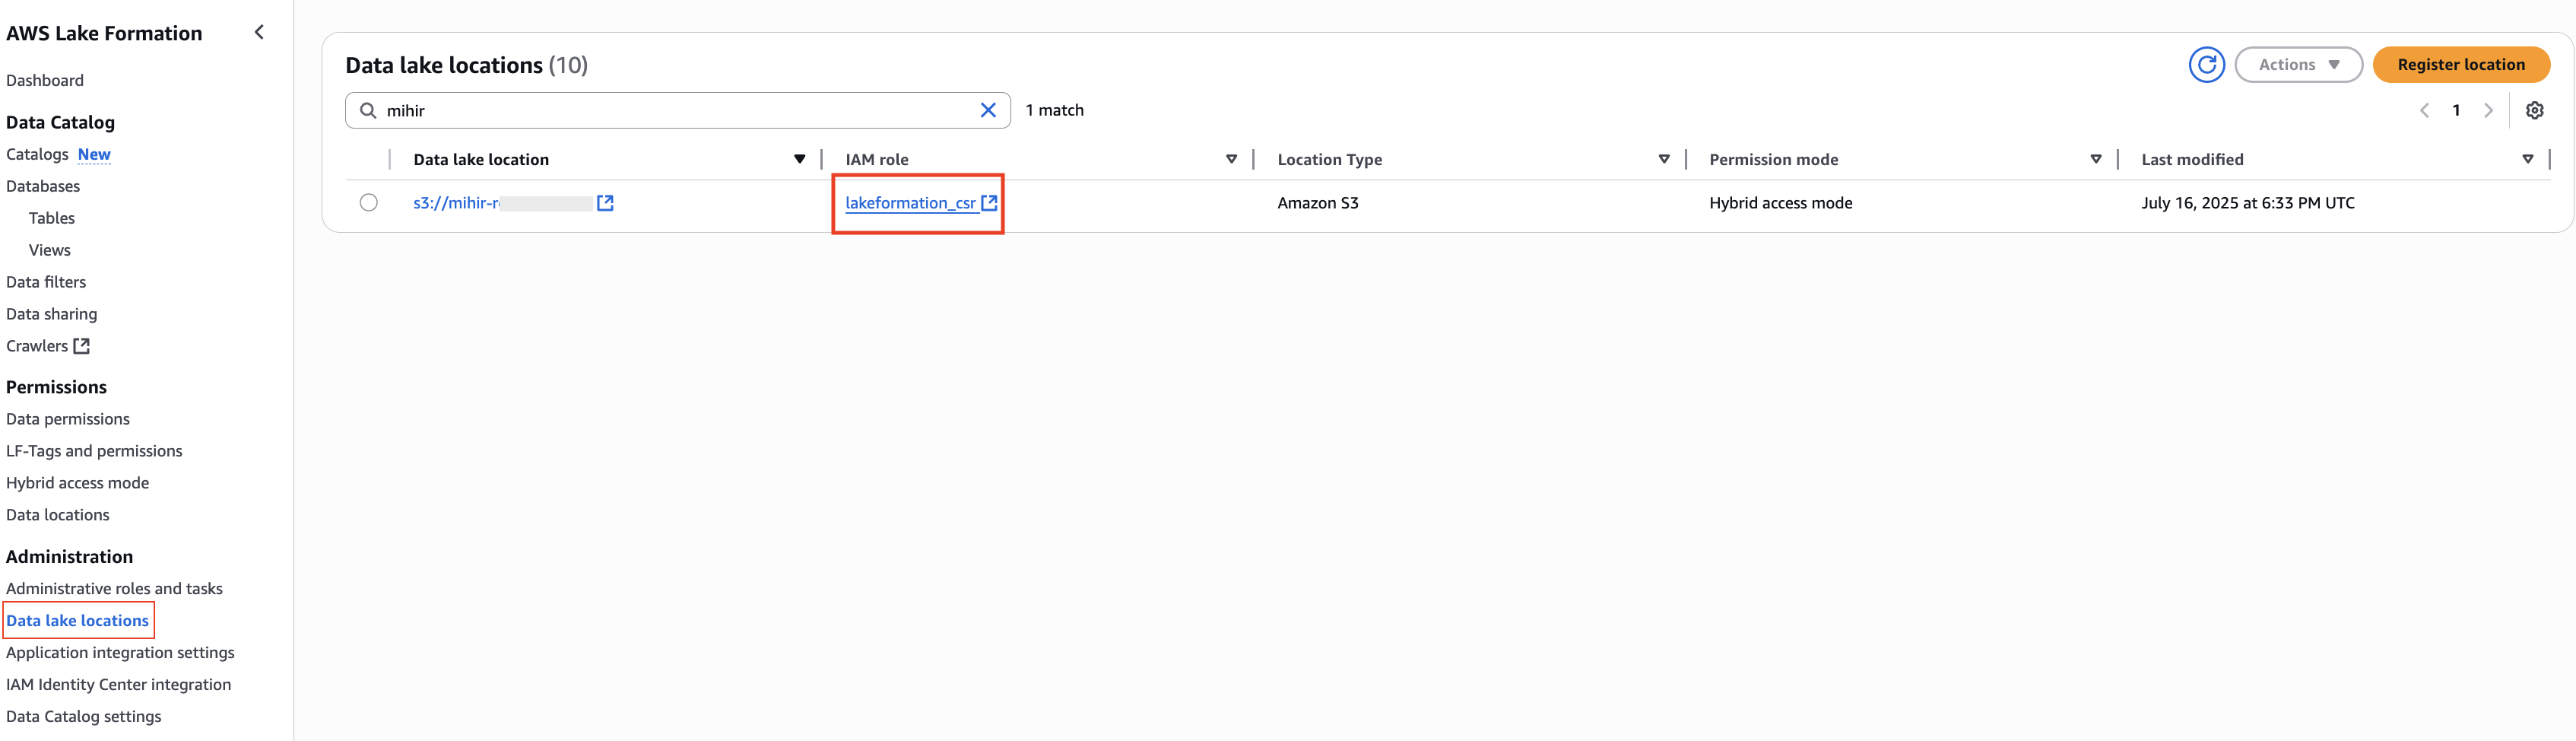
The S3 location where the tip-zipcode table is created is registered in Lake Formation using a Lake Formation service role. For this blog, we created a custom Lake Formation role (lakeformation_csr role) that has S3 access permissions for our Glue table.
Add the below below trust policy to the Lake Formation custom service role used for registering Data Lake locations:
{
    "Version": "2012-10-17",
    "Statement": [
        {
            "Sid": "",
            "Effect": "Allow",
            "Principal": {
                "Service": "lakeformation.amazonaws.com"
            },
            "Action": [
                "sts:AssumeRole",
                "sts:SetContext"
            ]
        }
    ]
}
Set up workgroups in Athena
Athena workgroups are an AWS feature that allows you to isolate data and queries within an AWS account. It provides a way to segregate data and control access so that each group can only access the data that is relevant to them. Athena workgroups are useful for organizations that want to restrict access to sensitive datasets or help prevent queries from impacting each other. When you create a workgroup, you can assign users and roles to it. Queries launched within a workgroup will run with the access controls and settings configured for that workgroup. They enable governance, security, and resource controls at a granular level. Athena workgroups are an important feature for managing and optimizing Athena usage across large organizations.
In this post, we create a workgroup specifically for members of our Data Engineering team. Later, when logged in under Data Engineer user profiles, we run queries from within this workgroup to demonstrate how access to Athena workgroups can be restricted based on the user profile. This allows governance policies to be enforced, making sure users can only access permitted datasets and queries based on their role.
- On the Athena console, choose Workgroups under Administration in the navigation pane.
- Choose Create workgroup.
- For Authentication, select AWS Identity Center.
- For Service role to authorize Athena, select Create and use a new service role.
- For Service role name, enter a name for your role.

- For Location of query result, enter an Amazon S3 location for saving your Athena query results.
This is a mandatory field when you specify IAM Identity Center for authentication.

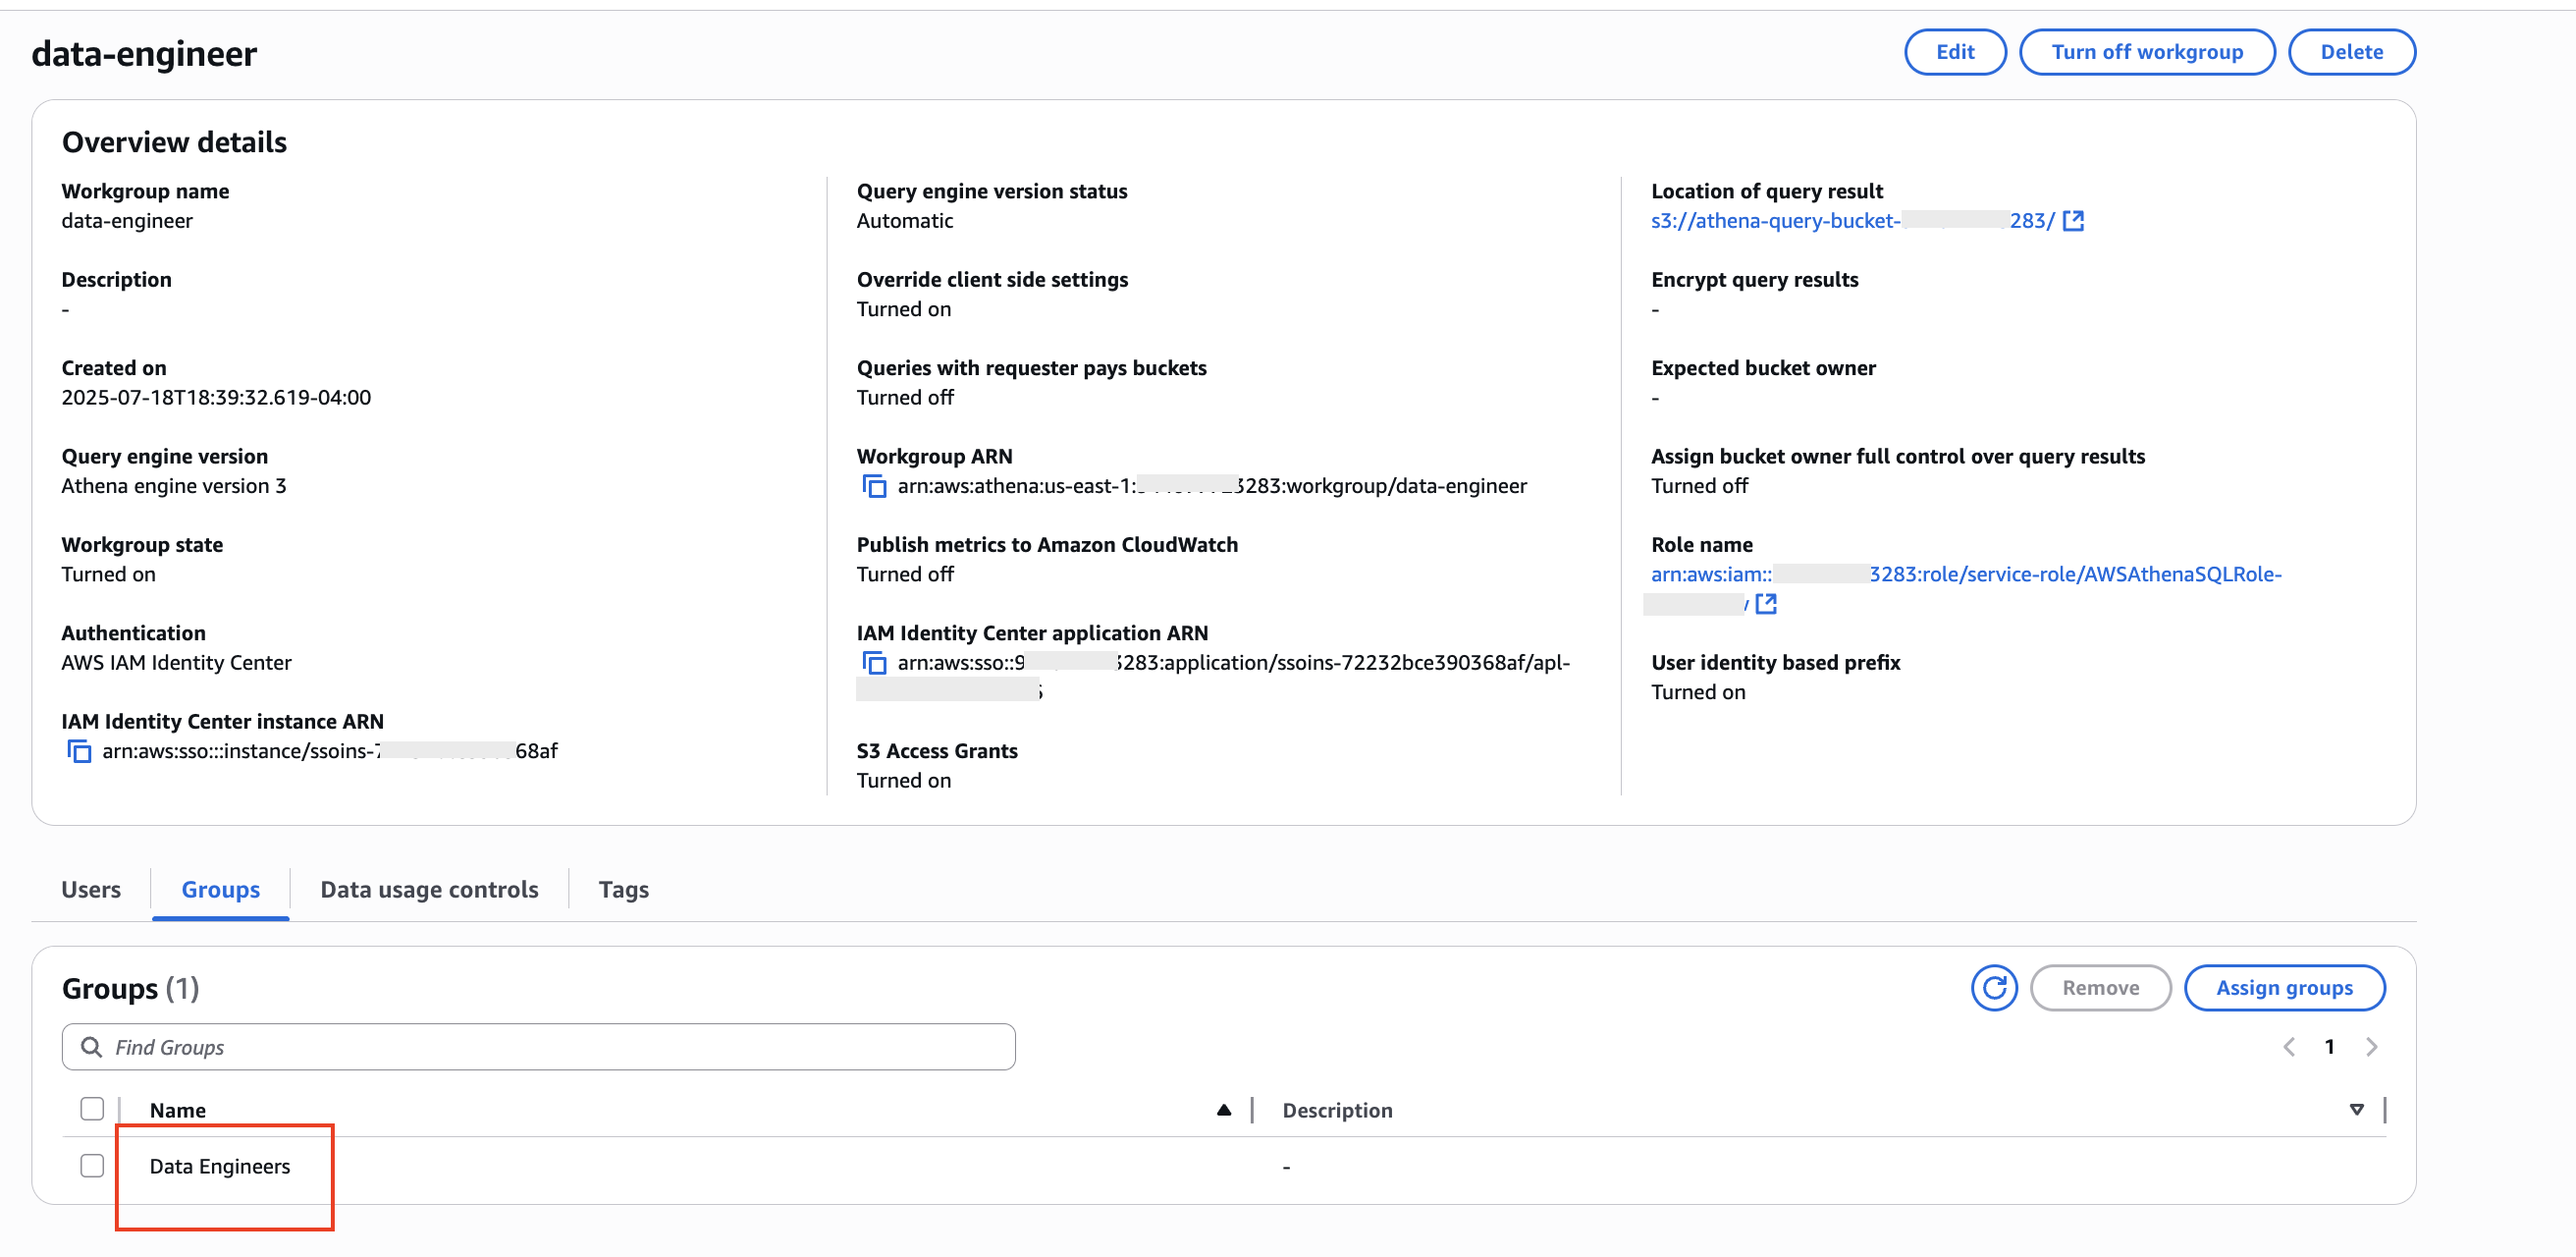
After you create the workgroup, you need to assign users and groups to it. For this post, we create a workgroup named data-engineer and assign the group Data-Engineer (propagated through the trusted identity propagation from IAM Identity Center).
- On the Groups tab on the data-engineer details page, select the user group to assign and choose Assign groups.
Set up Amazon S3 access grants to separate the query results for each workforce identity
Next, we set up Amazon S3 grants.
You can watch the following video to set up the grants or refer to Use Amazon EMR with S3 Access Grants to scale Spark access Amazon S3 for instructions.
Ensure that the IAM role used for registering the S3 Location in Access Grants has the below trust relationship:
{
    "Version": "2012-10-17",
    "Statement": [
        {
            "Effect": "Allow",
            "Principal": {
                "Service": "access-grants.s3.amazonaws.com"
            },
            "Action": [
                "sts:SetContext",
                "sts:AssumeRole"
            ]
        }
    ]
}
Initiate login through AWS federated access using the IAM Identity Center access portal
Now we’re ready to connect to EMR Studio and federated login using IAM Identity Center authentication:
- On the IAM Identity Center console, navigate to the dashboard and choose the AWS access portal URL.
- A browser pop-up directs you to the Okta login page, where you enter your Okta credentials.
- After successful authentication, you’ll be logged in to the AWS console as a federated user.
- Choose the EMR Studio application.
- After you federate to EMR Studio, choose Query Editor in the navigation pane to open a new tab with the Athena query editor.
The following video shows a federated user using the AWS access portal URL to access EMR Studio using IAM Identity Center authentication.
Run queries with granular access on the editor
On EMR Studio, the user can open the Athena query editor and then specify the correct workgroup in the query editor to run the queries.

The data engineer can query only the tables on which the user has access. The query results will appear under the S3 prefix, which is separate for each workforce identity.
Review the end-to-end audit trail of workforce identity
This section outlines the end-to-end authentication and authorization workflow for users accessing data through EMR Studio integrated with AWS Identity Center, Lake
Formation, and S3 Access Grants. The process demonstrates how enterprise user identities are propagated throughout the AWS services stack, enabling fine-grained access
control from initial login through query execution and results retrieval. The workflow covers four key phases: initial user authentication and application access, EMR
Studio query submission to Athena, Lake Formation-based data authorization, and S3 Access Grants credential vending for both writing query results and reading them back for
display.
- User Authentication via AWS SSO/IdC(Identity Center) Portal
- User hits the AWS SSO/IdC Access Portal and authenticates via enterprise user name and Password, along with MFA(if Configured)
- Application Selection and Role Assumption with Identity Propagation
- User selects EMR Studio Application from the list of available applications
- EMR Studio on behalf of User hits sts endpoint and calls AssumeRole API to get IAM session of the EMR Studio User Role (eg : arn:aws:sts::9440777XXXXX:assumed-role/<EMR User Role>/<IdC UserName>)
- When EMR Studio assumes the user role it also set the enterprise user identity on the assumed role session to propagate to downstream services. This is called Identity Enhanced IAM role sessions
- Optionally, EMR service calls GetCallerIdenity to verify the assumed role
- User Runs Query in EMR Studio
- EMR Studio submits query to Athena( StartQueryExecution API)
- Athena StartQueryExecution CT event with UserRole and End User Identity
- Athena Authentication and Role Assumption
- Athena Authenticates and Authorizes End user Identity using IdC API call
- After successful IdC Authentication and Authorization(AuthNZ) call, Athen acting on behalf of the user, assume the Athena Workgroup Execution role (eg : AWSAthenaSQLRole-<random>/userId) and adds end user identity session for downstream calls
- Lake Formation Authorization and Data Access Control
- Athena calls Lake Formation for reading data using the detailed workflow provided here
- S3 Access Grants Credential Vending for Query Results
- Athena invokes S3 Access Grants GetDataAccess API using the Athena Execution Role Identity Enhanced IAM role sessions
- S3 Access Grants(S3AG) after AuthNZ returns temporary credentials for writing results to S3 else returns 403
- Athena writes the query results to S3 using the S3AG vended temporary credentials
- EMR Studio Displays the Query results by calling Athena GetQueryResults API
- EMR studio calls Athena GetQueryResults API using the EMR Studio User Role Identity Enhanced IAM role sessions
- Athena repeats step Athena Authentication and Role Assumption
- Athena invokes S3 Access Grants GetDataAccess API using the Athena Execution Role Identity Enhanced IAM role sessions
- S3AG after AuthNZ returns temporary credentials for reading results from S3 else returns 403
- Athena reads the results from S3 and returns the JSON response to EMR Studio to display results to end customer
Clean up
Complete the following steps to clean up your resources:
- Delete the Okta applications that you created to integrate with IAM Identity Center.
- Delete IAM Identity Center configuration.
- Delete the EMR Studio that you created for testing.
- Delete the IAM role that you created for IAM Identity Center and EMR Studio integration.
Conclusion
In this post, we showed you a detailed walkthrough to bring your workforce identity to EMR Studio and propagate the identity to connected AWS applications like Athena and Lake Formation. This solution provides your workforce with a familiar sign-in experience, without the need to remember additional credentials or maintain complex role mapping across different analytics systems. In addition, it provides auditors with end-to-end visibility into workforce identities and their access to analytics services.
To learn more about trusted identity propagation and EMR Studio, refer to Integrate Amazon EMR with AWS IAM Identity Center.
About the authors
 Manjit Chakraborty is a Senior Solutions Architect at AWS. He is a Seasoned & Result driven professional with extensive experience in Financial domain having worked with customers on advising, designing, leading, and implementing core-business enterprise solutions across the globe. In his spare time, Manjit enjoys fishing, practicing martial arts and playing with his daughter.
 Neeraj Roy is a Principal Solutions Architect at AWS based out of London. He works with Global Financial Services customers to accelerate their AWS journey. In his spare time, he enjoys reading and spending time with his family.
 Mihir Borkar is a seasoned AWS Data Architect with nearly a decade of experience designing and implementing enterprise-scale data solutions on AWS. He specializes in modernizing data architectures using AWS data analytical services, designing scalable data lakes and analytics platforms with a focus on efficient, cost-effective solutions. Mihir is passionate about democratizing data access through self-service platforms, helping organizations unlock the value of their data. In his free time, Mihir loves to read about emerging cloud technologies.
 Arunkumar Mathiyazhagan is a Senior Software Engineer with Amazon Athena in East Palo Alto, specializing in serverless data analytics and access control. With deep expertise in building scalable analytics solutions, he focuses on developing features that democratize data access and empower customers to effortlessly analyze and understand their data. His passion lies in creating intuitive, secure, and performant solutions that help organizations derive meaningful insights from their data assets while maintaining proper access controls.