AWS Compute Blog
Building well-architected serverless applications: Controlling serverless API access – part 2
This series of blog posts uses the AWS Well-Architected Tool with the Serverless Lens to help customers build and operate applications using best practices. In each post, I address the nine serverless-specific questions identified by the Serverless Lens along with the recommended best practices. See the Introduction post for a table of contents and explanation of the example application.
Security question SEC1: How do you control access to your serverless API?
This post continues part 1 of this security question. Previously, I cover the different mechanisms for authentication and authorization available for Amazon API Gateway and AWS AppSync. I explain the different approaches for public or private endpoints and show how to use AWS Identity and Access Management (IAM) to control access to internal or private API consumers.
Required practice: Use appropriate endpoint type and mechanisms to secure access to your API
I continue to show how to implement security mechanisms appropriate for your API endpoint.
Using AWS Amplify CLI to add a GraphQL API
After adding authentication in part 1, I use the AWS Amplify CLI to add a GraphQL AWS AppSync API with the following command:
amplify add apiWhen prompted, I specify an Amazon Cognito user pool for authorization.

Amplify add Amazon Cognito user pool for authorization
To deploy the AWS AppSync API configuration to the AWS Cloud, I enter:
amplify pushOnce the deployment is complete, I view the GraphQL API from within the AWS AppSync console and navigate to Settings. I see the AWS AppSync API uses the authorization configuration added during the part 1 amplify add auth. This uses the Amazon Cognito user pool to store the user sign-up information.

View AWS AppSync authorization settings with Amazon Cognito
For a more detailed walkthrough using Amplify CLI to add an AWS AppSync API for the serverless airline, see the build video.
Viewing JWT tokens
When I create a new account from the serverless airline web frontend, Amazon Cognito creates a user within the user pool. It handles the 3-stage sign-up process for new users. This includes account creation, confirmation, and user sign-in.
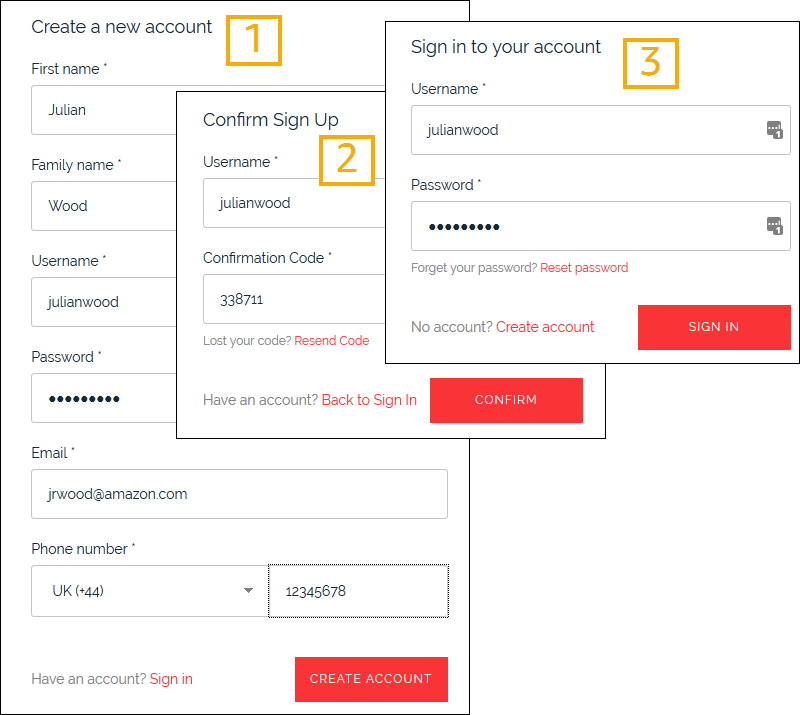
Serverless airline Amazon Cognito based sign-in process
Once the account is created, I browse to the Amazon Cognito console and choose Manage User Pools. I navigate to Users and groups under General settings and view my user account.

View User Account
When I sign in to the serverless airline web app, I authenticate with Amazon Cognito, and the client receives user pool tokens. The client then calls the AWS AppSync API, which authorizes access using the tokens, connects to data sources, and resolves the queries.

Amazon Cognito tokens used by AWS AppSync
During the sign-in process, I can use the browser developer tools to view the three JWT tokens Amazon Cognito generates and returns to the client. These are the accesstoken, idToken, and refreshToken.
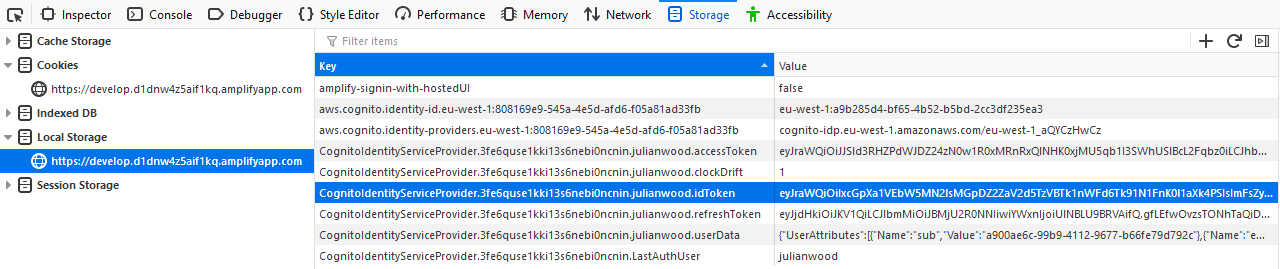
View tokens with browser developer tools
I copy the .idToken value and use the decoder at https://jwt.io/ to view the contents.

JSON web token decoded
The decoded token contains claims about my identity. Claims are pieces of information asserted about my identity. In this example, these include my Amazon Cognito username, email address, and other sign-up fields specified in the user pool. The client can use this identity information inside the application.
The ID token expires one hour after I authenticate. The client uses the Amazon Cognito issued refreshToken to retrieve new ID and access tokens. By default, the refresh token expires after 30 days, but can be set to any value between 1 and 3650 days. When using the mobile SDKs for iOS and Android, retrieving new ID and access tokens is done automatically with a valid refresh token.
For more information, see “Using Tokens with User Pools”.
Accessing AWS services
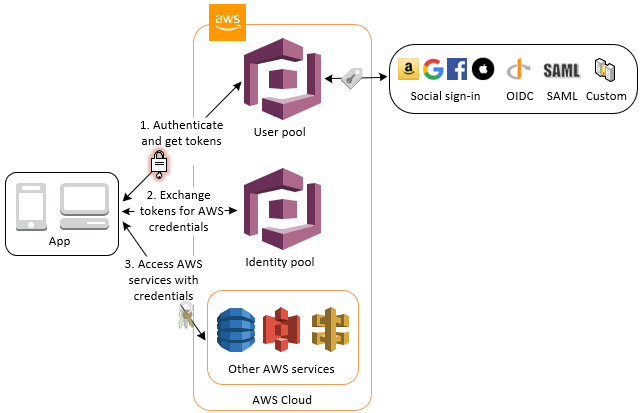
An Amazon Cognito user pool is a managed user directory to provide access for a user to an application. Amazon Cognito has a feature called identity pools (federated identities), which allow you to create unique identities for your users. These can be from user pools, or other external identity providers.
These unique identities are used to get temporary AWS credentials to directly access other AWS services, or external services via API Gateway. The Amplify client libraries automatically expire, rotate, and refresh the temporary credentials.
Identity pools have identities that are either authenticated or unauthenticated. Unauthenticated identities typically belong to guest users. Authenticated identities belong to authenticated users who have received a token by a login provider, such as a user pool. The Amazon Cognito issued user pool tokens are exchanged for AWS access credentials from an identity pool.
Identity pools have identities that are either authenticated or unauthenticated. Every user who uses the client is given a unique identity. If they have not authenticated then that identity is an “unauthenticated identity”. Once they authenticate, the identity becomes an authenticated identity. The Amazon Cognito issued user pool tokens are exchanged for AWS access credentials from an identity pool.
JWT-tokens-from-Amazon-Cognito-user-pool-exchanged-for-AWS-credentials-from-Amazon-Cognito-identity-pool
API keys
For public content and unauthenticated access, both Amazon API Gateway and AWS AppSync provide API keys that can be used to track usage. API keys should not be used as a primary authorization method for production applications, however they should still be treated as secrets. Instead, use these for rate limiting and throttling. Unauthenticated APIs require stricter throttling than authenticated APIs.
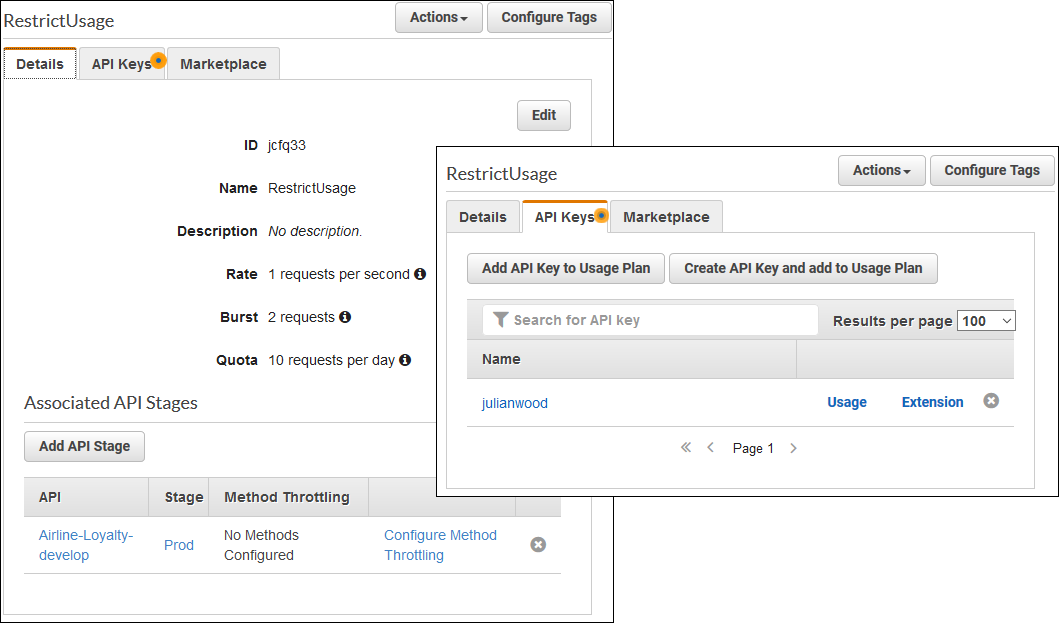
API Gateway usage plans specify who can access API stages and methods, and also how much and how fast they can access them. API keys are then associated with the usage plans to identify API clients and meter access for each key. Throttling and quota limits are enforced on individual keys.
Throttling limits determine how many requests per second are allowed for a usage plan. This is useful to prevent a client from overwhelming a downstream resource. There are two API Gateway values to control this, the throttle rate and throttle burst, which use the token bucket algorithm. The algorithm is based on an analogy of filling and emptying a bucket of tokens representing the number of available requests that can be processed. The bucket in the algorithm has a fixed size based on the throttle burst and is filled at the token rate. Each API request removes a token from the bucket. The throttle rate then determines how many requests are allowed per second. The throttle burst determines how many concurrent requests are allowed and is shared across all APIs per Region in an account.

Token bucket algorithm
Quota limits allow you to set a maximum number of requests for an API key within a fixed time period. When billing for usage, this also allows you to enforce a limit when a client pays by monthly volume.
API keys are passed using the x-api-key header. API Gateway rejects requests without them.
For example, within the serverless airline, the loyalty service uses an AWS Lambda function to fetch loyalty points and next tier progress via an API Gateway REST API /loyalty/{customerId}/get resource.
I can use this API to simulate the effect of usage plans with API keys.
-
- I navigate to the airline-loyalty API
/loyalty/{customerId}/getresource in API Gateway console. - I change the API Key Required value to be
true.
- I navigate to the airline-loyalty API

Setting API Key Required on API Gateway method
-
- I choose Deploy API from the Actions menu.
- I create a usage plan in the Usage Plans section of the API Gateway Console.
- I choose Create and enter a name for the usage plan.
- I select Enable throttling and set the rate to one request per second and the burst to two requests. These are artificially low numbers to simulate the effect.
- I select Enable quota and set the limit to 10 requests per day.

Create API Gateway usage plan
-
- I click Next.
- I associate an API Stage by choosing Add API Stage, and selecting the airline Loyalty API and Prod Stage.

Associate usage plan to API Gateway stage
-
- I click Next, and choose Create API Key and add to Usage Plan

Create API key and add to usage plan.
-
- I name the API Key and ensure it is set to Auto Generate.

- I choose Save then Done to associate the API key with the usage plan.
API key associated with usage plan
I test the API authentication, in addition to the throttles and limits using Postman.
I issue a GET request against the API Gateway URL using a customerId from the airline Airline-LoyaltyData Amazon DynamoDB table. I don’t specify any authorization or API key.

Postman unauthenticated GET request
I receive a Missing Authentication Token reply, which I expect as the API uses IAM authentication and I haven’t authenticated.
I then configure authentication details within the Authorization tab, using an AWS Signature. I enter my AWS user account’s AccessKey and SecretKey, which has an associated IAM identity policy to access the API.

Postman authenticated GET request without access key
I receive a Forbidden reply. I have successfully authenticated, but the API Gateway method rejects the request as it requires an API key, which I have not provided.
I retrieve and copy my previously created API key from the API Gateway console API Keys section, and display it by choosing Show.

Retrieve API key.
I then configure an x-api-key header in the Postman Headers section and paste the API key value.
Having authenticated and specifying the required API key, I receive a response from the API with the loyalty points value.

Postman successful authenticated GET request with access key
I then call the API with a number of quick successive requests.
When I exceed the throttle rate limit of one request per second, and the throttle burst limit of two requests, I receive:
{"message": "Too Many Requests"}
When I then exceed the quota of 10 requests per day, I receive:
{"message": "Limit Exceeded"}
I view the API key usage within the API Gateway console Usage Plan section.
I select the usage plan, choose the API Keys section, then choose Usage. I see how many requests I have made.

View API key usage
If necessary, I can also grant a temporary rate extension for this key.
For more information on using API Keys for unauthenticated access for AWS AppSync, see the documentation.
API Gateway also has support for AWS Web Application Firewall (AWS WAF) which helps protect web applications and APIs from attacks. It is another mechanism to apply rate-based rules to prevent public API consumers exceeding a configurable request threshold. AWS WAF also protects your website from common attack techniques like SQL injection and Cross-Site Scripting (XSS). You can also create rules that can block attacks from specific user-agents, bad bots, content scrapers, or geographies. AWS WAF rules are evaluated before other access control features, such as resource policies, IAM policies, Lambda authorizers, and Amazon Cognito authorizers. For more information, see “Using AWS WAF with Amazon API Gateway”.
AWS AppSync APIs have built-in DDoS protection to protect all GraphQL API endpoints from attacks.
Improvement plan summary:
- Determine your API consumer and choose an API endpoint type.
- Implement security mechanisms appropriate to your API endpoint
Conclusion
Controlling serverless application API access using authentication and authorization mechanisms can help protect against unauthorized access and prevent unnecessary use of resources.
In this post, I cover using Amplify CLI to add a GraphQL API with an Amazon Cognito user pool handling authentication. I explain how to view JSON Web Token (JWT) claims, and how to use identity pools to grant temporary access to AWS services. I also show how to use API keys and API Gateway usage plans for rate limiting and throttling requests.
This well-architected question continues in part 3 where I look at separating authenticated users into logical groups. I show how to use Amazon Cognito user pool groups to separate users with an Amazon Cognito authorizer to control access to an API Gateway method. I then show how to pass JWTs to a Lambda function to perform authorization within a function. I then explain how to also segregate users using custom scopes by defining an Amazon Cognito resource server.