AWS Compute Blog

Enabling job accounting for HPC with AWS ParallelCluster and Amazon RDS

This post is written by Nicola Venuti, HPC Specialist SA, and contributed to by Rex Chen, Software Development Engineer.

Introduction

Accounting, reporting, and advanced analytics used for data-driven planning and decision making are key areas of focus for High Performance Computing (HPC) Administrators. In the cloud, these areas are more relevant to the costs of the services, which directly impact budgeting and forecasting of expenses. With the growth of new HPC services that perform analyses and corrective actions, you can better optimize for performance, which reduces cost.

Solution Overview

In this blog post, we walk through an easy way to collect accounting information for evert job and step executed in a cluster with job scheduling. This post uses a new feature in the latest version (2.6.0) of AWS ParallelCluster, which makes this process easier than before, and Slurm.  Accounting records are saved into a relational database for both currently executing jobs and jobs, which have already terminated.

Prerequisites

This tutorial assumes you already have a cluster in AWS ParallelCluster. If  you don’t, refer to the AWS ParallelCluster documentation, a getting started blog post, or a how-to blog post.

Solution

Choose your architecture

There are two common architectures to save job accounting information into a database:

  1. Installing and directly managing a DBMS in the master node of your cluster (or in an additional EC2 instance dedicated to it)
  2. Using a fully managed service like Amazon Relational Database Service (RDS)

While the first option might appear to be the most economical solution, it requires heavy lifting. You must install and manage the database, which is not a core part of running your HPC workloads.  Alternatively, Amazon RDS reduces this burden of installing updates, managing security patches, and properly allocating resources.  Additionally, Amazon RDS Free Tier can get you started with a managed database service in the cloud for free. Refer to the hyperlink for a list of free resources.

Amazon RDS is my preferred choice, and the following sections implement this architecture. Bear in mind, however, that the settings and the customizations required in the AWS ParallelCluster environment are the same, regardless of which architecture you prefer.


Set up and configure your database

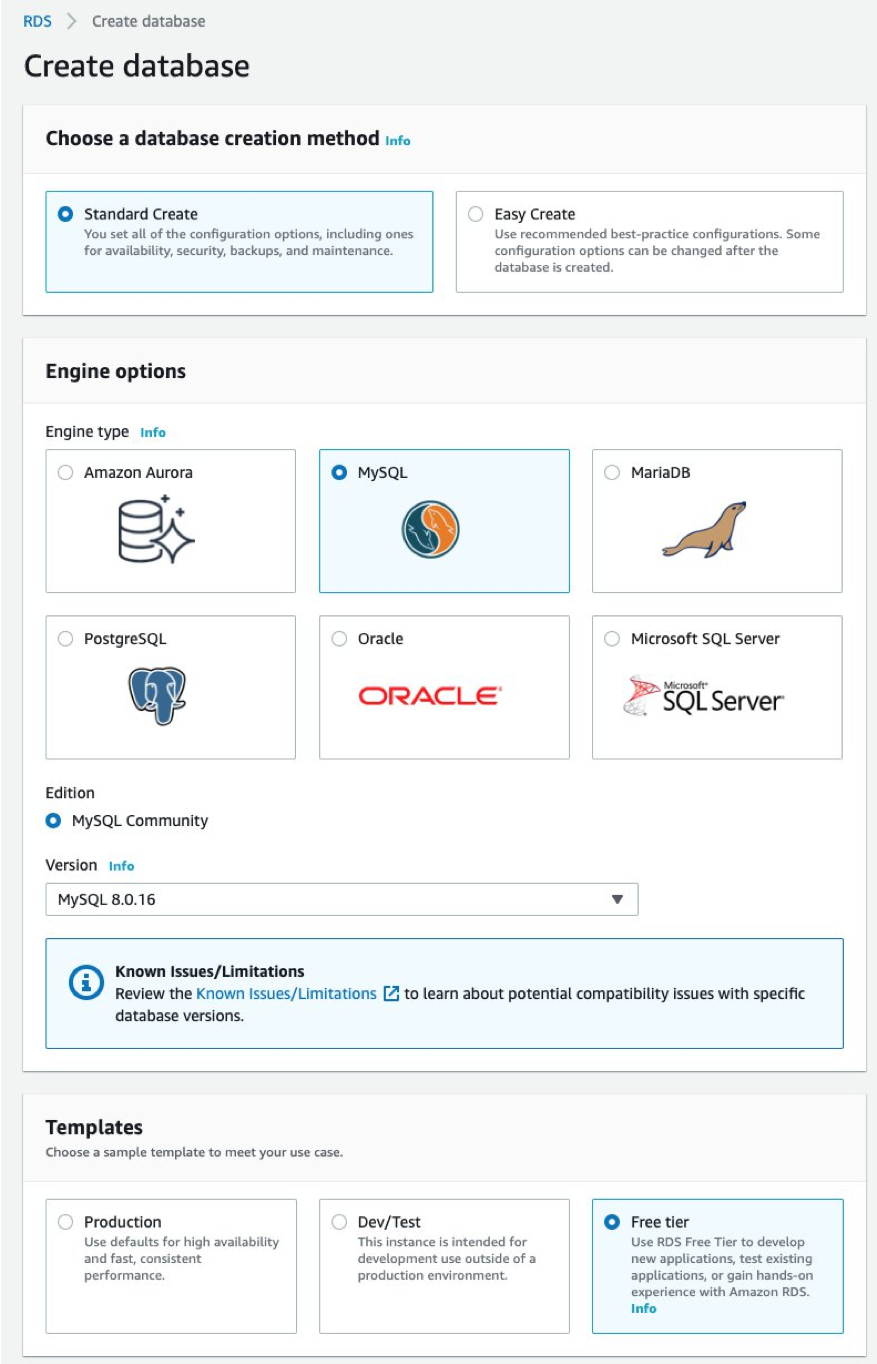
Now, with your architecture determined, let’s configure it.  First, go to Amazon RDS’ console.  Select the same Region where your AWS ParallelCluster is deployed, then click on Create Database.

There are two database instances to consider: Amazon Aurora and MySQL.

Amazon Aurora has many benefits compared to MySQL. However, in this blog post, I use MySQL to show how to build your HPC accounting database within the Free-tier offering.

The following steps are the same regardless of your database choice. So, if you’re interested in one of the many features that differentiate Amazon Aurora from MySQL, feel free to use. Check out Amazon Aurora’s landing page to learn more about its benefits, such as its faster performance and cost effectiveness.

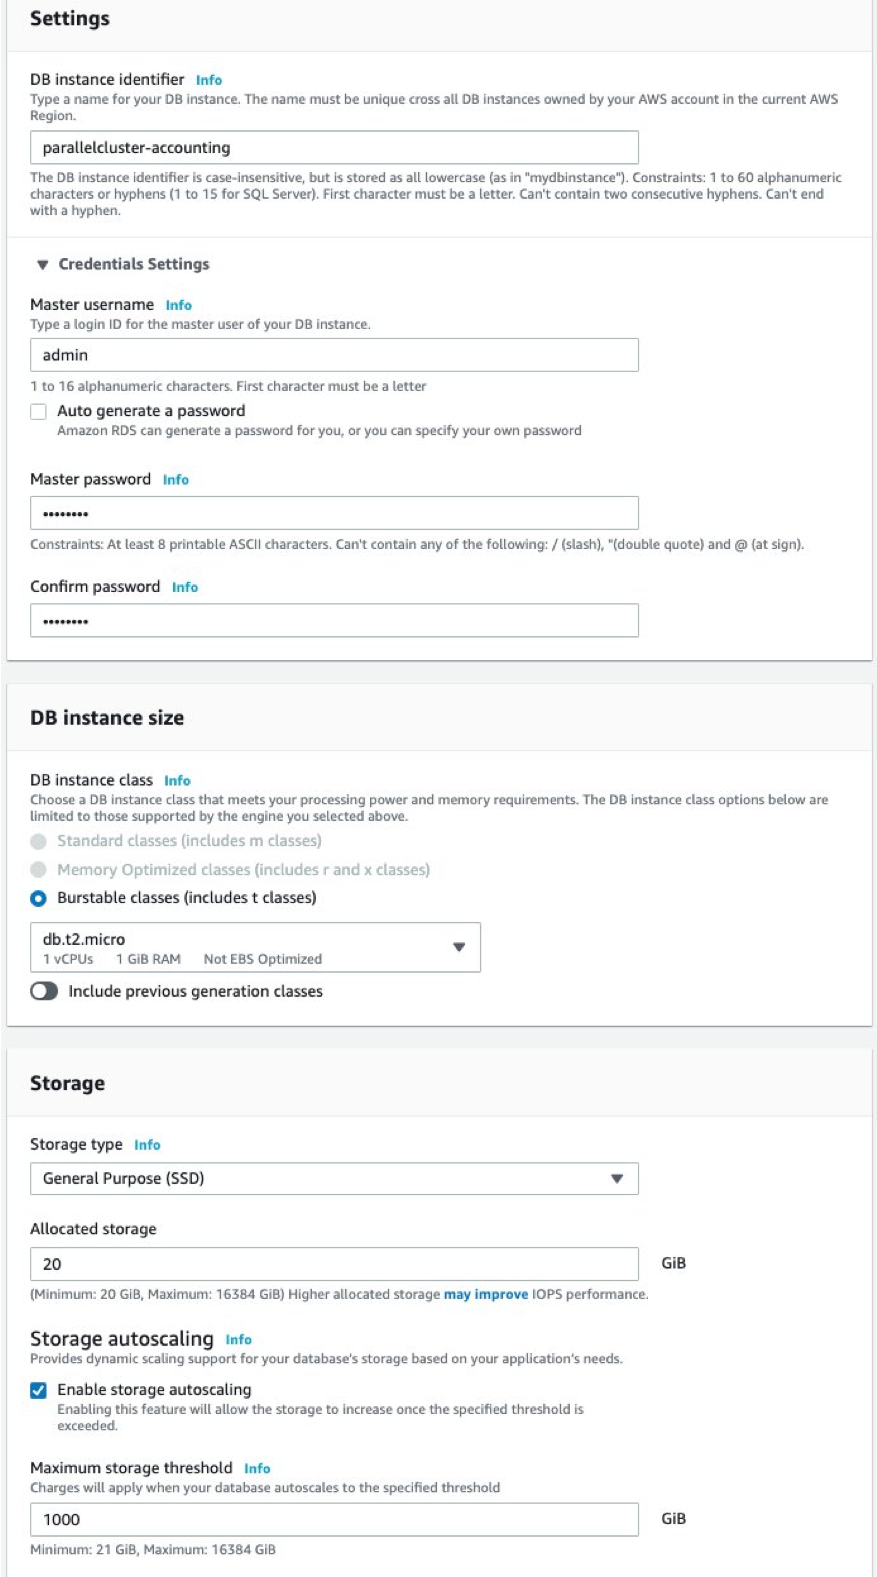
To configure your database, you must complete the following steps:

  1. Name the database
  2. Establish credential settings
  3. Select the DB instance size
  4. Identify storage type
  5. Allocate amount of storage

The following images show the settings that I chose for storage options and the “Free tier” template.  Feel free to change it accordingly to the scope and the usage you expect.

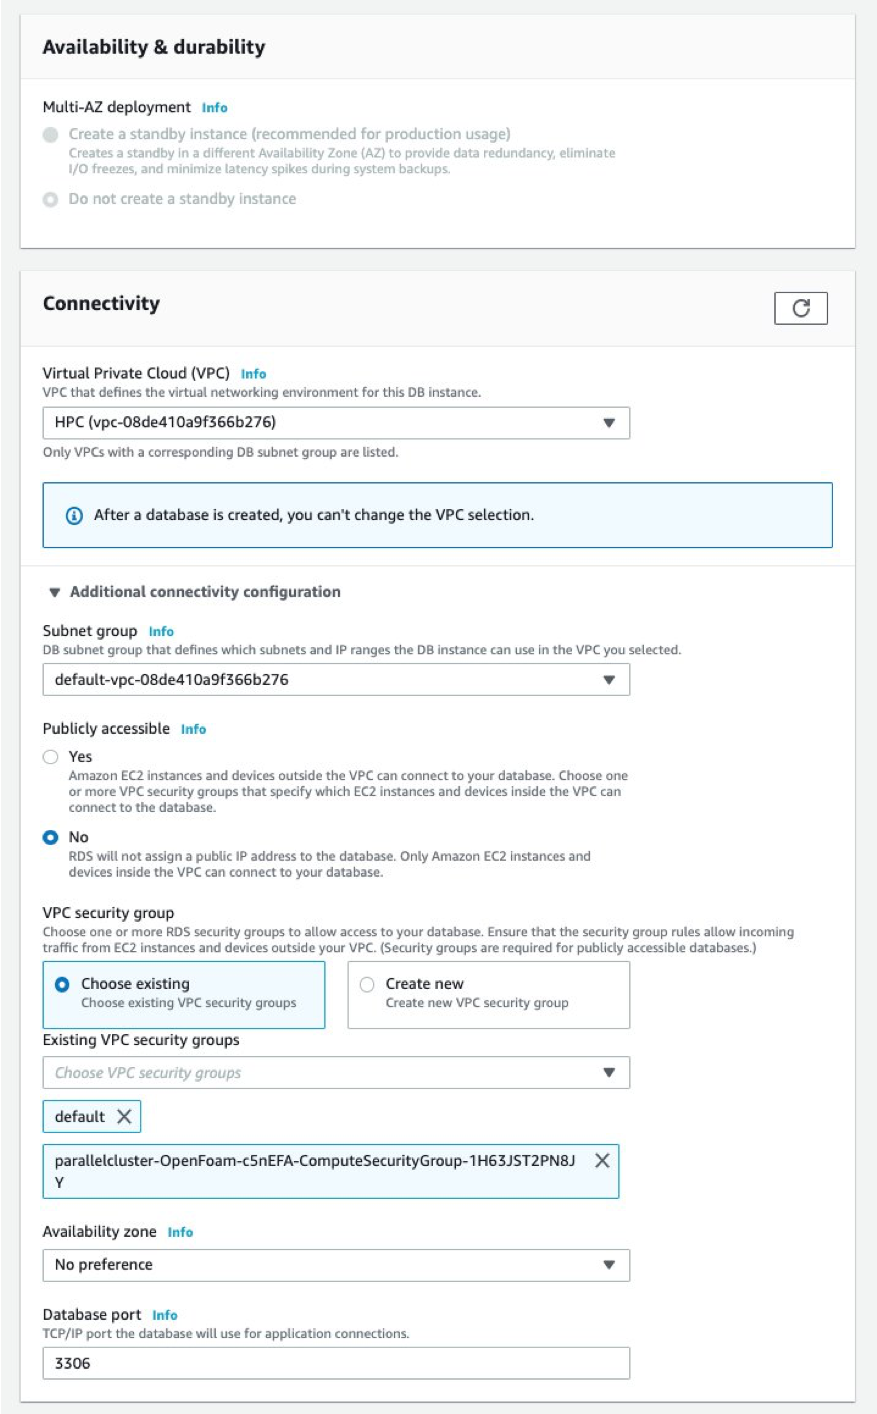
Make sure you select the corresponding VPC to wherever your “compute fleet” is deployed by AWS ParallelCluster, and wherever the Security Group of your compute fleet is selected.  You can access information for your “compute fleet” in your AWS ParallelCluster config file. The Security Group should look something like this: “parallelcluster-XXX-ComputeSecurityGroup-XYZ”.

At this stage, you can click on Create database and wait until the Database status moves from the Creating to Available in the Amazon RDS Dashboard.

The last step for this section is to grant privileges on the database.

  1. Connect to your database. Use the master node of your AWS ParallelCluster as a client.
  2. Install the MySQL client by running sudo yum install mysql on AmazonLinux and CentOS and sudo apt-get install mysql-client on Ubuntu.
  3. Connect to your MySQL RDS database using the following code: mysql --host=<your_rds_endpoint> --port=3306 -u admin -p The following screenshot shows how to find your RDS endpoint and port.


4. Run GRANT ALL ON `%`.* TO admin@`%`; to grant the required privileges.

The following code demonstrates these steps together:

[ec2-user@ip-10-0-16-243]$ mysql --host=parallelcluster-accounting.c68dmmc6ycyr.us-east-1.rds.amazonaws.com --port=3306 -u admin -p
Enter password:
Welcome to the MySQL monitor.  Commands end with ; or \g.
Your MySQL connection id is 251
Server version: 8.0.16 Source distribution

Copyright (c) 2000, 2018, Oracle and/or its affiliates. All rights reserved.

Oracle is a registered trademark of Oracle Corporation and/or its
affiliates. Other names may be trademarks of their respective
owners.

Type 'help;' or '\h' for help. Type '\c' to clear the current input statement.

mysql> GRANT ALL ON `%`.* TO admin@`%`;

Note: typically this command is run as GRANT ALL ON *.* TO 'admin'@'%';   With Amazon RDS , for security reasons, this is not possible as the master account does not have access to the MySQL database. Using *.*  triggers an error. To work around this, I use the _ and % wildcards that are permitted. To look at the actual grants, you can run the following: SHOW GRANTS;

Enable Slurm Database logging

Now, your database is fully configured. The next step is to enable Slurm as a workload manager.

A few steps must occur to let Slurm log its job accounting information on an external database. The following code demonstrates the steps you must make.

  1. Add the DB configuration file, slurmdbd.conf after /opt/slurm/etc/ 
  2. Slurm’s slurm.conf file requires a few modifications. These changes are noted after the following code examples.


Note: You do not need to configure each and every compute node because AWS ParallelCluster installs Slurm in a shared directory. All of these nodes share this directory, and, thus the same configuration files with the master node of your cluster.

Below, you can find two example configuration files that you can use just by modifying a few parameters accordingly to your setup.

For more information about all the possible settings of configuration parameters, please refer to the official Slurm documentation, and in particular to the accounting section.

Add the DB configuration file

#
## Sample /opt/slurm/etc/slurmdbd.conf
#
ArchiveEvents=yes
ArchiveJobs=yes
ArchiveResvs=yes
ArchiveSteps=no
ArchiveSuspend=no
ArchiveTXN=no
ArchiveUsage=no
AuthType=auth/munge
DbdHost=ip-10-0-16-243  #YOUR_MASTER_IP_ADDRESS_OR_NAME
DbdPort=6819
DebugLevel=info
PurgeEventAfter=1month
PurgeJobAfter=12month
PurgeResvAfter=1month
PurgeStepAfter=1month
PurgeSuspendAfter=1month
PurgeTXNAfter=12month
PurgeUsageAfter=24month
SlurmUser=slurm
LogFile=/var/log/slurmdbd.log
PidFile=/var/run/slurmdbd.pid
StorageType=accounting_storage/mysql
StorageUser=admin
StoragePass=password
StorageHost=parallelcluster-accounting.c68dmmc6ycyr.us-east-1.rds.amazonaws.com # Endpoint from RDS console
StoragePort=3306                                                                # Port from RDS console

See below for key values that you should plug into the example configuration file:

  • DbdHost: the name of the machine where the Slurm Database Daemon is executed. This is typically the master node of your AWS ParallelCluster. You can run hostname -s on your master node to get this value.
  • DbdPort: The port number that the Slurm Database Daemon (slurmdbd) listens to for work. 6819 is the default value.
  • StorageUser: Define the user name used to connect to the database. This has been defined during the Amazon RDS configuration as shown in the second step of the previous section.
  • StoragePass: Define the password used to gain access to the database. Defined as the user name during the Amazon RDS configuration.
  • StorageHost: Define the name of the host running the database. You can find this value in the Amazon RDS console, under “Connectivity & security”.
  • StoragePort: Define the port on which the database is listening. You can find this value in the Amazon RDS console, under “Connectivity & security”. (see the screenshot below for more information).

Modify the file

Add the following lines at the end of the slurm configuration file:

#
## /opt/slurm/etc/slurm.conf
#
# ACCOUNTING
JobAcctGatherType=jobacct_gather/linux
JobAcctGatherFrequency=30
#
AccountingStorageType=accounting_storage/slurmdbd
AccountingStorageHost=ip-10-0-16-243
AccountingStorageUser=admin
AccountingStoragePort=6819

Modify the following:

  • AccountingStorageHost: The hostname or address of the host where SlurmDBD executes. In our case this is again the master node of our AWS ParallelCluster, you can get this value by running hostname -s again.
  • AccountingStoragePort: The network port that SlurmDBD accepts communication on. It must be the same as DbdPort specified in /opt/slurm/etc/slurmdbd.conf
  • AccountingStorageUser: it must be the same as in /opt/slurm/etc/slurmdbd.conf (specified in the “Credential Settings” of your Amazon RDS database).


Restart the Slurm service and start the SlurmDB demon on the master node


Depending on the operating system you are running, this would look like:

  • Amazon Linux / Amazon Linux 2
[ec2-user@ip-10-0-16-243]$ sudo /etc/init.d/slurm restart                                                                                                                                                                                                                                             
stopping slurmctld:                                        [  OK  ]
slurmctld is stopped
starting slurmctld:                                        [  OK  ]
[ec2-user@ip-10-0-16-243]$ 
[ec2-user@ip-10-0-16-243]$ sudo /opt/slurm/sbin/slurmdbd
  • CentOS7 and Ubuntu 16/18
[centos@ip-10-0-16-162 ~]$ sudo /opt/slurm/sbin/slurmdbd
[centos@ip-10-0-16-162 ~]$ sudo systemctl restart slurmctld

Note: even if you have jobs running, restarting the daemons will not affect them.

Check to see if your cluster is already in the Slurm Database:

/opt/slurm/bin/sacctmgr list cluster

And if it is not (see below):

[ec2-user@ip-10-0-16-243]$ /opt/slurm/bin/sacctmgr list cluster
   Cluster     ControlHost  ControlPort   RPC     Share GrpJobs       GrpTRES GrpSubmit MaxJobs       MaxTRES MaxSubmit     MaxWall                  QOS   Def QOS 
---------- --------------- ------------ ----- --------- ------- ------------- --------- ------- ------------- --------- ----------- -------------------- --------- 
[ec2-user@ip-10-0-16-243]$ 

You can add it as follows:

sudo /opt/slurm/bin/sacctmgr add cluster parallelcluster

You should now see something like the following:

[ec2-user@ip-10-0-16-243]$ /opt/slurm/bin/sacctmgr list cluster
   Cluster     ControlHost  ControlPort   RPC     Share GrpJobs       GrpTRES GrpSubmit MaxJobs       MaxTRES MaxSubmit     MaxWall                  QOS   Def QOS 
---------- --------------- ------------ ----- --------- ------- ------------- --------- ------- ------------- --------- ----------- -------------------- --------- 
parallelc+     10.0.16.243         6817  8704         1                                                                                           normal           
[ec2-user@ip-10-0-16-243]$ 

At this stage, you should be all set with your AWS ParallelCluster accounting configured to be stored in the Amazon RDS database.

Replicate the process on multiple clusters

The same database instance can be easily used for multiple clusters to log its accounting data in. To do this, repeat the last configuration step for your clusters built using AWS ParallelCluster that you want to share the same database.

The additional steps to follow are:

  • In a multi-cluster configuration, best practices are for each cluster to use the same slurmdbd instead of running a separate slurmdbd for each cluster. Make sure each slurm.conf has a unique “AccountingStorageHost”.
  • If only the same database environment is desired to be used and not have Slurm in multi-cluster mode, then each Slurm controller can use a different slurmdbd. However, the StorageLoc must be unique.
  • Ensure that all the clusters are in the same VPC (or, if you prefer to use multiple VPCs, you can choose to set up VPC-Peering).
  • Add the SecurityGroup of your new compute fleets (“parallelcluster-XXX-ComputeSecurityGroup-XYZ”) to your RDS database.
  • Change the cluster name parameter at the very top of the file. This is in addition to the slurm configuration file ( /opt/slurm/etc/slurm.conf) editing explained prior.  By default, your cluster is called “parallelcluster.” You may want to change that to clearly identify other clusters using the same database. For instance: ClusterName=parallelcluster2

Once these additional steps are complete, you can run /opt/slurm/bin/sacctmgr list cluster  again. Now, you should see two (or multiple) clusters:

[root@ip-10-0-16-243 ]# /opt/slurm/bin/sacctmgr list cluster
   Cluster     ControlHost  ControlPort   RPC     Share GrpJobs       GrpTRES GrpSubmit MaxJobs       MaxTRES MaxSubmit     MaxWall                  QOS   Def QOS 
---------- --------------- ------------ ----- --------- ------- ------------- --------- ------- ------------- --------- ----------- -------------------- --------- 
parallelc+                            0  8704         1                                                                                           normal           
parallelc+     10.0.16.129         6817  8704         1                                                                                           normal           
[root@ip-10-0-16-243 ]#   

If you want to see the full name of your clusters, run the following:

[root@ip-10-0-16-243 ]# /opt/slurm/bin/sacctmgr list cluster format=cluster%30
                       Cluster 
------------------------------ 
               parallelcluster 
              parallelcluster2 
[root@ip-10-0-16-243 ]# 

Note: If you check the Slurm logs (under /var/log/slurm*), you may see this error:

error: Database settings not recommended values: innodb_buffer_pool_size innodb_lock_wait_timeout

This error refers to default parameters that Amazon RDS sets for you on your MySQL database. You can change them by setting new “group parameters” as explained in the official documentation and in this support article. Please also note that the innodb_buffer_pool_size is related to the amount of memory available on your instance, so you may want to use a different instance type with higher memory to avoid this warning.

Run your first job and check the accounting

Now that the application is installed and configured, you can test it! Submit a job to Slurm, query your database, and check your job accounting information.

If you are using a brand new cluster, test it with a simple hostname job as follows:

[ec2-user@ip-10-0-16-243]$ sbatch -N2 <<EOF
> #!/bin/sh
> srun hostname |sort
> srun sleep 10
> EOF
Submitted batch job 31
[ec2-user@ip-10-0-16-243]$

Immediately after you have submitted the job, you should see it with a state of “pending”:

[ec2-user@ip-10-0-16-243]$ sacct
       JobID    JobName  Partition    Account  AllocCPUS      State ExitCode 
------------ ---------- ---------- ---------- ---------- ---------- -------- 
38               sbatch    compute                     2    PENDING      0:0 
[ec2-user@ip-10-0-16-243]$ 

And, after a while the job should be “completed”:

[ec2-user@ip-10-0-16-243]$ sacct
       JobID    JobName  Partition    Account  AllocCPUS      State ExitCode 
------------ ---------- ---------- ---------- ---------- ---------- -------- 
38               sbatch    compute                     2  COMPLETED      0:0 
38.batch           batch                                1  COMPLETED      0:0 
38.0           hostname                                2  COMPLETED      0:0 
[ec2-user@ip-10-0-16-243]$

Now that you know your cluster works, you can build complex queries using sacct. See few examples below, and refer to the official documentation for more details:

[ec2-user@ip-10-0-16-243]$ sacct --format=jobid,elapsed,ncpus,ntasks,state
       JobID    Elapsed      NCPUS   NTasks      State 
------------ ---------- ---------- -------- ---------- 
38             00:00:00          2           COMPLETED 
38.batch       00:00:00          1        1  COMPLETED 
38.0           00:00:00          2        2  COMPLETED 
39             00:00:00          2           COMPLETED 
39.batch       00:00:00          1        1  COMPLETED 
39.0           00:00:00          2        2  COMPLETED 
40             00:00:10          2           COMPLETED 
40.batch       00:00:10          1        1  COMPLETED 
40.0           00:00:00          2        2  COMPLETED 
40.1           00:00:10          2        2  COMPLETED 
[ec2-user@ip-10-0-16-243]$ sacct --allocations
       JobID    JobName  Partition    Account  AllocCPUS      State ExitCode 
------------ ---------- ---------- ---------- ---------- ---------- -------- 
38               sbatch    compute                     2  COMPLETED      0:0 
39               sbatch    compute                     2  COMPLETED      0:0 
40               sbatch    compute                     2  COMPLETED      0:0 
[ec2-user@ip-10-0-16-243]$ sacct -S2020-02-17 -E2020-02-20 -X -ojobid,start,end,state
       JobID               Start                 End      State 
------------ ------------------- ------------------- ---------- 
38           2020-02-17T12:25:12 2020-02-17T12:25:12  COMPLETED 
39           2020-02-17T12:25:12 2020-02-17T12:25:12  COMPLETED 
40           2020-02-17T12:27:59 2020-02-17T12:28:09  COMPLETED 
[ec2-user@ip-10-0-16-243]$ 

If you have configured your cluster(s) for multiple users, you may want to look at the accounting info for all of these.  If you want to configure your clusters with multiple users, follow this blog post. It demonstrates how to configure AWS ParallelCluster with AWS Directory Services to create a multiuser, POSIX-compliant system with centralized authentication.

Each and every user can only look at his own accounting data. However, Slurm admins (or root) can see accounting info for every user. The following code shows accounting data coming from two clusters (parallelcluster and parallelcluster2) and from two users (ec2-user and nicola):

[root@ip-10-0-16-243 ~]# sacct -S 2020-01-01 --clusters=parallelcluster,parallelcluster2 --format=jobid,elapsed,ncpus,ntasks,state,user,cluster%20                                                                                                                                                        
       JobID    Elapsed      NCPUS   NTasks      State      User              Cluster 
------------ ---------- ---------- -------- ---------- --------- -------------------- 
36             00:00:00          2              FAILED  ec2-user      parallelcluster 
36.batch       00:00:00          1        1     FAILED                parallelcluster 
37             00:00:00          2           COMPLETED  ec2-user      parallelcluster 
37.batch       00:00:00          1        1  COMPLETED                parallelcluster 
37.0           00:00:00          2        2  COMPLETED                parallelcluster 
38             00:00:00          2           COMPLETED  ec2-user      parallelcluster 
38.batch       00:00:00          1        1  COMPLETED                parallelcluster 
38.0           00:00:00          2        2  COMPLETED                parallelcluster 
39             00:00:00          2           COMPLETED  ec2-user      parallelcluster 
39.batch       00:00:00          1        1  COMPLETED                parallelcluster 
39.0           00:00:00          2        2  COMPLETED                parallelcluster 
40             00:00:10          2           COMPLETED  ec2-user      parallelcluster 
40.batch       00:00:10          1        1  COMPLETED                parallelcluster 
40.0           00:00:00          2        2  COMPLETED                parallelcluster 
40.1           00:00:10          2        2  COMPLETED                parallelcluster 
41             00:00:29        144              FAILED  ec2-user      parallelcluster 
41.batch       00:00:29         36        1     FAILED                parallelcluster 
41.0           00:00:00        144      144  COMPLETED                parallelcluster 
41.1           00:00:01        144      144  COMPLETED                parallelcluster 
41.2           00:00:00          3        3  COMPLETED                parallelcluster 
41.3           00:00:00          3        3  COMPLETED                parallelcluster 
42             01:22:03        144           COMPLETED  ec2-user      parallelcluster 
42.batch       01:22:03         36        1  COMPLETED                parallelcluster 
42.0           00:00:01        144      144  COMPLETED                parallelcluster 
42.1           00:00:00        144      144  COMPLETED                parallelcluster 
42.2           00:00:39          3        3  COMPLETED                parallelcluster 
42.3           00:34:55          3        3  COMPLETED                parallelcluster 
43             00:00:11          2           COMPLETED  ec2-user      parallelcluster 
43.batch       00:00:11          1        1  COMPLETED                parallelcluster 
43.0           00:00:01          2        2  COMPLETED                parallelcluster 
43.1           00:00:10          2        2  COMPLETED                parallelcluster 
44             00:00:11          2           COMPLETED    nicola      parallelcluster 
44.batch       00:00:11          1        1  COMPLETED                parallelcluster 
44.0           00:00:01          2        2  COMPLETED                parallelcluster 
44.1           00:00:10          2        2  COMPLETED                parallelcluster 
4              00:00:10          2           COMPLETED    nicola     parallelcluster2 
4.batch        00:00:10          1        1  COMPLETED               parallelcluster2 
4.0            00:00:00          2        2  COMPLETED               parallelcluster2 
4.1            00:00:10          2        2  COMPLETED               parallelcluster2 
[root@ip-10-0-16-243 ~]# 

You can also directly query your database, and look at the accounting information stored in it or link your preferred BI tool to get insights from your HPC cluster. To do so, run the following code:

[ec2-user@ip-10-0-16-243]$ mysql --host=parallelcluster-accounting.c68dmmc6ycyr.us-east-1.rds.amazonaws.com --port=3306 -u admin -p
Enter password: 
Welcome to the MySQL monitor.  Commands end with ; or \g.
Your MySQL connection id is 48
Server version: 8.0.16 Source distribution

Copyright (c) 2000, 2018, Oracle and/or its affiliates. All rights reserved.

Oracle is a registered trademark of Oracle Corporation and/or its
affiliates. Other names may be trademarks of their respective
owners.

Type 'help;' or '\h' for help. Type '\c' to clear the current input statement.

mysql> show databases;
+--------------------+
| Database           |
+--------------------+
| information_schema |
| mysql              |
| performance_schema |
| slurm_acct_db      |
+--------------------+
4 rows in set (0.00 sec)

mysql> use slurm_acct_db;
Reading table information for completion of table and column names
You can turn off this feature to get a quicker startup with -A

Database changed
mysql> show tables;
+-----------------------------------------+
| Tables_in_slurm_acct_db                 |
+-----------------------------------------+
| acct_coord_table                        |
| acct_table                              |
| clus_res_table                          |
| cluster_table                           |
| convert_version_table                   |
| federation_table                        |
| parallelcluster_assoc_table             |
| parallelcluster_assoc_usage_day_table   |
| parallelcluster_assoc_usage_hour_table  |
| parallelcluster_assoc_usage_month_table |
| parallelcluster_event_table             |
| parallelcluster_job_table               |
| parallelcluster_last_ran_table          |
| parallelcluster_resv_table              |
| parallelcluster_step_table              |
| parallelcluster_suspend_table           |
| parallelcluster_usage_day_table         |
| parallelcluster_usage_hour_table        |
| parallelcluster_usage_month_table       |
| parallelcluster_wckey_table             |
| parallelcluster_wckey_usage_day_table   |
| parallelcluster_wckey_usage_hour_table  |
| parallelcluster_wckey_usage_month_table |
| qos_table                               |
| res_table                               |
| table_defs_table                        |
| tres_table                              |
| txn_table                               |
| user_table                              |
+-----------------------------------------+
29 rows in set (0.00 sec)

mysql>

Conclusion

You’re finally all set! In this blog post you set up a database using Amazon RDS, configured AWS ParallelCluster and Slurm to enable job accounting with your database, and learned how to query your job accounting history from your database using the sacct command or by running SQL queries.

Deriving insights for your HPC workloads doesn’t end when your workloads finish running. Now, you can better understand and optimize your usage patterns and generate ideas about how to wring more price-performance out of your HPC clusters on AWS. For retrospective analysis, you can easily understand whether specific jobs, projects, or users are responsible for driving your HPC usage on AWS.  For forward-looking analysis, you can better forecast future usage to set budgets with appropriate insight into your costs and your resource consumption.

You can also use these accounting systems to identify users who may require additional training on how to make the most of cloud resources on AWS. Finally, together with your spending patterns, you can better capture and explain the return on investment from all of the valuable HPC work you do. And, this gives you the raw data to analyze how you can get even more value and price-performance out of the work you’re doing on AWS.