AWS Database Blog
Automate benchmark tests for Amazon Aurora PostgreSQL – Part 2
This post is a continuation of Automate benchmark tests for Amazon Aurora PostgreSQL.
To recap, optimizing a database is an important activity for new and existing application workloads. You need to take cost, operations, performance, security, and reliability into consideration. Conducting benchmarks help with these considerations. With Amazon Aurora PostgreSQL-Compatible Edition, you can run multiple benchmarks with different transaction characteristics matching your data access patterns.
In this post, we provide you with an AWS CloudFormation template to automate the solution, demonstrate on Amazon Aurora PostgreSQL Serverless v2, and show you how to monitor performance while the benchmark is running.
Overview of solution
The solution provides the ability to run a benchmark across Amazon Elastic Compute Cloud (Amazon EC2) instances, and multiple benchmarks may run concurrently. For instance, one benchmark performs select, update, insert, and delete on an Aurora writer node. At the same time, another benchmark performs select statements on an Aurora reader node. The following diagram illustrates this architecture.

- The CloudFormation template deploys an AWS Systems Manager document (SSM document).
- An Amazon EC2 launch template is created defining an Amazon Linux 2 image and configuration settings. Instances are grouped by tags into a “read” or “write” category.
- Amazon EC2 instances are provisioned using the launch template and Amazon EC2 Auto Scaling groups.
- User initiates benchmark by selecting the Systems Manager document, using Systems Manager Run Command, and specifying tags.
- The Amazon EC2 instances receive the command, retrieve the database secret, and run on the user’s database for a defined duration.
- Amazon CloudWatch and Performance Insights capture the database activity.
Prerequisites
For this walkthrough, you should have the following prerequisites:
- An AWS account
- Amazon Virtual Private Cloud (Amazon VPC) with three private subnets
- An EC2 key pair
- An Aurora PostgreSQL Serverless v2 DB cluster version 13.7 or later
- An AWS Secrets Manager secret
- EC2 and RDS security groups
- AWS Systems Manager configured to perform actions on your instances
- A psql client with connectivity to your Aurora cluster
- Familiarity with PostgreSQL, Amazon Aurora, Amazon VPC, Amazon EC2, and IAM
- Database schema defined in Part 1 of this post
Create the database schema
To demonstrate how to customize the benchmark to your schema and data access pattern, we use three tables and three sequences instead of the default pgbench TPC-B benchmark. Follow the steps in Part 1 of this post to create the database schema.
Deploy the solution
You can deploy the solution by using the CloudFormation template provided as part of this post. In this solution, the resources we create in your account are:
- EC2 instance launch template
- IAM instance profile
- EC2 Auto Scaling group
- IAM role
- Systems Manager document (SSM document)
Choose Launch Stack to deploy the CloudFormation template in the us-east-1 Region:
![]()
Alternatively, you can manually create the stack:
- On the AWS CloudFormation console, choose Create stack.
- Enter the Amazon Simple Storage Service (Amazon S3) location of the stack:
- Choose Next.
Enter a stack name. Keep a note of the stack name, you will need it later when you run the Systems Manager command document.
- Provide the parameters for the database connection:
- Database Name – Enter the name of your PostgreSQL database.
- Database Secret ARN – Enter the AWS Secrets Manager secret ARN you use for your database. The host, port, username, and password are retrieved from the secret when the benchmark runs.
- Database Reader Host Endpoint – Enter the database reader endpoint. This is an optional parameter, and If not provided defaults to the writer host defined in Secrets Manager secret.

- Provide the parameters for the EC2 instance launch:
- EC2 Instance Type – Enter the EC2 instance type to run the benchmark. Default is t3.micro.
- EC2 Instance Security Key Name – Select your EC2 security key name.
- Security group ID for the Benchmark EC2 instances – Select the security group to assign to the EC2 Instances. The security group must provide access between the EC2 instances and your database.
- SubnetID for the Benchmark EC2 instances – Select the subnet ID in the VPC where the instances are launched. The subnet must have a network path to the database.
- Number of Benchmark Instances for Reads – Number of EC2 instances to generate read transactions in the benchmark.
- Number of Benchmark Instances for Writes – Number of EC2 instances to generate write transactions in the benchmark.

- Provide the pgbench parameters used to simulate multiple clients reading and writing to the PostgreSQL database:
- Number of Client Connections to Database – Number of client connections per EC2 instance reader/writer against the PostgreSQL database.
- Number of Threads per Connection – Number of threads per connection to run against the PostgreSQL database.
- Benchmark Duration – The run duration, in seconds, for the benchmark.

- After specifying all the parameters, choose Next to continue.
- On the Configure Stack options page, choose Next to continue.
- On the Review page, select I acknowledge that AWS CloudFormation might create IAM resources and choose Submit.
 On the AWS CloudFormation Events tab, wait approximately 5 minutes until you see the
 CREATE_COMPLETEstatus. The correct event is the one with the logical ID matching the CloudFormation template name.
- On the AWS CloudFormation Outputs tab you can view the tags used when you run the benchmark.

Run the benchmark
After deploying the resources using the CloudFormation template, you have two EC2 Auto Scaling groups, one for reads and one for writes, with one EC2 instance each. The EC2 instance is preconfigured with scripts and appropriate parameters to run the benchmark using pgbench.
To run the commands, you use the System Manager command functionality. This feature allows you to run commands against target EC2 instances using a command document. A Systems Manager document (SSM document) defines the actions Systems Manager performs on your managed instances.
The CloudFormation template used to deploy the resources in earlier steps deployed an SSM document with the actions including the pgbench command and the parameters provided during the CloudFormation stack deployment. We use the SSM document to run the benchmark on the target Aurora PostgreSQL database.
To run the benchmark, complete the following steps:
- On the Systems Manager console, under Shared Resources in the navigation pane, choose Documents.

- Filter the results by owner by selecting Owned by me.

- The stack name is added to the the end of the command document name. Select the SSM document hyperlink PostgreSQLBenchmarkCommandDocument-blog-sample.

- Review the command document details on the Content tab.

- Choose Run Command.

- The SSM document defaults the duration, connections, and threads to the values you specified when launching the CloudFormation template. You can change the values before running the SSM document.

- For Target selection, select Specify instance tags.
Instance tags are used to select the instances to run the SSM command document on. Tags identify the read and write groups of EC2 instances. We add the tag benchmark-{stack name} and the following values:
- read – EC2 instances with this tag value run the pgbench command using SQL select statements.
- write – EC2 instances with this tag value run pgbench with insert, delete, and update SQL statements.
- Enter the tag key
benchmark-{stack name}, valueread, and choose Add.
We usebenchmark-blog-samplein this post.

- Add a second instance tag key as
benchmark-blog-sample, valuewrite.

- After adding the instance tags, scroll down to the end of the page and choose Run.
- You now have one group of EC2 instances sending read traffic, and another group of instances sending write traffic.

- The status changes to Success when the benchmark is complete.

- Select an instance ID to view the benchmark script output.

Troubleshooting
If your EC2 instance is not appearing under Managed Instances in the Systems Manager console:
- For private subnets, your instance must be able to reach the internet using a NAT gateway, or you can configure VPC endpoints to reach Systems Manager.
- Check your security group provides access between the EC2 instances and the database.
- Check the NACL assigned to your VPC private subnet allows network traffic.
- Review the AWS Systems Manager quick setup documentation.
- See https://repost.aws/knowledge-center/systems-manager-ec2-instance-not-appear for additonal help.
You need to troubleshoot errors when the command status is not Success. Here are common errors and help to resolve:
Access Denied– The AWS Identity and Access Management (IAM) user or role initiating the command does not have access to the EC2 instances. Check the permissons assigned to the role.Failed– The benchmark script reported an error. Review the benchmark script output for details about the error.Connection timeout– Verify you selected the correct subnet, and the security group provides access between the EC2 instances and the database. See https://aws.amazon.com/premiumsupport/knowledge-center/rds-cannot-connect/ for help resolving connection problems..Server name not known SQL error– Verify the Secrets Manager secret has the correct key/value for username, password, host, and port .Permission denied SQL error– Verify the database username defined in the Secrets Manager secret has read, write, and delete access to the database tables, and permission to use the sequences.Relation does not exist SQL error– Verify you created the schema from Part 1 of this post. Check the database name you provided in the CloudFormation parameter Database Name is correct.
Monitoring
A variety of tools are available to monitor your database while conducting benchmarks, including Amazon RDS Performance Insights, Amazon RDS Enhanced Monitoring, Amazon RDS database logs, and CloudWatch.
For granular detailed monitoring and logging, you can enable Enhanced Monitoring and export PostgreSQL logs to CloudWatch. With these settings you can search, create alarms, and a consolidated detailed view of all database logging from one place. Exporting logs to CloudWatch ensures your logs are stored in highly durable storage. To learn more, refer to Overview of Enhanced Monitoring and Publishing Aurora PostgreSQL logs to Amazon CloudWatch Logs.
In the following screen captures, you see examples of monitoring during the run of this benchmark. This is based on Aurora Serverless v2 with one writer and one reader, both at a configuration of 1-16 Aurora Compute Units (ACUs).
Metrics related to ACU are only applicable to Aurora Serverless. If you are following this post using a non-serverless database you will not see ACU metrics.
To enable enhanced monitoring, select Enable Enhanced monitoring within the database configuration.


To enable log exports, select PostgreSQL log under Log exports within the database configuration.

With Performance Insights, you can see various metrics out of the box in graphical form, such as db.Transactions.xact_commit.avg and db.Transactions.active_transactions.avg, which can indicate the database scaling up in load.
Performance Insights:

You can enable this feature when creating the database or within the configuration at a later time. For more information, refer to Turning Performance Insights on and off.

To learn more about Performance Insights and its metrics, refer to Overview of the Performance Insights dashboard and Performance Insights counter metrics.
Another way to capture load on the database is to use CloudWatch. You can view custom metrics, which can help visualize the amount of ACUs your database is using. The ServerlessDatabaseCapacity metric shows the usage in ACU count.
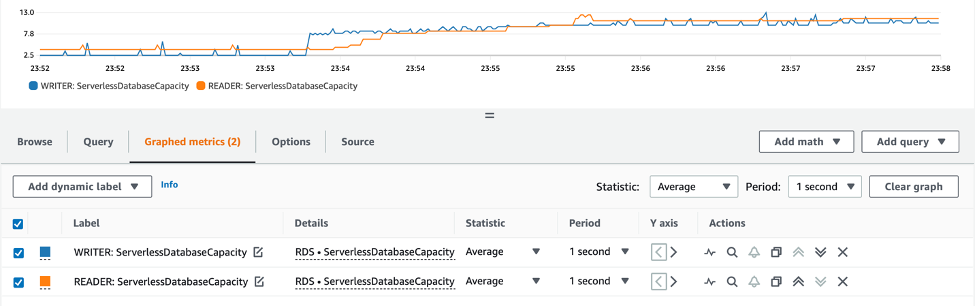
Another metric to consider is ACUUtilization, which shows the ratio, in percentage, of ACU utilization compared to the maximum provisioned ACU for your database. This can be helpful for both benchmarking and right-sizing your serverless database. Additionally, you can configure alarms based on these metrics. For more information, refer to Create a CloudWatch alarm based on a static threshold.

For information on monitoring through the AWS Command Line Interface (AWS CLI) or for more detail on the metrics listed in this post, refer to Important Amazon CloudWatch metrics for Aurora Serverless v2.
Clean up
To avoid incurring future charges, delete the resources you created while following along with this post. From the CloudFormation console select your stack and choose Delete.

After the stack delete is complete, the stack state changes to DELETE_COMPLETE, and the resources created by the CloudFormation template are deleted.
If you created the prerequisites for this post, you will need to delete those as well.
Conclusion
In this post, we provided a solution to automate and scale database benchmarks on Amazon Aurora PostgreSQL Serverless v2 using AWS CloudFormation and Systems Manager. The solution provides the ability to scale your benchmark across multiple EC2 instances, and have groups of different SQL statements running concurrently.
While running benchmarks against your database, it’s important to optimize cost, follow best practices, and create relevant benchmarks matching your workload data access patterns. We encourage you to experiment with and modify the CloudFormation template to suit your benchmarking needs.
About the Authors
 Andrew Love is a Sr. Data Lab Solutions Architect with AWS. He is passionate about helping customers build well-architected solutions to achieve their business needs. He enjoys spending time with his family, a good game of chess, home improvement projects, and writing code.
 Andre Hass is a Sr. Data Lab Solutions Architect with AWS. He has more than 20 years of experience in the databases and data analytics field. Andre enjoys camping, hiking, and exploring new places with his family on the weekends, or whenever he gets a chance. He also loves technology and electronic gadgets.
 Mike Parks is a Sr. Solutions Architect with a specialty in databases at AWS. He has over 15 years of experience in the enterprise IT industry with numerous database engagements throughout his career. He enjoys solving problems for his customers and helping them succeed in their mission. In his spare time, he enjoys running and outdoor activities.