AWS Database Blog
Implement Amazon RDS for SQL Server Standard edition cross-Region disaster recovery using access to transaction log backups feature
Today, you can achieve cross-Region disaster recovery (DR) using the Amazon RDS for SQL Server Cross Region Read Replica feature, but it’s only available for workloads running on SQL Server Enterprise edition (EE). You can also use the cross-Region automated backups feature to develop your DR strategy, but recovery time objective (RTO) and recovery point objective (RPO) varies based on your database size.
Customers running their Microsoft SQL Server workloads on Amazon Relational Database Service (Amazon RDS) for SQL Server Standard edition (SE) ask us how they can implement a cross-Region DR, achieve a low RTO and save costs.
In this post, we examine a use case in which you can implement Amazon RDS for SQL Server Standard edition (SE) cross-Region disaster recovery (DR) using access to the transaction log backups feature.
Overview of access to transaction log backups
Amazon RDS for SQL Server takes periodic transaction log backups and introduced access to transaction log backups in an AWS-managed Amazon Simple Storage Service (Amazon S3) bucket. With this feature you can now access these transaction log backup files and copy them to an S3 bucket in your own account.
Solution overview
For our use case, we take a scenario in which our production Amazon RDS for SQL Server instance is configured in high availability mode using multiple Availability Zones, and AWS Key Management Service (AWS KMS) is used for data at rest encryption. Our DR Amazon RDS for SQL Server instance is configured in a single Availability Zone to save costs. Both production and DR instances are using SQL Server Standard edition. We also want to keep the recovery point objective (RPO) as low as possible with a design where production and DR RDS SQL Server instances are loosely coupled using a tracking server model supported by Amazon RDS SQL Server Express, a free edition of SQL Server to keep the costs low. In our solution, we use the following key features:
- Amazon S3 Cross-Region Replication (CRR)
- Amazon S3 Replication Time Control (S3 RTC)
- AWS KMS multi-Region keys
- Amazon RDS for SQL Server Agent job replication
This solution involves the creation and utilization of new AWS resources. Therefore, it will incur costs on your account. Refer to AWS Pricing for more information. We strongly recommend that you set this up in a non-production instance and run the end-to-end validations before you implement this solution in a production environment.
The following diagram illustrates our solution architecture.

Figure 1: Solution overview
To implement the solution, we run the following high-level setup steps:
- Create an S3 bucket and add a bucket policy.
- Create a cross-Region bucket replication rule.
- Create a multi-Region KMS key.
- Create an AWS Identify and Access Management (IAM) policy and role and add permissions.
- Create an option group and add a native backup and restore option.
- Create Production, DR, and Tracking Amazon RDS for SQL Server instances.
- Enable transaction log backup copy at Production.
- Create sample databases at Production.
- Stage the solution.
- Implement the solution.
Prerequisites
To test this solution, you will need the following prerequisites:
- An AWS account
- An understanding of SQL Server transaction log backups and restores
- The latest version of the AWS Command Line Interface (AWS CLI) installed and configured on a Linux host
- SQL Server Management Studio (SSMS) installed on Amazon Elastic Compute Cloud (Amazon EC2)
- Access to Production, DR and Tracking Amazon RDS for SQL Server instances from the Amazon EC2 server
- Access to GitHub repository
Create an S3 bucket and add a bucket policy
Create an S3 bucket in each Region where you intend to create the Production and DR Amazon RDS for SQL Server instances. For this post, we use the bucket rds-sql-server-crdr-us-west-2-bucket and Amazon RDS for SQL Server instance rds-sql-server-crdr-us-west-2-instance in the us-west-2 Region as our Production. We use the bucket rds-sql-server-crdr-us-east-2-bucket and Amazon RDS for SQL Server instance rds-sql-server-crdr-us-east-2-instance in the us-east-2 Region as our DR.
As you create the S3 bucket, make sure Object-Ownership is set to BucketOwnerPreferred. Use the following AWS CLI command to create your bucket. You can replace the parameters according to your environment.
Now replace the account ID in the following AWS CLI command and add bucket policies one at a time:
Create cross-Region bucket replication rule
After the buckets are created, set up Cross-Region Replication (CRR) between rds-sql-server-crdr-us-west-2-bucket and rds-sql-server-crdr-us-east-2-bucket using the following AWS CLI command.
As a next step, use the following AWS CLI command to create an IAM policy and note the policy ARN in the output. We use the policy ARN to attach to a role in the next step. In the following example, we use rds-sql-server-crdr-s3-repl-policy as the policy name:
Now create an IAM role and attach the policy to the role. In the following example, we use rds-sql-server-crdr-s3-repl-role as the role name:
In our solution, our goal is to achieve a very low RTO. Use the following AWS CLI command to create the S3 bucket replication rule by using the Replication Time Control (RTC) feature.
Create a multi-Region KMS key
After you create the S3 bucket and add the bucket policy, the next step is to create a customer-managed symmetric key. When you create the key, make sure you select the same Region where the S3 bucket is. Take note of the key ARN from the output because we use it to add an alias rds-sql-server-crdr-kms-key for this key. In our testing, the key id is mrk-3ec2e833213245c3ae8ca8d36719fcd9. See the following code:
Create an IAM policy and role and add permissions
For the next step, use the following AWS CLI command to create an IAM policy and note the policy ARN in the output. We use the policy ARN to attach to a role in the next step. In the following example, we use rds-sql-server-crdr-us-west-2-policy and rds-sql-server-crdr-us-east-2-policy in our Production and DR region, respectively. You need to replace the <account id> and <key id> parameters based on your environment.
Now create an IAM role and attach the policy to its respective role. In the following example, we use rds-sql-server-crdr-us-west-2-role and rds-sql-server-crdr-us-east-2-role as the role name for our Production and DR Regions, respectively:
Create an option group and add a native backup and restore option
Use the following AWS CLI command to create an option group in the Production and DR Regions. In the following example, we use crdr-us-west-2-opt-grp and crdr-us-east-2-opt-grp as the option group name and SQL Server version 15.00 for our Production and DR Regions. You can replace the parameters according to your environment.
Use the following AWS CLI command to add the native backup and restore option to the option group you created. Replace the parameters and the IAM role ARN according to your environment.
Create Production, DR, and Tracking Amazon RDS for SQL Server instances
Use the following AWS CLI commands to create Production, DR, and Tracking RDS instances. The option group you created earlier is attached to the instance. In our example, we use a Multi-AZ option for high availability in Production, the default profile, and AWS KMS for data-at-rest encryption. For this post, we use backup-retention-period 7 while creating the Production RDS instance. In our design, we are creating the Tracking instance as publicly accessible to avoid VPC peering between Production and DR Regions because the instance will have only the cross-Region DR metadata. As a best practice, the Tracking RDS instance needs to be on a dedicated VPC with a security group. The inbound rule must be added to allow traffic from any IPv4 address with TCP protocol and the RDS instance port.
Enable transaction log backup copy at Production
To be able to copy the transaction log backups from the AWS managed S3 bucket to your bucket, you need to enable a transaction log backup copy for your Production Amazon RDS for SQL Server instance. Run the following SQL command against your Production Amazon RDS for SQL Server instance using SSMS from the Amazon EC2 host. You need to pass the S3 bucket ARN to the Amazon RDS procedure rds_tlog_copy_setup as input.
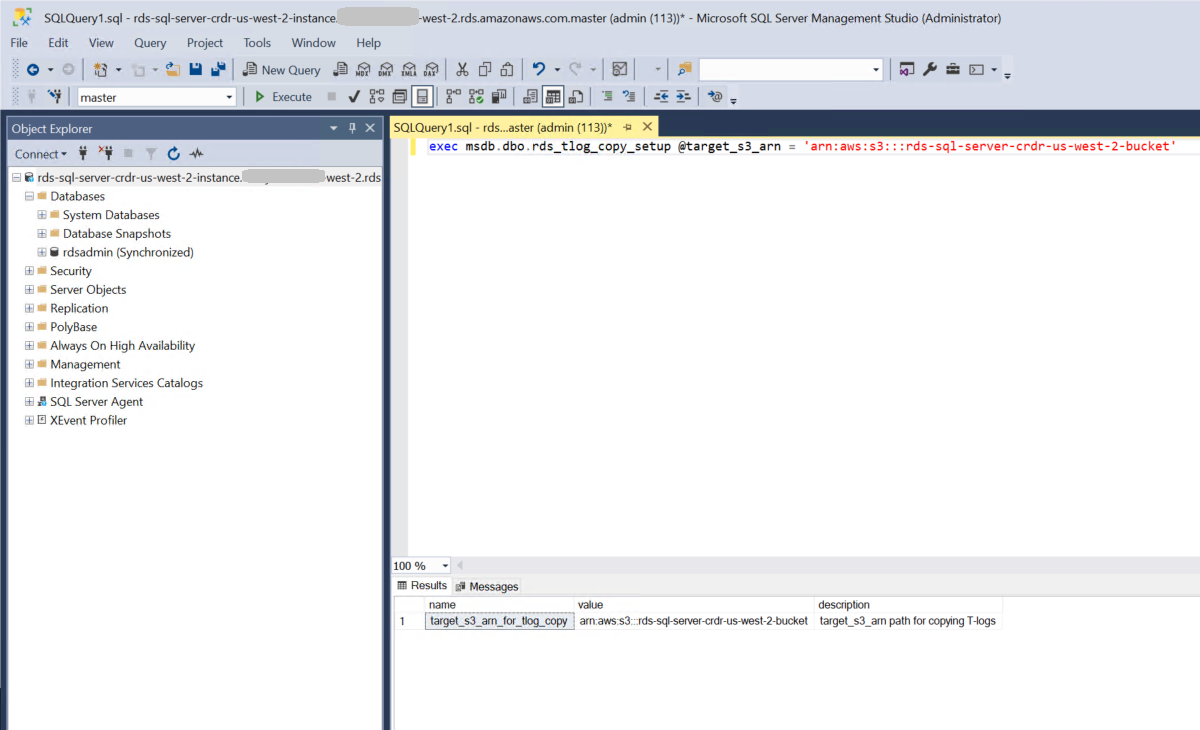
Figure 2: Enable transaction log backup copy
Create sample databases in Production
For our use case, we use the Microsoft SQL Server AdventureWorks sample databases to perform cross-Region DR. Download the AdventureWorks.zip file and extract AdventureWorks2019.bak, AdventureWorksLT2019.bak, AdventureWorksDW2019.bak files. Upload these three backup files to the S3 bucket rds-sql-server-crdr-us-west-2-bucket. Use the following script to restore the databases by connecting to the rds-sql-server-crdr-us-west-2-instance RDS instance using SSMS. This creates the AdventureWorks2019, AdventureWorksLT2019, and AdventureWorksDW2019 databases.
Stage the solution
To stage this solution, complete the following steps:
- Navigate to the GitHub repository and download the source code from your web browser.
- Remote desktop to the Amazon EC2 instance and copy the
amazon-rds-for-sql-server-cross-region-dr-main.zipfolder downloaded on your workspace. - Open SSMS and connect to the Tracking instance.
- Locate the
01. Tracking - Deploy.sqlfile within theamazon-rds-for-sql-server-cross-region-dr-mainfolder and open in a new window. - Run the code against the Tracking RDS instance to create a new database called
trackingdbwith the table in it. - Locate the
02. Linked-Server - Deploy.sqlfile within theamazon-rds-for-sql-server-cross-region-dr-mainfolder and open in a new window. - Run the code against the Production and DR RDS instance after replacing the variable values to a create linked server between a) Production and Tracking instance and b) DR and Tracking instance.
- Locate the
03. Prod-DR - Deploy.sqlfile within theamazon-rds-for-sql-server-cross-region-dr-mainfolder and open in a new window. - Run the code against the Production and DR RDS instance to create a new database called
crdrdbwith stored procedures in it. - Linked server is not Multi-AZ aware in Amazon RDS for SQL Server. To verify that SQL Agent jobs run after failover, you need to create the linked server on both sides of the Primary RDS instance.
Implement the solution
To implement the cross-Region DR solution, complete the following steps:
- Open SSMS and connect to the Production RDS SQL Server instance.
- Open a new query window and run the following command after replacing the input parameter values. Make sure you pass the database names exactly the way they appear in the SSMS Object Explorer. This procedure call creates the following:
- A
_FullBackup_job for each database supplied in the input. - A
_LSTrackingjob.
- A
_FullBackup_ jobsare not scheduled as default. You may run them one at a time, or you can run them together by navigating to Job Activity Monitor in SQL Server Agent.
Figure 3: Job Activity Monitor
- Wait for the full backup to complete and .bak files to appear in the S3 bucket, then enable the
_LSTrackingjob, which is deployed as disabled. The tracking job is scheduled to run every 5 minutes. - Open a new query window and run the following command at the primary SQL Server instance after replacing the input parameter values. This procedure call does the following:
- Creates a
_LSBackup_job for each database supplied in the input.
- Creates a
- Open SSMS and connect to the DR RDS SQL Server instance.
- Open a new query window and run the following command after replacing the input parameter values. This procedure call does the following:
- Restores full backups in
NORECOVERY. - Creates a
LSRestore_job for each database supplied in the input.
- Restores full backups in
Validate the solution
To validate the cross-Region DR solution, open SSMS and connect to the Tracking RDS SQL Server instance. Open a new query window and run the following command. Check the processing_status column; you will find tracking records with the following status:
- NULL – Production RDS instance has taken scheduled transaction log backup, but it has not been processed by the cross-Region DR solution yet.
- Copy-in-progress – Transaction log backup file copy is in progress from AWS managed S3 bucket to customer managed S3 bucket and Cross-Region Replication in progress.
- Restore-in-progress – Transaction log backup file is being applied at the DR RDS instance.
- Processed – Transaction log backup restore has been completed for that file.
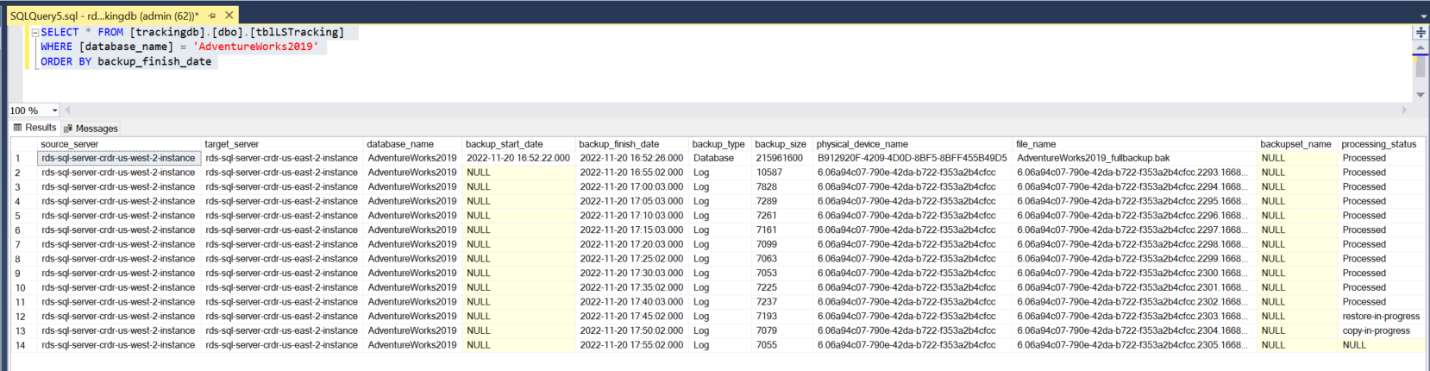
Figure 4: Validate solution using the tblLSTracking table
Perform cross-Region DR test
We test cross-Region DR by simulating a Production RDS-level outage. However, as our Production RDS instance is in multiple Availability Zones, shutdown is not an option. In our test, we will delete our Production RDS instance and promote the DR Region as Production.
Step 1: Use the following AWS CLI command to drop the Production RDS instance. You can replace the parameters according to your environment.
To minimize data loss, we run the LSRestore_jobs manually a couple of times to verify that the transaction log backups are picked up by the DR RDS for SQL Server instance to restore. You may run them one at a time, or you can run them together by navigating to Job Activity Monitor in SQL Server Agent.

Figure 5: Job Activity Monitor to run LSRestore_ jobs manually
Step 2: You need to make sure that for each database, their corresponding transaction log backup files are applied, and the status is changed from copy-in-progress or restore-in-progress to Processed in the processing status column. To do this, run the following SQL command at the DR RDS instance. The records with NULL status in the processing_status column represent the files that are backed up in the AWS managed S3 bucket but not copied to your Amazon S3 bucket and will be your possible data loss during this simulation. You can minimize RPO by running the _LSBackup_ jobs every 1 minute. To reduce the RTO, run the LSTracking job manually a couple of times.
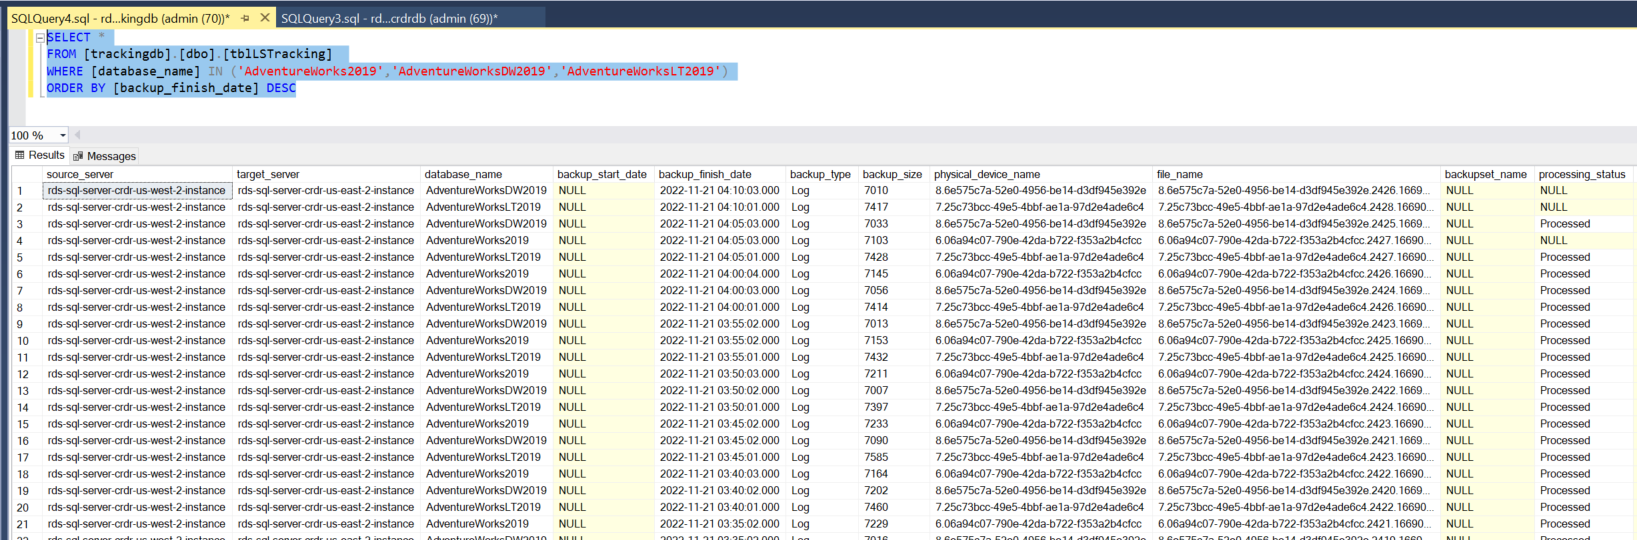
Figure 6: Verify transaction log backups are applied
Step 3: Open SSMS and connect to the DR RDS SQL Server instance. Open a new query window and run the following command after replacing the input parameter values. This procedure call does the following:
- Validates that the available transaction log backup files are restored.
- Brings each database
ONLINEbased on the input. - Drops
LSRestore_jobs for each database supplied in the input.

Figure 7: Promote DR as Primary
Step 4: Point your application to the new Production RDS instance (rds-sql-server-crdr-us-east-2-instance) after you confirm that the restored databases are online.
Now, add the Multi-AZ option for your Amazon RDS instance using the following AWS CLI command to achieve high availability. Adding Multiple Availability Zones is a background process and does not impact application uptime or performance.
Clean up
To avoid future charges and remove the components created while testing this use case, complete the following steps. This will delete the RDS instance and all associated databases. We recommend you take a final snapshot before deleting the RDS instance.
- On the Amazon RDS console, select the databases you set up, and on the Actions menu, choose Delete.
- On the Amazon RDS console, select the Option groups you set up, choose Delete.
- On the Amazon EC2 console, select the Amazon EC2 instance that you used to connect to the RDS instance, and on the Actions menu, choose Terminate.
- On the Amazon S3 console, locate the buckets you created earlier, then empty the bucket and delete the bucket.
- On the IAM console, delete the policies and roles you created.
- On the AWS KMS console, schedule deletion for the keys you created.
Other applications
Access to the transaction log backups feature can be used to solve other challenges:
- Maintain a copy of the Production RDS instance at on-premises as possible DR or to meet other business requirements.
- Possible fallback option while migrating from on-prem to Amazon RDS for SQL Server by shipping the logs back from Production RDS instance to on-premises SQL Server.
- Reduce downtime in a non-Multi-AZ setup while changing compute size.
- Maintain an in-Region copy while performing database code deployment as a quick fallback option.
- Automate the full and transaction log backup using SQL Server native backup/restore to support multi-tenant deployments.
Summary
In this post, we demonstrated how you can use Amazon RDS for SQL Server transaction log backup files to perform cross-Region disaster recovery. Try out Amazon RDS for SQL Server and use the access to transaction log backups feature to implement cross-Region DR to support your business needs.
If you have any comments or feedback, leave them in the comments section.
About the author
 Rajib Sadhu is a Senior Database Specialist Solutions Architect with over 15 years of experience in Microsoft SQL Server and other database technologies. He helps customers architect and migrate their database solutions to AWS. Prior to joining AWS, he supported production and mission-critical database implementation across financial, travel, and hospitality industry segments.