AWS Database Blog
Automate on-premises or Amazon EC2 SQL Server to Amazon RDS for SQL Server migration using custom log shipping
Enterprises are migrating their Microsoft SQL Server workloads to AWS fully managed database services like Amazon Relational Database Service (Amazon RDS) for SQL Server, which makes it easy to set up, operate, and scale SQL Server deployment in the cloud. AWS provides guidance on migrating from an on-premises SQL Server database to Amazon RDS for SQL Server. It describes two options for migration: using AWS Database Migration Service (AWS DMS) (often referred to as logical replication) or using native Microsoft SQL Server tools such as backup and restore.
Migrating on-premises or Amazon Elastic Compute Cloud (Amazon EC2) SQL Server databases to Amazon RDS for SQL Server using logical replication may not scale depending on the number of databases, database size, and large objects (BLOB, CLOB, XML) data types. Customers with business-critical applications and stringent Recovery Time Objective (RTO) requirements can’t afford long outages required by native backup and restore. Our customers have asked how to automate their hundreds of database migrations using native backup and restore in near-real time.
Microsoft SQL Server log shipping is a method of replicating databases using transaction logs that can enable the physical replication of a warm standby database such that it is an exact binary replica of the primary database. Often this method is referred to as physical replication.
Amazon RDS for SQL Server doesn’t support native log shipping. If you’re a database administrator or migration specialist working on an on-premises or Amazon EC2 SQL Server to Amazon RDS for SQL Server migration project, you have likely wondered how to develop your own scripts and automate the migration end to end.
In this post, we examine a use case in which you migrate your Microsoft SQL Server databases to Amazon RDS for SQL Server. We show you how to automate your SQL Server migration to Amazon RDS for SQL Server using custom log shipping. In our solution, we reference the on-premises or Amazon EC2 source SQL Server as the primary SQL Server instance and the target Amazon RDS for SQL Server as the secondary SQL Server instance.
Architecture overview
The custom log shipping solution is built using Microsoft’s native log shipping principles, where the transaction log backups are copied from the primary SQL Server instance to the secondary SQL Server instance and applied to each of the secondary databases individually on a scheduled basis. A tracking table records the history of backup and restore operations, and is used as the monitor. The following diagram illustrates this architecture.

The custom log shipping solution has the following major components:
- Amazon S3 – We use an Amazon Simple Storage Service (Amazon S3) bucket at the primary SQL Server instance to store both full and transactional log backup files.
- Amazon S3 file gateway – We use the S3 bucket at the primary SQL Server instance as the mount point. AWS Storage Gateway is a set of hybrid cloud storage services that provide on-premises access to virtually unlimited cloud storage. We use an Amazon S3 file gateway to mount the S3 bucket as a drive to the host operating system of the primary SQL Server instance.
- AWS Direct Connect – We recommend using AWS Direct Connect to establish a low-latency, secure, and private network connection between your on-premises data centers and AWS. If Direct Connect is not available, use AWS Site-to-Site VPN as an alternative.
- Tracking table – We use a tracking table at the secondary SQL Server instance to store full and transaction log backup information passed through a linked server from the primary SQL Server instance. As the secondary SQL Server instance restores the backup files, it updates the status in this table.
Solution overview
For our use case, we take the standalone scenario in which our SQL Server database engine runs on Amazon EC2, and see how we migrate the user databases to Amazon RDS for SQL Server using custom log shipping. The following diagram illustrates our solution architecture.
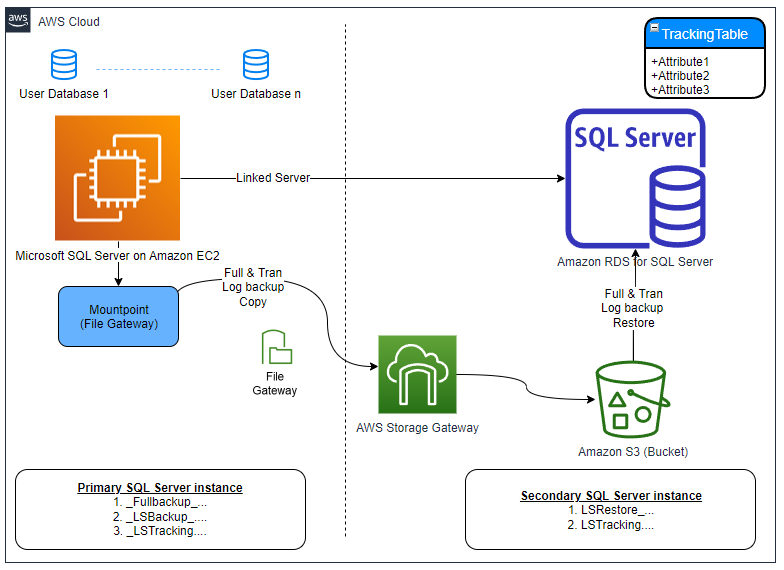
This solution has the following characteristics:
- The primary SQL Server instance runs on Amazon EC2 hosting user databases
- Storage Gateway is configured and an S3 bucket is mounted as the E:\ drive on the Amazon EC2 machine
- Databases scoped for the migration are configured in full backup and transaction log backup through the custom log shipping solution
- The S3 bucket mounted as the E:\ drive hosts all the full backup and transaction log backup files
- The secondary SQL Server instance is created using Amazon RDS for SQL Server
- A linked server between the primary and secondary SQL Server instances is hosted on the primary SQL Server instance to feed the secondary SQL Server instance on all full and transaction log backup information
- A tracking table is maintained on the secondary SQL Server instance to keep track of restore status
- The transaction log restore jobs on the secondary SQL Server instance are applying the logs from the S3 bucket on their respective databases
Prerequisites
To test this solution, you must have the following prerequisites:
- An AWS account
- An S3 bucket
- An RDS for SQL Server instance created in Single-AZ mode
- The native backup and restore option enabled on the RDS for SQL Server instance using the S3 bucket
- An EC2 instance with SQL Server installed and a user database configured
- An Amazon S3 file gateway created using Amazon EC2 as Platform options
- A file share created using Server Message Block (SMB) for Access objects using input and authentication method for Guest access
- On the primary SQL Server instance, the following command is run at the command prompt to store the guest credential in Windows Credential Manager:
For example, C:\Users\Administrator>cmdkey /add:172.31.43.62\rds-sql-backup-restore-demo /user:sgw-61DA3908\smbguest /pass:***********
- The S3 bucket/SMB file share is mounted at the primary SQL Server using the following command:
For example, C:\Users\Administrator>net use E: \\172.31.43.62\rds-sql-backup-restore-demo /persistent:yes /savecred
- Follow the optional steps mentioned later in this post if the newly mounted volume is not visible to the primary SQL Server instance
sysadminpermission on the primary SQL Server instance and access to the admin user name and password for the secondary SQL Server instance
Stage the solution
To stage this solution, complete the following steps:
- Navigate to the GitHub repo and download the source code from your web browser.
- Remote desktop to the EC2 instance hosting your primary SQL Server instance and copy the
amazon-rds-for-sql-server-custom-log-shipping-main.zipfolder downloaded on your workspace. - Open SQL Server Management Studio (SSMS) and connect to the primary SQL Server instance.
- Locate the
01. Primary - Deploy.sqlfile within theamazon-rds-for-sql-server-custom-log-shipping-mainfolder and open in a new window. - Run the code against the primary SQL Server instance to create a new database called dbmig with stored procedures in it.
- Locate the
02. Secondary - Deploy.sqlfile within theamazon-rds-for-sql-server-custom-log-shipping-mainfolder and open in a new window. - Run the code against the secondary SQL Server instance to create a new database called
dbmigwith a table and stored procedures in it.
Implement the solution
To implement the custom log shipping solution, complete the following steps:
- Open SSMS and connect to the primary SQL Server instance.
- Open a new query window and run the following command after replacing the input parameter values. Make sure you pass the database names exactly the way they appear in the SSMS Object Explorer. This procedure call creates the following:
- A folder in the S3 bucket after the primary SQL Server instance name.
xp_cmdshellis enabled during the folder creation process and disabled immediately after the folder creation is complete.- Subfolders by database names supplied as a comma-separated list in the input.
- A linked server between the primary and secondary SQL Server instances
- A
_FullBackup_job for each database supplied in the input. - A
_LSTrackingjob.
For example, see the following code with the supplied parameters:
- Disable any existing transaction log backup job you might have as part of your database maintenance plan.
- Locate the
03. Primary - Deploy LS Tracking.sqlfile within theamazon-rds-for-sql-server-custom-log-shipping-mainfolder and open in a new window. - Run the code against the primary SQL Server instance to create a new procedure
uspManagePrimaryLSTrackingwithin thedbmigdatabase. _FullBackup_jobs are not scheduled as default. You may run them one at a time or you can run them all together by navigating to Job Activity Monitor in SQL Server Agent.

- Wait for the full backup to complete and then enable the
_LSTrackingjob, which is deployed as disabled. The tracking job is scheduled to run every 5 minutes. - Open a new query window and run the following command at the primary SQL Server instance after replacing the input parameter values. This procedure call does the following:
- Enables log shipping for the databases supplied in the input.
- Creates a
_LSBackup_job for each database supplied in the input.
For example, see the following code with the supplied parameters:
- Open a new query window and run the following command at the primary SQL Server instance to capture the primary SQL Server instance name, which we use later:
- Open SSMS and connect to the secondary SQL Server instance.
- Open a new query window and run the following command after replacing the input parameter values. This procedure call does the following:
- Restores full backups in
NORECOVERY. - Creates a
LSRestore_job for each database supplied in the input.
- Restores full backups in
For example, see the following code with the supplied parameters:
- Consider updating your operational run-book to refer to the mount point (E:\ drive) as your new transaction log backup location for any point-in-time recovery scenario until the cutover.
Validate the solution
To validate the solution is deployed and custom log shipping is configured correctly, complete the following steps:
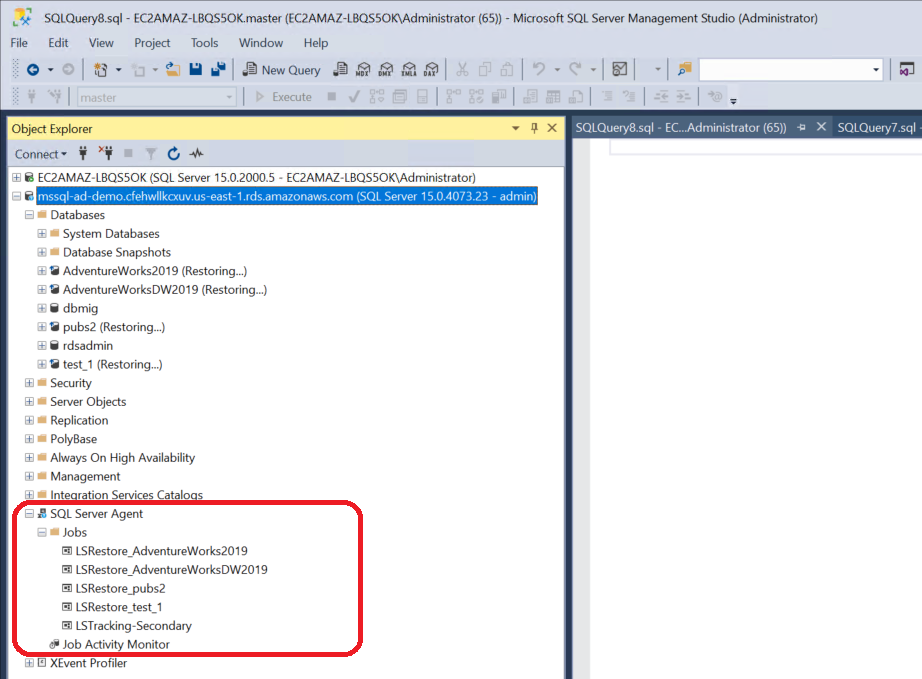
- Open SSMS and connect to the primary SQL Server instance.
- Expand SQL Server Agent in Object Explorer.
_FullBackup_ and _LSBackup_ jobs are listed for each database scoped for the migration.

- Navigate to one of the databases properties to verify transaction log shipping is configured for this database.

- Open File Explorer on the primary SQL Server instance host and navigate to the mount point.
You should see a folder named after the primary SQL Server instance and subfolders by database names.


- Open SSMS and connect to the secondary SQL Server instance.
- Expand SQL Server Agent in Object Explorer.
The database scoped for the migration is in Restoring state and the corresponding LSRestore_ jobs are listed for each database.
- Open a new query window and run the following command at the secondary SQL Server instance:

Optional configuration
If you’re considering running the custom log shipping solution for an extended period of time and the primary SQL Server instance might go through multiple maintenance, patching, or restart stages, complete the following steps:
- Locate the
04. Primary - Deploy PersistNetworkBackupDrive.sqlfile within theamazon-rds-for-sql-server-custom-log-shipping-mainfolder and open in a new window. - Replace the file share path, user name, and password with the values from your file share setup and run the code against the primary SQL Server instance.
This creates a new encrypted procedure uspPersistNetworkBackupDrive in the master database.
- Set automatic execution runs for the procedure
uspPersistNetworkBackupDriveevery time the primary SQL Server instance is started. - Run the procedure manually once for immediate effect:
Cutover
To complete the cutover, follow these steps:
- Find an approved outage window for the application and stop the application.
- Open SSMS and connect to the primary SQL Server instance.
- Wait for the last transaction log backup to complete, or you can run it manually at the primary SQL Server instance and disable
_LSBackup_<database_name> jobs. - Open SSMS and connect to the secondary SQL Server instance.
- Open a new query window and run the following command after replacing the database name in the input parameter and ensure the last transaction log file is
Processed: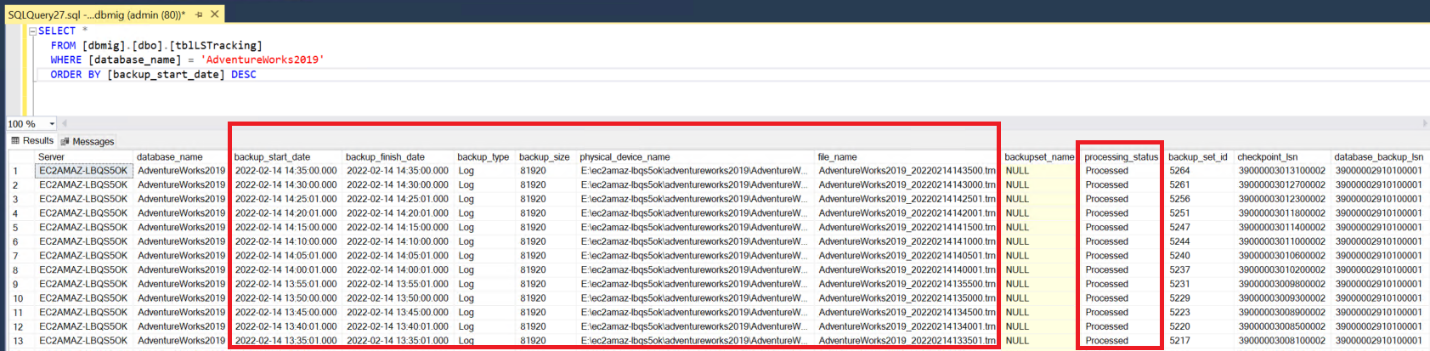
- Open a new query window and run the following command at the secondary SQL Server instance after replacing the input parameter values. This procedure call does the following:
- Removes
LSRestore_<database_name> jobs based on the input parameter. - Finalizes the restore and brings the databases online.
- Removes
- You may see the following message if the secondary SQL Server instance is still applying the last transaction logs:
After a successful cutover, you can see the databases are out of Restoring state and online.

- Transfer the logins and passwords from the primary SQL Server instance to the secondary SQL Server instance.
- Enable the Multi-AZ option for your production workload to meet your high availability (HA) requirements.
- Start your application after updating the connection string in your application with the RDS for SQL Server instance endpoint.
Troubleshooting
If for any reason you find the secondary SQL Server instance is working on a specific transaction log file for longer than expected and you want to reset it, complete the following steps:
- Open SSMS and connect to the secondary SQL Server instance.
- Open a new query window and run the following command after replacing the database name and file name in the input parameter. For example:
Clean up
To avoid future charges and remove all the components created while testing this use case, complete the following steps:
- Sign in to the AWS Management Console.
- Choose the Region where your EC2 instance and RDS for SQL Server instances reside.
- On the Amazon RDS console, choose Databases.
- Select the RDS for SQL Server instances.
- On the Actions menu, choose Delete.
- On the Amazon EC2 console, choose Instances.
- Select the EC2 instance.
- On the Instance state menu, choose Terminate instance.
- On the Amazon S3 console, select the bucket.
- On the menu, choose Delete after removing all the objects within it.
If you have deployed this solution on existing primary and secondary SQL Server instances, to remove only custom log shipping, complete the following steps:
- Open SSMS and connect to the primary SQL Server instance.
- Remove the log shipping configuration for each database:
- Delete
_FullBackup_jobs: - Delete the
_LSTrackingjob: - Open SSMS and connect to the secondary SQL Server instance.
- Delete the
LSTrackingandLSRestore_jobs: - If your secondary SQL Server instance isn’t in the production role and the target database is not in use, drop the log shipped databases:
Other scenarios
You can extend the solution to support the following use cases with the primary SQL Server instance:
- Running on an active/active or active/passive cluster by mounting the same S3 bucket using the same drive letter across all possible nodes in the cluster
- Database full backup (any single) size is over 5 TB by using multifile backup and restore method
- Configured in Mirroring/Always-On by deploying the solution on all the SQL Server instances
Limitations
This solution has following limitations:
- TDE-enabled database – Amazon RDS for SQL Server supports Transparent Database Encryption (TDE), but as part of the managed service offering, the certificate is managed by AWS. For this reason, a TDE-enabled on-premises database backup can’t be restored on Amazon RDS for SQL Server. You need to remove TDE from the primary SQL Server instance before setting up custom log shipping. Post cutover, you can enable TDE on the secondary SQL Server instance.
- 100 databases or less – Amazon RDS for SQL Server supports 100 databases or less per instance as of this writing. If you have more than 100 databases at the primary, you can set up custom log shipping for the first 100 databases only.
- Multi-AZ setup during custom log shipping – You can only configure Multi-AZ post cutover because Amazon RDS for SQL Server does not support full restores with NORECOVERY on Multi-AZ instances.
- Host OS – The custom log shipping solution supports Microsoft Windows Server only as the host operating system for the primary SQL Server instance.
- Native log shipping – If the primary SQL Server instance is configured in Microsoft native log shipping for disaster recovery (DR) or analytics, the setup needs to be removed to deploy custom log shipping.
- Local disk dependency – Custom log shipping can’t be deployed if the primary SQL Server instance is backing up transaction logs to a local disk and can’t be changed to Amazon S3 (for various reasons).
- Express Edition – Custom log shipping can’t be deployed if the primary or secondary SQL Server instance is Express Edition due to the SQL Agent dependency.
Summary
In this post, we demonstrated how to use the custom log shipping solution and automate your SQL Server database migration to Amazon RDS for SQL Server in scale. Try out Amazon RDS for SQL Server and migrate your SQL Server workload to AWS in near-real time.
If you have any comments or feedback, please leave them in the comments section.
About the Author
 Rajib Sadhu is Senior Database Specialist Solutions Architect with over 15 years of experience in Microsoft SQL Server and other database technologies. He helps customers architect and migrate their database solutions to AWS. Prior to joining AWS, he supported production and mission-critical database implementation across financial and travel and hospitality industry segments.