AWS Database Blog
Replicating Amazon EC2 or On-Premises SQL Server to Amazon RDS for SQL Server
Amazon RDS for SQL Server is a managed Microsoft SQL Server database service that makes it easy to set up, operate, and scale SQL Server deployments in the cloud. Amazon RDS takes away the time-consuming database administration activities so that you can focus on your schema design, query construction, query optimization, and building your application.
There are several options for migrating to Amazon RDS for SQL Server from SQL Server on Amazon EC2 or on-premises. You can use the native backup and restore option, or you can use the replication option through the AWS Database Migration Service (AWS DMS). Using the replication option saves you time, which allows you to bulk-load the tables and then capture the data changes along the way. In this post, we look into how you can use the AWS Schema Conversion Tool (SCT) and AWS Database Migration Service (DMS) in migrating SQL Server to RDS for SQL Server.
Source and destination database
In this exercise, the source database is created from the install-on-prem.sql script, and all the examples in this post use the Amazon Web Services – Labs GitHub repository. The destination is a SQL Server 2014 Amazon RDS for SQL Server instance. The source database can also be an on-premises SQL Server. When replicating from an on-premises SQL Server, ensure that you either have Direct Connect or a VPN connection to the virtual private cloud (VPC) where your Amazon RDS for SQL Server resides. This provides added security and better replication performance.
AWS DMS replication instance and creating the AWS DMS endpoints
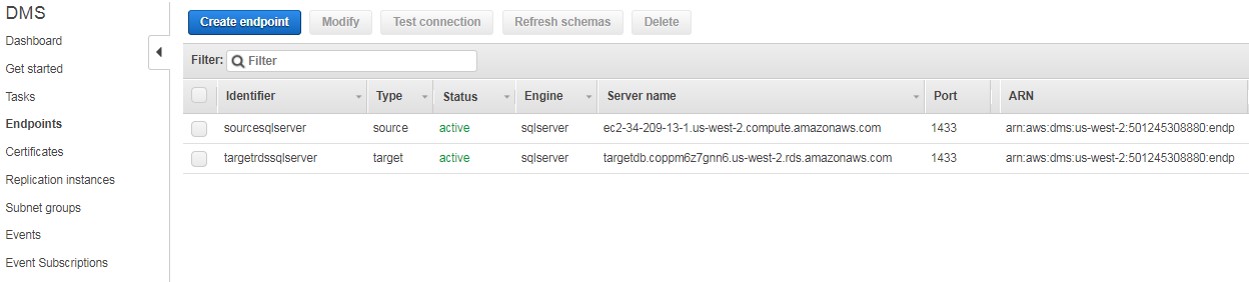
For this procedure, we created an AWS DMS replication instance that is used for the full load and change data capture (CDC) activities through the AWS DMS console. This server resides in the same VPC as the Amazon RDS for SQL Server instance. In AWS DMS, we created two endpoints: one for the source SQL Server and another for the target Amazon RDS for SQL Server.
AWS DMS loads your data to the destination table by table. In this case, where we are doing a homogenous migration, we use AWS DMS to create our destination tables and objects that are minimally needed for an efficient data migration. After full load is completed, right before starting the CDC, we apply the dependencies, constraints, and objects to the destination database.
Preparing for the migration
To prepare for the migration, you can use AWS SCT to do an assessment on which tables and objects from the source SQL Server database are compatible with the destination Amazon RDS for SQL Server database. Also, so you don’t have to manually create database objects in the destination database, you can use AWS SCT to generate the script that extracts the database objects from the source database.
You can also use the SQL Server Import and Export Wizard, which is part of Microsoft SQL Server Management Studio (SSMS), to copy your database objects. For more information, see SQL Server Import and Export Wizard in the SQL Server documentation.
To prepare for the migration, create a new project in AWS SCT.
- Generate a database migration assessment report in AWS SCT.
Although you’re doing homogenous migration of SQL Server, you can still validate to ensure that the script for schema generation that is created by AWS SCT completely re-creates all the needed tables and objects in your destination database.
Since you’re migrating SQL Server 2014 to Amazon RDS for SQL Server 2014, the report shows a 100 percent compatibility, as shown in the following image:
- Generate the script to re-create your tables and objects in the target schema.
On the source database that you want to migrate, open the context (right-click) menu and choose Save as SQL.
Note that this script contains all the tables and object definitions of the source SQL Server database. In this case, because you’re using AWS DMS to create the tables and primary keys at the destination Amazon RDS for SQL Server, you must edit this script and remove the tables and primary key definitions. This script should contain only the constraints, index, views, procedures, and functions that are applied to the target database after the full table load completes within your AWS DMS task later.
Within the SQL script generated by AWS SCT, remove these sections:
-- ------------ Write DROP-TABLE-stage scripts -----------

 -- ------------ Write CREATE-TABLE-stage scripts -----------
Migrating to SQL Server: full table load and CDC
There are two places where you can create and manage an AWS Database Migration Services (AWS DMS) task. You can do this in AWS DMS or in AWS SCT. In this exercise, you use AWS SCT to create and start an AWS DMS task.
-
- Set up your AWS Service Profile to use AWS DMS.To connect to AWS DMS, go to Global Settings, where you first set your AWS profile that has permission to create a task in AWS DMS.

- Create an AWS DMS task.
To create an AWS DMS task, specify your Task Name, the AWS DMS Replication instance, Source endpoint, and Target endpoint. You can either use the existing endpoints that you specify in AWS DMS or create a new one here in AWS SCT.
- Set up your AWS Service Profile to use AWS DMS.To connect to AWS DMS, go to Global Settings, where you first set your AWS profile that has permission to create a task in AWS DMS.
Migration type
For the Migration type, choose Migrate existing data and replicate ongoing changes. This means that you want AWS DMS to do a full load of all your existing tables and also capture the changes in your source database. There are other options for full table load only or CDC only. For more information about these options, see Migration Methods for AWS Database Migration Service.

Stopping the AWS DMS task to apply the script at the destination database
When you use AWS DMS to create the target schema on the destination database, it creates only the minimal objects needed to efficiently migrate the data—in this case, the table and primary keys. Also, when AWS DMS does a full load, it loads the data to the destination table by table. Therefore, any enforcement of the referential integrity and constraints must be applied after the tables are completely loaded. This is why you want to stop the AWS DMS task after the table full load is complete and then apply the modified AWS SCT generated script.
In the Stop task after full load completes list, you have the following options:
- If you choose Don’t Stop, you can manually stop the task after the full table load is complete, apply the AWS SCT generated script, and then resume.
- If you choose either Stop Before Applying Cached Changes or Stop After Applying Cached Changes, your task automatically stops after all tables are fully loaded. Then you can apply the generated script from AWS SCT.
In this case, choose Stop Before Applying Cached Changes. Choosing this option allows you to apply secondary indexes, which may help with the performance of the replication process.

For troubleshooting purposes, we recommend enabling the Logging property.
Finally, if you want to specify rules on how you want to filter and transform your table and columns from source to destination, you can create your own Table Mapping. Now you can choose Create to create the AWS DMS task.

After your AWS DMS task is created, you can then monitor the status of your table loads by going to the Table Statistics tab of the Data Migration View. When the state of all the tables has turned to Table Completed, the AWS DMS task automatically stops.

Then, using SQL Server Management Studio or other SQL tools, apply the script that you edited from the AWS SCT generated script to create the constraints and other database objects. Then resume the task for CDC.

During the migration process, you generated additional transactions in your source database, which results in adding 3,545 rows to the ticket_purchase_hist table (from 17,084 rows to 20,629).

After resuming the DMS task, you can see the inserts to the ticket_purchase_hist:

Completing the migration
One way of validating that your destination SQL database has caught up with the replication changes is to compare the number of rows of each table in the source and destination databases.
The following SQL statement is executed on both databases:
Comparing the output of the source and destination database, you should see the same row count for all tables.
| Source EC2 SQL Server | Destination RDS for SQL Server |
 |
 |
You can additionally perform tests using your tools or application to ensure that your Amazon RDS for SQL Server is functional and performant to the needs of your application. When your application is ready to switch to Amazon RDS, you can update your Domain Name System (DNS) or your connection string to point to Amazon RDS. Alternatively, if you’re using Amazon Route 53, our managed DNS service, you can create a CNAME resource record set that associates your domain name to the Amazon RDS for SQL Server instance.
About the Author
 Marie Yap is an enterprise solutions architect at Amazon Web Services. Marie has a technical consulting background focusing on tuning application and database performance for enterprise customers.