Desktop and Application Streaming
Build a serverless session resolver for your NICE DCV Connection Gateway
Customers are able to implement a custom session resolver for NICE DCV Connection Gateways using serverless AWS services. This approach provides a secure endpoint that resolves DCV connections at scale without requiring dedicated infrastructure. Administrators benefit from the built-in high availability, increase in agility, and cost optimizations offered by serverless technology. End users connecting through a DCV Connection Gateway are seamlessly routed to their DCV session, without relying on a single point of failure to resolve their session.
In this 300-level blog post, you implement a serverless session resolver endpoint for DCV Connection Gateway. Your resolver is accessed through the use of Amazon API Gateway and AWS Lambda. When the gateway resolves a session ID, it expects the private IP address of the destination DCV server as a response. In this blog, you use the Amazon Elastic Compute Cloud (Amazon EC2) instance ID as the session ID. Your gateway will POST the session information against your resolver API and get the destination DCV server private IP as a response.
Overview
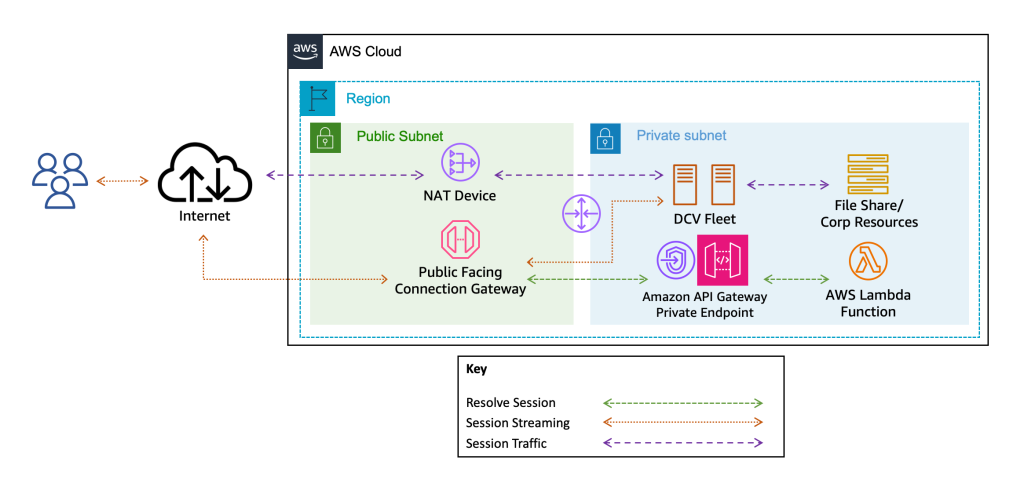
The architecture illustrates an end user connecting to a DCV server through a DCV Connection Gateway. The structure of this connection is DCV-Gateway-IP-or-DNS:8443/?authToken=TOKEN#SessionId. When the user connects to the gateway with this information, the SessionId parameter is sent as a HTTP POST request to an API Gateway. The API Gateway is securely accessed through a private Amazon Virtual Private Cloud (Amazon VPC) endpoint. The API Gateway POST method proxies this information to a Lambda function that returns the destination DCV server’s private IP address. In this walkthrough, you use the EC2 instance ID as the sessionId, however this can be customized to use different identifiers.
Prerequisites
To follow this blog, you will need an Amazon EC2 key pair and AWS Identity and Access Management (IAM) permissions to:
- Create an API Gateway
- Create a VPC endpoint
- Create and Lambda function
- Create an IAM Role and Policy
- Create an Amazon EC2 instance
You will also need an Amazon VPC with DNS resolution and DNS hostnames enabled. You should have public and private subnet configured following VPC best practices.
Walkthrough
Step 1: Create a VPC endpoint for API Gateway
- Navigate to the Amazon VPC Endpoints page in the AWS Management Console.
- Select Create endpoint.
- (Optional) Assign a Name tag to the endpoint.
- Verify the AWS services option is selected in Service Category.
- In the Services search box, insert execute-api, select the proposed filter (formatted as com.amazonaws.REGION.execute-api) and then select the com.amazonaws.REGION.execute-api item.
- In the VPC section, select your VPC ID from the dropdown.
- In the Subnets section, select the private subnets that are reachable from where you plan to provision your DCV Connection Gateway.
- In the Security groups section, select a security group that will allow access to the endpoint within the subnet.
- In the Policy section, select Full access.
- Finally, select Create endpoint.
- Take a note of the VPC endpoint ID, it is needed later.
Step 2: Create the DCVSessionResolver Lambda function
In this step, you create the DCVSessionResolver Lambda function. This function allows the user to generate an authentication token to be used to authenticate with the DCV server.
- Navigate to the AWS Lambda console.
- Select Create function.
- Verify Author from scratch is selected.
- Insert DCVSessionResolver in the Function name box.
- In the Runtime box, select Python 3.12 or newer.
- In the Architecture box, select arm64.
- Select Create function.
- Once the function is created, replace the content of the Lambda function with the code in the Github repository.
- Select Deploy.
- Navigate to the Configuration tab, select Permissions from the list on the left and then select the role link below Role name.
- Select the Add permissions button and then Create inline policy.
- Select the Choose a service link near Service and select EC2.
- In the Actions allowed section, select DescribeInstances under List.
- Select Next.
- Insert a name for the policy in the Policy name box.
- Select Create policy.
Step 3: Create an API Gateway
In this step, you create an API Gateway. This acts as a private Lambda trigger to invoke the DCVSessionResolver function you created in the previous step.
- Navigate to the Amazon API Gateway console. Verify you are in the Region you created the VPC endpoint in.
- Select Create API.
- In the REST API Private section, select the Build button.
- On the Create REST API page, keep New API selected and name your API DCVSessionResolver.
- In the VPC endpoint IDs dropdown, select the VPC endpoint you created in step one and select Add.
- Select Create API.
- Once the API is created, on the Resources page, select Create resource.
- For Resource name, enter resolveSession and select Create resource.
- On the resolveSession resource, select Create method.
- For Method type, select POST.
- Select the Lambda function radio button and toggle the Lambda proxy integration slider.
- For the Lambda function dropdown, select the Lambda function your created in the previous step and select Create method.
- Navigate to the Resource Policy page from the list on the left and select Create policy.
- From the Select a template dropdown, select Source VPC allow list.
- In the newly added policy, make the following changes:
- {{stageNameOrWildcard}}: Beta
- {{httpVerbOrWildcard}}: POST
- {{resourcePathOrWildcard}}: resolveSession
- “aws:sourceVpc”: aws:sourceVpce
- {{vpcID}}: VPC Endpoint ID from Step 1
- Note that aws:sourceVpc has been replaced with aws:sourceVpce. An example policy can be found below.
-
{
    "Version": "2012-10-17",
    "Statement": [
        {
            "Effect": "Deny",
            "Principal": "*",
            "Action": "execute-api:Invoke",
            "Resource": "arn:aws:execute-api:REGION:ACCT-ID:API-ID/Beta/POST/resolveSession",
            "Condition": {
                "StringNotEquals": {
                    "aws:sourceVpce": "vpce-1234567890abcdef0"
                }
            }
        },
        {
            "Effect": "Allow",
            "Principal": "*",
            "Action": "execute-api:Invoke",
            "Resource": " arn:aws:execute-api:REGION:ACCT-ID:API-ID/Beta/POST/resolveSession"
        }
    ]
}
- Select Save changes.
- Select Resources in the navigation pane.
- Select Deploy API on the /resolveSession method page.
- Select *New Stage* and name the stage Beta.
- Select Deploy.
- Take a note of the invoke URL of the newly created API and the API Id. The URL is in the format https://API-ID.execute-api.REGION.amazonaws.com/Beta/ and the API Id is retrieved from it.
Step 4: Create an IAM role for the DCV Connection Gateway
In this step, you create an IAM role for your DCV Connection Gateway EC2 instance. The IAM role allows the gateway to invoke the API Gateway to resolve incoming session IDs.
- Navigate to the AWS IAM console’s Policies page.
- Select Create Policy.
- Select the Choose a service in the Service section and select ExecuteAPI.
- In the Action level section, select Invoke.
- In Resources, select the Specific radio button. Within the execute-api-general section, select Add ARNs. In the dialog, insert the following:
- For Resource in, select This account.
- In the Region box the region where you created the API Gateway.
- In the Api id box the API id retrieved at the end of step three.
- In the Stage box insert Beta.
- In the Method box insert POST.
- In the Api specific resource path box insert DCVSessionResolver.
- Select Add ARNs.
- Select Next.
- Insert DCVSessionResolverApiPolicy in the Name box.
- Select Create policy.
- Choose Roles from the navigation pane.
- Choose Create role.
- Select EC2 in the Use case section and select Next.
- On the Add permissions page, select DCVSessionResolverApiPolicy.
- Choose Next.
- For Role name, enter DCVSessionResolverApiRole.
- Choose Create role.
Step 5: Create a DCV Connection Gateway
In this step, you provision a single DCV Connection Gateway that has its resolver configured to use the API Gateway private endpoint.
- Navigate to the EC2 console.
- Select Launch instance.
- For Name enter DCV Connection Gateway.
- Select Amazon Linux 2 as the instance’s AMI.
- Note that the Console will default to Amazon Linux 2023. DCV Connection Gateway supports a variety of Linux-based operating systems.
- Use the Architecture dropdown to select 64-bit (Arm).
- For Instance type, select a c7g.large, from the C7g instance family.
- For Key pair (login), select your key pair from the dropdown.
- In the Network settings section, choose the VPC and subnet for the DCV Connection Gateway.
- Note that you must have direct access to the gateway to establish connections. If the end users are initiating connections from the internet, you must have an internet gateway.
- Select a security group. This security group provides streaming access to the gateway and communication between the gateway, the API Gateway, and the DCV servers. The default configuration binds to port 8443, however this can be changed.
- Within the Configure storage section, select the default value of 8GB.
- Expand Advanced details.
- Attach the IAM Role you created in the previous step on the IAM instance profile dropdown.
- In the User data section, paste in the bootstrap script found in the Github repository.
- Note that you need to uncomment the
sedcommand that sets your resolver endpoint. Replace the RESOLVER-URL placeholder with the invoke URL you noted in step three.
- Note that you need to uncomment the
- Select Launch instance.
Validation
In this section, you validate that your session resolver is operational. In this blog, you did not deploy DCV servers. This section will validate that the API you deployed can respond to the DCV Connection Gateway. To test this, you initiate a connection to the gateway with a fictitious authentication token and an EC2 instance ID in your VPC as the session ID. After initiating this connection, the gateway logs reflect the session resolution.
- Build your DCV connection string by replacing the following placeholders. This begins with
https://since you use the browser as a DCV client to connect.- Replace GATEWAY-PUBLIC-IP-OR-DNS with the public IP or DNS of the DCV Connection Gateway.
- Replace i-abcdef01234567890 with an EC2 instance in your VPC. If you do not have another EC2 instance, you may use the DCV Connection Gateway instance.
https://GATEWAY-PUBLIC-IP-OR-DNS:8443/?authToken=EXAMPLE-TOKEN#i-abcdef01234567890
- Open your local browser and connect to the URL. Note that, by default, the gateway uses a self-signed certificate to encrypt the traffic. This prompts the user to trust the connection. In Chrome, you select Advanced and then the Proceed link. In production, you may distribute your own TLS certificate.
- After the connection fails, SSH or use AWS Systems Manager Session Manager to connect to the DCV Connection Gateway instance.
- Once connected, invoke the following command. The response will illustrate the API resolving the provided instance ID’s private IP address.
cat /var/log/dcv-connection-gateway/gateway.log | grep 'Route found'
Cleanup
In this blog, you deployed resources that generate costs; including an API Gateway, a VPC Endpoint, an EC2 instance, and a Lambda function. To mitigate further costs, you may remove these resources.
- Delete an API Gateway
- Delete a VPC Endpoint
- Terminate an EC2 instance
- Delete a Lambda function
- Navigate to the Lambda function within the Console. Select Action and Delete function.
You may remove the IAM policies and roles created during this walkthrough.
Conclusion
In this blog, you implemented a serverless session resolver endpoint for your DCV Connection Gateway using API Gateway and Lambda. Resolving a session will route the DCV session through the gateway to the DCV server associated with the session ID. The session ID used in this walkthrough was an instance ID, but this can be any identifier that results in a destination private IP response. The DCV protocol needs to be authenticated to begin streaming the session. The protocol authentication when streaming through a DCV Connection Gateway is performed through External Authentication. To implement serverless token provider and validator endpoints, refer to the Using serverless AWS services as an external authenticator for NICE DCV blog. In a production workload, there will typically be a UI framework to handle these interactions. A UI framework allows end users to select a button to handle the pre-session actions. This includes provisioning a token, locating the users session ID, and seamlessly connecting the user to their session through the use of a URI or browser client.
| Andrew came to AWS in 2019 from a large datacenter environment where he specialized in VMware, Cisco UCS, and automation. Through his time at AWS, he developed a passion for visualization workloads. In 2022, he started his current role as a Sr. Developer Advocate for DCV. |