Desktop and Application Streaming
Unified access to AWS End User Computing services
AWS End User Computing (EUC) services include a variety of virtual desktop and application streaming solutions designed to solve a wide array of customer needs. Amazon WorkSpaces provide users with fully managed, cloud-native persistent desktops. With Amazon WorkSpaces Applications, users securely stream their applications and/or selectively persistent desktops at scale. Amazon WorkSpaces Secure Browser provides cloud hosted secure web browser-based access to internal sites and Software as a Service (SaaS) web applications with enterprise controls.
Many customers adopt multiple AWS EUC services to meet the different requirements of their organization’s users and use cases. Frequently, these customers ask how to streamline access by providing their users a single catalog or storefront-like experience. This blog guides you through utilizing your existing Identity Provider (IdP) to offer users a consolidated view of their AWS EUC resources. Additionally, you will learn about several recent feature releases that enhance the end-user experience and simplify the process of providing seamless access.
In the final section of this blog, you will see an example of using Okta to build a unified AWS EUC portal. In a single view, the user has access to all their WorkSpaces desktops, WorkSpaces applications across fleets, and WorkSpaces Secure Browser portals.
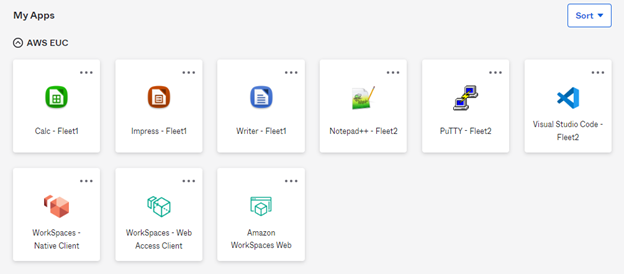
An example AWS EUC portal in Okta
Amazon WorkSpaces
Users connect to Amazon WorkSpaces via the client for their endpoint’s operating system or using the Web Access client. For all client types, they enter a registration code into the client to configure it. The registration code points the client at the correct Amazon WorkSpaces environment for their organization. For users with multiple WorkSpace desktops, they store multiple registration codes in the client.
WorkSpaces supports SAML 2.0 authentication, which provides access via an existing SAML 2.0 identity provider (IdP) and its authentication methods. With SAML authentication initiated in the IdP, users no longer enter the registration code into their client. Instead, the registration code is defined by the administrator in the IdP. For users with more than one WorkSpace, this simplifies their experience by displaying each WorkSpace they have access to as its own tile. For guidance on setting up SAML 2.0 with WorkSpaces, see the administration guide and implementation guide.
Use certificate-based authentication (CBA) with WorkSpaces to remove the prompt for the user’s Active Directory domain password at the desktop. For guidance on configuring certificate-based authentication, see the administration guide and this blog on the topic. The combination of SAML 2.0 and certificate-based authentication allows users to access their WorkSpace via a passwordless authentication flow. Recently, the WorkSpaces Web Access client released support for SAML 2.0 authentication as well as certificate-based authentication. Administrators now have the option to publish applications in their IdP that direct the user to the native client, the web access client, or both.
Following the steps in the SAML and certificate-based authentication guides result in an app tile that launches a session in the native WorkSpaces client. Administrators then have the option to create a tile that directs users to the WorkSpaces Web Access browser client. For seamless access from the IdP to the Web Access client, create a bookmark or shortcut type tile in your IdP. Enter the URL as:
https://webclient.amazonworkspaces.com/?registrationCode=<REGISTRATION_CODE>
Replace <REGISTRATION_CODE> with the WorkSpaces registration code for that directory. Once the tile is assigned, the user now has two tiles for WorkSpaces access. One tile that utilizes the local native client and a second that directs the session to the Web Access client. If you only want the user to utilize the Web Access client, hide the other tile if your IdP supports. Note, you must leave the hidden tile enabled to process the SAML authentication flow.
If a user has access to multiple WorkSpaces in different directories, create a tile for each registration code. Utilize groups in your IdP, such as synced Active Directory groups, to control visibility of the tiles. By naming the tiles based on the type or use case of the WorkSpaces, users clearly understand what each tile provides. The result is a view of all WorkSpaces they have access to, without the need to know or manage the registration codes.
Amazon WorkSpaces Applications
Users access WorkSpaces Applications streaming sessions by using a web browser, or the WorkSpaces Applications client on a supported device. Many customers provide their users access to WorkSpaces Applications using SAML 2.0 identity federation. For guidance on setting up SAML 2.0 with WorkSpaces Applications, refer to the administration guide. There, you will find instructions on setting up SAML as well as IdP specific instructions for various third-party identity providers.
Like WorkSpaces desktops, WorkSpaces Applications supports certificate-based authentication (CBA) for fleets joined to Microsoft Active Directory. Configuring certificate-based authentication removes the user prompt for their Active Directory password when logging into their session.
WorkSpaces Applications presents applications via its own catalog page. The service supports customizing the appearance of the application catalog with your own branding images, text, and color palettes. These catalogs are unique to each fleet and stack. Following the published guidance for your IdP results in an application tile that represents each fleet. Your users will select the fleet, be presented with the fleet’s application catalog, and there they select the application to launch.
It is possible to provide users access to multiple stacks from a single application tile in your IdP using a multi-stack application catalog. When using a multi-stack catalog, a user is presented with a view of all stacks where they have access to applications. They then select a catalog, and the applications they are entitled to are displayed.
Often customers ask how to provide their users a consolidated view showing all the applications the user has access to across all their fleets. It is possible to create a tile for each individual application in your IdP. To accomplish this, add an additional parameter to the relay state URL that points to a single application, instead of the application catalog page. To point an application tile in your IdP to a specific application, add the &app= query string parameter to the end of the URL. The relay state URL becomes:
https://<RELAY-STATE-REGION-ENDPOINT>?stack=<STACK_NAME>&accountId=<AWS_ACCOUNT_ID>&app=<APP_NAME>
Replace <RELAY-STATE-REGION-ENDPOINT> with the endpoint for your region. Replace <AWS_ACCOUNT_ID> with the AWS account that contains the stack. Replace <STACK_NAME> with the name of the WorkSpaces Applications stack. Replace <APP_NAME> with the name of the application in the WorkSpaces Applications image. If your fleet is enabled for the Desktop view, replace <APP_NAME> with Desktop (ex: &app=Desktop).
Amazon WorkSpaces Secure Browser
Users access WorkSpaces Secure Browser via their web browser. The standard method to provide access is to federate WorkSpaces Secure Browser with your SAML 2.0 identity provider. For guidance on setting up authentication with WorkSpaces Secure Browser, refer to the administration guide. Users access their secure browser session in one of two ways:
- Service-provider-initiated (SP-initiated) authentication via an endpoint URL provided by the service.
- Identity-provider-initiated (IdP-initiated) authentication.
Putting it all together in an Identity Provider
Having learned how each AWS EUC service utilizes SAML 2.0 authentication to streamline user access, you will combine it all to create a unified portal. This example is built using Okta as the Identity Provider, but the same concepts should work on other IdPs that support Amazon WorkSpaces, Amazon WorkSpaces Applications, and Amazon WorkSpaces Secure Browser. To provide access to the WorkSpaces Web Access client, it must also support bookmark apps or a tile type that points directly to another URL.
Amazon WorkSpaces
Configure Amazon WorkSpaces by following the implementation guide for SAML authentication. This document has specific instructions for configuring Okta with WorkSpaces. Refer to this blog for guidance on settings up certificate-based authentication. The result is a tile that directs the user’s session to the locally installed native WorkSpaces client.
To provide single click access to the Web Access client directly in the user’s browser, create a bookmark app. To provide seamless SAML access for the Web Access client, you must configure SAML for the directory, and optionally certificate-based authentication, outlined in the previous paragraph. Once you have confirmed SAML authentication to WorkSpaces is working, follow these steps to create a tile for the web access client:
- Log into your Okta admin portal and select Applications, then Browse App Catalog.
- Search for and select Bookmark App.
- Choose + Add Integration.
- Enter a descriptive Application label, such as
Amazon WorkSpaces Web Access. - For URL, enter
https://webclient.amazonworkspaces.com/?registrationCode=<REGISTRATION_CODE>. Replace<REGISTRATION_CODE>with the WorkSpaces registration code for that directory. - Assign users to the application and repeat for any additional WorkSpaces directories you wish to provide Web Access links for.
If you want users to only see the application tile for the Web Access client, hide the WorkSpaces SAML 2.0 application tile. Do not disable or delete this application from Okta, as this will break SAML 2.0 authentication for your users.
- Select the WorkSpaces SAML application icon.
- Select the General tab.
- Under App Settings, select Edit.
- For Application visibility, select the box next to Do not display application icon to users.
- Choose Save.
Amazon WorkSpaces Applications
Here, you will create a view that presents six applications that are delivered via two WorkSpaces Applications fleets and stacks. For this example, the article assumes these stacks and fleets already exist. Either create them in your account or substitute the applications with ones published in your own images. The first stack (AppStack1) contains a fleet that delivers LibreOffice Writer, Impress, and Calc. The second stack (AppStack2) has a fleet that contains PuTTY, Notepad++, and Visual Studio Code.
- Log into your Okta admin portal to create an application for each WorkSpaces Applications app and download the metadata file.
- Select Application, then select Browse App Catalog.
- Search for AppStream 2.0.
- Select Amazon AppStream 2.0 SAML, then choose + Add Integration.
- For Application label, enter the name of the application as it will appear for users.
- Choose Done.
- Select the Sign On tab, then in the right column choose View SAML setup instructions.
- Download the Metadata Document as appname.xml.
- Repeat this for all the applications.
- Create an Okta Identity provider entry for each application in AWS Identity and Access Management (IAM). Refer to Step 1 in the Okta SAML instructions for additional guidance.
- For this example, name the IdP entries
Okta-WorkSpacesApp-Writer,Okta-WorkSpacesApp-Impress,Okta-WorkSpacesApp-Calc,Okta-WorkSpacesApp-PuTTY,Okta-WorkSpacesApp-NotepadPP, andOktaWorkSpacesApp-VSCode. - Take note of each IdP ARN, for later use.
- For this example, name the IdP entries
- Continue on to Step 2 in the Okta SAML instructions to create an IAM role and policy.
- Complete this step only for the first application. You are creating a single IAM role that encompasses all the WorkSpaces Applications applications. Name the role in such a way that indicates this, such as
Okta-WorkSpacesApps-UnifiedAccess. - Once you complete the role creation, select the role in the IAM console.
- Select the Trust relationships tab, choose Edit trust policy.
- Update the trust policy, adding a principal entry for every application specific Okta Identity provider you created in step 1. Replace
<AWS_ACCOUNT_ID>with your AWS account number, and the provider names to match your Identity providers. This single trust policy allows all the IAM Identity providers to utilize the role.
- Complete this step only for the first application. You are creating a single IAM role that encompasses all the WorkSpaces Applications applications. Name the role in such a way that indicates this, such as
{
    "Version": "2012-10-17",
    "Statement": [
        {
            "Effect": "Allow",
            "Principal": {
                "Federated": [
                    "arn:aws:iam::<AWS_ACCOUNT_ID>:saml-provider/Okta-WorkSpacesApp-Writer",
                    "arn:aws:iam::<AWS_ACCOUNT_ID>:saml-provider/Okta-WorkSpacesApp-Impress",
                    "arn:aws:iam::<AWS_ACCOUNT_ID>:saml-provider/Okta-WorkSpacesApp-Calc",
                    "arn:aws:iam::<AWS_ACCOUNT_ID>:saml-provider/Okta-WorkSpacesApp-PuTTY",
                    "arn:aws:iam::<AWS_ACCOUNT_ID>:saml-provider/Okta-WorkSpacesApp-NotepadPP",
                    "arn:aws:iam::<AWS_ACCOUNT_ID>:saml-provider/Okta-WorkSpacesApp-VSCode"
                ]
            },
            "Action": [
                "sts:AssumeRoleWithSAML",
                "sts:TagSession"
            ],
            "Condition": {
                "StringEquals": {
                    "SAML:sub_type": "persistent"
                }
            }
        }
    ]
}-
- Choose Update policy.
- Select the Permission tab.
- Select the policy attached to the role.
- Choose Edit.
- Update the policy with each WorkSpaces Applications stack that contains your applications. Replace
<REGION>and<AWS_ACCOUNT_ID>with your AWS account information, and the stacks to match your WorkSpaces Applications environment. This policy allows the IdP entries on the trust relationship access to both fleets when the role is assumed.
{
    "Version": "2012-10-17",
    "Statement": [
        {
            "Effect": "Allow",
            "Action": "appstream:Stream",
            "Resource": [
                "arn:aws:appstream:<REGION>:<AWS_ACCOUNT_ID>:stack/AppStack1",
                "arn:aws:appstream:<REGION>:<AWS_ACCOUNT_ID>:stack/AppStack2"
            ],
            "Condition": {
                "StringEquals": {
                    "appstream:userId": "${saml:sub}"
                }
            }
        }
    ]
}- Continue on to Step 3 in the Okta SAML instructions to complete the configuration for each application tile.
- When you enter the Relay State parameter for each application, add
&app=<APP_NAME>to the end of the relay state. Replace<APP_NAME>with the name of the application in the WorkSpaces Applications image. If your fleet is enabled for the Desktop view, replace<APP_NAME>withDesktop. This changes the launch behavior. Instead of launching the WorkSpaces Applications catalog, it launches a session to that application directly.
- When you enter the Relay State parameter for each application, add
- Utilize Okta groups to control visibility of each application tile. Use WorkSpaces Applications application entitlements to control visibility in the WorkSpaces Applications catalog and toolbar.
Amazon WorkSpaces Secure Browser
Last, configure Amazon WorkSpaces Secure Browser utilizing the recently released IdP-initiated single sign-on support.
- Follow the Getting started with WorkSpaces Secure Browser documentation until you get to Configure identity provider under Step 1.
- Select Standard (external IdP), choose Continue with Standard IdP.
- Open a new tab in your browser, and log into your Okta admin portal. Do not close the tab with the AWS console for WorkSpaces Secure Browser on it.
- Under Applications, choose Applications.
- Choose Create App Integration.
- Select SAML 2.0, then choose Next.
- Enter a descriptive App name, such as
Amazon WorkSpaces Secure Browser. - Choose Next.
- Return to the AWS console tab, copy the value for SP ACS URL.
- Paste that value into Single sign-on URL in the Okta console.
- For Audience URI (SP Entity ID), paste the value from SP Entity ID.
- For Default RelayState, paste the value from Relay state parameter.
- For Name ID format, select EmailAddress.
- Choose Next.
- Select I’m an Okta customer adding an internal app, then choose Finish.
- Select the Sign On tab.
- Under Metadata details, copy the value of Metadata URL to your clipboard.
- Return to the WorkSpaces Secure Browser console, under Identity provider (IdP) details, select Enter metadata endpoint URL.
- For IdP metadata URL, paste the metadata value copied from the Okta console.
- Choose Next, then choose Launch web portal.
- Back in the Okta console, assign users on the Assignments tab.
Users are now able to launch their WorkSpaces Secure Browser sessions from the portal URL or directly from the application tile in Okta.
The managed dashboard in Okta feature allows administrators to provide tabs that group specific apps for end users. Utilize this feature to further enhance the unified AWS EUC experience for your users by displaying all the application tiles in a curated view.
Conclusion
AWS End User Computing services encompass solutions to meet a wide array of requirements and use cases. Using SAML 2.0 authentication and your Identity Provider, provide your users a unified view into all the AWS EUC services they have access to. Doing so streamlines the user experience and is especially important for users with access to multiple AWS EUC resources. Recent feature releases such as IdP-initiated SSO for WorkSpaces Secure Browser and SAML 2.0 with certificate-based authentication for the WorkSpaces Web Access client enhance the user experience. By following the ideas presented in this blog, you can create a unified access experience for your end users.
 |
Justin Grego is a Senior End User Computing Specialist Solutions Architect. As part of the EUC Service Aligned SA Team, he helps enable both customers and fellow SAs get up to speed on and be successful with new AWS EUC features and services. |