AWS for M&E Blog
Streamline content preparation and quality control for VOD platforms using Amazon Rekognition Video
Last year, we launched Amazon Rekognition video segment detection, an API that makes it easy for media customers to automatically detect frame accurate end credits, black frame segments, shot changes, and color bars in video files using machine learning (ML). Today, we are announcing support for four new types of segments (opening credits, content segments, slates, and studio logos), improved accuracy for credits and shot detection, and new filters to control black frame detection.
Video segment detection enables operations and media supply chain teams to streamline highly manual and tedious content preparation and quality control (QC) tasks for video on demand (VOD) applications. Common tasks include: adding markers like ‘Next Episode’ and ‘Skip Intro’, detecting pre-inserted ad break markers indicated by silent black frames, and removing unwanted sections such as slates and color bars before publishing. With video segment detection, customers can reduce asset review time from hours to minutes, cut down the cost of manual operations by 2-5x, and prepare large volumes of archival or third-party content for streaming at short turnaround. This helps broadcasters and streaming platforms to free up operator resources for higher value work, create interactive skip prompts to keep viewers engaged, and simplify ad insertion workflows for easier monetization.
Key Features
Let us look at each new segment type in more detail.
Opening and end credits: Amazon Rekognition Video helps you automatically identify the exact frames where the opening and closing credits start and end for a movie or TV show. With this information, you can generate ‘binge markers’ or interactive viewer prompts such as ‘Next Episode’ or ‘Skip Intro’ in VOD applications. Amazon Rekognition uses machine learning to handle a wide variety of opening and end credit styles ranging from simple rolling credits to more challenging credits alongside content, credits on scenes, or stylized credits in anime content.
Slates: Slates are sections, typically at the beginning of a video, that contains text metadata about the episode, studio, video format, audio channels, and more. Amazon Rekognition can identify the start and end such slates, making it easy for operators to use the text metadata with further analysis or to simply remove the slate when preparing content for streaming platforms.
Studio Logos: Studio logos are sequences that show the logos or emblems of the production studio involved in making the show. Amazon Rekognition can identify such sequences, making it easy for operators to review them further for identifying studios.
Content: Content refers to the portions of the TV show or movie that contain the program or related elements. Silent black frames, credits, color bars, slates, and studio logos are not considered to be content. Amazon Rekognition detects the start and end of each content segment in the video, which enables multiple uses such as finding the program runtime or demarcating important program segments. For example, a quick recap of the previous episode at the beginning of the video, or a bonus post-credit content that appears after the end credits. Similarly, some videos may have ‘textless’ content at the end – a set of all program sections that have overlaid text, but with the text removed. This allows operators to internationalize the content by using overlaid text in another language. Once all the content segments are detected with Amazon Rekognition Video, customers can apply additional domain-specific rules such as ‘my videos always start with a recap’ to further identify the key segments that need further review or follow-up action.
The following is a typical timeline of a video asset in a media supply chain. Note the color bars and opening credits at the beginning, content segments such as recaps and main program, black frames to denote ad insertion markers throughout the video, and the end credits at the end. With Amazon Rekognition Video, you can detect each of these segments automatically and get frame accurate start and end timestamps, SMPTE timecodes, or frame numbers.

Accuracy improvements
In addition to introducing new segment types, we have also improved the accuracy for shot detection and end credits detection. In particular, challenging end credits styles such as credits over scenes, credits side-by-side with content, longer credit sequences with intermittent content, and stylized credits in anime are now detected more accurately.
How it Works
Video segment detection is an asynchronous API composed of two operations: StartSegmentDetection to start the analysis, and GetSegmentDetection to get the analysis results. StartSegmentDetection accepts an H.264 video stored in Amazon Simple Storage Service (Amazon S3) along with input parameters, and returns a unique JobId upon successful completion, which can then be used with GetSegmentDetection to fetch video results. We recommend using a 720p or 1080p ‘proxy’ version of your content for best results. If you have high-resolution source files in formats like Apple ProRes or MXF, you can use AWS Elemental MediaConvert to transcode them to H.264 first.
Black frame filters
In this release, we have added additional filters to manage the detection of silent black frames. Customers can have media files from different sources with varying levels of quality and color range support. For example, a file digitized from an old tape archive may have different black levels and higher noise than a modern, digitally produced file. To address these varying needs, we now provide Black Frame filters that can be specified in the API request. The following is an example request JSON for StartSegmentDetection:
{
  "Video": {
    "S3Object": {
      "Bucket": "test_files",
      "Name": "test_file.mp4"
    }
    "SegmentTypes":["TECHNICAL_CUES", "SHOT"]
    "Filters": {
      "TechnicalCueFilter": {
         "MinSegmentConfidence": 90,
         "BlackFrame" : {
            "MaxPixelThreshold": 0.1,
            "MinCoveragePercentage": 95
         }
      },
      "ShotFilter" : {
          "MinSegmentConfidence": 60
      }
  }
}
Now we look at the black frame filter parameters in more detail:
MaxPixelThreshold is a threshold used to determine the maximum luminance value for a pixel to be considered black. In a full color range video, luminance values range from 0-255. A pixel value of 0 is pure black, and the most strict filter.
The maximum black pixel value is computed as follows: max_black_pixel_value = minimum_luminance + MaxPixelThreshold *luminance_range. For example, for a full color range video with BlackPixelThreshold = 0.1, max_black_pixel_value is 0 + 0.1 * (255-0) = 25.5.The default value of MaxPixelThreshold is 0.2, which maps to a max_black_pixel_value of 51 for a full color range video.
MinCoveragePercentage is the minimum percentage of pixels in a frame that need to have a luminance below the max_black_pixel_value for a frame to be considered a black frame. Luminance is calculated using the BT.709 matrix.
The default value is 99, which means at least 99% of all pixels in the frame need to be black pixels as per the MaxPixelThreshold value set. You can reduce this value to allow more noise on the black frame.
API Response
Next, we look at a sample response from GetSegmentDetection. Notice that you now get back the start, end, and duration for each segment in frames, in addition to timestamps and SMPTE timecodes.
    "JobStatus": "SUCCEEDED",
    "VideoMetadata": [
        {
            "Codec": "h264",
            "DurationMillis": 478145,
            "Format": "QuickTime / MOV",
            "FrameRate": 24.0,
            "FrameHeight": 360,
            "FrameWidth": 636
        }
    ],
    "AudioMetadata": [
        {
            "Codec": "aac",
            "DurationMillis": 478214,
            "SampleRate": 44100,
            "NumberOfChannels": 2
        }
    ],
"Segments": [
        {
            "StartFrameNumber": 0,
            "EndFrameNumber": 299,
            "DurationFrames": 299,
            "StartTimestampMillis": 0,
            "EndTimestampMillis": 9976,
            "DurationMillis": 9976,
            "StartTimecodeSMPTE": "00:00:00;00",
            "EndTimecodeSMPTE": "00:00:09;29",
            "DurationSMPTE": "00:00:09;29",
            "Type": "TECHNICAL_CUE",
            "TechnicalCueSegment": {
                "Confidence": 90.45006561279297,
                "Type": "BlackFrames"
            }
        },
        {
            "StartFrameNumber": 299,
            "EndFrameNumber": 449,
            "DurationFrames": 150,
            "StartTimestampMillis": 9976,
            "EndTimestampMillis": 14981,
            "DurationMillis": 5005,
            "StartTimecodeSMPTE": "00:00:09;29",
            "EndTimecodeSMPTE": "00:00:14;29",
            "DurationSMPTE": "00:00:05;00",
            "Type": "TECHNICAL_CUE",
            "TechnicalCueSegment": {
                "Confidence": 100.0,
                "Type": "Content"
            }
        },
        {
            "StartFrameNumber": 0,
            "EndFrameNumber": 299,
            "DurationFrames": 299,
            "StartTimestampMillis": 0,
            "EndTimestampMillis": 9976,
            "DurationMillis": 9976,
            "StartTimecodeSMPTE": "00:00:00;00",
            "EndTimecodeSMPTE": "00:00:09;29",
            "DurationSMPTE": "00:00:09;29",
            "Type": "SHOT"
            "ShotSegment": {
                "Index": 0,
                "Confidence": 99.9982681274414
            },
        },
        {
            "StartFrameNumber": 300,
            "EndFrameNumber": 449,
            "DurationFrames": 149,
            "StartTimestampMillis": 10010,
            "EndTimestampMillis": 14981,
            "DurationMillis": 4971,
            "StartTimecodeSMPTE": "00:00:10;00",
            "EndTimecodeSMPTE": "00:00:14;29",
            "DurationSMPTE": "00:00:04;29",
            "Type": "SHOT"
            "ShotSegment": {
                "Index": 1,
                "Confidence": 99.9982681274414
            },
        }
    ],

    "SelectedSegmentTypes": [
        {
            "Type": "SHOT",
            "ModelVersion": "2.0"
        },
        {
            "Type": "TECHNICAL_CUE",
            "ModelVersion": "2.0"
        }
    ]
}
Getting started
You can start using video segment detection APIs by downloading the latest AWS SDK. Refer to our documentation for more details on the API and code examples. For more API pricing information, see the Amazon Rekognition Video pricing page. Video segment detection APIs are priced at $0.05/min or $3/hour of video each for technical cue detection (black frames, credits, content, slates, studio logos) and shot detection.
To help you to visualize the results created by the API, check out the Segment Detection solution, an open source code project in GitHub. You can also use the video segment detection API through applications built by AWS Partners, such as Codemill Accurate Player Validate. Let us now see how the solution works.
Segment detection solution
Upload, analyze, and visualize detection results
The demo solution allows you to upload, analyze video(s), and visualize the detection through a web portal:
- Create the demo solution through the supplied AWS CloudFormation template, and log into the web portal
- Drag and drop your video files to start the analysis. The solution then runs Amazon Rekognition Segment detection API to detect technical cues and shots, and returns the detection results in JSON format.
- Once the video is fully analyzed, navigate and visualize the detection results by toggling the buttons for each segment type. Results are overlaid on the video timeline
Tears of steel | (CC) Blender Foundation | mango.blender.org
Convert JSON to EDL format
Once you have the Amazon Rekognition Segment detection JSON results, you can use the demo solution to convert the JSON file to EDL file format with the following steps:
- After logging in to the web portal of the solution, click on the SimpleConvert
- Drag and drop the JSON file to the portal and click on Start convert
- Once the JSON file is converted, click on Download EDL to download the EDL package.

Import EDL into NLE tools
Once you download and unzip the EDL package, each of the EDL files can be imported into an NLE tool as a timeline element:
- Open DaVinci Resolve and create a New Project
- Drag and drop the video into the Media Pool
- Click on File > Import > Timeline and select one of the EDL files, for example, ‘shot.edl’ to import it
- After importing, all the shot segments are presented on the timeline as elements with frame accuracy. You can then navigate the timeline to find individual segments and edit the clip.
The following animation demonstrates how you can import the Amazon Rekognition generated EDL file into BlackMagic Design DaVinci Resolve.

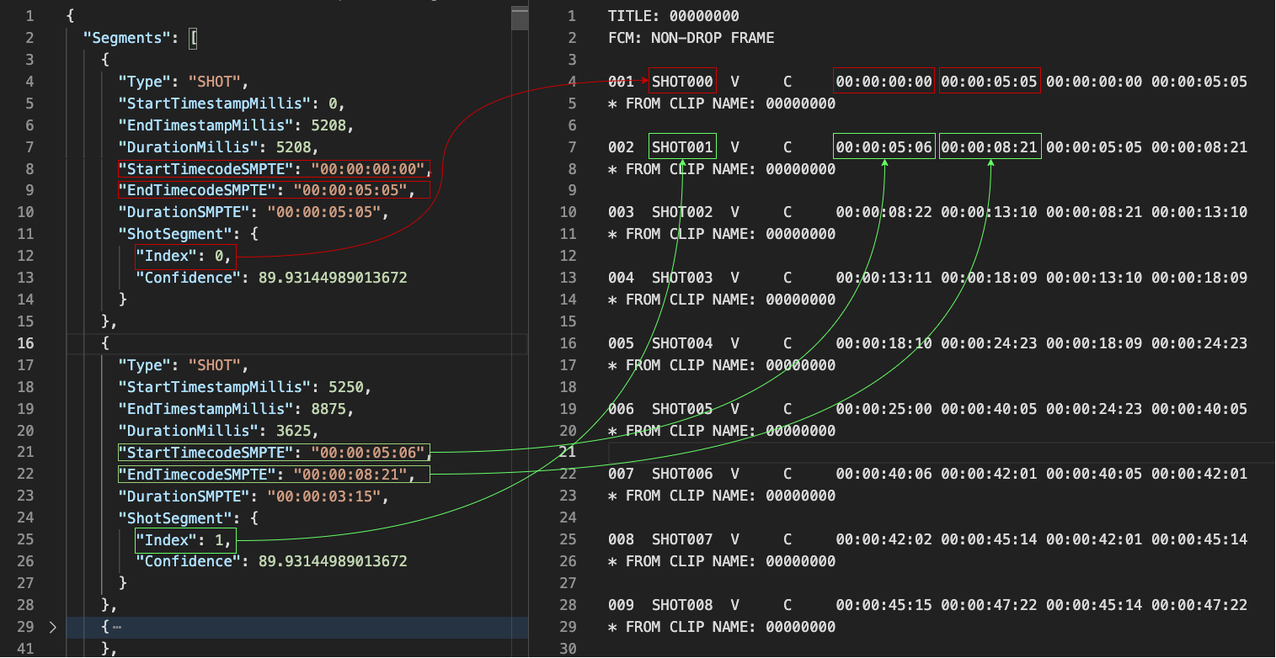
Converting from JSON to EDL CMX3600 Format
To further understand how the conversion works, let us take a closer look at the EDL file format and the JSON response of segment response.
EDL File
TITLE: TEARSOFSTEEL 4K
FCM: NON-DROP FRAME

001  SHOT000  V     C     00:00:00:00 00:00:08:21 00:00:00:00 00:00:08:21
* FROM CLIP NAME: tearsofsteel_4k.mov

002  SHOT001  V     C     00:00:08:22 00:00:13:10 00:00:08:21 00:00:13:10
* FROM CLIP NAME: tearsofsteel_4k.mov
where
001, Field 1 identifies the edit decision.
SHOT000, Field 2 identifies the reel number
V, Field 3 identifies the element is in interested. “V” represents “Video only”
C, Field 4 describes the action of the decision. “C” represents “Cut”
SPACE character, Field 5 identifies the type of transition. In our case, “ ” is filled for “Cut” operation
00:00:00:00, Field 6 represents the source play IN time
00:00:08:21, Field 7 represents the source play OUT time
00:00:00:00, Field 8 represents the record play IN time
00:00:08:21, Field 9 represents the record play OUT time
Without going into details of the EDL CMX 3600 specification, we can still see that the EDL file contains a list of the decision / transitions (“Cut”, for instance) and the timing information such as IN and OUT time.
Converting to EDL file format is as simple as mapping the start and end SMPTE timecodes of the detection and formatting it into a compatible EDL CMX3600 decision lines.
Summary
In this blog, we talked about the Amazon Rekognition Video segment detection API, which makes it easy for media customers to streamline content preparation and quality control (QC) tasks for VOD applications. We reviewed the four new segment types added in this release – opening credits, content segments, slates, and studio logos. We also saw how black frame detection can be further customized using new filter options. Finally, we walked through how to use the Segment Detection solution to easily test your video files and convert the JSON API responses into EDL files for easy import into non-linear editors such as BlackMagic Davinci Resolve or Adobe Premiere Pro. For more details on the Amazon Rekognition Video segment detection API, refer to our documentation.