Front-End Web & Mobile
Build your own application for route optimization and tracking using AWS Amplify and Amazon Location Service
Many companies serve their customers “in the field.” These are broadly: 1) companies that have a field service business function, e.g., for the repair of equipment that they sell to their customers, and 2) companies that have a route sales business function, e.g., a Consumer Packaged Goods (CPG) company’s own or contract employees stocking the shelves of a retailer with the CPG company’s products (called direct-to-store delivery (DSD)).
In an earlier post, we described a solution that can benefit field services across industries and DSD route sales for food & beverage companies. In this post, we’ll demonstrate how you can build and run this solution yourself, which will prepare you to adapt this solution to your organization’s needs. We’ll demonstrate how AWS Amplify, a set of tools and features to build full-stack applications on AWS, integrates with Amazon Location Service, AWS AppSync, and AWS IoT Core to provide a reference solution for transportation and logistics tracking. Your application will enable a dispatcher to search and enter origin, destination, and waypoint locations on a map. The Amazon Location matrix routing feature calculates the time and distance between any two points on a map. Based on this feature, we provide an implementation that uses matrix routing as the input, and then calculates and displays a route on the map that provides the shortest time to complete the trip. The application also provides the ability to track a driver on the map as they complete their route by simulating an Internet of Things (IoT) sensor/device installed in their vehicle.
Solution overview
The solution is available for download with a detailed README. It’s divided into three components:
- Route entry – The Route entry component leverages Amplify React development with AWS AppSync and Amazon DynamoDB to enable a field service dispatcher to enter and store origin, destination, and waypoint locations using a map.
- Route calculation – The Route calculation component leverages AWS Lambda, Amazon Location matrix routing, and AWS AppSync to automatically create an optimized lowest cost route based on the shortest time to complete the trip, and then displays the optimized route on the map.
- Route tracking – The Route tracking component integrates the Amplify based React application with AWS App Sync, AWS IoT Core, and Amazon Location tracker to track our driver on the map as they complete their route. This component simulates an IOT sensor/device installed in the vehicle.
In this post, we’ll build the solution iteratively by completing the setup for each component. At every step, you can test a component before moving to the next stage. We expect this entire exercise to take 45-60 minutes to complete, depending on your experience level. If you need to take a break, then consider stopping after completing the setup of the first or second of the three solution components. The following architecture diagram depicts the AWS services involved in each of the components outlined above:
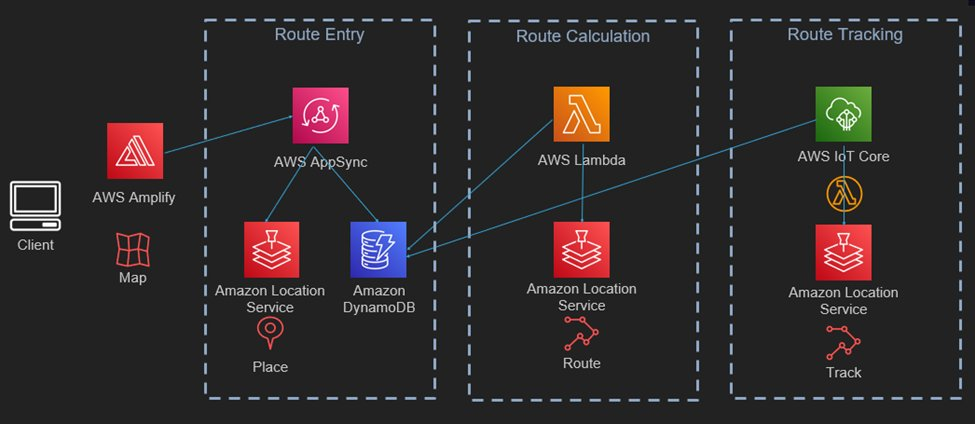
Figure 1: Route optimization and tracking using Amplify and Amazon Location
Prerequisites
We highly recommend using the AWS Cloud9 environment to run and deploy this solution. Alternatively, you can use any development environment of your choice.
Option 1: Setup Cloud9
- Go to the Cloud9 web console
- At the top right corner of the console, make sure that you’re using this region: Virginia (
us-east-1) - Select Create environment
- Name it RouteOptimizationWorkshop, and go to the Next step
- Select Create a new EC2 instance for environment (direct access) and pick m5.large
- Leave all of the environment settings as they are, and go to the Next step
- Select Create environment
Once the Cloud9 instance has started, open a new terminal and run the following commands:
echo -e "[default]\noutput=json\nregion=us-east-1" >> ~/.aws/config– this will set the default region for your AWS Command Line Interface (AWS CLI) and Amplify CLI commandsnpm install --location=global @aws-amplify/cli@9.1.0 – this will install the Amplify CLI
Then, follow the steps described here to increase the default volume size.
Option 2: Locally on your machine
- AWS CLI
- Follow these steps to install the latest version of the AWS CLI
- Configure the AWS CLI using Quick configuration with aws configure
- Node.js version >= 14.x
- o Verify that your Node.js version >= 14.x. Download the latest version here
- Npm version >= 8.x
- o Verify that your npm version >= 8.x. Verify and download the latest version here
- Amplify CLI
npm i -g @aws-amplify/cli(v9.1.0 or higher)- o Install and configure the Amplify CLI
- o Our solution requires v0.1.0 or higher of the Amplify CLI
Solution setup – Route Entry
Step 0 – Clone the repo and install project dependencies
Clone the repo. While in the root of the project directory, run the following command to install all the dependencies:
Step 1 – Create a new Amplify project
The codebase that we’ve just cloned comes with a folder containing the backend configuration. Since we’ll create it from scratch, delete the amplify folder (i.e., rm -rf amplify).
Then, while still in the project’s root, run the following command (amplify init) and follow the prompts to initialize a new Amplify project:
Step 2 – Create Amazon Location resources
Then, while still in your terminal and in the root of the project, run the amplify add geo command to create a new Amazon Location map resource:
Next, run the command once again – but with different answers to the prompts – to create a Place index resource:
Next, add an Amplify custom resource. These custom resources are Lambda backed resources. They are needed here because at the moment Amplify CLI doesn’t support creating Route calculator and Tracker resources:
Before starting to define resources in the AWS Cloud Development Kit (AWS CDK) stack, you must add a new dependency to the stack. Open the amplify/backend/custom/customResourceXXXXX/package.json file in your text editor and replace its content with this:
After having modified the file above, change the directory to the amplify/backend/custom/customLocation directory, and then run npm i in your terminal to install the dependencies that we’ve just added.
These extra dependencies are needed for the AWS CDK stack to create the Amazon Location Tracker and RouteCalculator.
Open the amplify/backend/custom/customLocation/cdk-stack.ts file and add the code from amplify/backend/custom/customLocation/cdk-stack.ts from our solution’s repository
Next, you must allow the authenticated AWS Identity and Access Management (IAM) role to access the Route calculator resource. This will allow logged-in users to call the geo:CalculateRoute API.
Go back to the main directory of the project and run the following command to extend the Amplify generated IAM role:
Next, add the following statement to the override.ts file that was generated (amplify/backend/awscloudformation/override.ts):
import { AmplifyRootStackTemplate } from "@aws-amplify/cli-extensibility-helper";
export function override(resources: AmplifyRootStackTemplate) {
const authRole = resources.authRole;
const basePolicies = Array.isArray(authRole.policies)
? authRole.policies
: [authRole.policies];
authRole.policies = [
...basePolicies,
{
policyName: "amplify-permissions-custom-resources",
policyDocument: {
Version: "2012-10-17",
Statement: [
{
Resource: {
"Fn::Sub":
"arn:aws:geo:${AWS::Region}:${AWS::AccountId}:route-calculator/routecalculator_supplychain",
},
Action: ["geo:CalculateRoute*"],
Effect: "Allow",
},
],
},
},
];
}
From the root of the project folder, continue by adding an AWS AppSync API using the Amplify CLI.
Note that when creating the AppSync API, make sure to set Amazon Cognito User Pool as Authorization mode. Do this by selecting “Authorization Mode” and selecting “Amazon Cognito User Pool” after selecting “GraphQL”. If you’ve already stepped through the options, then you can update the GraphQL API by running `amplify update api` and selecting “Authorization Mode“.
Before deploying the resources, open the file amplify/backend/api/awssupplychaindemo/schema.graphql and replace its content with the following schema:
Step 4: Push resources to the cloud
Note that if the Amplify CLI asks you to generate the schemas/models for the GraphQL API, answer NO. These files are already included in the base application.
At this stage, if you run npm start while in the project’s folder, you should be able to see the login screen as shown in the following image. Go ahead and create an account.
Figure 2: Login screen to sign in or create an account to access the solution
Once you create an account, you can create an itinerary and add or search for locations on the map as shown in the following image:
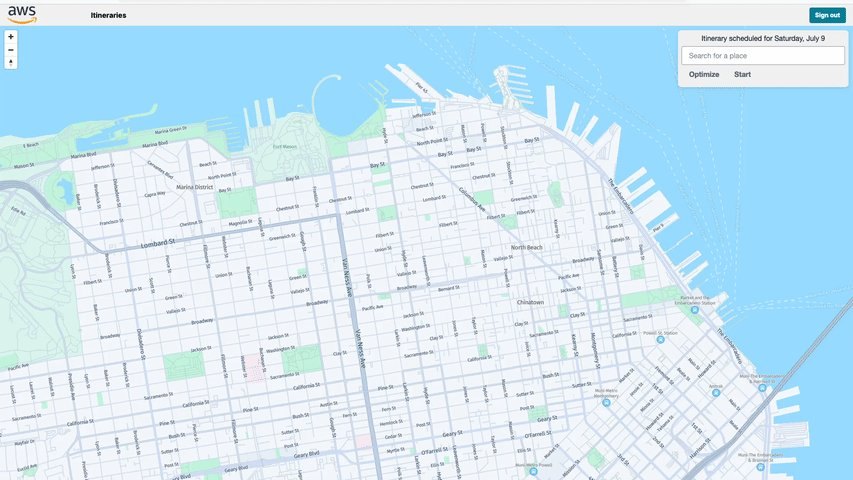
Figure 3: Add locations directly on the map as waypoints or destination addresses.
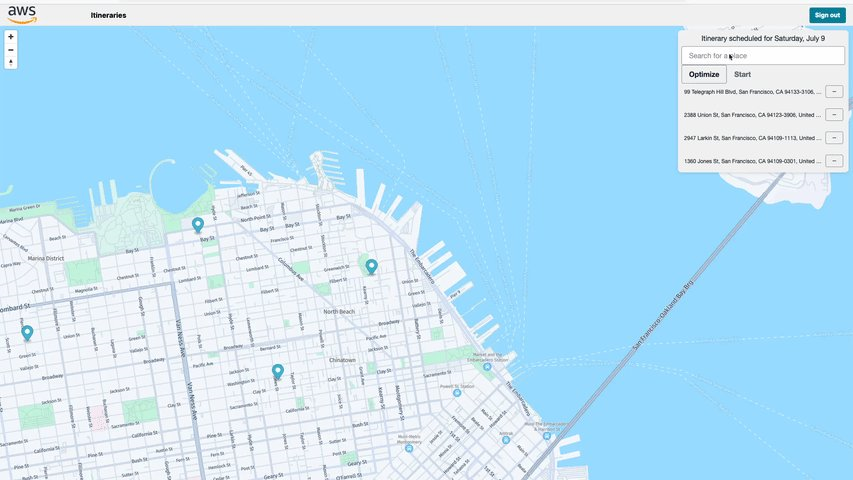
Figure 4: Search for locations to be added on the map as waypoints or destination addresses.
Solution setup – Route Calculation
Step 1: Create an Lambda layer
We’ll start by creating a new Layer that will contain a Logger utility from Lambda Powertools for TypeScript.
Lambda Powertools for TypeScript provides a suite of utilities for Lambda functions running on the Node.js runtime, to ease the adoption of best practices such as tracing, structured logging, custom metrics, and more.
From the root of the project folder, run the following command:
Next, change directory to the amplify/backend/function/awssupplychaindemopowertools/lib/nodejs folder that was added to your project, and run npm i @aws-lambda-powertools/logger@latest to install the AWS Lambda Powertools Logger that you’ll use to create structured logs for our Lambda functions.
Create a file at amplify/backend/function/awssupplychaindemopowertools/opt/powertools.js and add the following code:
Step 2: Create the Lambda function for shortest time calculation based on matrix routing
Next, let’s add a new Lambda function to our project. We’ll call this function routeOptimizerFn and use it to perform the route optimization using the Matrix Routing API.
Note that when presented with multiple options from the Amplify CLI, you can make your selection using the spacebar.
Next, in the amplify/backend/function/routeOptimizerFn/src folder, run the following command with your terminal:
npm i @aws-sdk/client-dynamodb @aws-sdk/util-dynamodb @aws-sdk/client-location
Then, open the amplify/backend/function/routeOptimizerFn/src/index.js file and replace its contents with the ones that you can find in the amplify/backend/function/routeOptimizerFn/src/index.js of our repository.
Finally, open the amplify/backend/function/routeOptimizerFn/custom-policies.json file and replace its contents with the following:
Step 3: Add a new GraphQL mutation to the schema
Next, we must add a new GraphQL mutation to the schema so that AWS AppSync knows that we want to use the routeOptimizerFn function for this mutation.
Open the schema file in the amplify/backend/api/awssupplychaindemo/schema.graphql file and add the following mutation at the bottom of the file. Note that we’re using the -${env} suffix: this is a convenience feature that Amplify CLI provides that will automatically replace the -${env} suffix with the current environment name.
Then, run amplify push to update your backend resources. Follow and confirm the prompts displayed.
Note that if the Amplify CLI asks you to generate the schemas/models for the GraphQL API, answer NO. These files are already included in the base application.
Once the Amplify CLI has finished deploying, you can start the application again (npm start). While in the map view of the itinerary, you can now select the “Optimize” button to trigger the route optimization.

Figure 5: Select the optimize button to create a shortest time route on the map.
Solution setup – Route Tracking
Step 1: Create the Lambda function to simulate a vehicle driving on the route
Create the first Lambda function that will be used to simulate a truck driving on the route in the map. From the root of the project folder, run the following command:
Finally, open the index.js file and add the code in the index.js file here in our GitHub repository.
While editing this file, make sure to replace the value of the THING_ENDPOINT constant using the AWS IoT Core endpoint that corresponds to your AWS Region and account. Obtain your endpoint by running the following command:
aws iot describe-endpoint –endpoint-type iot:Data-ATS
The result should look like this:
Next, since you want this Lambda function to run for as long as possible, let’s extend the timeout duration from the default of 25 seconds to 15 minutes. To do so, open the amplify/backend/function/deviceSimulatorFn/deviceSimulatorFn-cloudformation-template.json file and find the line that has the "Timeout": 25 text, and replace it with "Timeout": 900 (15 minutes).
Finally, open the amplify/backend/function/devicesimulator/custom-policies.json file and add the following code. Replace the region-name and account-id with the values from your corresponding AWS Region and account.
Step 2: Create the AWS IoT Core resources
Next, continue by running the following command to generate a new AWS IoT Core certificate that will be used by the function to connect to the IoT Core endpoint. This is one of the few manual steps that you must run, since it’s easier to manage this resource via the AWS CLI than with Amplify:
Navigate to the amplify/backend/function/devicesimulatorfn/src/certs folder and run the following command:
The result should look like this:
Note the certificateId key from the above output. You will use this to update the certificateId value in the iotResources custom resource that you create in the following.
Once again, we can use the amplify add custom command to create the IoT resources that we need with AWS CDK. From the root folder of the project, run the following command:
Navigate to the file at amplify/backend/custom/iotResources/package.json and update the dependency list from the corresponding file in our GitHub repo.
While in the amplify/backend/custom/iotResources directory, run the npm i command to install these dependencies. Next, navigate to the amplify/backend/custom/iotResources/cdk-stack.ts file and update it with the contents of the iotResources/cdk-stack.ts from our repo. In this cdk-stack.ts file, find the line that looks like this:
Replace the value between the quotes with the certificate ID that you created earlier.
Step 3: Create remaining Lambda functions
Now you must create the remaining Lambda functions needed for the Route Tracking component. Follow step-by-step instructions in Step 6: Create the remaining Lambda functions of our GitHub repo. Since you’ve already created the routeOptimizer function, skip creating it in these step-by-step instructions and create all of the other functions.
Step 4: Update the GraphQL schema
Now that we have added more functions, we must update the GraphQL schema to include custom mutations and queries. Navigate to the amplify/backend/schema/schema.graphql file. Update the content of the file so that it includes the following snippet.
Note that you should already have a type Mutation statement in it. Therefore, make sure to remove the existing one before you place the following one.
Step 5: Push resources to the cloud
Finally, push Route Tracking related resources to the cloud by running amplify push from the root of your project folder.
Note that if the Amplify CLI asks you to generate the schemas/models for the GraphQL API, answer NO. These files are already included in the base application.
After the Amplify CLI has finished deploying the resources, you can once again start the application by running npm start in your terminal.
Now that you’ve implemented the route tracking feature, you can start tracking a simulated vehicle. To start the simulation, you must have an itinerary with the date set as the current date that is also already optimized
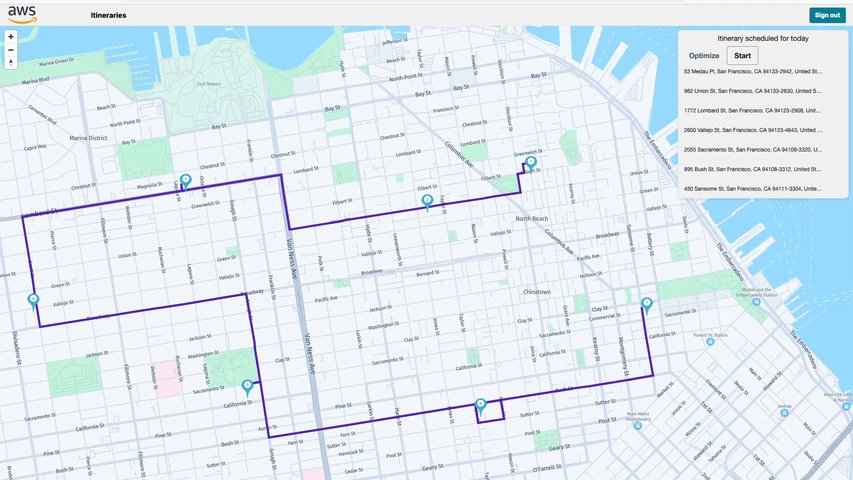
Figure 6: Select the start button to simulate and track a vehicle on the map.
Cleanup
To stop recurring charges, you can clean up the entire application by running the following command from the project root folder:
Conclusion
In this post, using a field service and route sales use case, we’ve demonstrated how you can build your own transportation and logistics tracking solution from scratch using Amplify, Amazon Location, AWS AppSync, and AWS IoT. The three well-integrated but modular components of the solution (Route Entry, Route Calculation, and Route Tracking) should provide you with a robust starting point for adapting this solution to your own organization’s route planning and tracking needs.