Front-End Web & Mobile
Integrate AWS Step Functions with AWS Amplify using Amplify Custom Resources
AWS Amplify makes it possible to add custom AWS resources to an Amplify-created backend using the amplify add custom command and the AWS Cloud Development Kit (AWS CDK) or AWS CloudFormation. By doing so, developers can easily add and manage AWS resources beyond Amplify’s built-in use cases to their projects.
AWS Amplify makes it fast and easy to build cloud-powered mobile and web apps on AWS. Amplify comprises a set of tools and services that enable frontend web and mobile developers to leverage the power of AWS services to build innovative and feature-rich applications. The Amplify CLI is a command line toolchain that helps frontend developers create app backends in the cloud.
In this blog post, we’ll use an Amplify custom resource to add an AWS Step Functions workflow to our Amplify project.
AWS Step Functions is a serverless orchestration service that lets you combine AWS Lambda functions and more than 10,000 AWS API actions to build business-critical applications. Step Functions workflows manage failures, retries, parallelization, service integrations, and observability so developers can focus on higher-value business logic.
What we’ll learn
- How to create a Step Functions workflow as an Amplify custom resource using the AWS CDK.
- How to connect our custom resource to an existing Amplify-managed GraphQL API.
What we’ll build
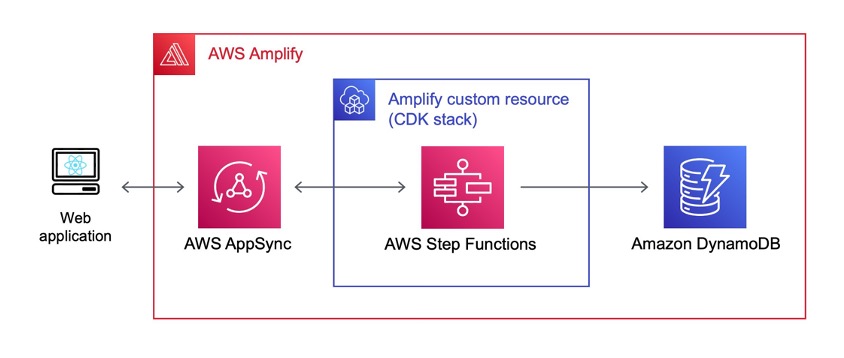
Figure 1. Architecture diagram: what we’re going to build.
The proposed solution consists of the following elements:
- Our sample web application is a customer feedback form built using Vite and Amplify UI.
- Submitting the feedback form will trigger a Step Functions express workflow created as an Amplify custom resource via an AWS AppSync API managed by Amplify.
- The Step Function workflow will detect the sentiment of the submitted feedback using Amazon Comprehend’s
DetectSentimentAPI. - Next, the workflow will store the feedback and detected sentiment in an Amplify-managed Amazon DynamoDB table.
- If a non-positive sentiment is detected, the workflow will trigger a notification to a customer support email address using the Amazon Simple Notification Service (Amazon SNS).
- Depending on the result of the sentiment analysis, our web application will display different confirmation messages to the customer.
The Step Functions workflow looks like this:
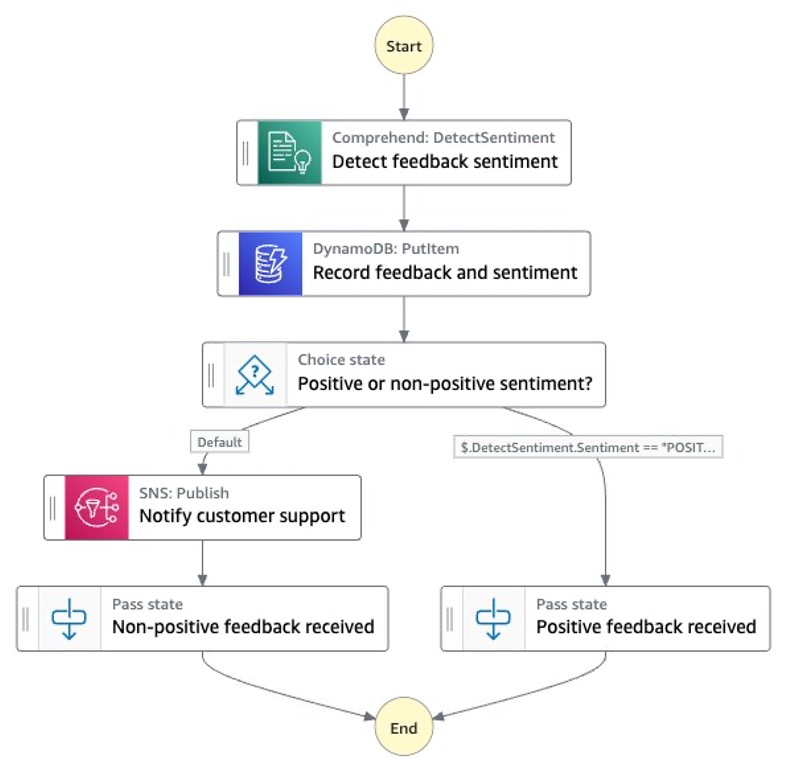
Figure 2. Step Functions workflow for processing user feedback.
From the perspective of the user of our web application, the result will look like this:
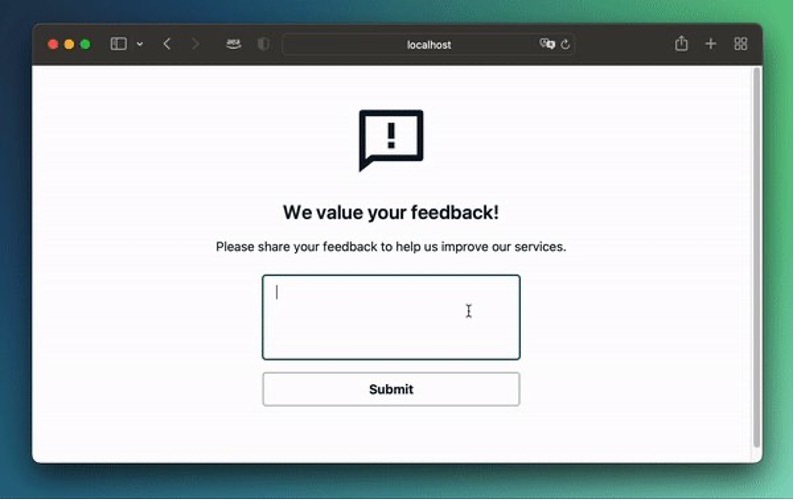
Figure 3. Demonstration of the outcome of this solution.
Walkthrough
Prerequisites
- An AWS Account.
- Node.js and git installed.
Setting up the Amplify CLI
To install the Amplify CLI, use the following command:
npm install -g @aws-amplify/cli
Setting up the base Amplify project
Next, clone the sample project from the aws-samples GitHub repository:
git clone https://github.com/aws-samples/aws-amplify-stepfunctions-example.git
cd aws-amplify-stepfunctions-example
Next, we are going to use the Amplify CLI to create the resources contained in the sample project in our AWS account with the following command:
amplify initSet up the project as depicted in the following screenshot:

Amplify will now set up our project environment in AWS and notify us once it’s done:

We are now ready to add AWS resources to our Amplify stack using the Amplify CLI.
Setting up a GraphQL API
We will start by adding a GraphQL API to our Amplify stack. Later in the walkthrough, we will connect our Step Functions workflow here.
Execute the following command and configure the API as depicted below:
amplify add api
Open the schema.graphql file located in amplify/backend/api/<project_name>/. Define the following GraphQL schema:
"""
Creates a database table for 'Feedback' to store the feedbacks
 submitted through our web application.
"""
type Feedback @model @auth(rules: [{ allow: public }]) {
  id: ID!
  content: String!
  sentiment: String
}

"""
Create a new 'Execution' type that will be returned by our call
to the Step Functions workflow.
"""
type Execution {
  name: String
  status: String
  input: String
  executionArn: String
  startDate: String
  stopDate: String
  output: String
}

"""
Mutation that triggers the synchronous execution of our Step
Functions workflow.
"""
type Mutation {
  executeStateMachine(input: String!): Execution @aws_api_key
}
Have Amplify apply this schema to our resources in AWS by running the following command:
amplify pushWhen asked if you want Amplify to generate code for the newly created GraphQL API, answer “Yes”, specify “javascript” as target language, and confirm the other default options:

Adding an Amplify custom resource
To add a Step Functions workflow to our Amplify project, we’re going to use an Amplify custom resource:
amplify add custom
After we specify a name for our Amplify custom resource, Amplify will create an empty AWS CDK stack for us in the directory amplify/backend/custom/<our custom resource name>/.
Importing the required dependencies to our AWS CDK stack
We can now customize the stack’s code to add our Step Functions resource and connect it to our GraphQL API. You can find the complete example code for the custom resource stack in the template/ directory in the cloned git repository or here on GitHub. We will discuss the code step by step in this walkthrough.
We add AWS resources to our AWS CDK stack by first opening amplify/backend/custom/<name of custom resource>/cdk-stack.ts.
Let’s add the dependencies we’re going to need to build our Step Functions workflow and remove the commented-out AWS CDK resources so that our file matches the following.
Replace the content of cdk-stack.ts with:
import * as cdk from "aws-cdk-lib";
import * as AmplifyHelpers from "@aws-amplify/cli-extensibility-helper";
import { AmplifyDependentResourcesAttributes } from "../../types/amplify-dependent-resources-ref";
import { Construct } from "constructs";
import * as iam from "aws-cdk-lib/aws-iam";
import * as sns from "aws-cdk-lib/aws-sns";
import * as subs from "aws-cdk-lib/aws-sns-subscriptions";
import * as appsync from "aws-cdk-lib/aws-appsync";
import * as sfn from "aws-cdk-lib/aws-stepfunctions";
import * as tasks from "aws-cdk-lib/aws-stepfunctions-tasks";
import * as dynamodb from "aws-cdk-lib/aws-dynamodb";


export class cdkStack extends cdk.Stack {
  constructor(
    scope: Construct,
    id: string,
    props?: cdk.StackProps,
    amplifyResourceProps?: AmplifyHelpers.AmplifyResourceProps
  ) {
    super(scope, id, props);
    /* Do not remove - Amplify CLI automatically injects the current deployment environment in this input parameter */
    new cdk.CfnParameter(this, "env", {
      type: "String",
      description: "Current Amplify CLI env name",
    });

    // All CDK resources we define as part of this walkthrough will go here.

  }
}
Referencing our existing GraphQL API in the custom resource stack
As a first step, we will reference our existing GraphQL API resource as a dependency in the AWS CDK stack. You can find the name of the API resource by looking at the name of the directory generated by the Amplify CLI. Note that the name of this folder might be different if you have named the project differently:

Update the name of the API resource in two places if it is not amplifysfn as in our example:
// Defines the existing GraphQL API as a dependency for the custom resource CDK stack
const dependencies: AmplifyDependentResourcesAttributes =
    AmplifyHelpers.addResourceDependency(
    this,
    amplifyResourceProps.category,
    amplifyResourceProps.resourceName,
    [
        {
        category: "api",
        resourceName: "amplifysfn", // <- Adjust with name of your API resource
        },
    ]
    );

// Get the ID of the existing GraphQL API
const apiId = cdk.Fn.ref(
    dependencies.api.amplifysfn.GraphQLAPIIdOutput // <- Adjust with name of your API resource
);

// References the existing API via its ID
const api = appsync.GraphqlApi.fromGraphqlApiAttributes(this, "API", {
    graphqlApiId: apiId,
});

// Adds the AWS Step Functions (SFN) service endpoint as a new HTTP data source to the GraphQL API
const httpdatasource = api.addHttpDataSource(
    "ds",
    "https://sync-states." + cdk.Stack.of(this).region + ".amazonaws.com",
    {
    name: "HTTPDataSourceWithSFN",
    authorizationConfig: {
        signingRegion: cdk.Stack.of(this).region,
        signingServiceName: "states",
    },
    }
);
Creating a Step Functions workflow in the custom resource stack
Now we can create our Step Function workflow directly inside the AWS CDK stack using the @aws-cdk/aws-stepfunctions and @aws-cdk/aws-stepfunctions-tasks modules. We’ll start by creating the state machine definition which contains all its tasks and logic states:
/*
Defines the first task in our SFN workflow.
We call the Amazon Comprehend detectSentiment API with
the input provided with the SFN execution.
*/
const detect_sentiment_task = new tasks.CallAwsService(
    this,
    "Detect feedback sentiment",
    {
    service: "comprehend",
    action: "detectSentiment",
    iamResources: ["*"],
    iamAction: "comprehend:DetectSentiment",
    parameters: { "Text.$": "$.input", LanguageCode: "en" },
   resultPath: "$.DetectSentiment",
    }
);

// Get the name of the current Amplify environment (e.g., "dev", "prod")
const envName = AmplifyHelpers.getProjectInfo().envName;

// Import the DynamoDB table created by Amplify as a result of the @model directive in our GraphQL schema
const feedbackTable = dynamodb.Table.fromTableName(
    this,
    "FeedbackTable",
    "Feedback-" + apiId + "-" + envName
);

// Save feedback and detected sentiment to DynamoDB table
const save_to_ddb = new tasks.DynamoPutItem(
    this,
    "Record feedback and sentiment",
    {
    item: {
        id: tasks.DynamoAttributeValue.fromString(
        sfn.JsonPath.stringAt("$$.Execution.Id")
        ),
        __typename: tasks.DynamoAttributeValue.fromString("Feedback"),
        createdAt: tasks.DynamoAttributeValue.fromString(
        sfn.JsonPath.stringAt("$$.State.EnteredTime")
        ),
        updatedAt: tasks.DynamoAttributeValue.fromString(
        sfn.JsonPath.stringAt("$$.State.EnteredTime")
        ),
        content: tasks.DynamoAttributeValue.fromString(
        sfn.JsonPath.stringAt("$.input")
        ),
        sentiment: tasks.DynamoAttributeValue.fromString(
        sfn.JsonPath.stringAt("$.DetectSentiment.Sentiment")
        ),
    },
    table: feedbackTable,
    resultPath: sfn.JsonPath.DISCARD,
    }
);
We have now received a result from the DetectSentiment API and stored it in DynamoDB together with the original input. Next, our Step Function should handle positive and non-positive results differently.
// Creates an Amazon SNS topic to which we'll later publish notifications from our SFN workflow
const customer_support_topic = new sns.Topic(
    this,
    "Customer support SNS topic"
);

/* Creates a subscription to the topic defined above using our own email
address. Make sure to replace this with an actual email address you have
access to.
*/
customer_support_topic.addSubscription(
    new subs.EmailSubscription("email@example.com") // <- replace with your email
);

/*
Defines a SFN task that publishs a notification
containing the sentiment detected by Amazon Rekognition to
the SNS topic we defined above.
*/
const handleNonPositiveResult = new tasks.SnsPublish(
    this,
    "Notify customer support",
    {
    topic: customer_support_topic,
    message: sfn.TaskInput.fromObject({
        Message: "Non-positive feedback detected.",
            "Detected sentiment": sfn.JsonPath.stringAt(
            "$.DetectSentiment.Sentiment"
            ),
    }),
    }
);

// Defines a pass state that outputs that a negative sentiment was detected
const nonPositiveResult = new sfn.Pass(
    this,
    "Non-positive feedback received",
    {
    result: sfn.Result.fromObject({ Sentiment: "NON-POSITIVE" }),
    }
);

// Defines what state the workflow moves to after the handleNonPositiveResult state
handleNonPositiveResult.next(nonPositiveResult);

// Defines a pass state that outputs that a positive sentiment was detected
const positiveResult = new sfn.Pass(this, "Positive feedback received", {
    result: sfn.Result.fromObject({ Sentiment: "POSITIVE" }),
});

// Defines a Choice state
const sentiment_choice = new sfn.Choice(
    this,
    "Positive or non-positive sentiment?"
);

// Defines what happens if our Choice state receives a positive sentiment
sentiment_choice.when(
    sfn.Condition.stringEquals("$.DetectSentiment.Sentiment", "POSITIVE"),
    positiveResult
);

// Defines what happens if our Choice state receives anything other than a positive sentiment
sentiment_choice.otherwise(handleNonPositiveResult);
Defining the Step Functions resource
Finally, based on our state machine definition we can define the Step Functions workflow resource. Additionally, we need to define the correct IAM access rights for our workflow to execute the contained tasks.
// The state machine definition brings together all our defined tasks
const stateMachineDefinition = detect_sentiment_task
    .next(save_to_ddb)
    .next(sentiment_choice);

// Create a service role for SFN to use
const serviceRole = new iam.Role(this, "Role", {
    assumedBy: new iam.ServicePrincipal(
    "states." + cdk.Stack.of(this).region + ".amazonaws.com"
    ),
});

/*
Defines the express SFN workflow resource using the state
machine definition as well as the service role defined above.
*/
const stateMachine = new sfn.StateMachine(this, "SyncStateMachine", {
    definition: stateMachineDefinition,
    stateMachineType: sfn.StateMachineType.EXPRESS,
    role: serviceRole,
});

// Grant AppSync HTTP data source rights to execute the SFN workflow
stateMachine.grant(
    httpdatasource.grantPrincipal,
    "states:StartSyncExecution"
);

// Creates an IAM role that can be assumed by the AWS AppSync service
const appsyncStepFunctionsRole = new iam.Role(
    this,
    "SyncStateMachineRole",
    {
    assumedBy: new iam.ServicePrincipal("appsync.amazonaws.com"),
    }
);

// Allows the role we defined above to execute express SFN workflows
appsyncStepFunctionsRole.addToPolicy(
    new iam.PolicyStatement({
    resources: [stateMachine.stateMachineArn],
    actions: ["states:StartSyncExecution"],
    })
);
Integrating the workflow with the GraphQL API
Now that the Step Functions workflow is design our AWS CDK stack, we can create a new resolver for our GraphQL API data source that references the workflow’s Amazon Resource Name (ARN):
/*
Adds a GraphQL resolver to our HTTP data source that defines how
GraphQL requests and fetches information from our SFN workflow.
*/
httpdatasource.createResolver("execute-state-machine", {
    typeName: "Mutation",
    fieldName: "executeStateMachine",
    requestMappingTemplate: appsync.MappingTemplate.fromString(
    START_EXECUTION_REQUEST_TEMPLATE(stateMachine.stateMachineArn)
    ),
    responseMappingTemplate:
    appsync.MappingTemplate.fromString(RESPONSE_TEMPLATE),
});
As you can see, the resolver references both a request mapping template and a response mapping template. These mapping templates define how our GraphQL resolver communicates with a data source – in this case the Step Functions workflow. Let’s define both a request and a response mapping template in cdk-stack.ts:
// ...
import * as tasks from "@aws-cdk/aws-stepfunctions-tasks";
import * as dynamodb from "@aws-cdk/aws-dynamodb";

const START_EXECUTION_REQUEST_TEMPLATE = (stateMachineArn: String) => {
  return `
  {
    "version": "2018-05-29",
    "method": "POST",
    "resourcePath": "/",
    "params": {
      "headers": {
        "content-type": "application/x-amz-json-1.0",
        "x-amz-target":"AWSStepFunctions.StartSyncExecution"
      },
      "body": {
        "stateMachineArn": "${stateMachineArn}",
        "input": "{ \\\"input\\\": \\\"$context.args.input\\\"}"
      }
    }
  }
`;
};

const RESPONSE_TEMPLATE = `
## Raise a GraphQL field error in case of a datasource invocation error
#if($ctx.error)
  $util.error($ctx.error.message, $ctx.error.type)
#end
## if the response status code is not 200, then return an error. Else return the body **
#if($ctx.result.statusCode == 200)
    ## If response is 200, return the body.
  $ctx.result.body
#else
    ## If response is not 200, append the response to error block.
    $utils.appendError($ctx.result.body, $ctx.result.statusCode)
#end
`;

export class cdkStack extends cdk.Stack {
    // ...
Again, to get a full view of the code for our custom Amplify stack, make sure to take a look at the file in GitHub.
Deploying the Amplify custom resource
Move back to the project root and deploy your the custom resource to AWS:
amplify pushYou will receive an email asking you to confirm your subscription to the customer support SNS topic. Your confirmation is necessary to make sure the workflow executes successfully.
Testing the workflow
Now that we have our Amplify resources set up, let’s also prepare the sample web application. The sample code you cloned from GitHub contains a skeleton web application scaffolded using Vite. Back in the project root directory, install the project’s required dependencies using npm:
npm ciTo test our workflow, start the web application via:
npm startLet’s try entering a positive and then a negative feedback in the form. As demonstrated in Figure 3, you will see different success messages depending on the sentiment of your feedback after you hit the Submit button. In addition, feedback that does not have a positive sentiment will trigger an email being sent via the customer support SNS topic.
Cleaning up
To remove the resources created as part of this walkthrough, run amplify delete from the project root directory and follow the instructions in the CLI.
Conclusion
In this blog post, you’ve learned how to set up a Step Functions workflow as an Amplify custom resource and how to connect it to an Amplify-managed GraphQL API. Consult the Amplify custom resource documentation to learn more about integrating AWS services into your Amplify projects. Learn more about AWS Step Functions in the AWS Step Functions Workshop and extend the sample workflow using the AWS CDK documentation for AWS Step Functions.
Share your feedback by opening a GitHub issue or via the comments below.