Microsoft Workloads on AWS
How to automate your Microsoft Windows Server upgrades using AWS Systems Manager
This blog post is the second of a four-part series on how to upgrade Windows Server 2012 and 2012 R2. The focus of this series is to provide options to handle the upcoming end-of-support event in October. Part 1 overviews the end-of-support dilemma, plus how to perform an in-place, manual upgrade along with an insight into the End of Support Migration Program (EMP). Part 2 walks you through how to automate your upgrade using Amazon Systems Manager (SSM). Part 3 shows how to leverage modernization options, such as AWS App2Container, to handle an upgrade. Part 4 demonstrates how to upgrade Microsoft Windows Server 2012 using the AWS Application Migration Service.
Overview
AWS Systems Manager is one of several options you can use to upgrade your existing instances to the latest version of Windows Server. In this blog post, we will share how to automate a Windows Server in-place upgrade process using AWS Systems Manager (as show in Figure 1). We released a video that details this option. You can visit our AWS Online Tech Talks channel (and hit Subscribe if you have not already done so) and check out our Navigate the Windows Server end of support challenge with AWS tech talk. We recommend fast forwarding to 34:36 to see the solution in action.
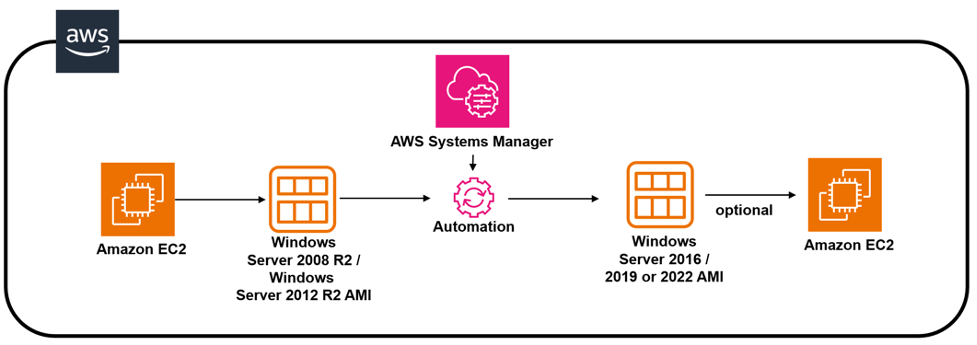
Figure 1. Upgrade process using AWS SSM
Prerequisites
Note: This automation process works only on Windows Server 2008 R2, 2012 R2, 2016 and 2019. For Windows Server 2008 R2, the Amazon Elastic Compute Cloud (Amazon EC2) instance will be upgraded to Windows Server 2012 first and then to Windows Server 2016 or 2019.
To complete this upgrade, you’ll need to meet the following prerequisites:
- An existing Amazon EC2 instance that needs to be upgraded.
- SSM agent installed and working on the instance you intend to upgrade.
- TLS 1.2 should be enabled for this automation to work on the instance.
- At least 20 GB of free space on the root for the upgrade to succeed.
- If the instance is joined to an existing Active Directory domain, we recommend that you specify a SubnetID that does not have connectivity to Active Directory to avoid hostname conflicts.
- A public subnet with “auto-assign public IPv4 addresses” set to TRUE. This could be a major blocker. If so, consider upgrading using the method described in the part one of this blog post series.
- An AWS Identity and Access Management (IAM) role to allow for the Amazon EC2 instance to communicate with SSM and execute the upgrade process on your behalf. For instructions on how to create the necessary role, please refer to the IAM documentation.
Please Note: The automation process described in this post works only on Windows Server 2008 R2, 2012 R2, 2016 and 2019. If running this for Windows Server 2008 R2, the Amazon Elastic Compute Cloud (Amazon EC2) instance will be upgraded to Windows Server 2012 first and then to Windows Server 2016 or 2019. It is also important to remember that although the automation documentation allows you to upgrade licensed and bring your own license (BYOL) versions of Windows Server, there are some additional steps needed when dealing with BYOL. Details can be found in our documentation.
Limitations
This automation method doesn’t support upgrading Windows domain controllers, clusters, or Windows desktop operating systems. Additionally, it doesn’t support Amazon EC2 instances for Windows Server with the following roles installed:
- Remote Desktop Session Host (RDSH)
- Remote Desktop Connection Broker (RDCB)
- Remote Desktop Virtualization Host (RDVH)
- Remote Desktop Web Access (RDWA)
Supported upgrade paths
The AWS Systems Manager automation runbook AWSEC2-CloneInstanceAndUpgradeWindows supports the following upgrade paths:
- Windows Server 2008 R2 to Windows Server 2012 R2, to Windows Server 2019 or 2022
- Windows Server 2012 R2 to Windows Server 2016
- Windows Server 2012 R2 to Windows Server 2019
- Windows Server 2016 to Windows Server 2019
- Windows Server 2016 to Windows Server 2022
- Windows Server 2019 to Windows Server 2022
Upgrading your Windows Server instance
Let’s detail the steps to complete this upgrade using the automation method. You might want to keep a scratch pad handy to keep track of the various information needed for the automation.
Before we proceed with the OS upgrade, let’s take note of the following items. You will need them later on.
- In the AWS Management Console, get the Instance ID of Windows Server 2012 R2 (as shown in figure 2).

Figure 2. Windows 2012 R2 Amazon EC2 instance in AWS Console
- Take note of the public SubnetID by looking at the EC2 instance networking properties (as shown in figure 3).

Figure 3. EC2 instance networking properties
- In the AWS Identity IAM console, select the IAM role that you created that has access to SSM (as shown in figure 4). Below is the Policy name, which you need to attach to the role and which is associated with the instance.

Figure 4. SSM policy in the IAM console
- Last, enter the instance password.
- Now, let’s RDP into Windows 2012 instance. As shown in Figure 5, the Windows 2012R2 machine has several applications loaded on the desktop and installed on the system. We will use this as a reference once the upgrade process is completed.

Figure 5. Windows 2012 in RDP session
We are ready to upgrade Windows Server 2012 R2!
- Open the AWS Systems Manager console and select Automation (as shown in Figure 6), which is found under the Change Management section.

Figure 6. AWS Systems Manager automation in AWS Console
- Select Execute automation (as shown in Figure 7).

Figure 7. Executing the automation in AWS Console
- In the Search field, type “clone” to create a filter. A set of automation documents will appear (as shown in figure 8).
- Select the document named AWSEC2-CloneInstanceAndUpgradeWindows (also shown in figure 8).

Figure 8. Automation document in AWS Console
- Once you have loaded the document, select Execute automation (as show in Figure 9).

Figure 9. Running the automation in AWS Console
- On the next screen, pick the instance to upgrade (as shown in figure 10). If you have a meaningful name for the instance, use that. If not, input the InstanceID you provided previously.

Figure 10. Select the EC2 instance in the AWS Systems Manager console
- Use the dropdown menu to input the information you collected previously (as shown in figure 11):
– IamInstanceProfile
– SubnetId
– TargetWindowVersion - If the instance you are trying to upgrade is using the BYOL option, the field “BYOLWindowsMediaSnapshotid” needs to be filled with the Snapshot ID of your EBS volume of the Windows Server 2012R2 installation media. When you complete this section, go to the bottom of the page, and select Execute (as seen in figure 11).

Figure 11. Provide the upgrade parameters
- At this point, if you have selected the correct options, you should see the Execution detail page, as shown in Figure 12. Please note that the entire process might take over two hours to complete. For Windows Server 2008 R2, the automation will first upgrade the instance to Windows Server 2012 R2, followed by the target version of Windows Server you selected.In case of a failures, please note that the SSM agent reports detailed information about state, execution and error status to local log files on the host. The log files are located in the %PROGRAMDATA%/Amazon/SSM/Logs on the host where the command was executed. Optionally, you can also send log files to AWS CloudWatch Logs.

Figure 12. Execution detail in Systems Manager
- Now that the image creation is complete, let’s go to the Amazon EC2 console (as shown in figure 13). On the left pane, under Images, select AMI. Then make sure that you are selecting the AMIs that are Owned by me. You might have a few AMIs in the list. Look for the Creation date when you launched the automation upgrade. Another clue is to search using the attribute AMI name : upgraded. Once you have found your AMI, select Launch instance from AMI.

Figure 13. AMI in EC2 console
- The Launch an Instance screen will open, as shown in Figure 14. Select the instance type you want to launch. This is an opportunity for you to rightsize your instance based on usage metrics. Make sure you select the correct VPC that you want the instance to be deployed to and its Subnet.
- Note: Remember to use the password captured originally from the Windows 2012 R2 system, as we cloned this system. You can add the keypair later on, if desired, on the new instance. Once complete, select Launch Instance. If everything has been done correctly, you should see the following screen (as shown in Figure 15):

Figure 14. Launch initiation of upgraded instance
- Note: Remember to use the password captured originally from the Windows 2012 R2 system, as we cloned this system. You can add the keypair later on, if desired, on the new instance. Once complete, select Launch Instance. If everything has been done correctly, you should see the following screen (as shown in Figure 15):
- If everything has been done correctly, you should see the following screen (as shown in Figure 15):

Figure 15. Successfully initiated the launch of the new instance
- Validate that the new upgraded instance is accessible, and connect via remote desktop protocol (RDP) by using the original password we copied earlier in the process.
- In the Amazon EC2 console, choose the newly upgraded instance and select Connect (as shown in Figure 16).

Figure 16. Upgraded EC2 instance in AWS Console
- In the Connect to instance window (as shown in Figure 17), under the RDP client tab, you can get the Public DNS name of the instance to connect to the server with RDP client.

Figure 17. Connect to the upgraded instance with RDP
- Once you log in, as shown in Figure 18, you should see the applications on the server. In this case, it will be the same applications that were on the Windows 2012 R2 system.

Figure 18. Upgraded instance in RDP
Congratulations, you have automatically upgraded your server from Windows 2012 R2 to Windows 2019!
Please note, prior to putting the system back into production, you should verify and validate application functionality to ensure there are no compatibility issues.
Cleanup
Since this blog post is a how-to, there are no cleanup steps required. The step-by-step approach shows you exactly how to automate your upgrade.
Conclusion
In this blog post, we shared step-by-step instructions on how to upgrade Windows Server 2012 automatically using AWS Systems Manager. We believe this method is most applicable to larger and more complex environments.
Please keep in mind that this one of the many options available for dealing with EOS and how AWS can help you address these issues with the use of technology, tooling, and experts.
- Part 1: How to manually upgrade Microsoft Windows Server 2012 on AWS
- Part 3: How to upgrade and modernize Microsoft Windows Server 2012 with Windows containers on AWS
- Part 4: How to upgrade Microsoft Windows Server 2012 with AWS Application Migration Service
If you would like our help to review the options described in this post, please reach out and AWS will gladly meet with you and your team to review the best option to address your EOS situation.
AWS can help you assess how your company can get the most out of cloud. Join the millions of AWS customers that trust us to migrate and modernize their most important applications in the cloud. To learn more on modernizing Windows Server or SQL Server, visit Windows on AWS. Contact us to start your migration journey today.