Microsoft Workloads on AWS
Migrating Microsoft Azure SQL DB to Amazon Aurora MySQL-Compatible Edition
Migrating a Microsoft Azure SQL database typically requires using database tools to extract data from the Azure SQL database, making necessary schema changes on the target database, and then importing the data into the target database. This usually involves manual steps and extended periods of downtime to the source applications. What if there was a way to migrate quickly and securely from Azure SQL to Amazon Aurora MySQL-Compatible Edition, while minimizing application downtime and user intervention?
This blog post illustrates how you can automate the migration from Microsoft Azure SQL DB to Amazon Aurora MySQL-Compatible Edition quickly, securely and minimize downtime to applications that rely on the Microsoft Azure SQL Database.
Below, we assume you have an existing Microsoft Azure SQL database that you wish to migrate to Amazon Aurora MySQL-Compatible Edition. You will need administrator access to the Azure SQL database, as well as the connection information, user name, and password. You will also need to modify the Azure SQL database firewall to allow access from the AWS Database Migration Service (AWS DMS) and Amazon Elastic Compute Cloud (Amazon EC2) instance hosting the AWS Schema Conversion Tool (AWS SCT).
For the target database, we are going to be using the Amazon Aurora MySQL-Compatible Edition.
We will use an Amazon EC2 Windows instance for the AWS SCT deployment. SCT can be installed locally on any Windows or commonly used Linux platform.
The dataset we are going to be using is the sample dataset that can be selected when creating an Azure SQL database (SalesLT). Figure 1 below illustrates the Azure/AWS services used for the migration.
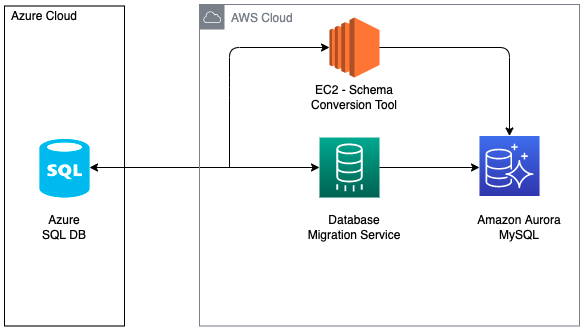
Figure 1. Azure/AWS services used
Schema Conversion
Converting the database schema and code objects is usually the most time-consuming operation in a heterogeneous database migration. AWS SCT is an easy-to-use application that you can install on an on-premises server, a local laptop/desktop, or an Amazon EC2 instance. SCT helps simplify heterogeneous database migrations by examining your source database schema and automatically converting the majority of the database code objects, including views, stored procedures, and functions, to a format compatible with your target database. Any object(s) that SCT cannot convert automatically will be marked with detailed information that you can use to convert the object(s)manually.
Data Migration
After you have completed the schema conversion, you’ll need to move the data itself. In case of production databases, you may not be able to afford any downtime during the migration. To facilitate near-zero downtime for migration, you may need to keep the source and target databases in sync until you switch your application to the new target.
The AWS Database Migration Service (AWS DMS) helps you migrate the data from the source database to the target database easily and securely. AWS DMS supports data migration to and from most widely used commercial and open-source databases. For our example, the source database is located in Azure SQL, and the target database will be hosted on Aurora MySQL-Compatible Edition. Additionally, the source database will remain fully operational during the migration, minimizing downtime to applications that rely on the database.
Migration Process
The migration of an Azure SQL database to an Aurora MySQL-Compatible database includes the following steps:
- Create an Amazon Aurora MySQL-Compatible cluster
- Create an AWS EC2 Instance for installation of the AWS SCT
- Connect the AWS SCT to Azure SQL database and import the schema
- Convert the Azure SQL database schema to a MySQL schema
- Create an AWS DMS replication instance
- Define an AWS DMS endpoints
- Create an AWS DMS migration task
Step 1: Create an Amazon Aurora MySQL-Compatible cluster
If you already have an Aurora MySQL cluster that you want to use for a target of migration, feel free to use it. If you want to create a new Aurora MySQL cluster, see the detailed instructions in Creating an Amazon Aurora DB Cluster.
Step 2: Create an AWS EC2 Instance for installation of the AWS Schema Conversation Tool (AWS SCT)
When creating an EC2 instance, select a t3.medium instance type with Windows Server 2016 or higher as the operating system. For an introduction on how to create an EC2 instance, see Amazon Elastic Compute Cloud User Guide for Windows.
For information about how to install AWS SCT, see Installing, verifying, and updating AWS SCT.
Step 3: Connect the AWS SCT to Azure SQL DB and import the schema
Open the SCT console and choose File, New project wizard as illustrated in Figure 2.

Figure 2. Open new schema conversion project
Create a new database migration project as illustrated in Figure 3.
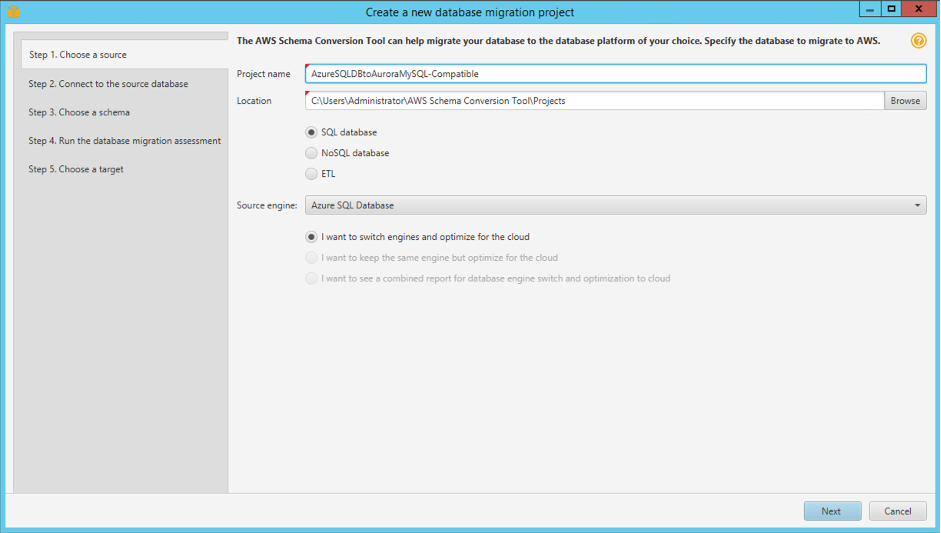
Figure 3. Create a new database migration project
Type the desired name of the project in the Project Name field.
Select the Source Engine to be Azure SQL Database if not already selected.
Select Next and complete the Azure SQL DB connection details as per Figure 4.
| Server Name | server name of your AzureSQL instance |
| Database | AzureSQL database name |
| User name | AzureSQL database user name |
| Password | AzureSQL database password |
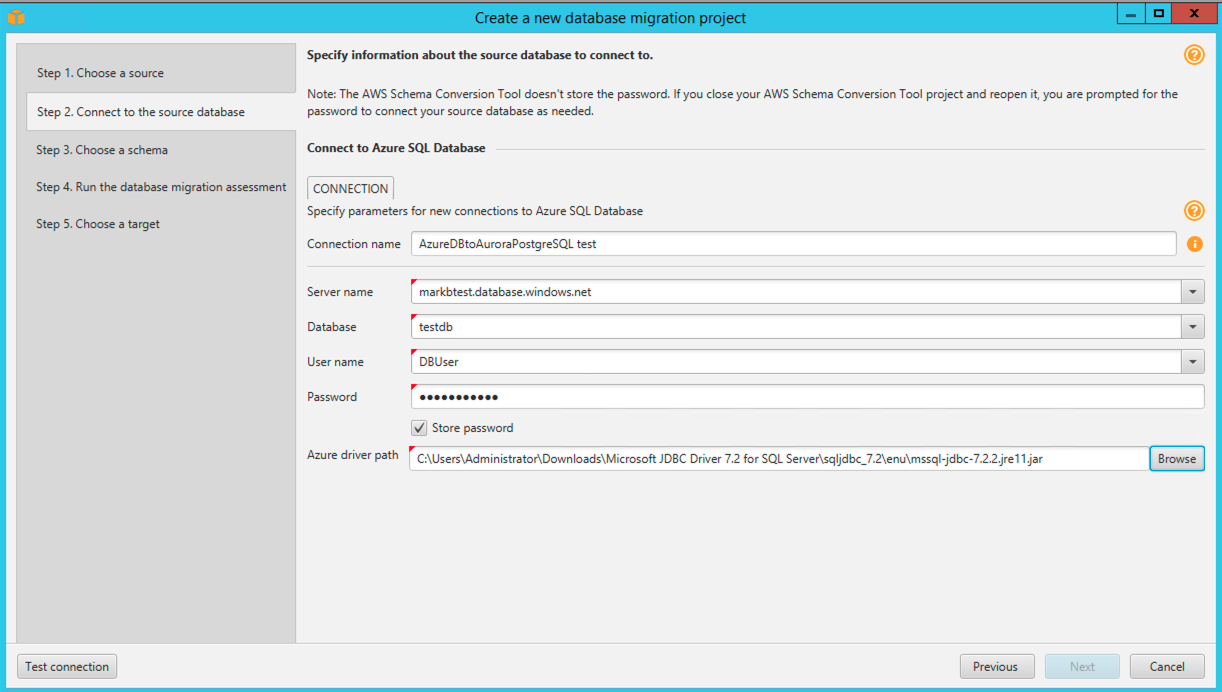
Figure 4. Connect to source database
Select Test Connection and, if the test is successful, the Next button will be highlighted in blue. Select Next. If not, resolve any errors and select Test Connection again.
Note: Remember to add the AWS EC2 instance public IP to the Azure SQL DB firewall, as illustrated in figure 5 below.
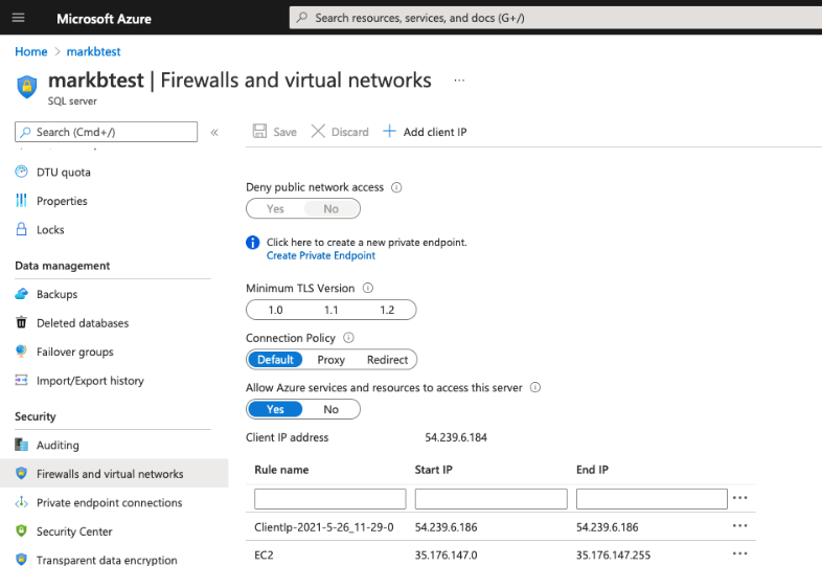
Figure 5. Configure AzureDB firewall to allow access
The database will be confirmed, as illustrated on Figure 6.
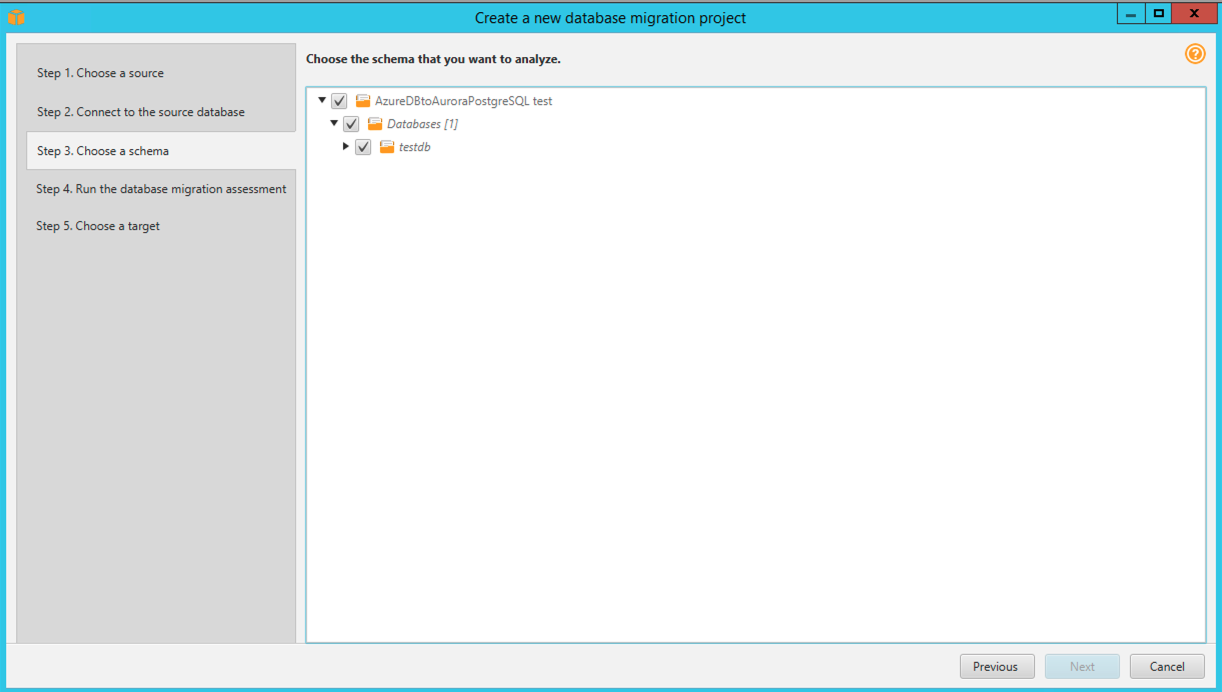
Figure 6. Successful connection to the source database
Select Next and SCT will run the database migration assessment. The assessment will provide details on the complexity to migrate the schema between different database engines, as shown in Figure 7 below.
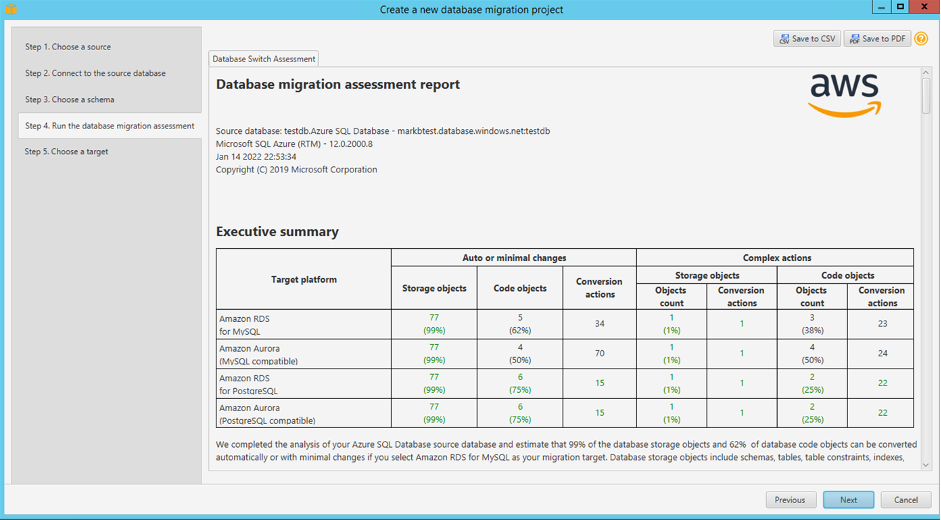
Figure 7. SCT Assessment report
Select Next and type in the following details for the Aurora MySQL-Compatible database:
| Server Name | server name of your AzureSQL instance |
| Server Port | 3306 (MySQL) |
| User name | Aurora MySQL-Compatible username |
| Password | Aurora MySQL-Compatible password |
Select the Store Password checkbox to store the password in SCT, as shown in Figure 8.
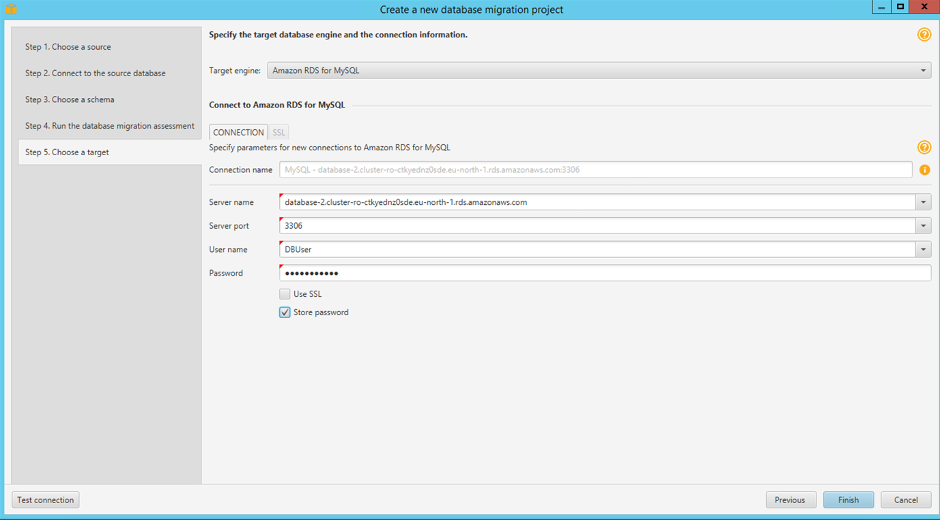
Figure 8. Connect to target database
Now that you have created a new Database Migration Project, the next step is to convert the Azure SQL DB schema of the source database to the Amazon Aurora (MySQL) schema.
Select the View button and choose the Assessment Report view, as illustrated in Figure 9.
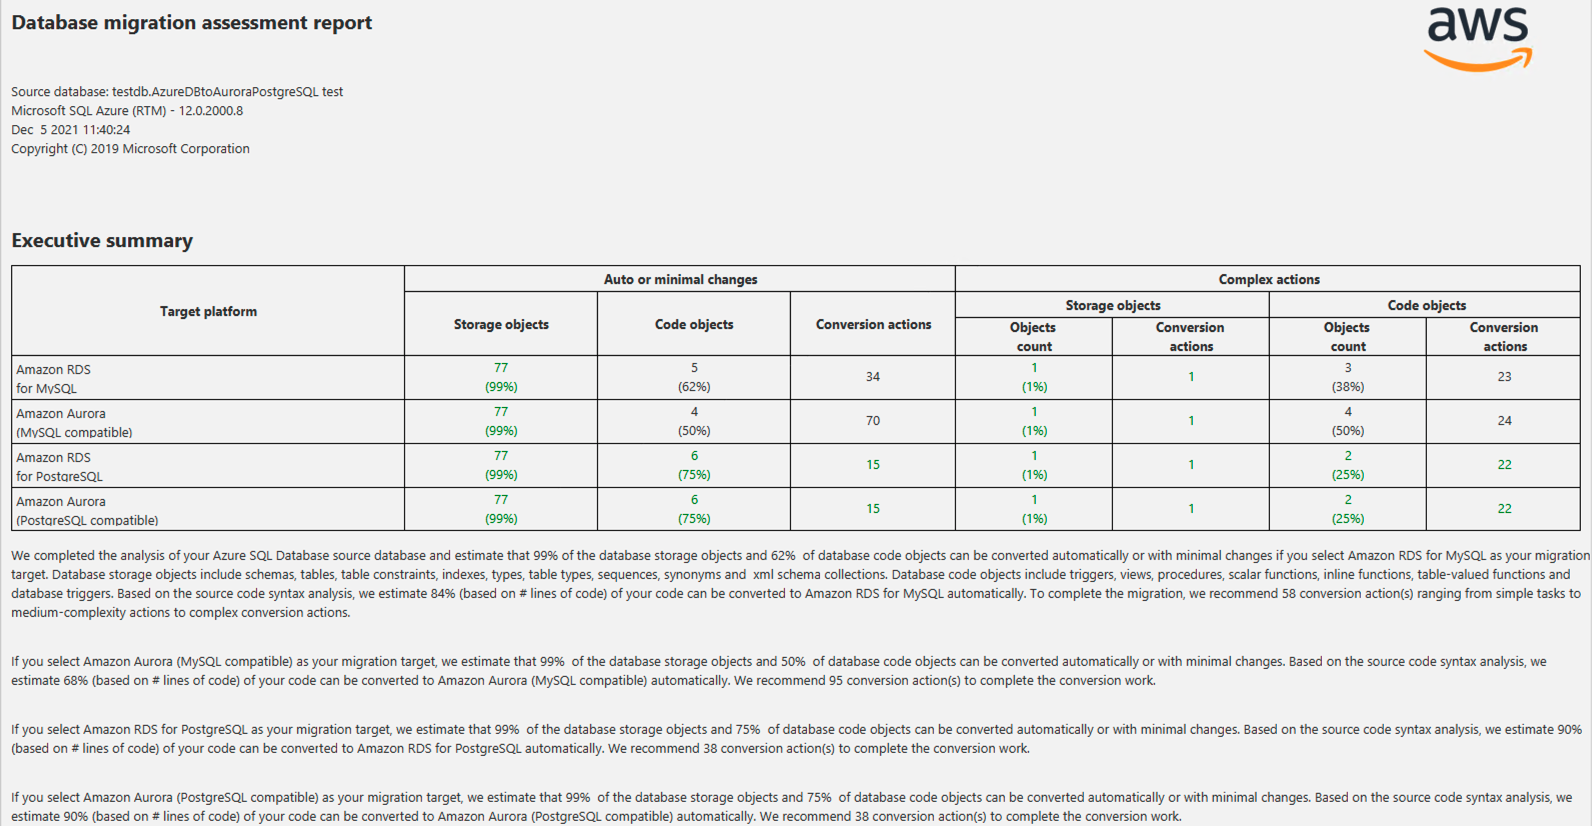
Figure 9. Database Migration Assessment report
A summary of the schema migration is displayed. Select the Action Items tab to view individual items, as shown in Figure 10.
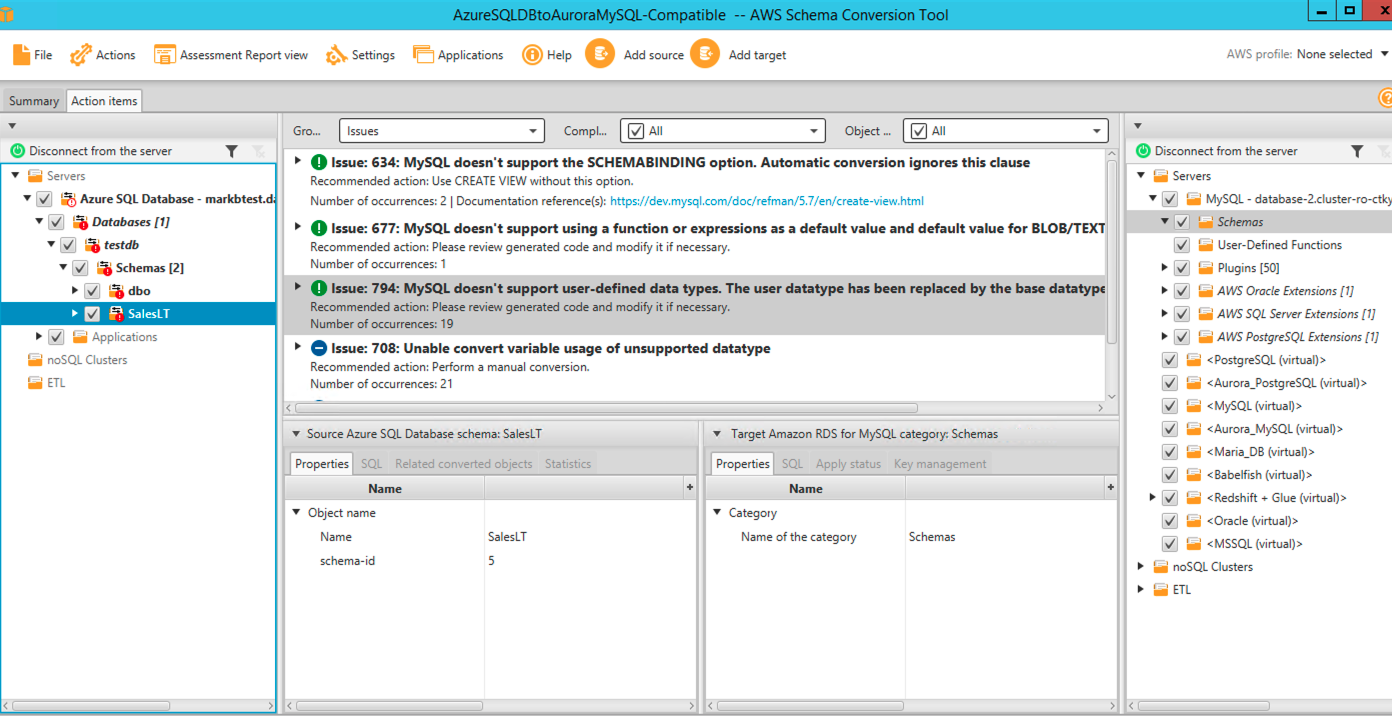
Figure 10. Summary view of action items
Expand the individual lines to see the suggested SQL changes, as illustrated in Figure 11. The SQL code is editable and can be updated as required.
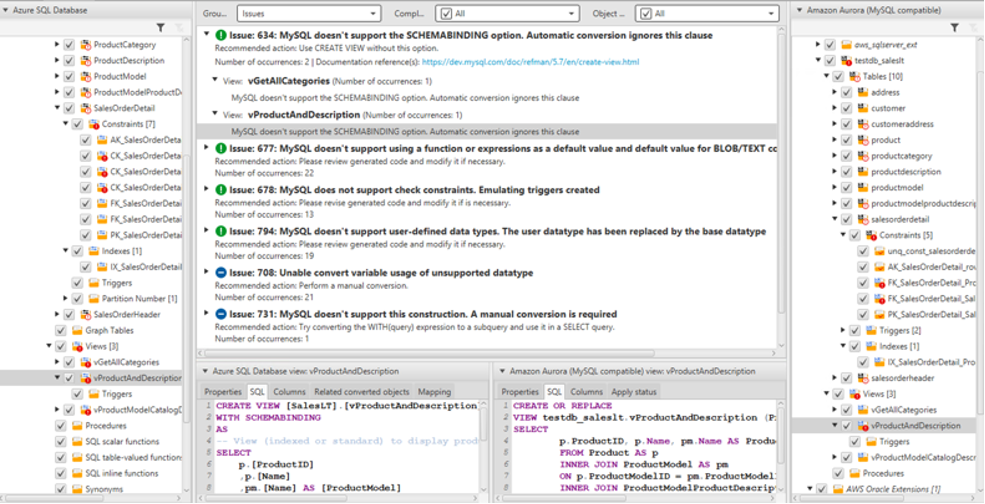
Figure 11. Detailed view of each action item
Figure 11 Legend:
Green – Automatic conversation
Blue – Requires investigation and manual conversion
Step 4: Convert the database schema to a MySQL schema
Select the source database (SalesLT), as illustrated in Figure 12 below, right-click and choose Convert Schema. If you receive the message These objects might already exist in the target database. Replace?, select Yes.
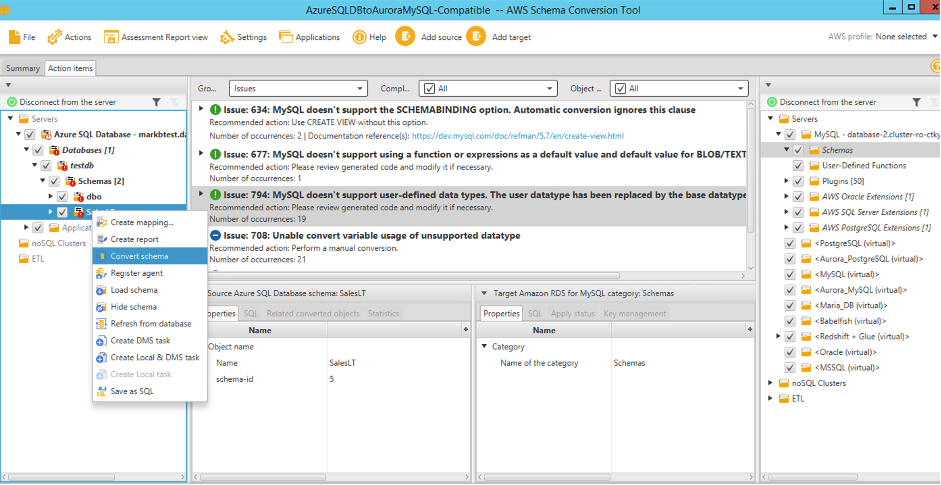
Figure 12. Convert the source database
Select the target database (testdb_SalesLT), as illustrated in Figure 13 below, right-click and choose Apply to database. If you receive the message You chose to apply the schema definition for testdb_SalesLT. Are you sure?, select Yes.

Figure 13. Apply conversion to the target database
At this stage, the schema has now been applied to the target database. By expanding the right menu (Target), the converted schema can now be seen.
Step 5: Create an AWS DMS replication instance
Navigate to the AWS Management Console, log into your AWS Account and enter Database Migration Service in the search bar. Select the Database Migration Service result, and you will be directed to the AWS DMS page (see Figure 14 below), where you will select Create replication instance and complete the setup using the information in the table below as guidance:
| Name | Unique name for instance |
| Descriptive Amazon Resource Name | Friendly name for instance |
| Description | Instance description |
| Instance class | Instance size further details here |
| Description | Instance description |
| Engine version | 3.4.5 or latest version |
| Allocated storage | 50GB or required storage |
| VPC | VPC for instance |
| Multi AZ | Dev or test workload (Single AZ) |
| Public accessible | Tick |
After completing the configuration, as illustrated in Figure 14, select CREATE button.
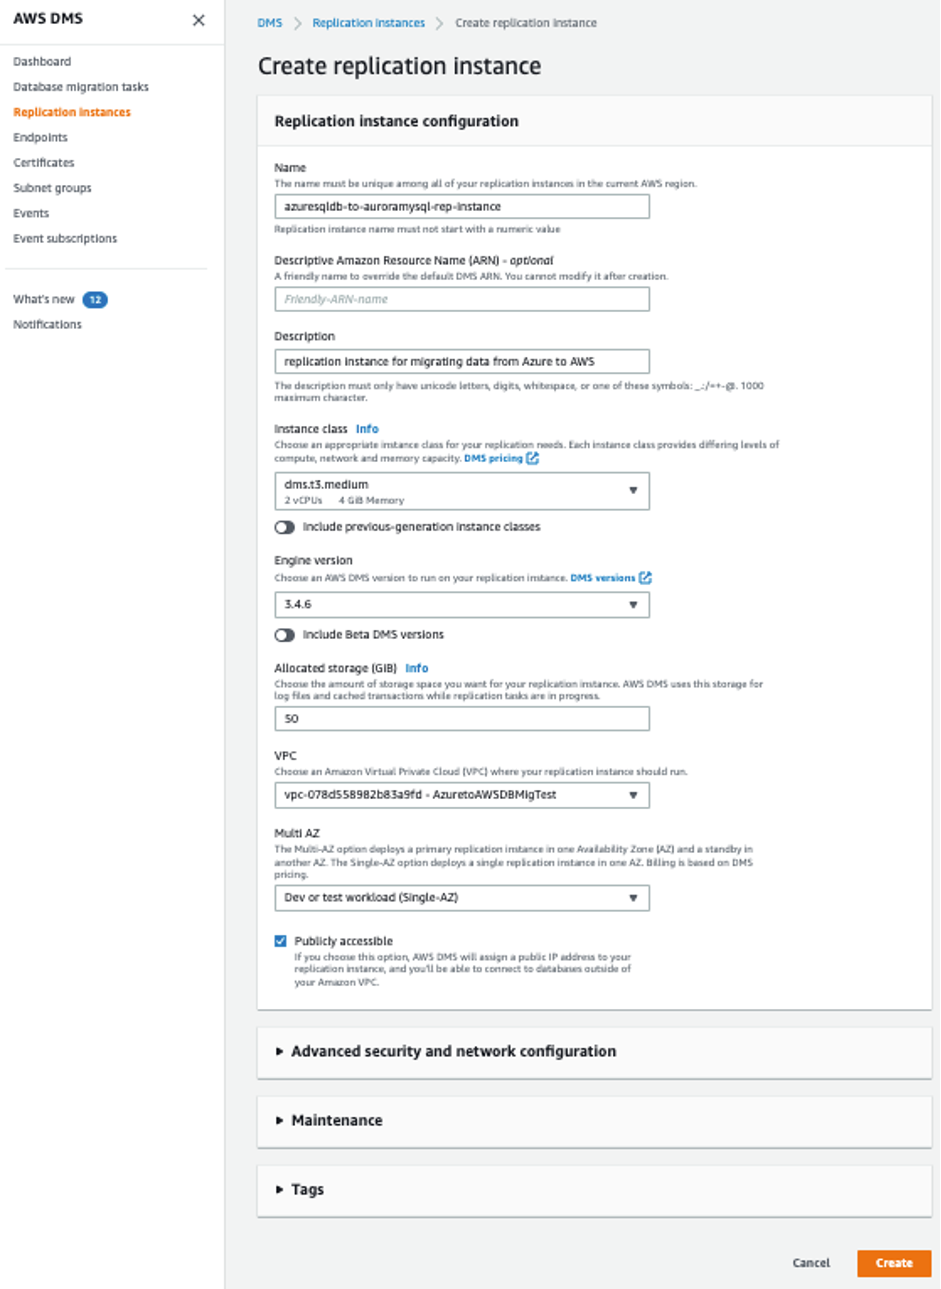
Figure 14. Create a Replication Instance
Notes:
Change the Security Group from “default” to the required security group after the replication instance is created. For test purposes, it can be left as “default.”
Add the DMS instance public IP to the Azure SQL DB firewall to allow access.
Step 6: Define an AWS DMS endpoints
While logged into the AWS Management Console, navigate to AWS DMS and select Endpoints and create the following source endpoint:
| Source Endpoint | click on radio button |
| Endpoint type | Source endpoint |
| Endpoint identifier | azuresqldb |
| Descriptive Amazon Resource Name | Friendly name (optional) |
| Source engine | Microsoft Azure SQL Database |
| Server name | markbtest.database.windows.net |
| Port | 1433 |
| SSL | none |
| User Name | DBUser |
| Password | DBPassword |
| Database Name | TestDB |
Be sure to replace the bold, italic sample values above with values associated with your specific AzureSQL database.
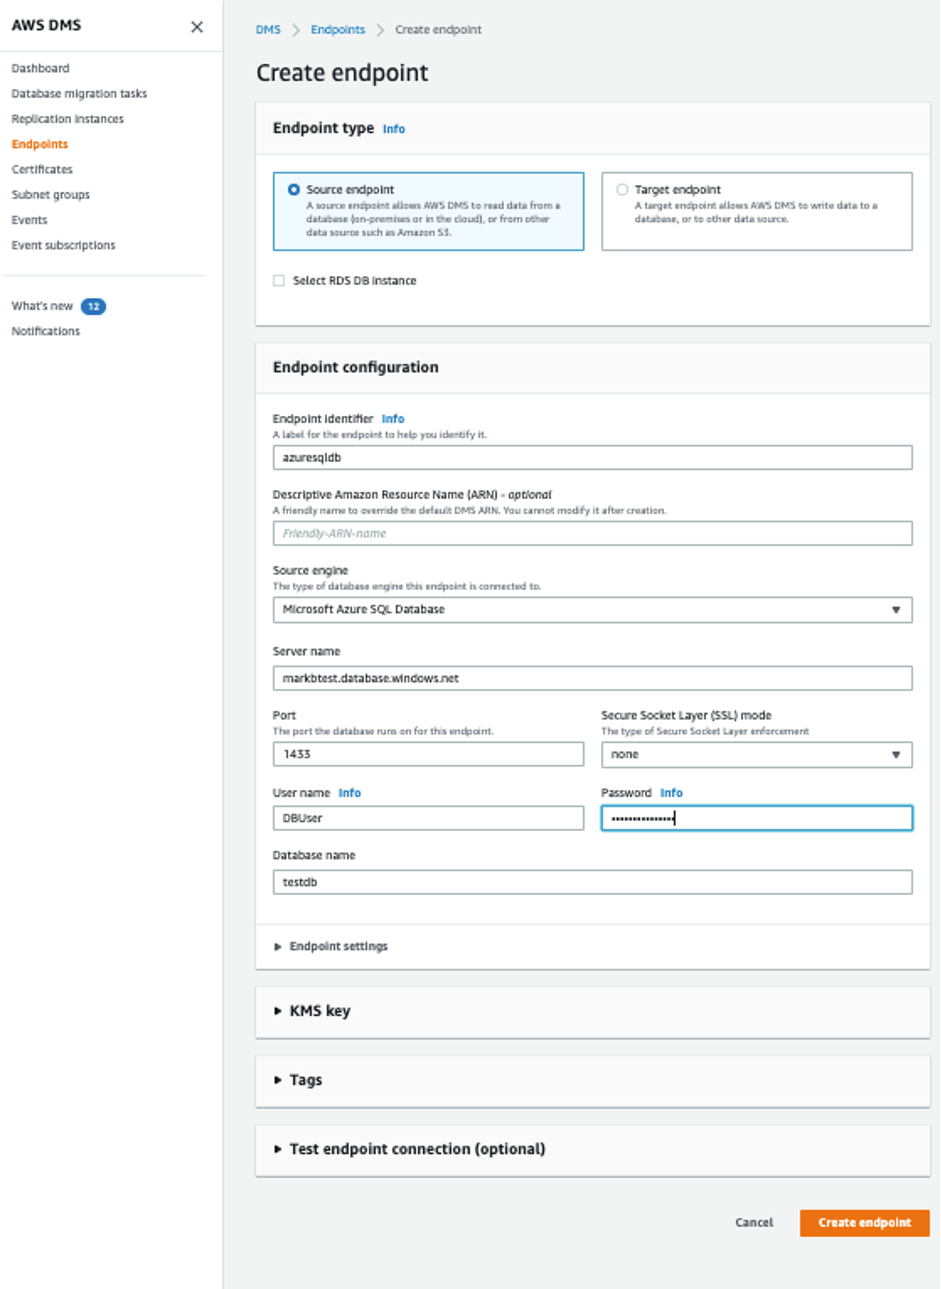
Figure 15. Create a source endpoint using AzureSQL connection details
After creating the configuration, as illustrated in Figure 15, expand ‘Test endpoint connection (optional).’ Select the VPC and replication instance, and then select ‘RUN TEST,’ as illustrated in Figure 16.
| VPC | AzuretoAWSDBMigTest |
| Replication instance | azuretoawsrepl |
Be sure to replace the bold, italic sample values above with values associated with your specific VPC and replication instance.
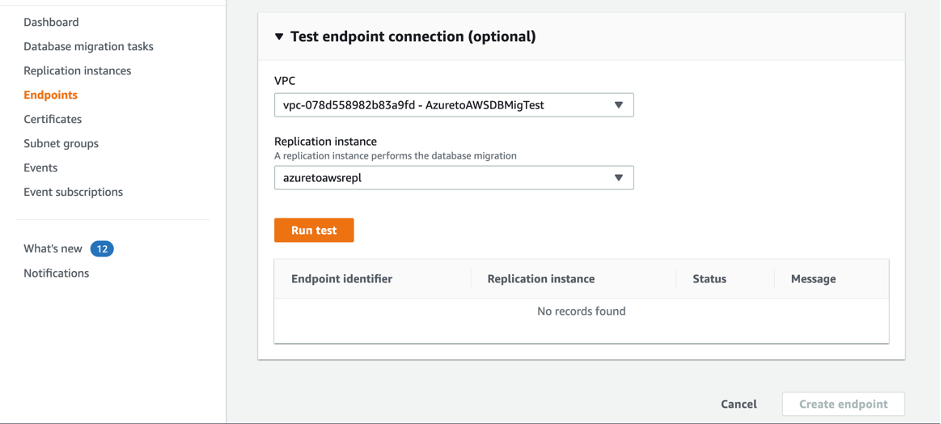
Figure 16. Test connection to source endpoint
Once the endpoint connection test is successful, select the ‘CREATE ENDPOINT’ button in Figure 15.
While logged into the AWS Management Console, navigate to AWS DMS, select ENDPOINTS, and create the following target endpoint:
| Target Endpoint | click on radio button |
| Endpoint type | Target endpoint |
| Select RDS DB Instance | tick |
| RDS instance | Aurora MySQL cluster |
| Endpoint identifier | AmazonAuroraMysql-Compatible |
| Descriptive Amazon Resource Name | Friendly name (optional) |
| Source engine | Amazon Aurora MySQL |
| Server name | database-2.cluster-ro-ctkyednz0sde.eu-north-1.rds.amazonaws.com |
| Port | 3306 |
| Secure Socket Layer mode | none |
| User name | DBUser |
| Password | DBPassword |
Be sure to replace the bold, italic sample values above with values associated with your specific Amazon Aurora MySQL-Compatible database.
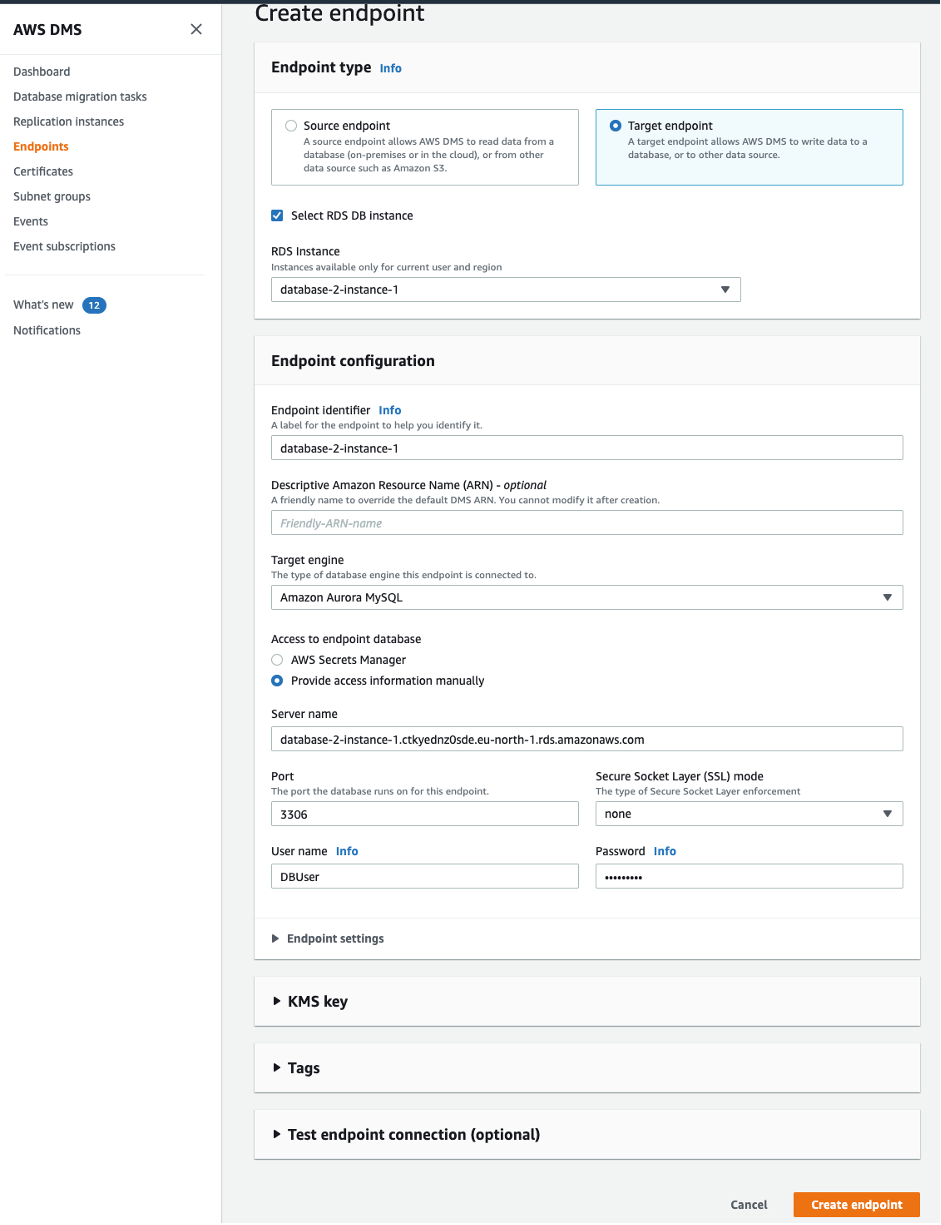
Figure 17. Create a target endpoint using Amazon Aurora MySQL-Compatible connection details
After creating the configuration in Figure 17, expand ‘Test endpoint connection (optional),’ select the VPC and replication instance, and select ‘RUN TEST,’ as illustrated in Figure 16.
| VPC | AzuretoAWSDBMigTest |
| Replication instance | azuretoawsrepl |
Be sure to replace the bold, italic sample values above with values associated with your specific VPC and replication instance.
Once the endpoint connection test is successful, select the ‘CREATE ENDPOINT’ button in Figure 17.
Step 7: Create an AWS DMS migration task
While logged into the AWS Management Console, navigate to the Database Migration Task and select ‘CREATE TASK’ to create the following tasks, as illustrated in Figure 18.
| Task configuration | title of window |
| Task identifier | Unique name for task |
| Descriptive ARN | Optional friendly name |
| Replication instance | Replication instance created above |
| Endpoint identifier | AmazonAuroraMysql-Compatible |
| Descriptive Amazon Resource Name | Friendly name (optional) |
| Source database endpoint | Source database endpoint as created above (Azure SQL DB) |
| Target database endpoint | Target database endpoint as created above (AWS Aurora) |
| Migration type | Migrate existing data, continuous replication is not available using Azure SQL DB as a source |
| Task settings | title of window |
| Target table preparation | Truncate, ensure the tables are empty |
| Include LOB (Large objects) | Limited LOB mode |
| Enable Validation | Not available with Azure SQL DB as a source |
| Enable CloudWatch logs | Recommended, but does incur an additional cost |
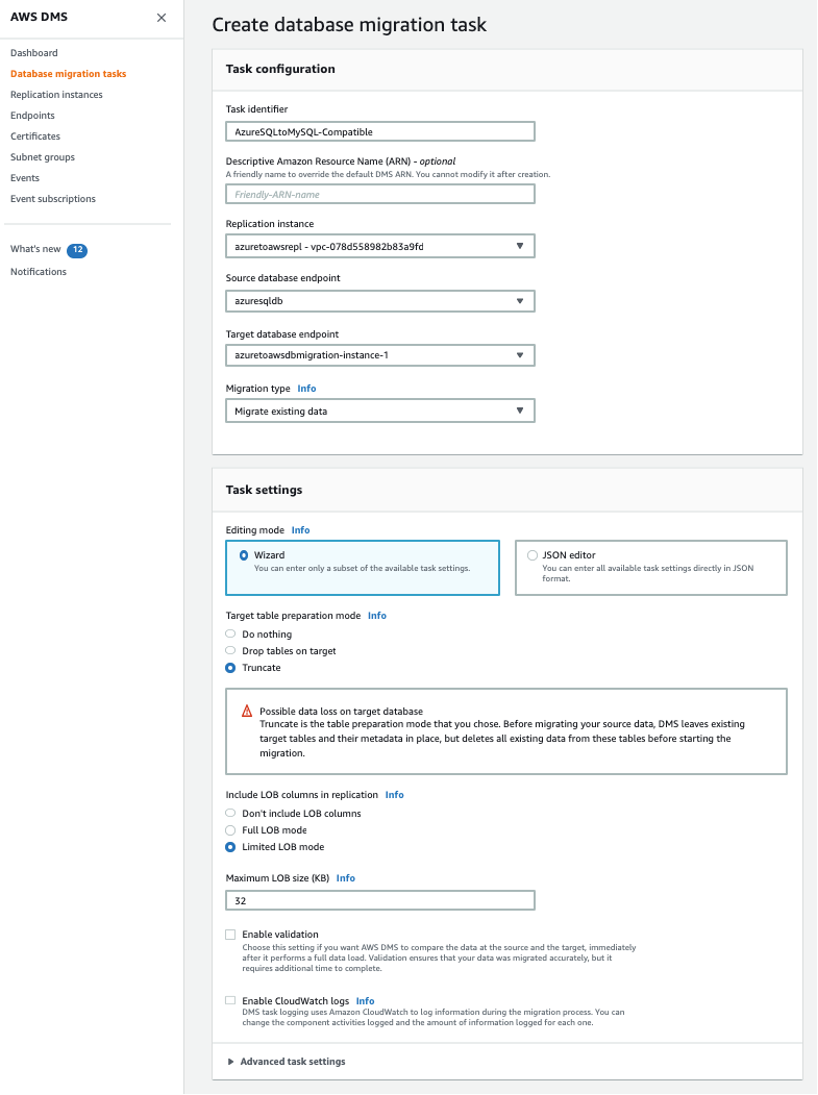
Figure 18. Create Database Migration Service
Complete the database migration service configuration by updating the ‘Table Mappings’ section, as illustrated in Figure 19.
| Table Mappings | click on ‘Wizard’ radio button |
| Add new selection rule | Select the schema items to include e.g.
Schema: Enter a schema Schema name: SalesLT Table name: % Action: Include |
| Add transformation rule | Select transformations require e.g.
Target: schema Schema name: Enter a schema Schema name: SalesLT Action: Rename to Value: testdb_saleslt This renames the source schema (SalesLT) to the destination schema (testdb_saleslt) |
| Premigration assessment | title of sub window |
| Enable premigration assessment run | Not required |
| Migration task startup config | title of sub window |
| Start migration task | Automatically on create, this will start the migration task immediately after creation |


Figure 19. Create source/destination table mappings in AWS Database Migration Service
Select ‘CREATE TASK’.
Once the task has been created, migration of the Azure SQL database will begin automatically and the migration progress will be reflected in the console, as shown in Figure 20. Select the Identifier and select the Table statistics tab to view the migration statistics of each table, as illustrated in Figure 21.

Figure 20. Data Migration Status
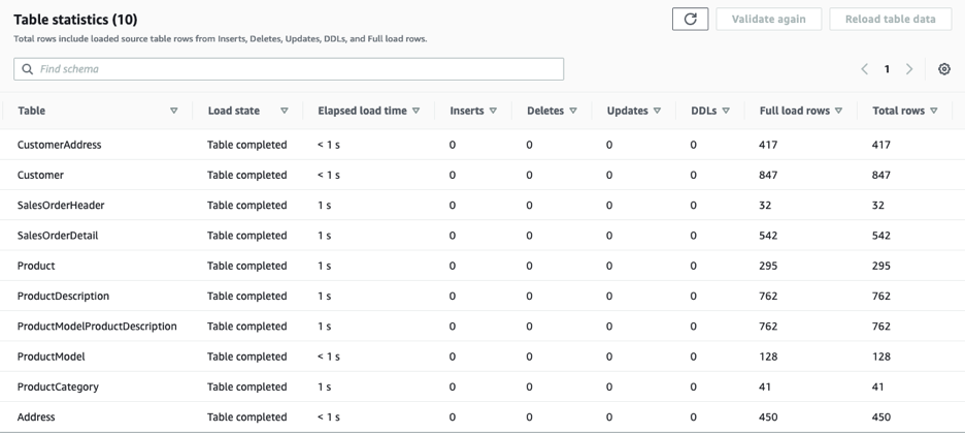
Figure 21. Table migration statistics
At this point, all the tables that belong to the specified schema and their data have been transferred from your Azure SQL database into Amazon Aurora MySQL-Compatible. You can verify that all the data has transferred by using your favorite MySQL client—for example, MySQL Workbench.
Conclusion
In this blog post, we have demonstrated how to migrate your database schema and data from AzureSQL to Amazon Aurora MySQL-Compatible using the AWS Schema Conversion Tool and AWS Data Migration Service. Try it out!
AWS can help you assess how your company can get the most out of cloud. Join the millions of AWS customers that trust us to migrate and modernize their most important applications in the cloud. To learn more on modernizing Windows Server or SQL Server, visit Windows on AWS. Contact us to start your migration journey today.