Microsoft Workloads on AWS
Using Amazon EC2 Auto Scaling to Manage Azure Pipelines Agent Capacity
In this blog post, we will show you how to use Amazon Elastic Compute Cloud (Amazon EC2) Auto Scaling with your self-hosted Amazon EC2 Azure Pipelines agents to deploy applications to Amazon Web Services (AWS) using Azure DevOps.
Introduction
There are many ways that you can build and deploy your applications to AWS. You can use AWS services, such as AWS CodeBuild and AWS CodePipeline or Amazon CodeCatalyst, which was announced at re:Invent 2022. You can also use third-party services, such as Azure Pipelines, which is a feature of both Azure DevOps services and the on-premises Azure DevOps Server. Azure DevOps is a software collaboration and delivery tool that can be used for continuous integration and delivery (CI/CD) of your applications. You can use Microsoft-hosted or deploy self-hosted Azure Pipelines agents in Amazon EC2.
Self-hosted agents allow deployment teams to have full control over the installed software and operating environment of the Azure Pipeline agents. With self-hosted agents, you can supply your own Amazon Machine Image (AMI) with specific build and security software. Using self-hosted agents also allows you to use additional security features, such as provisioning of agents directly within your Amazon Virtual Private Cloud (VPC), giving you direct network access to private resources. You can also use the agent’s Amazon EC2 instance profile so that an AWS Identity and Access Management (IAM) role can be used for accessing AWS resources, rather than having to explicitly provide permanent IAM credentials in Azure DevOps.
When running self-hosted Azure Pipelines agents on AWS, there is no built-in way to control agent pool capacity automatically. So, if you provide too few agents in a pool, builds may take a long time because of insufficient capacity. Alternatively, with too many agents, you will pay for idle resources when there is excess capacity.
In this blog post, we will demonstrate a method to use Amazon EC2 Auto Scaling with your self-hosted Azure Pipelines agents using Amazon EC2 instances. For this scenario, we employ
Solution overview
Our solution includes an AWS CloudFormation template that lets you deploy either Windows or Linux-based Azure Pipelines agents with an Auto Scaling group corresponding to a single agent pool (Figure 1).
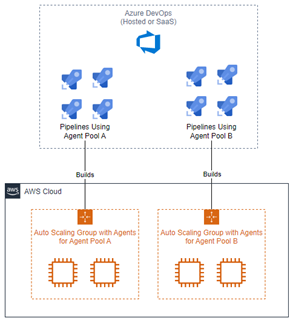
Figure 1: Self hosted agent on Amazon EC2
When Azure DevOps starts a build process, it will be handled by an agent in the pool specified in the pipeline, or it will be queued until an agent is available to run it. Each agent is a virtual machine configured with the agent software and associated with Azure DevOps. Adding a new agent to a pool requires it to be registered. Registration parameters include the Azure DevOps Server URL, agent pool name, and Personal Access Token (PAT) required for authentication. To remove an agent from the pool, it must be unregistered so that it will not simply show up as an offline agent in the pool.
The solution’s (Figure 2) GitHub repository includes an AWS CloudFormation template that can be deployed in your AWS account. When you deploy this solution, it will provision an Auto Scaling group, two AWS Systems Manager (AWS SSM) documents, two Amazon EventBridge rules, and an IAM role.
The Auto Scaling group that is created manages the number of Amazon EC2-based Azure Pipeline agents in service. It uses the two AWS Systems Manager documents (named Stackname-AzurePipelineScaleIn and Stackname-AzurePipelineScaleOut upon creation) that respond to Auto Scaling group lifecycle events through the use of the Amazon EventBridge rules. The “ScaleOut” document runs on instance launch. It installs the latest .NET build tools and Git client, and then registers it with Azure DevOps by downloading and installing the Azure Pipelines agent software. The “ScaleIn” document unregisters the agent before the Auto Scaling group terminates it. These documents are configured both for Windows and Linux hosts and will run the correct set of commands based on the operating system of the agent being provisioned.
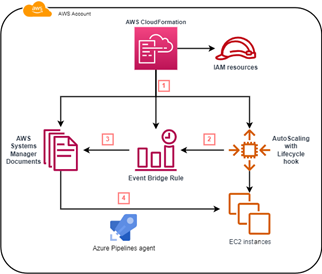
Figure 2: Self hosted agent on Amazon EC2
As a parameter to the CloudFormation template, you can specify either an AWS-supplied AMI or use one that you have created. You can use EC2 Image Builder to assist with creating a custom AMI. Supplying your own image is helpful when you have specific requirements related to pre-installed software. Pre-installing software allows for faster scaling since software installations will not have to occur as a part of the scaling out process.
If you want to specify your own AMI with the necessary build tools already installed, then before deploying this solution, you can modify the AWS SSM documents in the CloudFormation template to remove the build tools installation. These are clearly indicated by comments in the document scripts and can be safely deleted.
This solution uses Parameter Store, a feature of AWS Systems Manager, to securely store the Personal Access Token, the AMI ID to be used for agents, and the link to the latest Azure DevOps agent software. When one or more of these values changes, there is no need to redeploy the stack – you just change the values in the corresponding parameters. You will need to create these parameters ahead of time, and they can be referenced by more than one deployment of this solution in the same AWS account.
This solution assigns the minimal permissions required for each resource through the use of IAM roles. For instance, the role created for Amazon EventBridge is assigned only the permission required to run the SSM documents and complete the Auto scaling lifecycle events.
The solution also creates a role, which it assigns to each new agent. This role has the minimum permissions required to allow the Amazon EC2 instance to communicate with AWS Systems Manager. Since this solution only supplies minimal permissions when created, it is likely you will need permissions beyond what is created as a part of this template to deploy your applications to AWS. You can assign the permissions to the agents for application deployment through a service connection in Azure DevOps or modify the Amazon EC2 instance role to include additional permissions as required. The exact name of the role you modify is provided via the InstanceProfileName output of the CloudFormation stack that is created as part of this solution.
Prerequisites
You will need to prepare to use this solution for your Azure Pipelines agents:
- An AWS account that you have permissions to deploy this into.
- An Amazon VPC provisioned where your agents will be launched. The subnets that you specify will need internet connectivity. If you intend to use private subnets, then ensure that there is a NAT Gateway
- Clone the provided GitHub repository into your local environment.
- You will need to have an Azure Pipelines agent pool provisioned. The new agents will be added to and removed from this pool.
- You will need to supply three AWS Systems Manager Parameter Store parameters to store values used by this solution. They are:
- The URL used to download the latest version of the Azure DevOps agent installer.
- The Personal Access Token (PAT) for a user with permissions to register Azure Pipelines agents. You can review the documentation to learn how to create a Personal Access Token. This parameter is required to be of type SecureString.
- The ID of the AMI to be used for your agents.
Once you have all the prerequisites, you can deploy the solution.
Walkthrough
Navigate to the AWS CloudFormation console and ensure you have the correct AWS Region selected. First, you will need to upload the template.
- Choose Create stack.
- In the Prerequisite – Prepare template section, select “Template is ready.”
- In the Specify template section, select “Upload a template file.”
- Press Choose file and select the file “AzurePipelinesAgents.yml” from the repository from the “CloudFormation” directory in the repository.
- Choose
Next, supply the parameters needed to deploy the solution (Figure 3):
- Stack name – This will be name of the AWS CloudFormation stack used in the solution. If you want to deploy this more than once in an AWS account, you will need to choose a different stack name for each.
- AzureDevOpsAgentURLParameterName – This is the name of the AWS Systems Manager Parameter Store parameter that contains the URL of the Azure DevOps agent software. You can find the latest version of the Azure Pipelines agents for each operating system and processor architecture in the official GitHub repository.
- AzureDevOpsPATParameterName – This is the name of the AWS Systems Manager Parameter Store parameter that will contain the Azure DevOps personal access token used for provisioning the agents.
- AzureDevOpsAgentPoolName – The name of the agent pool these instances will be added to.
- AzureDevOpsOrganizationURL – The URL of the Azure DevOps organization that these agents will belong to.
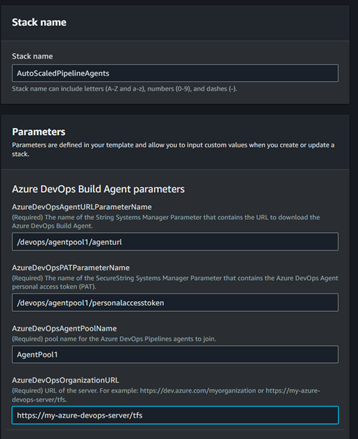
Figure 3: Parameters to Deploy the solution with example values
Next, you will need to enter the parameters needed for launching the Amazon EC2 instances in the Instance Launch Template Parameters section (Figure 4):
- AmiIdParameterName – This is the AWS Systems Manager Parameter store parameter where you store the AMI ID. If you are using a custom AMI that you have created to launch instances, then this will be a parameter that you create to store the AMI ID. If you wish to use the standard Windows or Linux template, you can use one of the public parameters that is automatically updated with the latest version of the AMI. You can learn more in the documentation on how to find the right parameter name for the AMI you want to use.
- InstanceType – This is the Amazon EC2 instance type that will be used for new agents. At the time of this writing, the solution includes the t3.small, t3.medium, t3.large, and m5.large instance types. If you need other instance types , you can update the AWS CloudFormation template to add them.
- Subnets – Choose the Amazon VPC subnets for new agents deployment. If none are available that are suitable for your needs, you can provision a new VPC before launching this solution.
- Security group – The VPC Security group that will be attached to new agents when they are created.
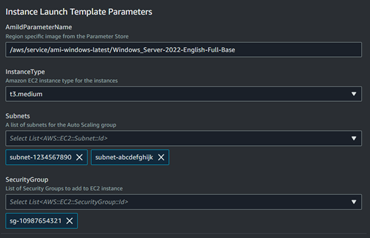
Figure 4: Instance Launch Template Parameters with example values
Finally, since this solution scales agents on a schedule, you need to specify scaling parameters in the Scheduled scale in parameters and Scheduled scale out parameters (Figure 5):
- ScheduledScaleInCron and ScheduledScaleoutCron – Cron expressions that specify when the scale in and scale out actions will occur, respectively.
- ScaleInDesiredCapacity and ScaleOutDesiredCapacity – The desired capacity for the auto scaling group when in the scaled in and scaled out states, respectively.
- ScaleInMinCapacity and ScaleOutMinCapacity – The minimum capacity for the auto scaling group when in the scaled in and scaled out states, respectively.
- ScaleInMaxCapacity and ScaleOutMaxCapacity – The maximum capacity for the auto scaling group when in the scaled in and scaled out states, respectively.
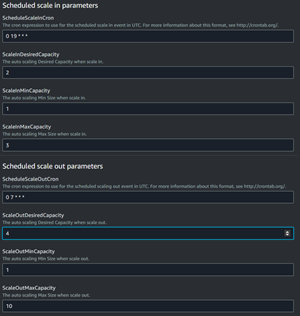
Figure 5: Scheduled Scaling Parameters with example values
Although the scaling behavior does not vary with scheduled scaling, you could implement target tracking scaling policies based on instance metrics (such as CPU usage) and control the auto scaling group capacity within the constraints set by the schedule.
When you have finished entering the parameters, choose Next. The Configure stack options will be displayed. Here, you can add tags and configure other settings for the stack. For this example, choose Next.
On the Review page, confirm that the parameters reflect what you are expecting to deploy. Then select the checkbox next to I acknowledge that AWS CloudFormation might create IAM resources. Then choose Submit.
The stack will take several minutes to deploy. The Auto Scaling group will be set to zero capacity upon initial deployment. You may manually change the Auto Scaling group’s capacity or change it when the first schedule action takes place. For this example, you will test by changing the desired capacity to ensure proper function.
Testing
You can find your Auto Scaling group in the Auto Scaling groups console. Its name will begin with the stack name you used to deploy it. Choose it and then select the Instance management tab. Initially, you will see no instances. On the Details tab, choose Edit. Change the Desired capacity and Minimum capacity each to be “1” (Figure 6). Choose Update.

Figure 6: Change Auto Scaling group capacity
A new instance will be launched in the Auto Scaling group. You can view the progress on the Instances tab (Figure 7). It will take several minutes for the instance to launch in the Auto Scaling group.

Figure 7: Instances in the Auto Scaling group
If you visit the corresponding agent pool in Azure DevOps (Figure 5), the instances will be present and in the “Online” state once it is ready to process jobs.
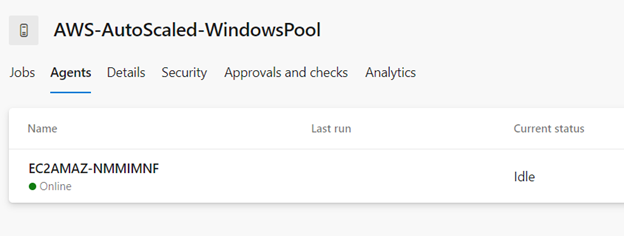
Figure 8: Agent pool instances
To test the reverse process, you can change the desired capacity on the Auto Scaling group back down to zero (Figure 9).
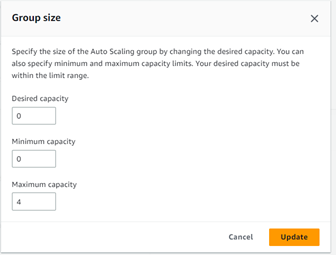
Figure 9: Change Auto Scaling group capacity to zero
Once you do that, return to the agent pool in Azure DevOps. You will notice that the agent will transition to an offline state (Figure 10), followed by complete removal from the pool (Figure 11).
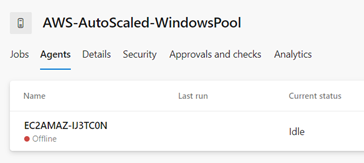
Figure 10: Agent goes offline
Figure 11: Agent is removed from the pool
Once you have confirmed this behavior, you can start using the agent pool in your CI/CD process.
Considerations
This solution helps you make better usage of your agents and reduce idle capacity when you know multiple build runs are less likely. However, there are some items to consider when using this implementation.
If an agent is removed permanently in a non-graceful way, such as being manually terminated, then the automation will never run for that instance, and it will perpetually show up in an offline state in the agent pool. If that happens, you will need to manually remove it from the agent pool.
As mentioned previously, it can be time-consuming to install the build tools during scale out of the Auto Scaling group. A faster alternative is to create your own image using a tool like EC2 Image Builder to pre-install all the tools you will need, and reduce the instance initialization to only include registering the instance with Azure DevOps.
A common use case of this scheduled scaling scenario is to scale agent pools during workdays so that developers can run multiple CI builds on demand, and reduce the capacity overnight when only scheduled builds are likely to run. You could also expand this functionality to scale in and out based on metrics, such as CPU utilization, or use predictive scaling based on the number of build jobs that normally run at a certain time.
To ensure that there is always available capacity, this scenario requires at least one agent to be running at all times. If you need more sophisticated behavior, you can consider using Azure DevOps service hooks to enable direct communication with AWS through the Webhook mechanism to, for instance, increment the desired capacity in an Auto Scaling group to 1, if currently set to zero.
Cleanup
Deploying this solution will provision AWS resources and incur cost. Once you have completed testing and you no longer need the agent scaling mechanism in place, you can remove the provisioned resources by deleting the AWS CloudFormation stack you created as a part of this example. Navigate to the CloudFormation Console and select the stack that you created. Choose Delete, and then choose Confirm when prompted. Any instances that are running as part of the Auto Scaling group will be terminated and removed from the agent pools, and all resources originally created by the CloudFormation template will be removed. You will need to manually delete the AWS Systems Manager Parameter Store parameters you created for the prerequisites since they are not created as part of the CloudFormation stack.
Conclusion
In this blog post, we demonstrated a method for automatically scaling Azure Pipelines agents that are hosted in AWS. Upon a new agent instance launch, it uses AWS Systems Manager documents to automate the installation of the agent software on the agent and add it to the agent pool. When a scale-in event occurs, agents are automatically removed from the agent pool and terminated.
This will help you control the number of agents running in your AWS environment so you can control costs while having sufficient agent capacity required to run your builds in a timely fashion.
When deploying your cloud-based applications to AWS using Azure DevOps, you can use the AWS Toolkit for Azure DevOps to provide you with specific functionality you need to deploy any workload to AWS.
AWS has significantly more services, and more features within those services, than any other cloud provider, making it faster, easier, and more cost effective to move your existing applications to the cloud and build nearly anything you can imagine. Give your Microsoft applications the infrastructure they need to drive the business outcomes you want. Visit our .NET on AWS and AWS Database blogs for additional guidance and options for your Microsoft workloads. Contact us to start your migration and modernization journey today.