AWS Cloud Operations Blog
Centralize image administration for virtual machines and containers using EC2 Image Builder
Customers may have different processes for image building across virtual machines, containers, or both. This variation in processes introduces operational overhead in managing images, including the initial configuration and the ongoing updates. From the AWS Well-Architected Operational Excellence Pillar, section “Document and share lessons learned”, these images should be standardized, configured with the latest patches, and free from known security vulnerabilities, to be used across organizations. Given the variation in processes, and workloads that may be hosted in different accounts and regions, image administration becomes a challenging task.
EC2 Image Builder is a fully managed AWS service that centralizes image management for both your virtual machine and container workloads. Organization-specific configurations, like network traffic proxies, can be integrated through modular components and reused through recipes to build images for both workloads. The built images can then be scanned by Amazon Inspector for security vulnerabilities. When considering a multi-account structure, the image creation process can reside in a central DevSecOps account, and then leverage the native distribution feature of EC2 Image Builder to distribute the hardened images across accounts and regions.
In this blog post, you will learn how to leverage the different capabilities of EC2 Image Builder in centrally administering your images. These capabilities reduce the operational overhead of having separate processes for different workloads across accounts and regions, streamlining the image management process.
Overview of solution
The following architecture illustrates the image management process for both virtual machine and container workloads. We are leveraging the EC2 Image Builder image pipeline as the automation framework for creating and maintaining images. For virtual machine workloads, the AMI image pipeline is used and highlighted in green. For container workloads, the container image pipeline is used and highlighted in blue.
To distribute the generated images, you can leverage the distribution feature inside your image pipeline configuration. You can distribute your AMI images to multiple accounts and regions using this distribution feature. However, you can only distribute your container images to different Amazon Elastic Container Registries (ECRs) residing in different regions of your current account (i.e., account configured with the container image pipeline). To copy the created container images to Amazon ECR registries in a different account, you will need to configure a workflow to copy the created images, or you can configure image replication between your Amazon ECR registries in different accounts.
If you have configured security scanning for your image pipelines, all images generated as part of the pipeline will be automatically scanned. These scans help to uncover any Common Vulnerabilities and Exposures (CVEs) within the generated images. The results of these scans will also be saved under the security findings page of the corresponding pipeline.
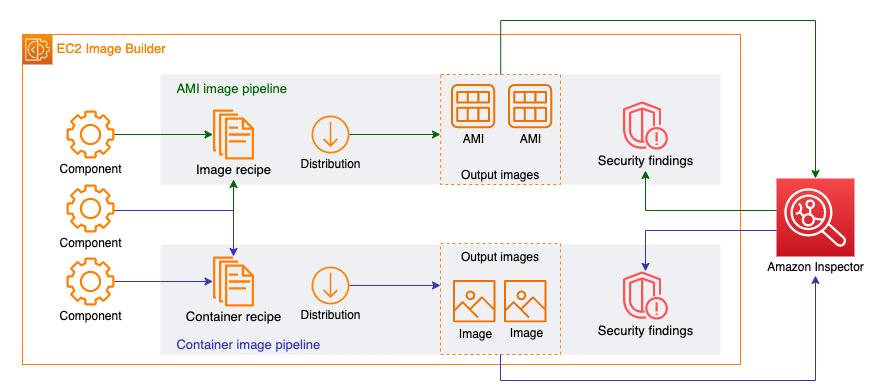
Figure 1: Architecture leveraging EC2 Image Builder for both virtual machine and container image administration
Walkthrough
In this walkthrough, we will construct the architecture described in the previous section. You will first deploy an AWS CloudFormation template to create all the necessary building blocks for both AMI and container image pipelines. You will then update the shared component between the two pipelines with a vulnerable package, allowing Amazon Inspector to scan for vulnerabilities. Optionally, you can update your CloudFormation stack to output images to additional accounts and regions, creating a seamless distribution process.
Note: The sample CloudFormation template will not create Amazon ECR in an Amazon Virtual Private Cloud (VPC) environment. If you have such requirements please configure appropriate interface endpoints, and reconfigure the EC2 Image Builder infrastructure configuration with correct Amazon VPC settings.
Prerequisites
For this walkthrough, you should have the following prerequisites:
- AWS CloudShell to run scripts with the AWS Command Line Interface (CLI).
- Amazon Inspector enabled for Amazon EC2 scanning and Amazon ECR scanning.
- (Applicable for the optional distribution section) To distribute AMI images across accounts and regions, you must create the EC2ImageBuilderDistributionCrossAccountRole in all of the target accounts trusting the image pipeline account, then attach the Ec2ImageBuilderCrossAccountDistributionAccess policy to the role.
Reuse components to build both AMI and container images
In this section, you will deploy the CloudFormation template, and explore how components can be reused across both AMI and container images. Component is a resource within the EC2 Image Builder that uses a YAML-based document to describe different phases and steps that you would like the service to take when building your images. This is extremely helpful for customers that have repeatable patterns, and would like to apply these patterns across different workloads. For example, settings to align to the CIS benchmark, applying organization specific network configurations to AWS native agents, and installing organization specific libraries and development packages. By referencing these pre-defined components in the process of building both AMI and container images, customers no longer need to manage these settings in a segregated manner.
Follow the procedures below to deploy the CloudFormation template and explore the reuse of components:
- Open CloudShell in your AWS account.
- Execute the following command to download the CloudFormation template:
curl -O https://d2908q01vomqb2.cloudfront.net/artifacts/MTBlog/cloudops-1477/sample-imagebuilder.yaml- Execute the following command to deploy the CloudFormation template:
aws cloudformation create-stack \
--stack-name sample-ec2-image-builder \
--template-body file://sample-imagebuilder.yaml \
--capabilities CAPABILITY_NAMED_IAM- Execute the following command to check the status of your CloudFormation stack deployment. The CloudFormation stack typically takes around 5 minutes to deploy. You should see “CREATE_COMPLETE” as the stack status upon successful deployment.
aws cloudformation describe-stacks --stack-name sample-ec2-image-builder --query "Stacks[0].StackStatus"- Open EC2 Image Builder in your AWS account, and navigate to the Components tab from the side bar. You should see 3 components deployed in your account.
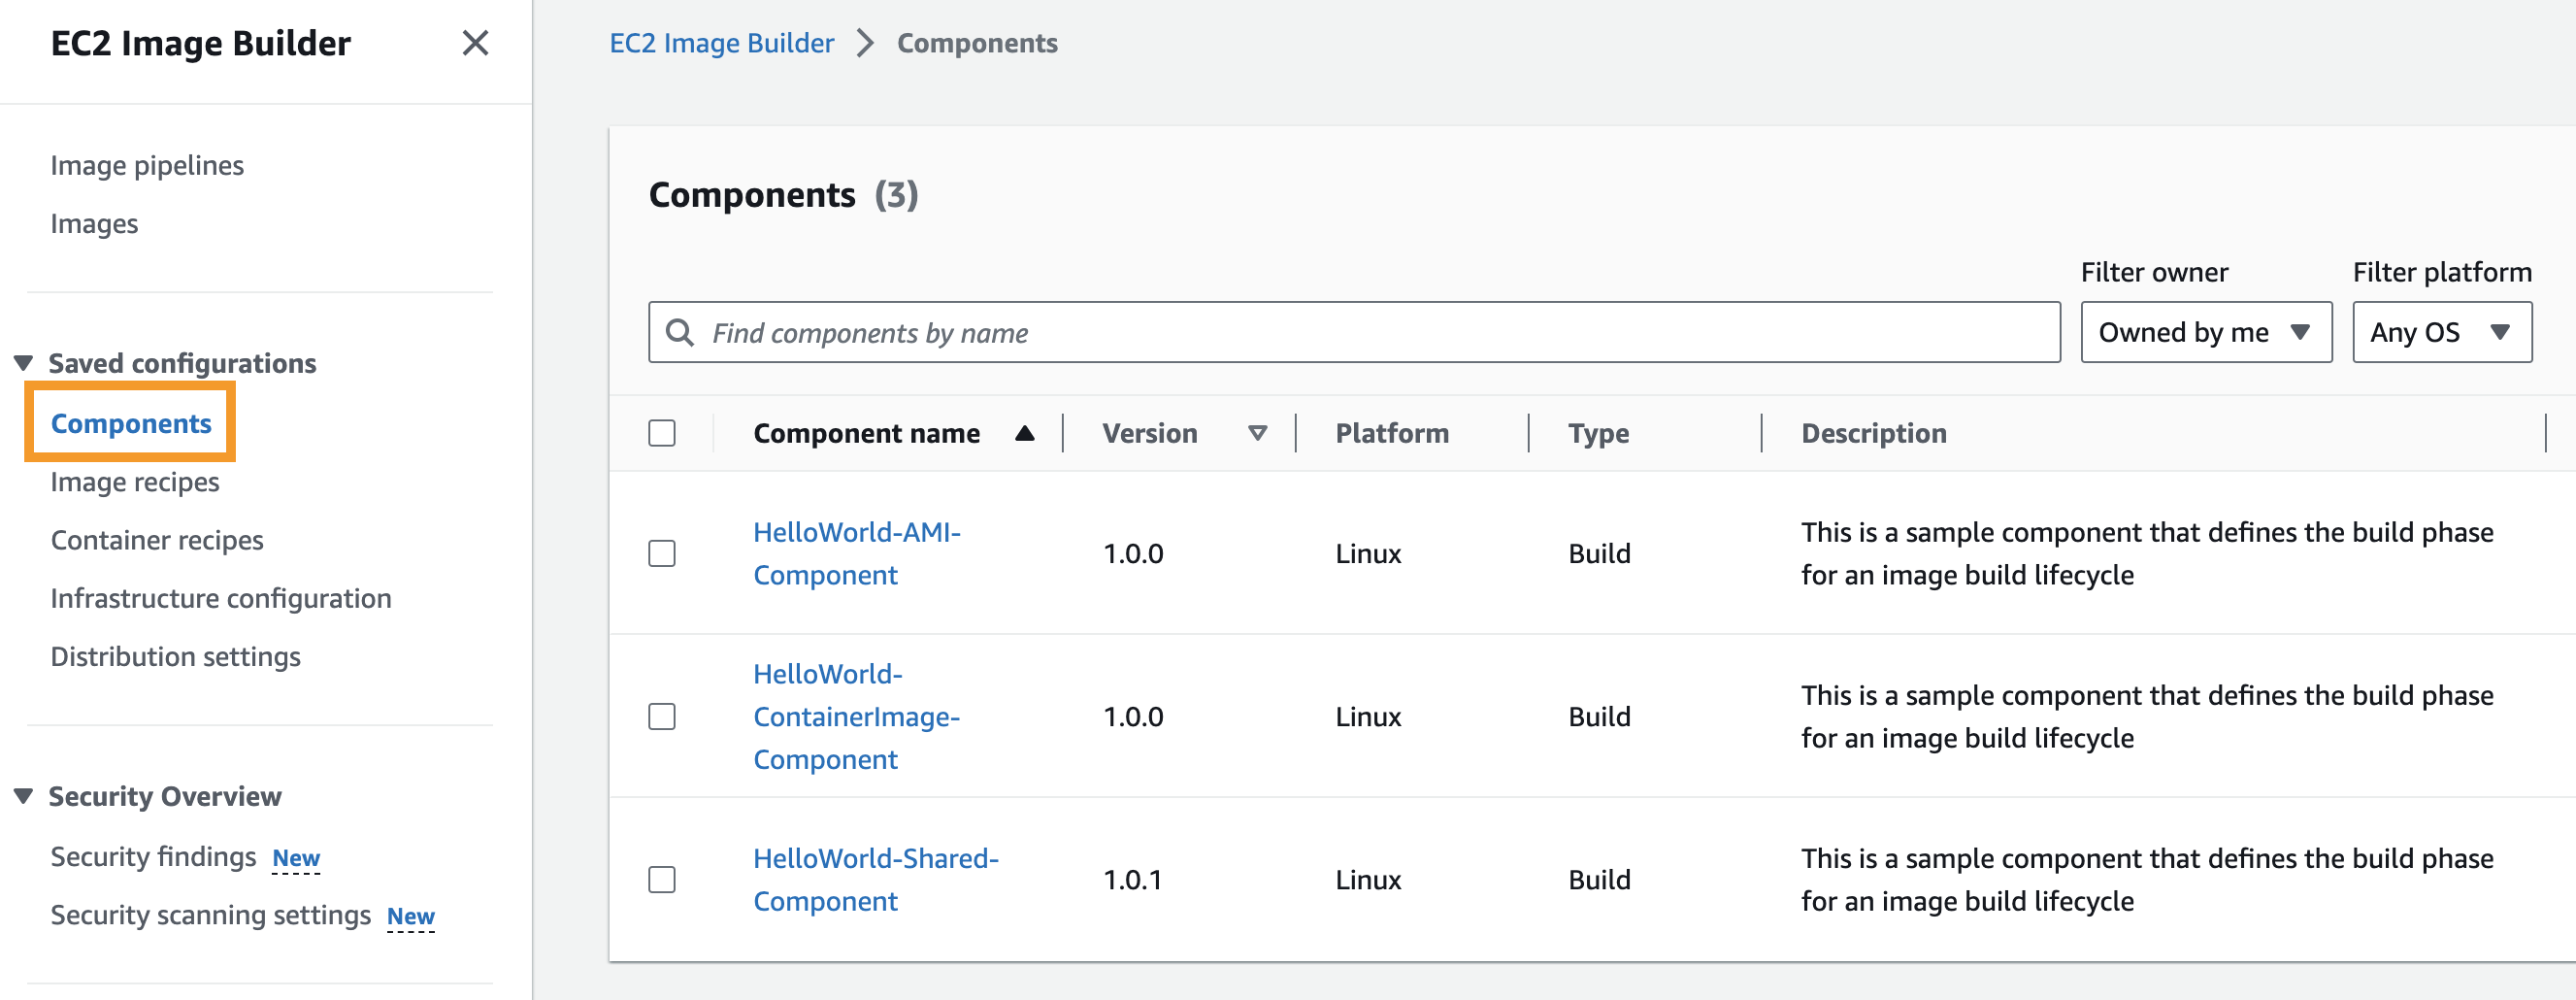
Figure 2: Sample components output from AWS CloudFormation stack deployment
- Navigate to the image recipes tab from the side bar, and open the “AmazonLinux2-AMI-Recipe | 1.0.0”. Recipe is an EC2 image builder resource that defines the base image along with the set of components that you would like to customize your image. There are two types of recipes, image recipes for AMI images, and container recipes for containers. The figure below highlights that this image recipe has two components associated, one being the shared “HelloWorld-Shared-Component”.
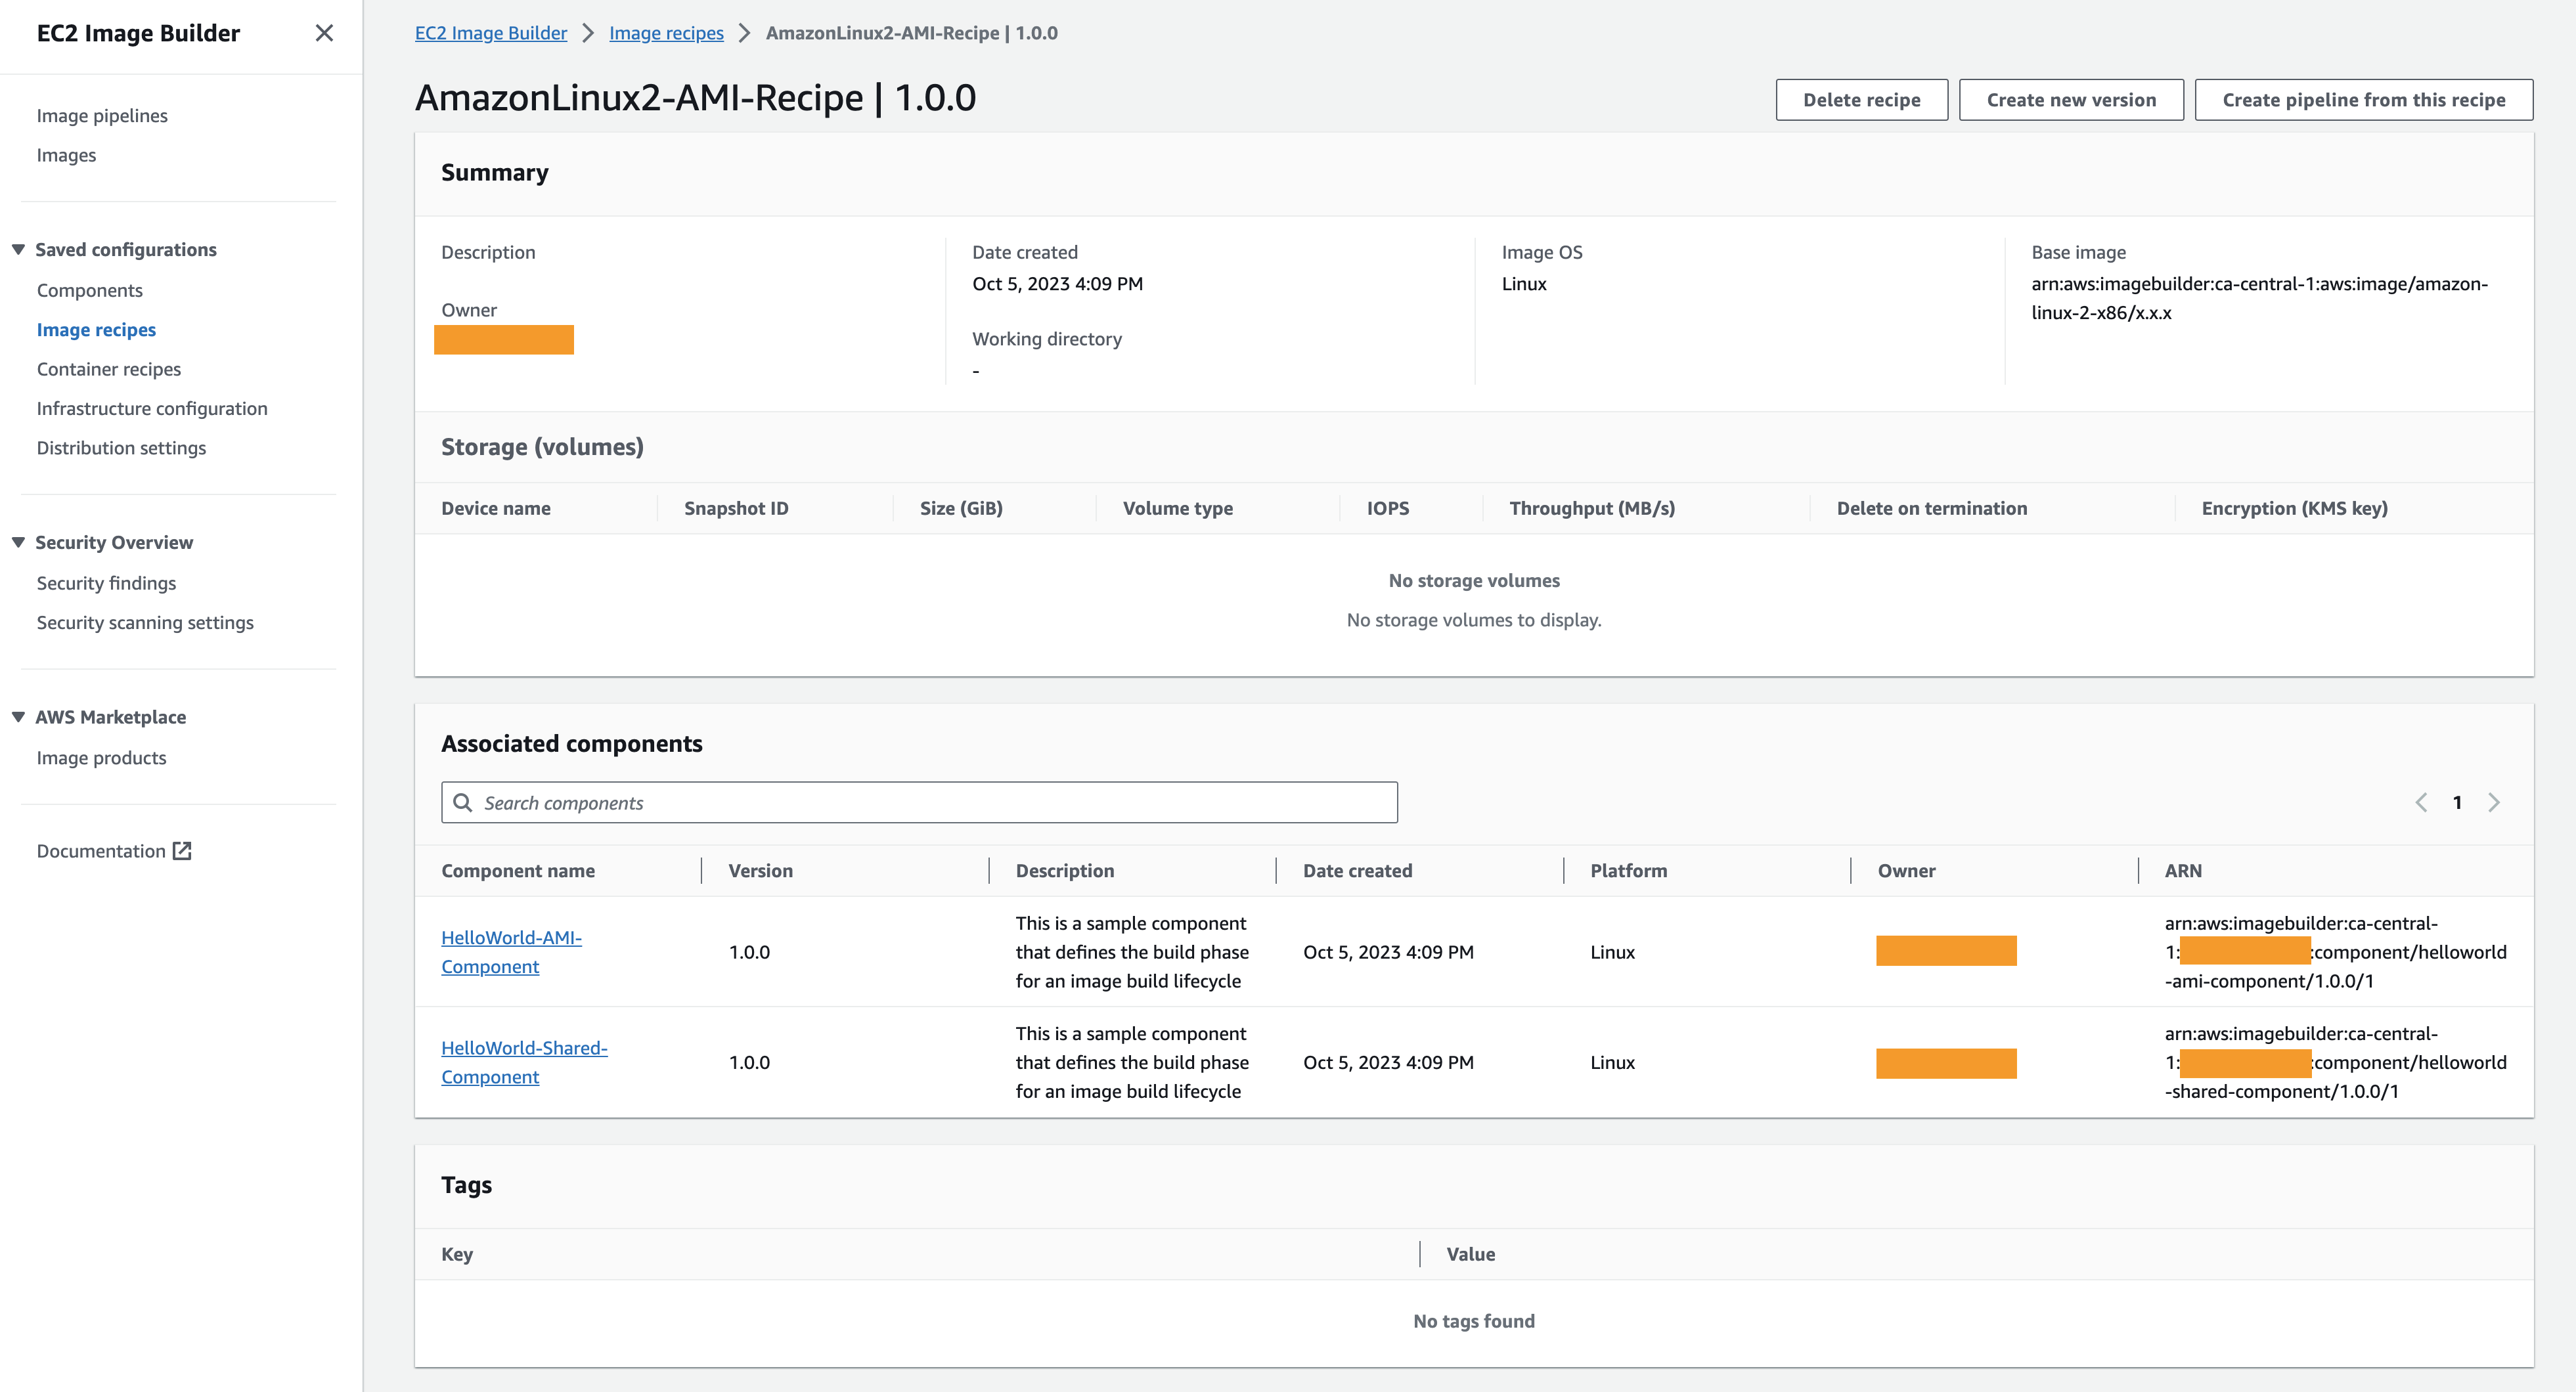
Figure 3: Sample image recipe with associated components
- Navigate to the container recipes tab from the side bar, and open the “AmazonLinux2-Container-Recipe| 1.0.0”. You should see this container recipe is also referencing the shared “HelloWorld-Shared-Component”.
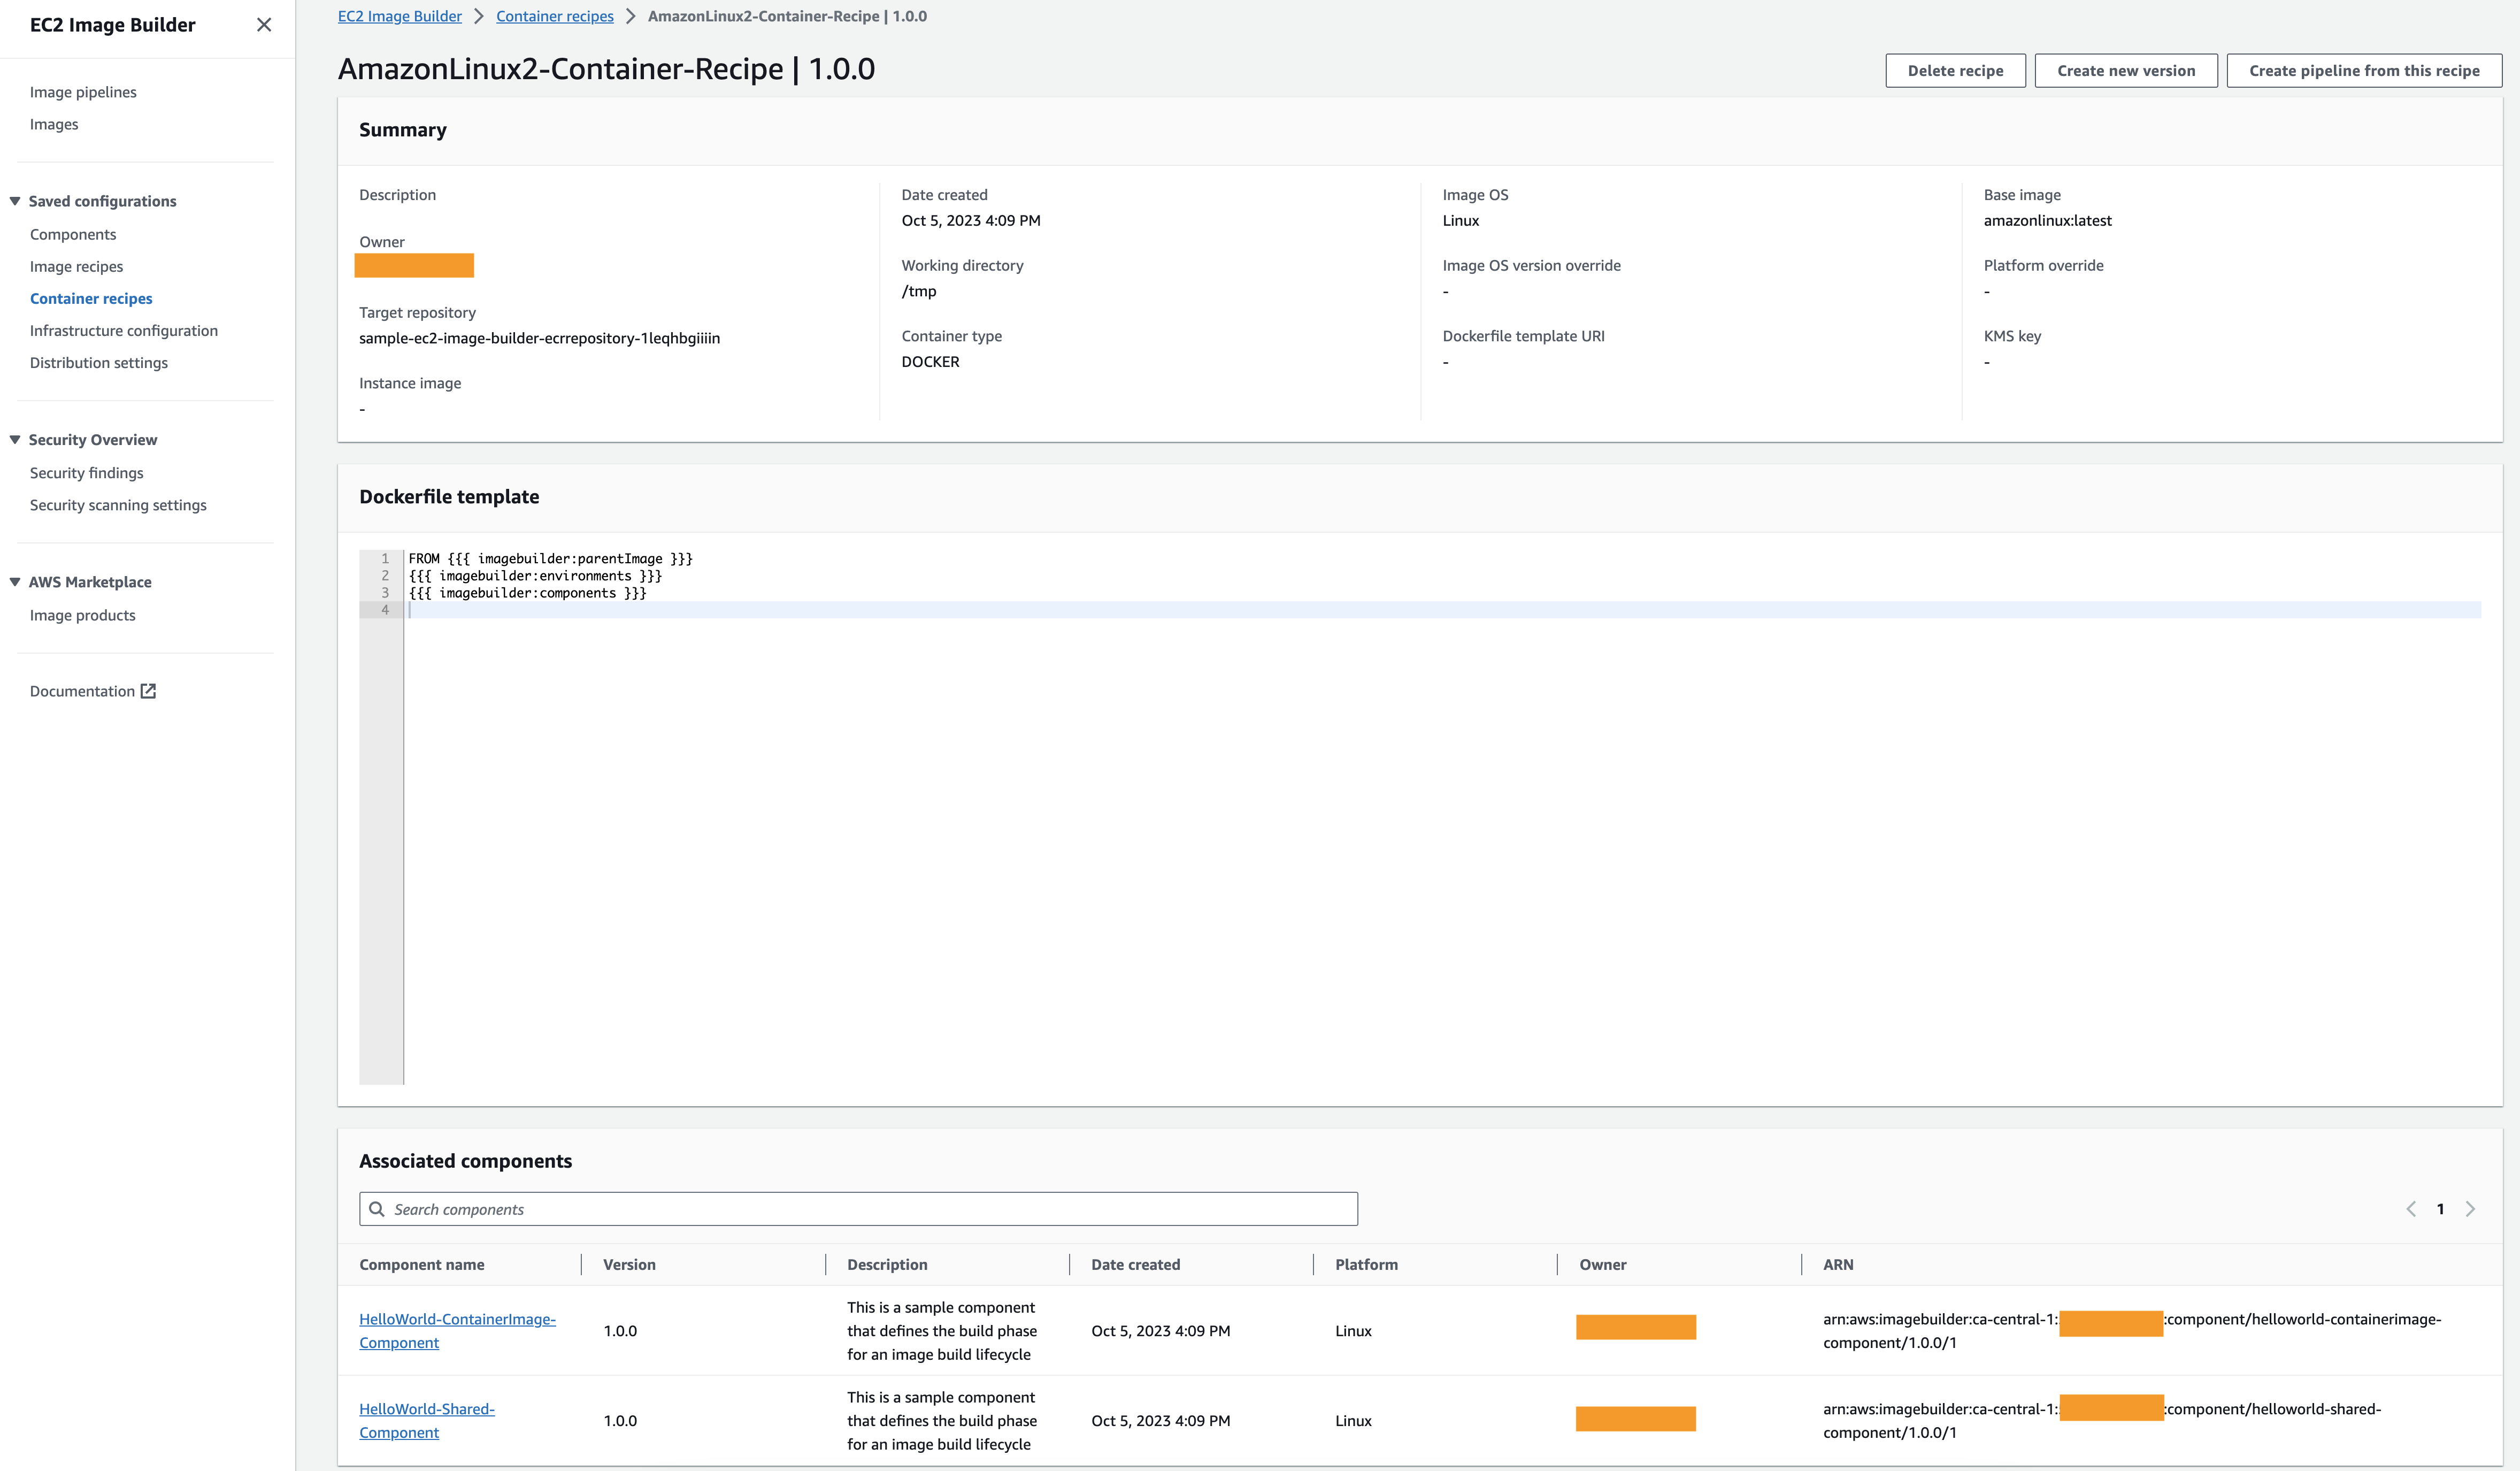
Figure 4: Sample container recipe with associated components
The components that we use in this section only include the build phase, with a single command to output different hello world statements inside the build process. To build more complex components, you can leverage the AWS Task Orchestrator and Executor (AWSTOE), and reference the examples and syntaxes inside the AWS documentation.
Discovering image security vulnerabilities with Amazon Inspector
In this section, you will update the shared component to install the vulnerable package python-jwt==3.3.3. You will then build vulnerable images using this shared component, allowing Amazon Inspector to discover the vulnerabilities.
Follow the procedures below to update the shared component:
- Return to AWS CloudShell.
- Execute the following command to add the vulnerable package to the shared component:
sed -i '140i \ - sudo yum install -y python3-pip\n\ - pip3 install "python-jwt==3.3.3"' sample-imagebuilder.yaml- Execute the following command to update different resource version from 1.0.0 to 1.0.1. This include shared component (line 124), image recipe (line 149) and container recipe (line 176) that references the shared component.
sed -i '124b1; 149b1; 176b1; b ;:1;s/1.0.0/1.0.1/g' sample-imagebuilder.yaml- Execute the following command to update the CloudFormation stack:
aws cloudformation update-stack \
--stack-name sample-ec2-image-builder \
--template-body file://sample-imagebuilder.yaml \
--capabilities CAPABILITY_NAMED_IAM- Execute the following command to check the status of your CloudFormation stack update. The CloudFormation stack typically takes around 5 minutes to update. You should see “UPDATE_COMPLETE” as the stack status upon successful update.
aws cloudformation describe-stacks --stack-name sample-ec2-image-builder --query "Stacks[0].StackStatus"- Navigate back to EC2 Image Builder.
- Open the image pipelines tab from the sidebar, and select the “AmazonLinux2-AMI-Pipeline”. From the “Actions” drop down menu, click on “Run pipeline”.
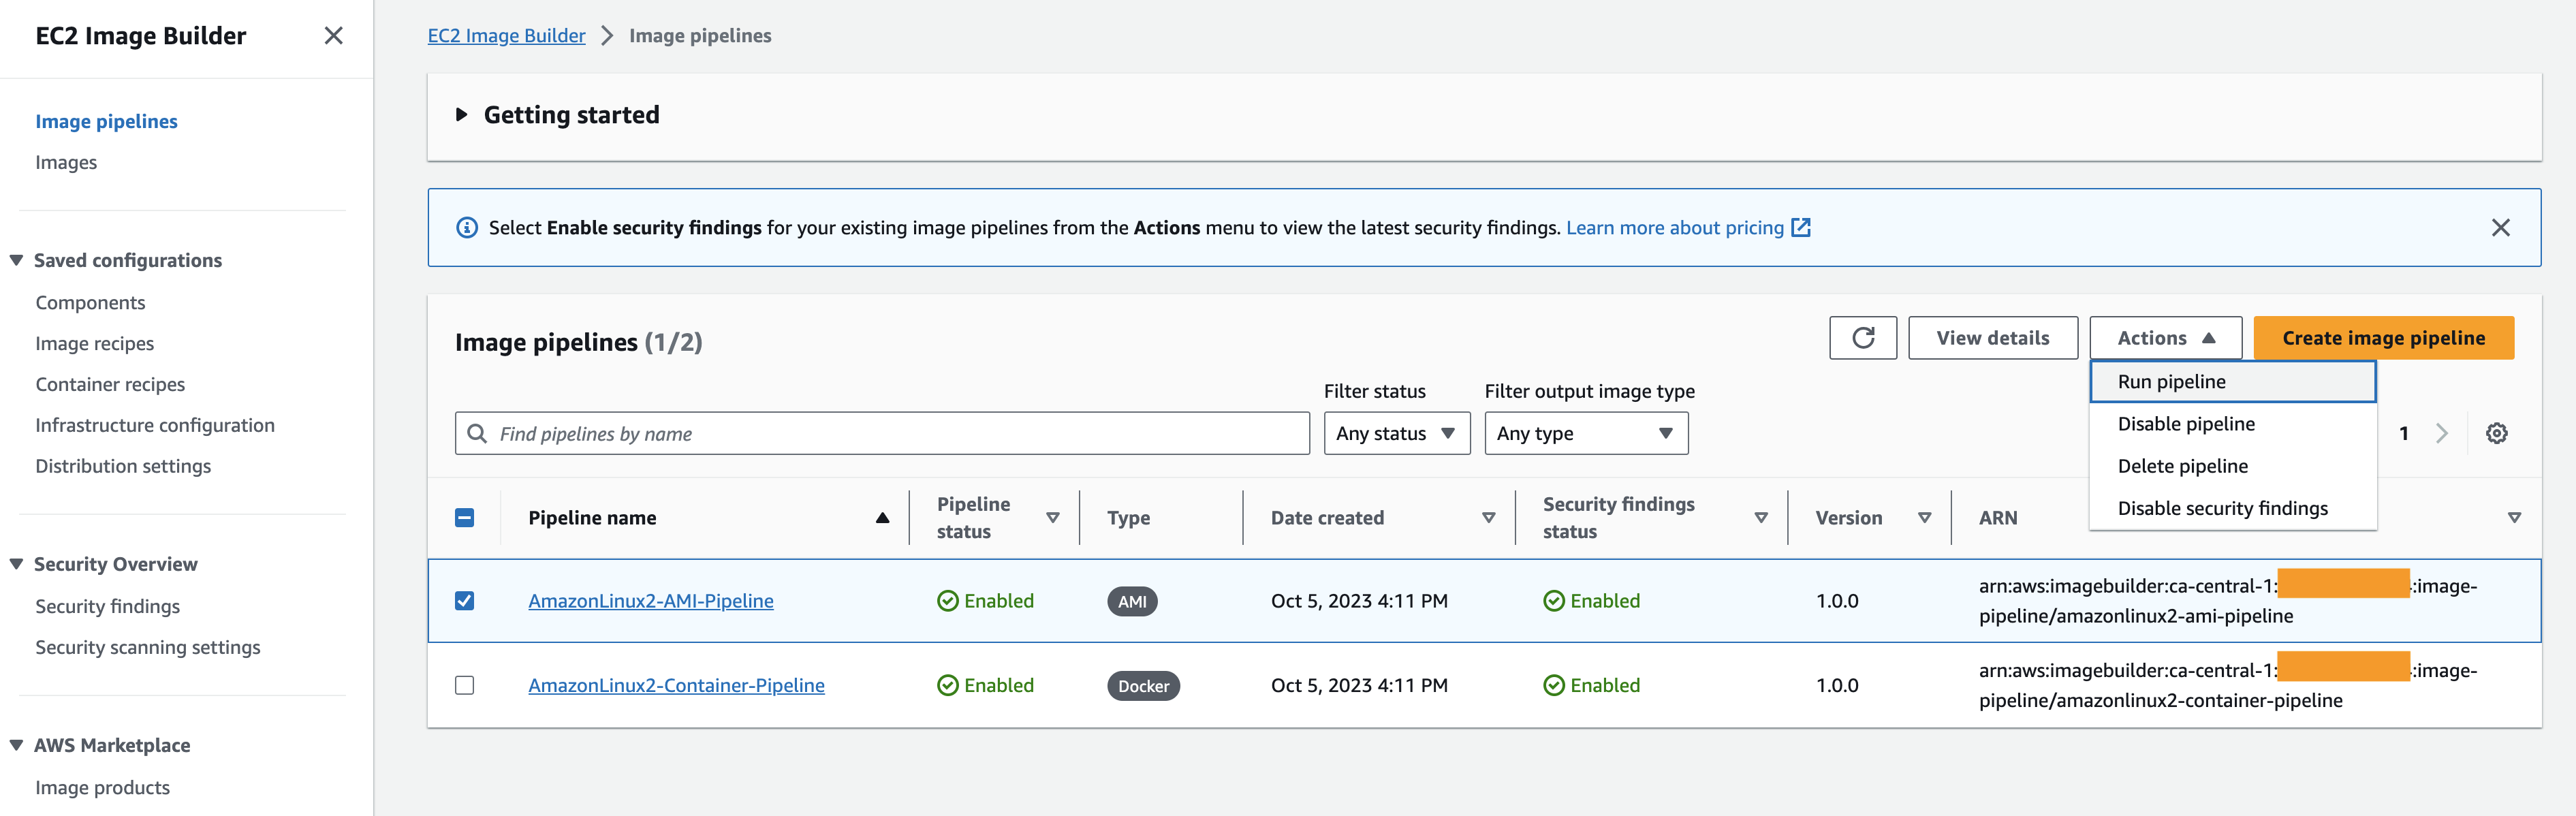
Figure 5: Run EC2 Image Builder pipeline
- The pipeline takes about 30 minutes to complete.
- Upon successful execution of the AMI image pipeline, you should see an output image as below.
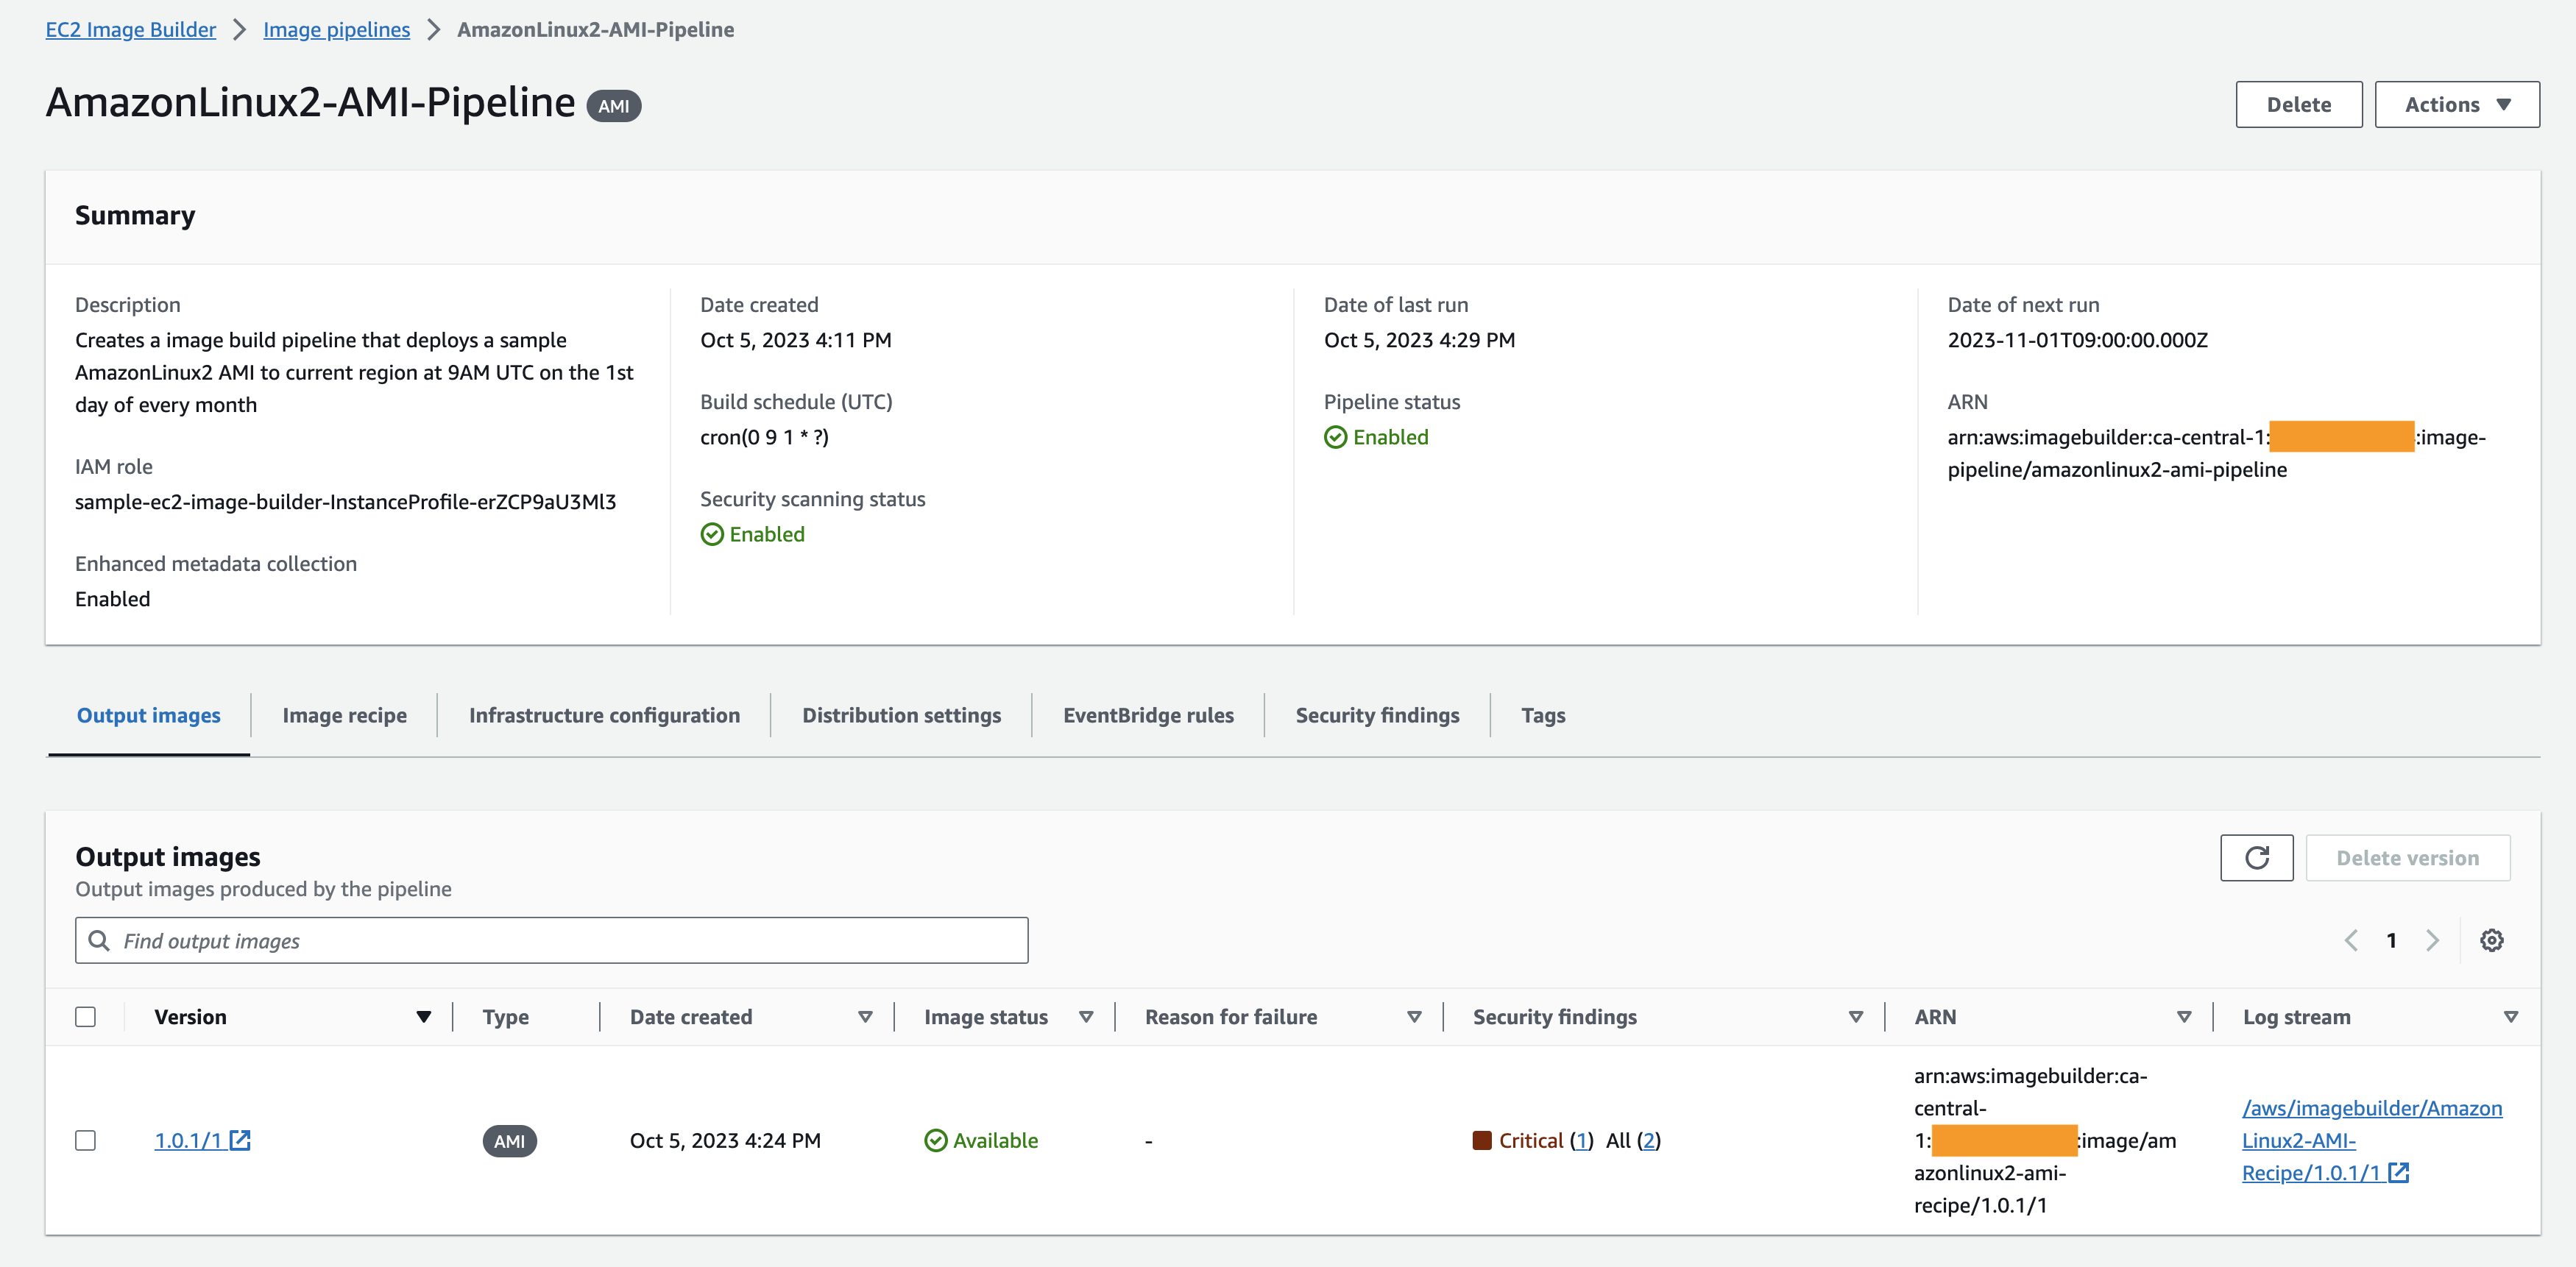
Figure 6: Output AMI images
- Under the “Security findings” tab you should see the detailed security findings as below.
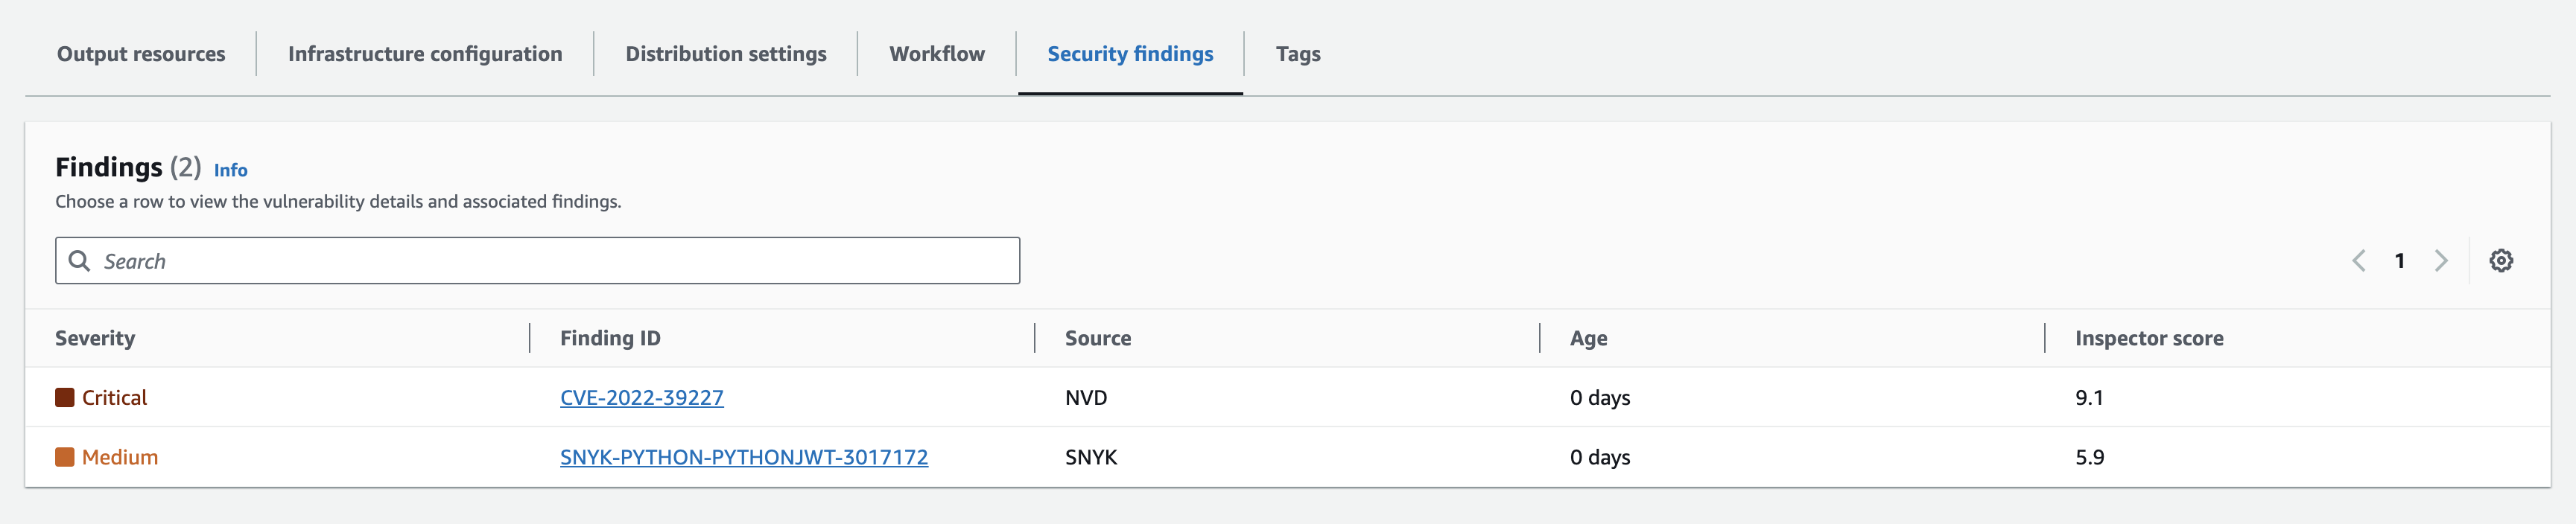
Figure 7: Security Findings for built AMI images
Note: When deploying your workload using any provided images, make sure to check that there are no critical security findings as part of the Amazon Inspector assessment. An example given in this blog: Use Amazon Inspector to manage your build and deploy pipelines for containerized applications.
- Repeat the same process for “AmazonLinux2-Container-Pipeline”, the generated container images should also highlight security findings from Amazon Inspector.
(Optional) Distribute output image across accounts and regions
In this section, you will use the distribution feature to copy the created AMI image across regions and accounts. We will not demonstrate cross-region container image distribution because you need to specify the Amazon ECR repository name in the target region, which is out of scope of this blog.
Note: You must have the EC2ImageBuilderDistributionCrossAccountRole created in the target account, as in the prerequisite section.
Follow the procedures below to distribute the created AMI image:
- Return to AWS CloudShell.
- Execute the following command to add an additional distribution region and account. Please replace the < TARGET-REGION> and <TARGET-ACCOUNT> fields in this command. The target region field should be different from the one you are currently using.
sed -i '223i \ - Region: <TARGET-REGION>\n\ AmiDistributionConfiguration:\n\ Name: "ami-dist-config-name-1 {{ imagebuilder:buildDate }}"\n\ Description: "Distribute a copy of the AMI to the target account and region"\n\ TargetAccountIds:\n\ - <TARGET-ACCOUNT>' sample-imagebuilder.yaml- Execute the following command to update the CloudFormation stack:
aws cloudformation update-stack \
--stack-name sample-ec2-image-builder \
--template-body file://sample-imagebuilder.yaml \
--capabilities CAPABILITY_NAMED_IAM- Execute the AMI image pipeline following step 7 in the previous section. After successful execution of the pipeline, you should see the output images in the specified region and account.
Cleaning up
To avoid incurring future charges:
- Delete all images stored in the Amazon ECR repository named “sample-ec2-image-builder-ecrrepository-<HASH>”.
- Execute the following command to delete the CloudFormation stack:
aws cloudformation delete-stack --stack-name sample-ec2-image-builder- Delete Amazon CloudWatch log groups with names “/aws/imagebuilder/AmazonLinux2-AMI-Recipe” and “/aws/imagebuilder/AmazonLinux2-Container-Recipe”.
- Delete the created AMIs in the Amazon EC2 console. The AMI names should follow the format “ami-dist-config-name-1 <DATE>”.
Conclusion
In this blog post, we explored EC2 Image Builder’s capability to streamline and centralize image management for both virtual machines and containers. Through a hands-on walkthrough, you learned how to reuse the components in different image pipelines, use the built-in integration with Amazon Inspector to perform security scanning generated images, and optionally distribute the created images across accounts and regions.
To learn more about EC2 Image Builder, you can go through the AWS Documentation, and for more hands-on examples you can explore the amazon-ec2-image-builder-samples GitHub repository.
About the authors