AWS Cloud Operations Blog
Change Management for Life Sciences
In this post, we’ll demonstrate how Customers looking to maintain Good Laboratory Practices (GLP), Good Clinical Practices (GCP), Good Manufacturing Practices (GMP) can get started evaluating their environments for the controls found in Title 21 of the Code of Federal regulations (CFR) Part 11, and remediate non-compliant resources via a change control process using native AWS Services and capabilities. We will refer this collection of good practices as GxP throughout this post.
GxP is an acronym referring to the compliance regulations and guidelines that are typical of the life sciences organizations making food and medical products, such as drugs, medical devices, and medical software applications. The requirements of GxP regulations are necessary for making sure that medical products are safe for consumers, and for making sure of the integrity of the data used to make product quality decisions.
Change management is one of the most important aspects that customers of this highly regulated industry encounter during their daily operations. This is because customers operating under GxP regulations must implement changes in a controlled manner, and as defined explicitly by the Standard Operating Procedures (SOPs) written by the organization. These SOPs are organizationally specific and designed to make sure that products and services are delivered with quality and consistency every time.
Organizations define these SOPs to make sure that they are remaining compliant with company and government regulations, such as CFR Part 11, to which GxP customers will be beholden. Change control is a critical component for any quality management system or compliance framework. As customers move business critical applications to the cloud, they must understand how to implement change controls against their cloud resources. The defined procedures for change control in a cloud environment should be secure, scalable, automated, and incorporate validation and approval steps.
Solution overview
AWS Config is a foundational compliance service for customers operating workloads on the AWS platform. AWS Config is a service that continuously monitors and records your AWS resource configurations and lets you automate the evaluation of recorded configurations against your desired configuration. AWS Config evaluations are ingested by other AWS services to provide compliance status data. Furthermore, it integrates natively with many other AW services. One of the services that AWS Config interacts with natively is AWS Systems Manager, which is the hub for Centralized Operations Management on the AWS cloud.
Systems Manager Change Manager, a capability of Systems Manager, lets customers implement SOP level change controls into their environment. Customers can do this by leveraging Change Managers’ ability to create a defined template or procedure for requesting, approving, implementing, and reporting on operational changes to your application configuration and infrastructure. Change Manager lets you define pre-approved change templates to help automate change processes as they’re defined in your SOPs. This can help maintain quality standards and reduce risk by avoiding unintentional results when making operational changes. Change templates can be helpful during audits to show how standard changes are made.
Customers can use Systems Manager Change Manager within an AWS Config Remediation Action to trigger a Change Request when a resource becomes noncompliant. AWS offers Conformance Packs, which are a collection of AWS Config rules that can be deployed and maintained together. Here is a post outlining the best practices for AWS Config Conformance Packs, in this post we’ll focus on control ID 11.10(a) of CFR part 11 and deploy one AWS Config Rule from the CFR part 11 Conformance Pack, which will detect all Amazon Elastic Block Store (Amazon EBS) volumes not attached to an Amazon Elastic Compute Cloud (Amazon EC2) resource, and then trigger a Change Manager request for approval to run a Systems Manager Runbook to snapshot and delete the Amazon EBS volume. As per AWS guidance, if an Amazon EBS volume isn’t deleted when the instance that it’s attached to is terminated, then it may violate the concept of least functionality.
Prerequisites
- AWS Config enabled in your account(s)
- Users with permissions for Systems Manager
Instructions
Deploy the Amazon EBS volume and role via AWS CloudFormation.
- Download the CloudFormation template blog-prerequisites.yml.
- Open the CloudFormation console.
- Choose Create Stack.
- For Specify template, choose Upload a template file, choose the file you saved from step one blog-prerequisites.yml, and choose Next.
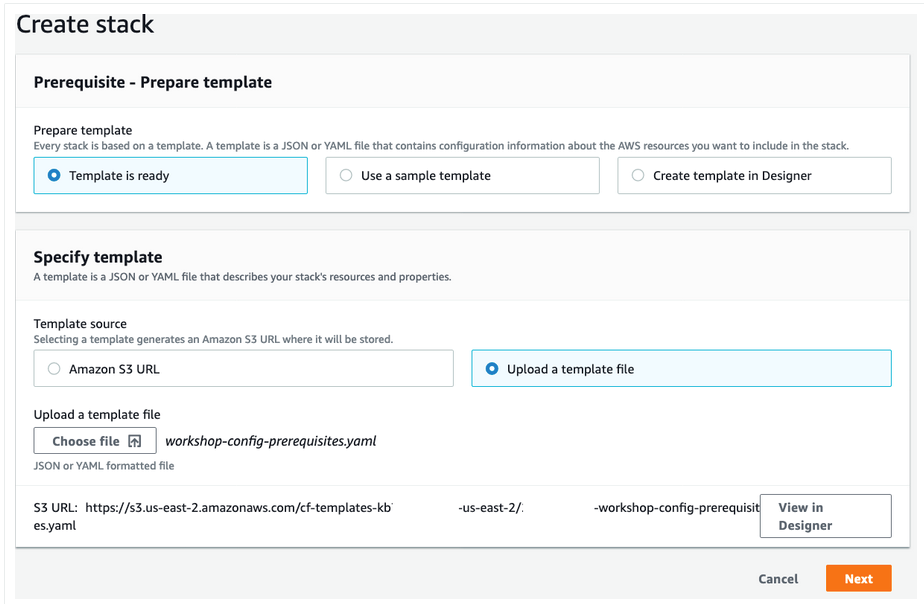
Figure 2: Prepare template screen in CloudFormation create stack
- For Stack name, enter blog-prerequisites, and choose Next.
- On the Configure stack options page, leave the defaults and choose Next.
- On the Review page, check the box I acknowledge that AWS CloudFormation might create IAM resources with custom names., and choose Create stack.
CloudFormation will begin provisioning the resources specified within the CloudFormation template. Once complete, you’ll have AWS Identity and Access Management (IAM) Roles that we’ll use for AWS Config for auto remediation. The CloudFormation will have also provisioned an unused Amazon EBS volume for the AWS Config rule to detect the unattached Amazon EBS volume. Once the status of the CloudFormation stack changes to CREATE_COMPLETE, you can proceed with the next steps. This process should complete within five minutes.
Setup Change Manager in Systems Manager
- Search forSystems Manager, and on the left navigate to Change Manager.
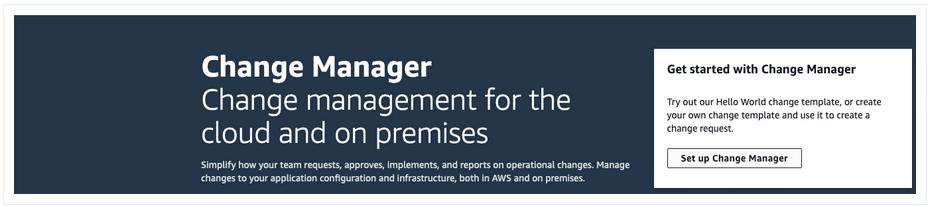
Figure 3: Set up change manager from the Change Manager screen
- Choose Set up Change Manager.
- On the Change Manager page, choose Settings, and then choose Edit.
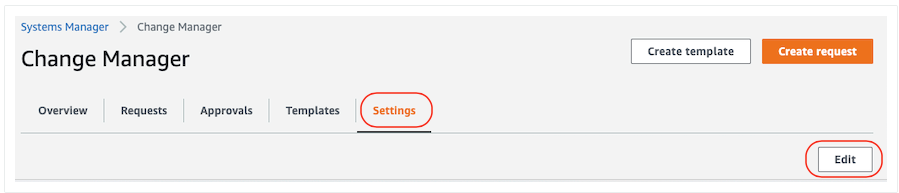
Figure 4: Edit the Change Manager Settings
- Under User Identity Management, select IAM.

Figure 5: User Identity Management selection
- Under the Template reviewer notification section, choose Create an Amazon SNS topic.
- Name your topic blog_topic or something that resonates with you, and press Add notification.
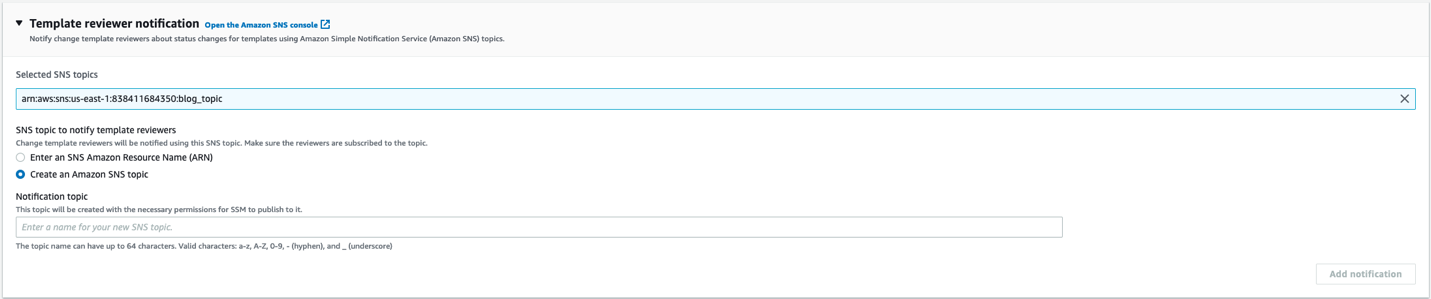
Figure 6: Template reviewer set-up screen
- Under Template Reviewers, choose Add. From the Select IAM approvers, choose your IAM user. Select Add approvers.
Note that this is where you can add all of the users who will review and approve the Change Manager templates.
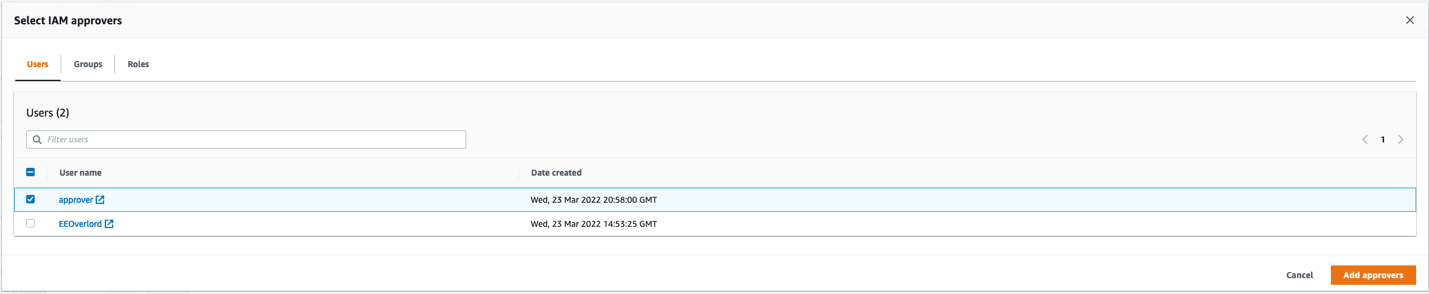
Figure 7: IAM Approver selection screen
- In the section Best practices, under Change templates, uncheck the Require template review and approval before use option.
Note that the best practice is to leave this checked, but for simplicity we’ll leave it unchecked, since we’ll use the template before it’s reviewed and approved.
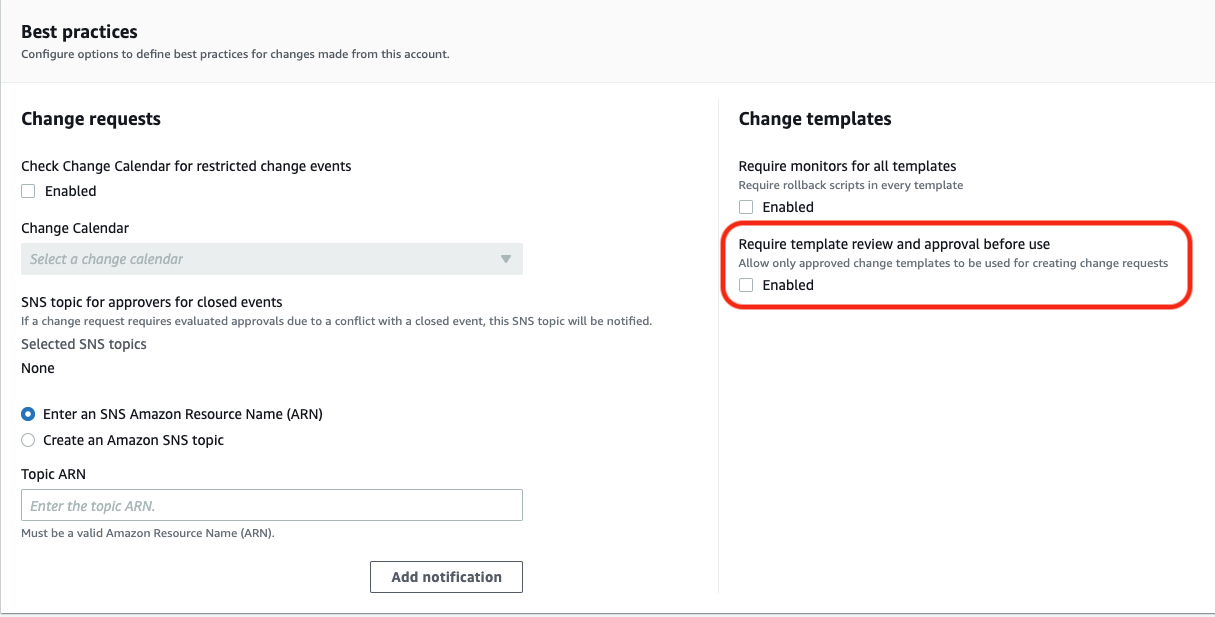
Figure 8: Best Practices set-up screen
- Scroll to the bottom of the page, and select save.
- On the Change Manager page, choose Create template. On the Create change template page, enter the
blog-hcls-ebs-volumename for your template.
In Change template details, do the following:
- For Description, enter a brief explanation of how the change template that you’re creating should be used (in this example, to create a snapshot of the Amazon EBS volume before deleting the Amazon EBS volume).
- For Change template type, choose Standard change template.
- The Runbook options section is used to specify the runbooks that users can choose from when they’re creating a change request. In this example, choose Select a single runbook.
- For Runbook, choose the names and versions of the runbooks that users can choose from for their change requests. In this example, choose AWSConfigRemediation-DeleteUnusedEBSVolume.

Figure 9: Change template details screen
- In Change request approvals, under First-level approvals, select Add approver, and then choose Template specified approvers.
- From the Select IAM approvers, choose your IAM user. Select Add approvers.
- Under Change requests approvals, in the Amazon SNS topic for approval notifications, choose Select an Existing Amazon SNS topic, choose
blog_topicfor the Notification topic name, and select Add notification. This will let you specify the Amazon Simple Notification Service (Amazon SNS) topic to notify approvers that a change request is ready for their review. - Under Notifications, choose the SNS topic that will be used to notify the template reviewer. In this example, choose Select an Existing Amazon SNS topic, and choose the topic that we created earlier
blog_topic, select Add notification. - Choose Save and Preview.
Create a custom Automation Document in Systems Manager
- In Systems Manager, on the left-hand side under Shared Resources, select Documents.
- Select Create document and choose Automation.
Figure 10: List of automation documents managed by Amazon
- For Document details, Name your automation HCLS-Change-Manager-DeleteUnusedEBSVolume
Select the Editor tab, and then select the Edit button. Select OK to continue.
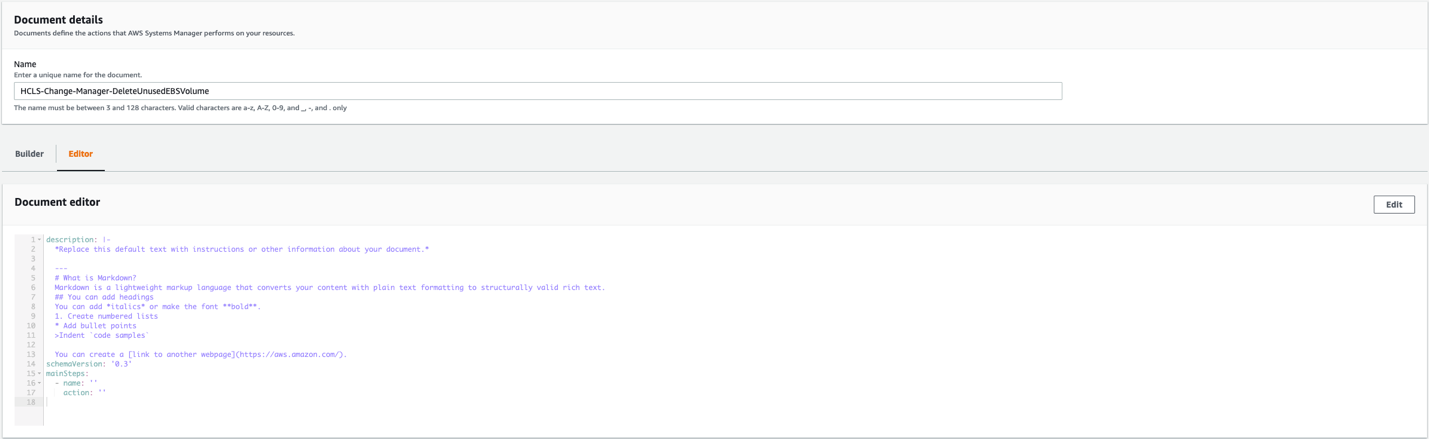
Figure 11: Document editor screen
- Navigate to the yaml file HCLS-Change-Manager-DeleteUnusedEBSVolume
and copy the contents of the entire file. Then, you’ll replace the contents of your custom automation document with the contents of this file. - Select Create automation.
Setting up AWS Config Rule with Change Manager Remediation Document
- In the AWS Config console, under Rules, select the ec2-volume-inuse-check rule you created.
- Select Actions | Re-evaluate.
- After a few moments, an Amazon EBS Volume should be flagged as non-compliant.
- Next, we’ll fix this non-compliant resource by adding the remediation document that we just created to the AWS Config rule.
- Select Actions | Manage remediation.
- Under the Edit: Remediation action, do the following:
-
- Remediation method: Automatic remediation
- Remediation action: HCLS-Change-Manager-DeleteUnusedEBSVolume
- Resource ID parameter: VolumeId
- Under Parameters
- ChangeManagerTemplate: blog-hcls-ebs-volume
- AutomationAssumeRole: type in the ARN of the SSMAutomationChangeManagerEBS Role. You can find this in IAM, under Roles.
- Select Save.
- Go back to the AWS Config rule ec2-volume-inuse-check, and under Resource in Scope, you’ll see the non-compliant resources. Select the Amazon EBS Volume, and then select Remediate.

Figure 12: Non-compliant Amazon EBS Volume located in the Resources in Scope screen
Review Change Manager Request for Remediation
- Open Change Manager from the Systems Manager console
Note that you should the Change Manager console using the IAM user that was designated as the request approver.
- Select Requests tab.
- Under Change Requests, you should see the DeleteUnusedEBSVolume request that AWS Config created.
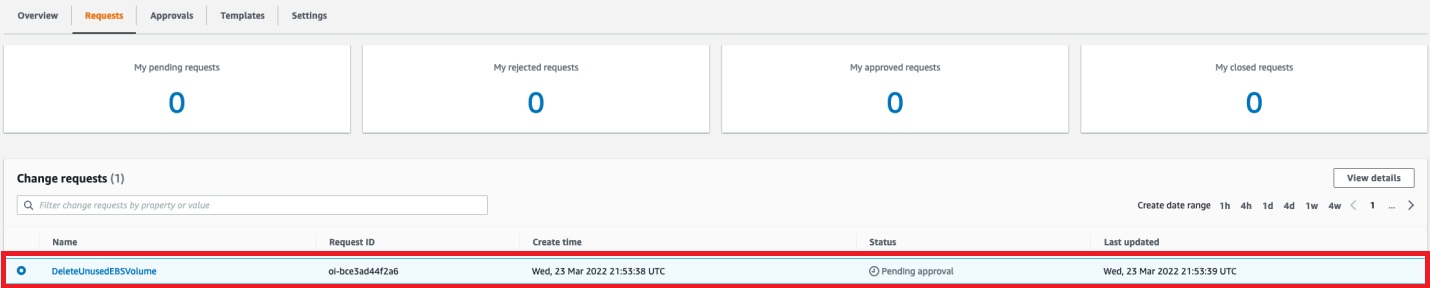
Figure 13: Change requests needing attention
- Select the Request, and then select Approve.
- Select Approve under the Approve change request dialog box.
- In a couple of minutes, the change request status will change to Success.
- In AWS Config, verify that the Amazon EBS volume is no longer marked as non-compliant.
Conclusion
This post demonstrates how to use AWS Config and Systems Manager Change Manager together to create a secure, scalable, and automated change management process. It provides a simple example for how Life Sciences customers can use AWS services to implement defined processes that maintain quality and reduce the risk of inadvertent results. Stay tuned for our next installation where we’ll demonstrate how Life Sciences customers can leverage AWS Audit Manager in conjunction with what we covered in this post to make internal and external audits much simpler.
Authors: