Networking & Content Delivery
Simulating Site-to-Site VPN customer gateways using strongSwan part 2: Certificate-based authentication
Do you need to either demonstrate or learn more about using certificate-based authentication with AWS Site-to-Site VPN capabilities?
In part 1 of this series, we showed how to use an AWS CloudFormation template to deploy the open source strongSwan VPN solution to implement the on-premises side of an AWS Site-to-Site VPN connection. The open source Quagga software suite complements the role of strongSwan by automatically propagating routing information across Site-to-Site VPN connections using Border Gateway Protocol (BGP).
Part 1 shows you how to use private shared key (PSK)-based authentication in support of your Site-to-Site VPN connections.
This new part 2 post shows you how to use an updated version of the CloudFormation template to configure certificate-based authentication in support of your Site-to-Site VPN connection. Use of certificate-based authentication can help you enhance the security of your Site-to-Site VPN connections. See Site-to-Site VPN tunnel authentication options for more background on the PSK- and certificate-based options.
If you’re interested in using PSK-based authentication with AWS Site-to-Site VPN, we recommend that you follow part 1. If you’re interested in learning more about how to use certificate-based authentication with AWS Site-to-Site VPN, continue reading.
| About this blog post | |
| Time to read | 20 minutes |
| Time to complete | 60 minutes – including 20 minutes beyond part 1 to generate certificates, store the certificates into an S3 bucket, and add the private certificate passphrase to AWS Secrets Manager. |
| Costs to complete | Resources that may incur costs while you run this experiment include:
|
| Learning level | Advanced (300) |
Solution overview
The CloudFormation template vpn-gateway-strongswan.yml used in part 1 has been enhanced to support the use of certificate-based authentication. You can review the supporting code in the associated GitHub repository.
The same topologies covered in part 1 still apply:
- Integration with AWS Site-to-Site VPN features via:
- AWS Transit Gateway
- AWS Virtual Private Gateway
- Do-it-yourself (DIY) site-to-site VPN connections
As with part 1, this post focuses on the first two topologies. If you intend to set up a DIY site-to-site connection, you should be able to use this post to help you figure out how to use certificate-based authentication in support of a DIY topology.
Figure 1 represents a common topology of an AWS Site-to-Site VPN connection with Transit Gateway.
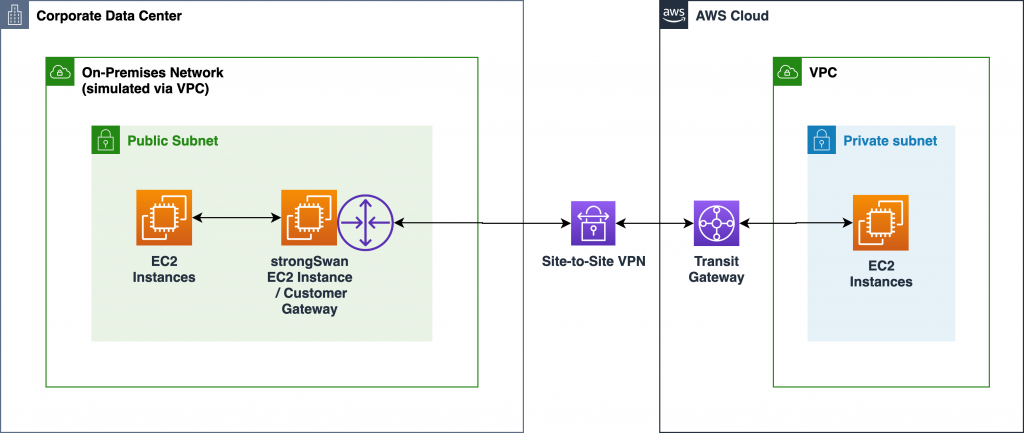
Figure 1: Site-to-Site VPN with Transit Gateway
Previewing work required for certificate-based authentication
Compared to using PSK-based authentication, there’s more upfront work required to prepare for using certificate-based authentication. The added benefit is increased security of your VPN connections.
The following sections are intended to introduce you to the extra work involved in preparing for certificate-based authentication. If you’d like to skip this background information, you can go straight to the step-by-step instructions.
Work required in your AWS environment
Figure 2 represents the private CAs and customer gateway private certificate that you must create in your AWS environment. It also represents the tunnel-specific private certificates that are automatically generated when you configure your VPN connection.
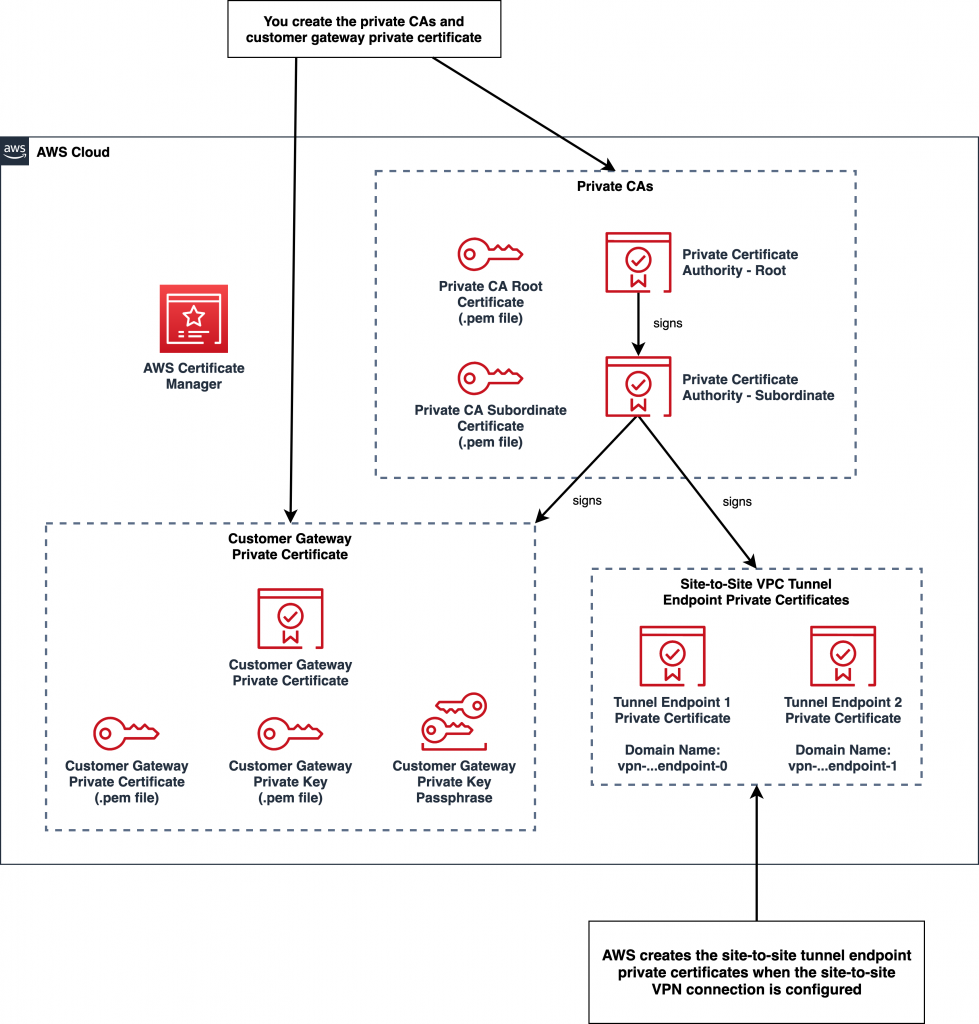
Figure 2 – Private CAs and certificates in your AWS environment
Private certificates authorities (CAs)
When using certificate-based authentication, you must use the AWS Certificate Manager private CA feature to create root and subordinate private CAs. The root CA is used to sign the subordinate CA, while the subordinate CA is used to sign private certificates that are used to support your VPN connections.
See AWS Certificate Manager Pricing for details on the costs of operating private CAs. Ensure that you review the pricing details before you provision your private CAs. When you’re done with your experiment, you should consider deleting the private CAs so that you minimize any costs incurred.
Customer gateway private certificate
Once you’ve created the necessary CAs, use AWS Certificate Manager to create a private certificate to identify and authenticate your on-premises customer gateway when it initiates the VPN connection.
The customer gateway private certificate is signed by the subordinate private CA. When you configure a customer gateway in your AWS environment, choose certificate-based authentication and associate your customer gateway private certificate with the customer gateway.
Later, when your VPN connection and tunnels are established, this association ensures that only a customer gateway that has this customer gateway private certificate can connect to your AWS environment.
Exported forms of the certificates and customer gateway private key
Once you’ve created the private CAs and the customer gateway private certificate, you must save copies of the associated certificates to your desktop.
Later, you’ll transfer these certificates to you simulated on-premises environment. Using these certificates, the strongSwan VPN tool will validate the authenticity of both the customer gateway private certificate and tunnel-specific private certificates that are sent to the client when the VPN connection is established.
You must also save a copy of the customer gateway private key so that the strongSwan VPN tool can decrypt the content of the customer gateway private key. Since the customer gateway private key is sensitive data, you must use a passphrase to encrypt the private key file.
Role of the domain name of tunnel-specific private certificates
The tunnel-specific private certificates are automatically generated by AWS when you either create a transit gateway attachment to a VPN or create a site-to-site connection. These certificates contain a domain name that is used when deploying the strongSwan VPN gateway stack in your simulated on-premises environment.
When the tunnels are being established, the strongSwan tool uses the domain names to help validate the tunnel-specific private certificates exchanged when the tunnels are established.
Work required in your simulated on-premises environment
Before you can create the CloudFormation stack for your strongSwan VPN gateway in your simulated on-premises environment, you’ll need to perform the following steps.
First, you must upload the certificates and customer gateway private key to an S3 bucket that is accessible from your simulated on-premises environment.
Next, you must create a secret in AWS Secrets Manager and store the passphrase to decrypt the customer gateway private key in that secret.
Figure 3 shows the certificates and the customer gateway private key stored in an S3 bucket. The passphrase for the customer gateway private key is stored in a secret in AWS Secrets Manager.
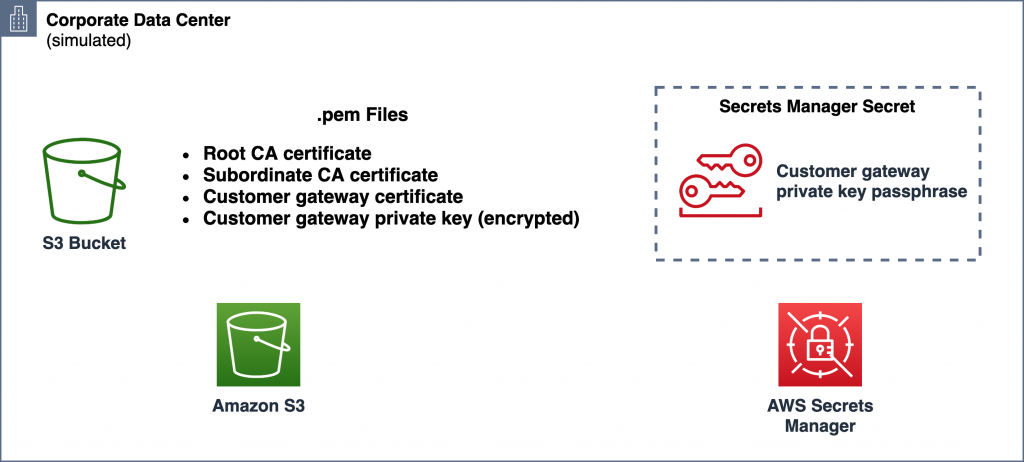
Figure 3 – Certificates and customer gateway private key stored in Amazon S3 in your simulated on-premises environment
Setting up and testing your environment
The following steps establish an AWS Site-to-Site VPN connection in conjunction with AWS Transit Gateway. Minor adjustments to the set-up process are required if you’d rather deploy a Site-to-Site VPN connection with AWS Virtual Private Gateway.
If you’d like to build a DIY solution where a strongSwan VPN gateway is used on both ends of the VPN connection, you should be able to extend these instructions.
The overall steps include:
- Complete prerequisites
- Allocate an Elastic IP address in your simulated on-premises environment
- Create certificates in your AWS environment
- Configure the AWS side of the VPN connection
- Download the VPN tunnel configuration
- Publish certificates to your simulated on-premises environment
- Deploy strongSwan VPN gateway stack to your on-premises VPC
- Troubleshoot stack creation failures
- Monitor the VPN connection status
- Test the VPN connection
1. Complete prerequisites
For this configuration, ensure that you satisfy these prerequisites:
- You have an AWS account.
- You’ve selected an AWS Region in which to perform your demonstration.
- You have two VPCs each with at least one subnet.
- A VPC that simulates your on-premises environment. This post assumes that you have at least one public subnet in your on-premises VPC.
- A VPC that represents your AWS cloud environment with at least one subnet. The subnet can be either private or public.
- You have at least basic knowledge of AWS networking and the use of VPCs.
- You have basic familiarity with Linux and the Linux command line so that you can test the VPN connection.
2. Allocate an Elastic IP address in your simulated on-premises environment
Allocate an Elastic IP address in your on-premises VPC so that in later steps you can:
- Configure a Customer Gateway in your AWS cloud environment VPC.
- Provide the static public IP address for your strongSwan VPN gateway EC2 instance in your on-premises network.
Allocate an Elastic IP address:
- Open the Amazon VPC console at https://console.aws.amazon.com/vpc/
- Choose the AWS Region of interest
- In the navigation pane, choose Elastic IPs
- Choose Allocate new address
- Choose Amazon pool
- Choose Allocate
- Select the newly allocated Elastic IP address and note the IP address and its Allocation ID. You’ll need the allocation ID in a later step when you deploy the strongSwan VPN gateway in your simulated on-premises environment.
3. Create certificates in your AWS environment
3.1 Create and install the root and subordinate CA certificates in your AWS environment
If you don’t already have private root and subordinate CA certificates in your AWS environment, use AWS Certificate Manager Private Certificate Authority to create the CA certificates.
See Creating and installing the Certificate for a Private CA for the detailed steps to create the following CA certificates:
- Root CA certificate
- Subordinate CA certificate
Export CA certificates
Once you’ve created and installed the CA certificates, you must export them so you can upload them to an S3 bucket in your simulated on-premises environment in a later step.
- In your AWS cloud environment, access the AWS account where you will configure your transit gateway and VPN connection.
- Go to AWS Certificate Manager in the AWS Management Console.
- Select Private CAs
- Select the root CA.
- Select CA Certificate
- Select Export certificate body to a file
- Save the certificate to a local file.
Perform the same steps for the subordinate CA certificate.
3.2 Create customer gateway private certificate in your AWS environment
Next, you must create a private certificate to represent your customer gateway. You will upload this certificate and its associated private key to an S3 bucket in your simulated on-premises environment in a later step.
See Requesting a Private Certificate for details on how to create a private certificate to use as the identity of the customer gateway.
Export customer gateway private certificate and private key
Once you’ve created private certificate, you must export both the private certificate and the private key so you can upload them to an S3 bucket in a later step.
- Go to AWS Certificate Manager in the AWS Management Console.
- Select the customer gateway private certificate.
- Select Actions -> Export
- You’ll be asked to enter a passphrase that will be used to encrypt and decrypt the exported private key file.
- Select Export certificate body to a file to export the private certificate.
- Select Export certificate private key to a file to export the private key.
4. Configure the AWS side of the VPN connection
Next, set-up an AWS Site-to-Site VPN connection in your AWS cloud VPC environment. We use AWS Transit Gateway in these instructions. Alternatively, you can choose to use AWS Virtual Private Gateway. See Getting started in the AWS Site-to-Site VPN documentation for instructions on setting up a virtual private gateway.
Create a customer gateway
First, create a customer gateway in your AWS Cloud environment:
- Go to VPC in the AWS Management Console
- Select Customer Gateways
- Select Create Customer Gateway
- Assign a name to the customer gateway
- Select the dynamic routing option to demonstrate the use of BGP
- Since we’ll be demonstrating the use of dynamic routing via BGP, provide a BGP Autonomous System Number (ASN) associated with your customer gateway. You can either use one that is assigned to your network, or, if you’re only experimenting, you can specify a private ASN in the 64512-65534 range.
- Provide the Elastic IP address for your customer gateway that you allocated in the previous step.
- Select the private certificate that you’ve created to identity your customer gateway
Create a transit gateway and Site-to-Site VPN connection in your AWS Cloud environment:
- See Getting started with Transit Gateway for instructions on how to create a transit gateway for your AWS Cloud VPC environment and attach your AWS Cloud VPC. To keep things simple, you can use the following default settings:

- Update your AWS cloud VPC route table(s) to route your on-premises destined network traffic to the transit gateway. For example, if your on-premises network is 10.0.0.0/16, add a route to the transit gateway:

- Create a transit gateway VPN attachment
- See Creating a Transit Gateway VPN attachment for the instructions to create a Site-to-Site VPN connection that is integrated with Transit Gateway.
- When configuring the attachment:
- Provide a name for the attachment
- Select the Virtual Private Gateway target gateway type
- Choose the option use an existing customer gateway
- Select the customer gateway that you just created
- Select the dynamic routing option since you’ll be using BGP
- Accept the default tunnel options unless you want to experiment with the advanced options
- Note the domain names of the tunnel-specific private certificates
- Once the VPN attachment has been created, access Site-to-Site VPN Connections in the AWS Management Console
- Select the VPN connection
- Select Tunnel Details
- Under Certificate ARN, open each of the private certificate links.
- Note the domain name for each private certificate. You’ll need these values when you deploy the strongSwan VPN stack in your simulated on-premises environment
5. Download the VPN tunnel configuration
Within the site-to-site VPN connection resource of your AWS cloud VPC environment, download the VPN configuration file.
- Go to VPC in the AWS Management Console
- Choose the AWS Region of interest
- Choose Site-to-Site VPN Connections
- Select the VPN connection of interest, choose Download, choose the Generic option for Vendor, and download the configuration file.
If you browse the configuration file, you will see configuration settings for two VPN tunnels. You’ll use the tunnel configuration data in a later step when you deploy a strongSwan-based VPN gateway stack in your simulated on-premises VPC.
6. Publish certificates to your simulated on-premises environment
6.1 Upload certificates and private key to an S3 bucket in your simulated on-premises environment
In your simulated on-premises environment, either reuse an existing S3 bucket or create a new one and upload the following certificate files to the bucket:
- Root CA certificate
- Subordinate CA certificate
- Customer gateway private certificate
Upload the customer gateway private key file to the same S3 bucket.
Once you’ve uploaded the certificates and customer gateway private key file, you should have 4 files in your S3 bucket. The names of your files will likely differ from these examples.

6.2 Add customer gateway private key passphrase to AWS Secrets Manager
In your simulated on-premises environment, you’ll need to create a new secret in AWS Secrets Manager to hold the value of the passphrase you used earlier to encrypt the customer gateway private key.
You’ll provide the name of this secret to CloudFormation in a later step when you deploy the strongSwan VPN gateway stack.
- Access AWS Secrets Manager
- Select Store a new secret
- Select Other types of secrets
- In Secret key/value:
- Enter the text passphrase as the key. Since the CloudFormation template looks for a key with this value, you must use “passphrase”.
- Enter the passphrase value for the customer gateway private key as the value. You had supplied a passphrase when you originally created the private key.
- Select Next

- Provide a name for the secret. How you name the secret is your choice. You’ll supply this name as a parameter when you use CloudFormation in a later to deploy the strongSwan VPN gateway stack.
- Select Next

- Select Next, and Store
7. Deploy strongSwan VPN gateway stack to your on-premises VPC
In this step, you create a CloudFormation stack using the vpn-gateway-strongswan.yml template and configuration data obtained from the remote site’s Site-to-Site VPN Connection resource.
You can use either the AWS Management Console or an included helper script and the AWS Command Line Interface (CLI) to create the stack.
Given the number of parameters involved, you will probably find it easier to use the CLI so you can specify the parameter values once in a JSON file. This is easier than entering them using the AWS Management Console.
The CLI approach also makes it easier to spin up new stack instances, both in cases where failures occur and when you change settings as you experiment with features.
CloudFormation stack parameters
See the README in the GitHub repository for more details on the CloudFormation stack parameters.
| CloudFormation Stack Parameter | Description |
| System Classification and Environment | You can choose to override these parameter values if you’d like to customize the naming of AWS resources created by the template. |
pEnvPurpose |
Specify the purpose for this particular stack. This short qualifier will be used in resource names including, for example, IAM roles. For example, “dev1”, “test”, “1”, etc. |
| Authentication Type | |
pAuthType |
The type of authentication. Either In this example, use “ |
| Certificate-Based Authentication | |
pCertBucket |
Name of S3 bucket (not the ARN) containing the following certificate files in .pem format. |
pCgwCert |
Name of customer gateway certificate file residing in S3. |
pCgwPrivateKey |
Name of customer gateway private key file residing in S3. |
pCgwPrivateKeyPassphraseSecretName |
Name of secret in AWS Secrets Manager containing the passphrase for the customer gateway private certificate file residing in S3. The AWS Secrets Manager secret must be in the form of |
pRootCaCert |
Name of root CA certificate file residing in S3. Required when using certificate-based authentication. |
pSubordinateCaCert |
Name of subordinate CA certificate file residing in S3. Required when using certificate-based authentication. |
| VPN Tunnel 1 | Open the VPN configuration file that you downloaded earlier. |
pTunnel1VgwCertDomainName |
The domain name of the private certificate associated with tunnel 1. Required when using certificate-based authentication. You can obtain this value from accessing your site-to-site VPN connection in your AWS environment, selecting the Tunnel Details tab, and scrolling to the right to see the Certificate ARN column, and selecting the ARN associated with tunnel 1. Once the certificate information is displayed, locate the Domain name value. |
pTunnel1VgwOutsideIpAddress |
See the remote site’s configuration for the “IPSec Tunnel #1” section, “Outside IP Addresses” section and “Virtual Private Gateway” value. |
pTunnel1CgwInsideCidr |
See the remote site’s configuration for the “IPSec Tunnel #1” section, “Inside IP Addresses” section and “Customer Gateway” value. |
pTunnel1VgwInsideCidr |
See the remote site’s configuration for the “IPSec Tunnel #1” section, “Inside IP Addresses” section and “Virtual Private Gateway” value. |
pTunnel1VgwBgpAsn |
See the remote site’s configuration for the “BGP Configuration Options” and the “Virtual Private Gateway ASN” value. |
pTunnel1BgpNeighborIpAddress |
See the remote site’s configuration for the “BGP Configuration Options” and the “Neighbor IP Address” value. |
| VPN Tunnel 2 | |
pTunnel2VgwCertDomainName |
The domain name of the private certificate associated with tunnel 2. Required when using certificate-based authentication. You can obtain this value from accessing your site-to-site VPN connection in your AWS environment, selecting the Tunnel Details tab, and scrolling to the right to see the Certificate ARN column, and selecting the ARN associated with tunnel 2. Once the certificate information is displayed, locate the Domain name value. |
| Rest of the tunnel 2 parameters | Address the same parameters types as explained for tunnel 1, but use values taken from the tunnel 2 section of the configuration file. Note that most of the values for tunnel 2 are different from those used to configure tunnel 1. |
| On-premises Network Configuration | Settings associated with the configuration of the VPC and other resources that are simulating your on-premises network environment. |
pVpcId |
The VPC in which the VPN gateway is to be deployed. |
pVpcCidr |
The CIDR block of the local VPC. Used to advertise via BGP routing information to the remote site. |
pSubnetId |
The subnet in which the VPN gateway is to be deployed. |
pEipAllocationId |
The allocation ID of the Elastic IP address that is to be associated with the VPN gateway. |
pLocalBgpAsn |
The BGP Autonomous System Number (ASN) used to represent the local end of the site-to-site VPN connection. |
Using the CLI
If you have the AWS CLI installed, you might find it easier to use the shell script manage-stack to create the stack. You can obtain this script from the same repository as the CloudFormation template.
- We recommend you clone the repository to your local system where you have the AWS CLI installed.
- Customize one of the
template-parameters-*.jsonfiles containing example sets of parameters for your stack. For example, to specify all of the parameters required for certificate-based authentication, make a copy of thetemplate-parameters-certificate-auth.jsonfile. - Run the
manage-stackwrapper script to create the stack. For example:$ ./manage-stack -s vpn-gateway-1 --region us-east-1 template-parameters-certificate-auth.json
Here are the option arguments supported by the manage-stack script:
| Option Argument | Required? | Description | Default |
-s or --stack-name |
Required | Specifies the name to assign to the newly created stack. | None |
-r or --region |
Optional | AWS Region. Since the aws CLI is used, the standard environment variables are honored. | The aws CLI will use the standard AWS_DEFAULT_REGION environment variable if set. |
-p or --profile |
Optional | AWS profile. Since the aws CLI is used, the standard environment variables are honored. | The aws CLI will use the standard AWS_PROFILE environment variable if set. |
Monitor progress of the stack creation using the AWS Management Console. Wait for creation of the stack to complete. Since the template uses a wait condition, the stack does not complete until the strongSwan application and other components have been configured and started.
Using the AWS Management Console
When you deploy the CloudFormation stack, you must enter parameter values that are associated with the VPN connection and specifically for the two tunnels that make up the connection. You must have the VPN configuration file open as a reference so you can copy and paste values for the parameters in the CloudFormation stack.
- Open the AWS CloudFormation console at https://console.aws.amazon.com/cloudformation/.
- Choose the AWS Region of interest.
- Choose Create Stack and choose With new resources.
- Choose Upload a template file.
- Use your browser to download the
vpn-gateway-strongswan.ymlCloudFormation template file to your local computer. - Select Choose file to select the CloudFormation template file that you downloaded.
- Choose Next to proceed to Specify stack details.
- Enter a name for your new CloudFormation stack. For example, “
vpn-gateway” - Specify the required parameters. See the preceding table of parameters for details.
- Choose Next to proceed to Configure stack options.
- Choose Next to review your stack settings.
- Choose Create stack.
Wait for creation of the stack to complete. Since the template uses a wait condition, the stack does not complete until the strongSwan application and other components have been configured and started.
8. Troubleshoot stack creation failures
If creating the stack seems to take too long (usually more than 5 minutes), or fails and resources are rolled back, then you must troubleshoot the situation.
Since there are a large number of parameters passed to the stack creation process, it’s not unusual for parameters to contain inaccurate data. More often than not, stack creation failures are due to incorrect parameter data.
Stack creation fails quickly
Verify your parameter settings against both your local network configuration and the configuration of the site-to-site tunnels. If you’re using an Elastic IP address, ensure the allocation ID is correct.
Stack creation fails after a long period of time
You may find that the stack creation fails after multiple minutes and resources are rolled back. In this case, it’s best to delete the stack and use the CLI approach described in the preceding step in an attempt to create the stack again. However, this time, use CloudWatch Logs to inspect the progress of the first boot configuration steps during stack creation.
Similar to the previous circumstance, verify your parameter settings against both your local network configuration and the configuration of the site-to-site tunnels. If you’re using an Elastic IP address, ensure that the allocation ID is correct.
If no obvious issues are found in the template parameters, delete the failed stack and use the CLI wrapper script in an attempt to create the stack again.
This time, during stack creation, inspect the CloudWatch Logs log group to find failures that occur during the first boot configuration process. For example, if the S3 bucket name for certificate key files is incorrect, the first boot configuration process will fail.
Specifically, access the cfn-init.log log stream to review the first boot configuration for any errors. By default, the CloudWatch Logs log group for your EC2 instance will be named /infra/vpngw/ec2/<environment purpose>.
If the cfn-init.log log stream looks clean, then review the charon.log stream for errors. If you’re using certificate-based authentication and your certificates and key files are incorrect, then you’ll typically see errors in this log stream.
A common mistake is to either fail to create a secret in AWS Secrets Manager or the secret key:value pair is incorrect. See the preceding steps for details on creating the secret in AWS Secrets Manager. Pay close attention to the fact that the secret’s key must be set to “passphrase“.
9. Monitor the VPN connection status
You can monitor the use of certificate-based authentication by inspecting the content of the charon.log file using either CloudWatch Logs or by connecting directly to the strongSwan EC2 instance and inspecting /var/log/charon.log. By default, the CloudWatch Logs log group for your EC2 instance will be named /infra/vpngw/ec2/<environment purpose>.
Once creation of the stack has completed, monitor the Site-to-Site VPN Connection on the remote site to confirm that the two VPN tunnels have progressed from the DOWN state to the UP state.
It will usually take 3-5 minutes before both tunnels progress to the UP state.
When using dynamic routing and BGP with the strongSwan configuration established using the CloudFormation template, both tunnels should eventually progress to the UP state.
If the VPN gateway configuration is correct, Tunnel 1 will come up first followed several minutes later by Tunnel 2.

If the tunnels don’t come up within 5 or so minutes after your stack has completed, it’s likely that one or more of the tunnel related CloudFormation stack parameters is incorrect. Double check the parameter values. If any are incorrect, delete and recreate the VPN gateway CloudFormation stack. You should not need to delete and recreate the remote site’s transit gateway and VPN resources.
Review CloudWatch logs of the VPN gateway
You can inspect the VPN gateway’s logs via CloudWatch Logs. In the AWS Management Console under the CloudWatch services and CloudWatch Logs, look for a log group that is named similar to: /infra/vpngw/ec2/....
The log files in order of importance are:
cf-init.log– Look for successful execution of the configuration sets from theAWS::CloudFormation::Initsection of the CloudFormation template.charon.log– If CloudFormation initialization looks ok, review the content of this log file to monitor the establishment of the VPN tunnels.
Inspect the strongSwan VPN gateway
If any of the following log files are not present: charon.log, zebra.log, bgpd.log, start a terminal session with the VPN gateway instance and execute a command to display error messages associated with services starting up on the strongSwan EC2 instance.
Since the CloudFormation stack configures the VPN gateway EC2 instance to support terminal access through AWS Systems Manager Session Manager, you can easily connect to the strongSwan EC2 instance via the EC2 portion of the AWS management console.
- Access the EC2 service of the AWS Management Console
- Choose the strongSwan EC2 instance. For example, infra-vpngw-test
- Choose Connect in the upper portion of the console
- Choose the Session Manager option
- Choose Connect
Use the following commands to display errors associated with starting the following services:
You can review the status of the strongSwan application via sudo strongswan status command. Execution of this command should show that both tunnels are connected:
You can inspect the BGP routes that Quagga knows about by executing the sudo vtysh command followed by the show ip bgp summary subcommand. In the following example, the BGP tunnel neighors are listed:
Next, you can inspect the routes by executing the <code<show ip route subcommand. In the following example, 10.4.0.0/19 represents the route advertised by the transit gateway via BGP.
10. Test the VPN connection
Once you’ve confirmed that the two tunnels are in the UP state, you’re ready to test the VPN connection. The simplest means to test the VPN connection is to deploy an Amazon Linux EC2 instance in a subnet in the VPC of the simulated on-premises environment, deploy an EC2 instance in your AWS cloud VPC, and test connectivity between the EC2 instances.
Add a route to your strongSwan instance in your on-premises subnet routing table
Since you’re using BGP, the strongSwan instance will advertise your on-premises routing information to the transit gateway and vice versa. However, that routing information is not propagated to the VPC route tables on either side of the connection.
In your on-premises VPC, ensure that the subnet in which you intend to deploy a test EC2 instance is associated with a VPC route table that routes all traffic destined for the remote side of the VPN connection to the elastic network interface (ENI) of your strongSwan EC2 instance.
Similarly, on the remote side, ensure that the subnet in which you intend to deploy the other test EC2 instance is associated with a VPC route table that routes all traffic destined for your on-premises network to your transit gateway.
An end-to-end testing scenario with two test EC2 instances is shown in Figure 4.
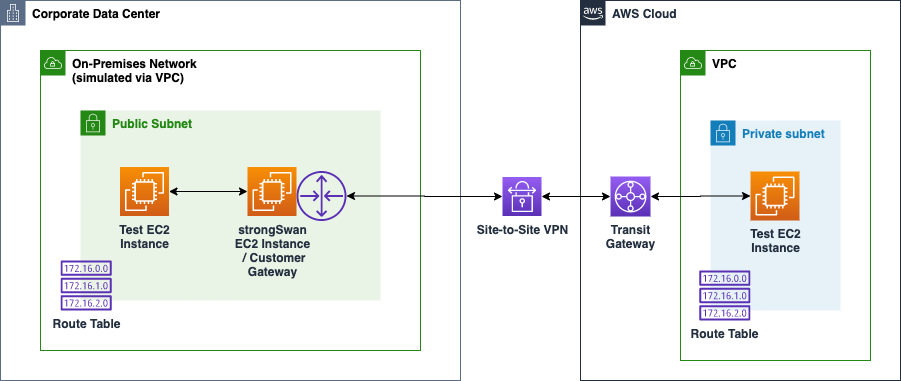
Figure 4: Testing your site-to-site VPN connection using two EC2 instances
Deploy an Amazon Linux EC2 instance to a subnet in each VPC
- Select which method you’d like to use to access your Linux instance:
- Systems Manager Session Manager: No publicly accessible IP address is required. Instead, you can use either AWS Management Console or SSH command line to access your instance. See Getting Started with Session Manager for set up details.
- SSH: Ensure that the security group allows for SSH inbound access and that the instance has a publicly accessible IP address.
- Deploy an Amazon Linux EC2 instance to one each of the two VPCs.
- Ensure the security group includes “All ICMP – IPv4” with a source of the remote network.
Using ping to test connectivity
Use the ping command from either of the two test EC2 instances to validate routing and connectivity between the instances. In the following example, the EC2 instance configured with the address 10.4.15.88 is in the remote environment on the other side of the site-to-site VPN connection. In this example, the ping was successful.
Use the tcpdump command on the target instance to monitor traffic. In the following example, ping or ICMP requests from 10.0.4.26 are flowing into the target instance that has an IP address of 10.4.15.88. ICMP responses are flowing out of the target instance back to the client at 10.0.4.26.
See Testing the Site-to-Site VPN connection for additional tips on testing.
If your ping tests are not successful, verify the following configurations on both sides of the site-to-site VPN connection:
- Ensure that “
All ICMP – IPv4” is allowed in the EC2 security group on each of your test EC2 instances. - Route tables:
- If you are using AWS Transit Gateway, ensure that your remote VPC’s route table has a routing entry to direct on-premises traffic to the transit gateway attachment.
- In your local on-premises VPC, ensure that a route entry directs AWS cloud traffic to the strongSwan EC2 instance’s network interface.
If necessary, consider using tcpdump on the strongSwan VPN gateway EC2 instance to see if traffic is being routed through the gateway.
Exploring other capabilities
See the README for more advanced capabilities you might want to explore and demonstrate including:
- Hosting the VPN gateway in a private subnet.
- Updating the VPN gateway stack with configuration changes.
- Replacing the VPN gateway stack with a new stack.
- Route all internet destined traffic from your AWS Cloud VPC back through the Site-to-Site VPN connection and out your existing security devices.
Cleaning up
To avoid incurring future charges, delete the following resources.
In your simulated on-premises environment:
- Use AWS CloudFormation to delete the stack that deployed the strongSwan VPN gateway.
- If you created an Elastic IP Address in support of the strongSwan VPN gateway, you can use the EC2 area of the AWS Management Console to delete the Elastic IP address.
- If you created a VPC to emulate the on-premises side of the Site-to-Site VPN connection and no longer need it, you can consider deleting the VPC and its supporting resources.
- Terminate the test Linux EC2 instance.
- Delete the certificate files from your S3 bucket and delete the bucket.
- Delete the secret from AWS Secrets Manager
In your AWS Cloud environment:
- Delete your Site-to-Site VPN connection.
- Delete your Transit Gateway.
- Delete your customer gateway.
- Terminate the test Linux EC2 instance.
- Delete the certificates and private CAs from AWS Certificate Manager.
Conclusion
In this post, we showed how to experiment with and demonstrate certificate-based authentication to further enhance the security of your Site-to-Site VPN connections.
If you’d like to learn more about the AWS Site-to-Site VPN services referenced in this example, see the following resources:

Christopher Kampmeier
Chris is a Senior Solutions Architect helping financial services customers throughout the world adopt AWS to meet their business needs. Prior to joining AWS, Chris led agile teams to provide builder services to hundreds of delivery teams within a global payment technology solutions provider. In his spare time, he enjoys cycling, working on home automation and yard projects, and traveling with his family.

Mohammed Munem
Mohammed is a Cloud Infrastructure Architect at AWS Professional Services who works closely with customers to accelerate their AWS Cloud journey. In his spare time, he enjoys running, cycling, and spending time with his family.