AWS Public Sector Blog
Live streaming to Facebook and YouTube with AWS Elemental MediaLive

The COVID-19 pandemic pressed organizations to virtualize events that would have previously been held in person, like town halls, school board meetings, public health announcements, and more. While larger organizations may have existing media departments, smaller organizations have had to find ways to utilize social media and other consumer-grade resources to stream these events online.
Consumer-grade solutions may be no cost, but usually involve integrations between third parties and lack support if there are issues. And some organizations find integrations they depend on between services to be unavailable at the last minute or fail during an event. AWS Elemental MediaLive can reduce the dependence on third-party integration and provides an option to stream to multiple endpoints simultaneously. This post walks through how to use AWS Elemental MediaLive to stream to Facebook Live and YouTube Live using an AWS CloudFormation stack to stand up resources automatically.
About AWS Elemental MediaLive
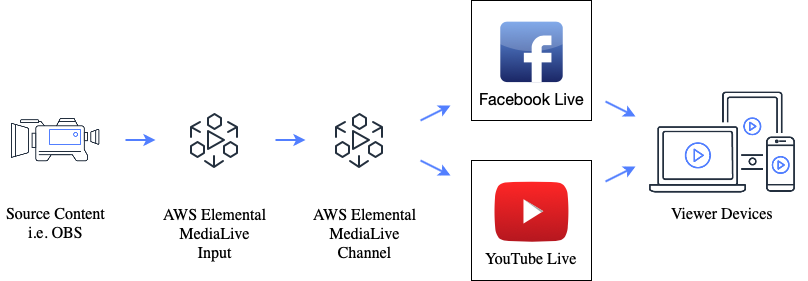
AWS Elemental MediaLive has two main objects: an input and a channel. A MediaLive input can accept any input capable of producing an RTMP (Real-Time Messaging Protocol) stream. The channel object is attached to an input, processes the video with encoding, and has outputs that map to Facebook and YouTube for live streaming via RTMP(S). If you’re not familiar with RTMP, I walk through the required steps to configure OBS (Open Broadcaster Software), an open source application capable of creating an RTMP stream from screen share or a wide range of other inputs. OBS can also allow you to create text overlays, transitions, and more. Check out the OBS website for more details.
The solution outlined in this post can be cost effective for organizations of all sizes. With OBS and your social media settings pre-configured, you can use CloudFormation to provision/decommission AWS Elemental MediaLive resources in a just-in-time fashion to only pay for the resources you need. As of the publication date of this post, resources for this walkthrough are approximated to cost just $1.26/hour with an HD (1080p) source video*, streaming in HD to YouTube/Facebook in HD. Learn more about the pricing of AWS Elemental MediaLive.
*Pricing based on US Regions: Virginia, Ohio, Oregon. Subject to change.
Overview of solution
To start a live stream with this CloudFormation Stack:
- Prepare Facebook/YouTube; gather RTMP Stream Keys.
- Launch the AWS CloudFormation Stack with appropriate inputs.
- Open the MediaLive Channel console (link in Outputs); start the channel.
- Open OBS, configure, and start streaming.
- Return to Facebook/YouTube to begin your live session.
Link to AWS CloudFormation stack:
![]()
Prerequisites
For this walkthrough, you should have the following prerequisites:
- An AWS account
- Access to the following AWS services: AWS CloudFormation, AWS Elemental MediaLive
- Facebook / YouTube accounts
- Basic understanding of social media live settings and permissions
- OBS Application (or other software/hardware capable of streaming via RTMP)
Deployment
1. Prepare Facebook to go live:
a. Log into Facebook from a browser.
b. Select “Go Live.”
c. Select “Use Stream Key.”
d. Enable “Use a Persistent Stream Key.”
e. Copy the “Stream Key” field and save for use later.

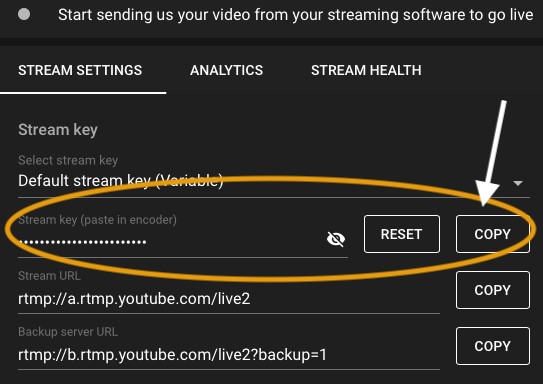
2. Prepare YouTube to go live
Note: YouTube requires a 24-Hour Verification Process for new accounts
a. Login to YouTube from a browser.
b. Select “Create” then “Go Live” to enter the YouTube Studio.
c. Copy the “Stream Key” field and save for use later.
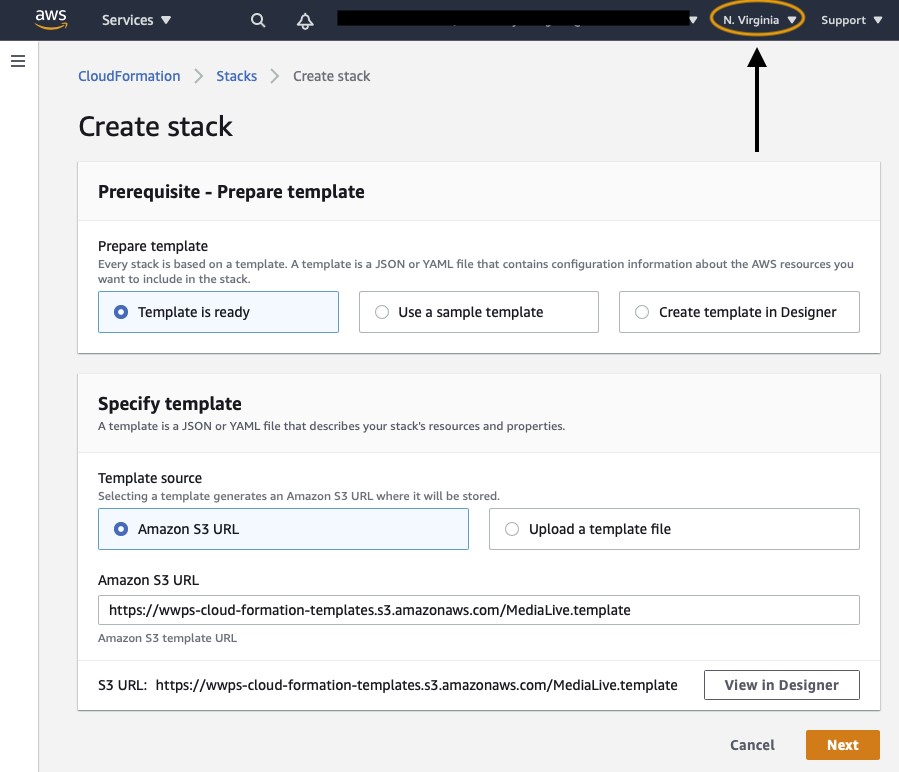
3. Deploy the CloudFormation template.
Select the “Launch Stack” button below or paste into your browser:
![]()
4. Confirm the Region is appropriate.
Note: Choose the region closest to your source. i.e. US-East-1 (N. Virginia), US-East-2 (Ohio) or US-West-2 (Oregon)
AWS Elemental MediaLive is not supported in US-West-1 (N. California).
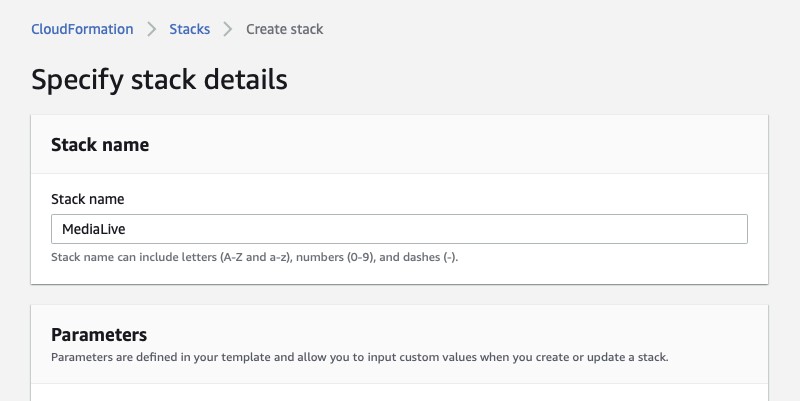
5. Stack name defaults to “MediaLive.” You can replace with your own meaningful name within the requirements (uppercase, lowercase, numbers, and dashes) such as TownHallStream.
Provide the appropriate parameters:
a. FacebookStreamKey: Saved from Step 1.
b. InputCIDR: This defines the IP address(es) that are allowed to stream to this input. If you know the outbound source IP, you can provide it here. Otherwise, use 0.0.0.0/0 to allow all source IP addresses.
c. InputStreamKey: This value defines the Stream Key used in OBS. Set to some alpha-numeric value i.e. 2YM5KJrZkzDA4YbF (A-Z, a-z,0-9, no spaces).
d. InputStreamName: This value defines the Stream Name used in OBS. Set to some relevant value. i.e. TownHall (A-Z, a-z,0-9, no spaces).
e. YouTubeStreamKey: Saved from Step 2.
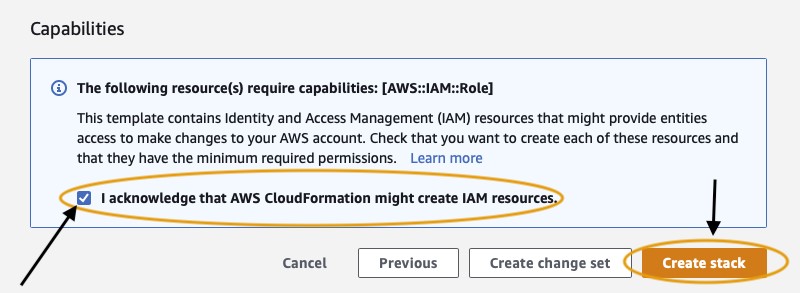
6. Select Next twice. On the final step, under Capabilities, select the box “I acknowledge that AWS CloudFormation might create IAM resources.” Finally, select “Create Stack.”
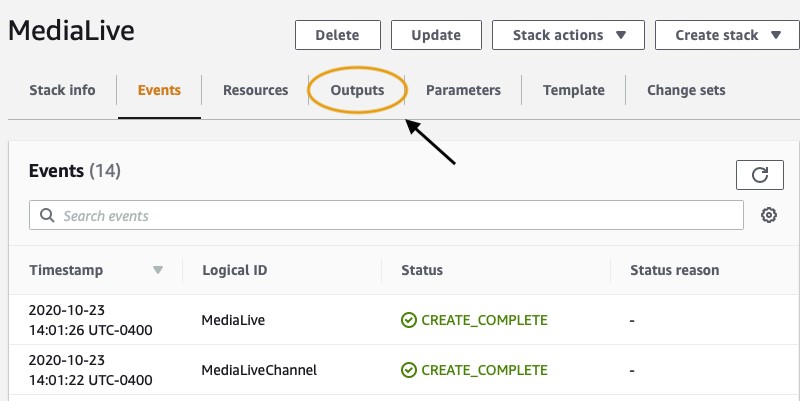
7. It takes several minutes to deploy the necessary resources. You can hit refresh on the “Events” pane to see the progress or select “New Events Available.” When the CloudFormation stack finishes deployment, you see an event named after the stack with a completed status. Channels in MediaLive deploy as stopped. You need to start the channel before it can accept streaming traffic.

8. Select outputs.
9. Right click on the first output and open in a new browser/tab to preserve your CloudFormation window.

10. Check the box beside your newly deployed Channel, and select “Start.”
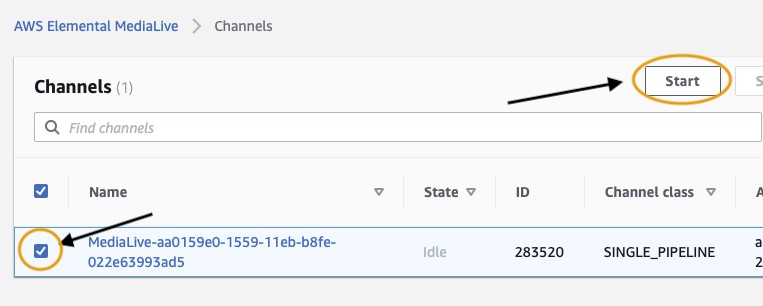
Note: It takes several minutes for the channel to start. Wait until the ‘State’ shows as ‘Running’ before proceeding.
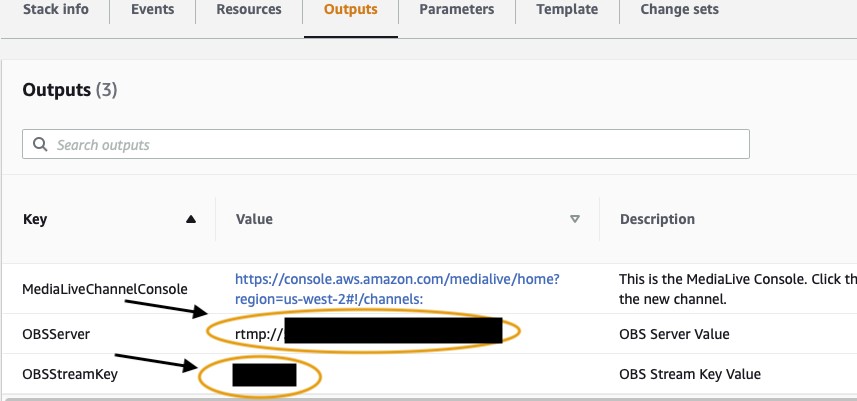
11. Return to your CloudFormation tab. Copy the “OBSServer” and “OBSStreamKey” values.
Note: OBSServer value includes a dynamic IP address and Stream Name. StreamName and StreamKey matches the inputs provided in step 5.
12. Navigate to the “Settings” menu in OBS. Select Stream. Set “Service” to “Custom” and paste the “Server” and “Stream Key” from the previous step. Select “Apply” and “Ok.”

13. Back in OBS, setup your sources and content as necessary. When ready to go live, select “Start Streaming.” You should observe a green status and kb/s value appear in the lower-right corner.
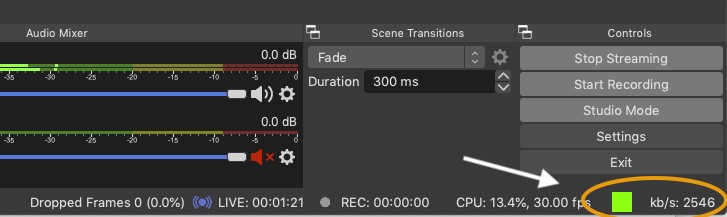
At this point, MediaLive will be ingesting your OBS stream on the Input, and streaming out to YouTube and Facebook on the Channel Outputs.
14. Return to Facebook and confirm the preview shows your streaming content. Set your permissions, title, post content and click “Go Live.”
15. YouTube should begin streaming the content as soon as it arrives from MediaLive.
16. At the end of your event, end the post in Facebook and stop the Live Stream in YouTube.
Cleaning up
1. Return to the AWS Elemental MediaLive Channels Console. Select your channel and click “Stop.” If you want to leave these resources in place between events, you’re done. When you’re ready for another event, come back to the MediaLive Channel console and start the channel.
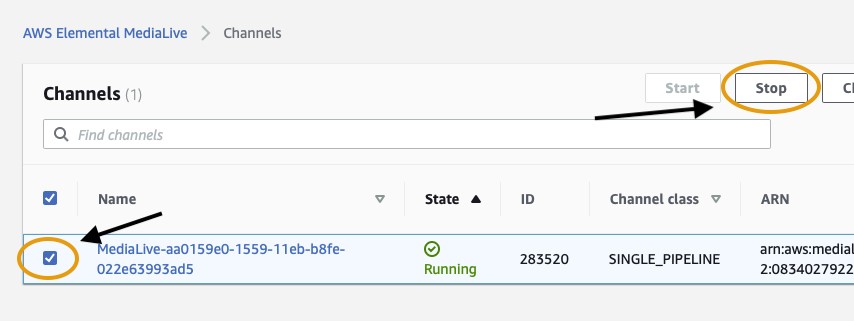
Note: It takes several minutes for the channel to stop. Wait until the ‘State’ shows as ‘Idle’ before proceeding.
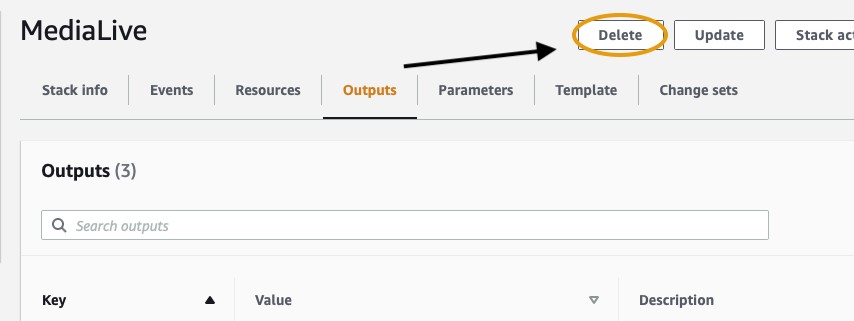
2. If you want to delete the components to eliminate costs between events, return to the CloudFormation Console. Select “Delete” then “Delete stack.”
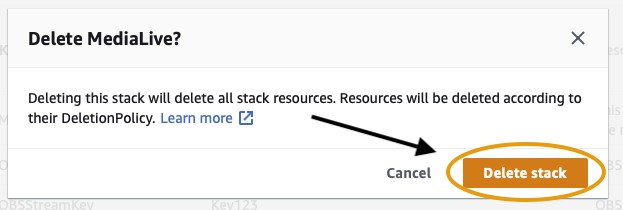
CloudFormation removes all of the resources that were created for this stack. Within a few moments, you can refresh the CloudFormation window to see “No stacks,” which confirms your resources have been successfully removed.
Conclusion
In this blog post, I walked through the deployment and configuration of a live stream from OBS to Facebook and YouTube using AWS Elemental MediaLive. With CloudFormation to automate the deployment of resources, this solution could be deployed in a just-in-time model right before each event. CloudFormation also helps decommission all resources just after the event to eliminate costs outside of the event. The solution requires no upfront costs and uses pay-as-you-go pricing. Learn more about AWS Elemental MediaLive and the cloud for the public sector.
Subscribe to the AWS Public Sector Blog newsletter to get the latest in AWS tools, solutions, and innovations from the public sector delivered to your inbox, or contact us.